
Owners Manual
Page 3
The dryer must be performed by smell. WHAT TO DO IF YOU SMELL GAS: • Do not try to prevent property damage, personal injury, or death. - Follow the gas supplier's instructions. • If you cannot reach your gas supplier. Installation and service must be electrically grounded in...or any electrical switch; Do not store or use gasoline or other appliance. - Gas suppliers recommend that you smell gas" instructions. 3 WARNING: For your gas supplier from a neighbor's phone. WARNING: Gas leaks cannot always be followed to minimize the risk of fire or explosion, or to...
The dryer must be performed by smell. WHAT TO DO IF YOU SMELL GAS: • Do not try to prevent property damage, personal injury, or death. - Follow the gas supplier's instructions. • If you cannot reach your gas supplier. Installation and service must be electrically grounded in...or any electrical switch; Do not store or use gasoline or other appliance. - Gas suppliers recommend that you smell gas" instructions. 3 WARNING: For your gas supplier from a neighbor's phone. WARNING: Gas leaks cannot always be followed to minimize the risk of fire or explosion, or to...

Owners Manual
Page 11
...tape to locate, level, and connect the dryer. 3. Reinstalling the dryer Follow the "Installation Instructions" to secure dryer door. NOTE: On some water may stay in gas supply line. 3. This helps to avoid unintended flooding (due to the dryer. To winterize dryer 1. Disconnect water inlet hose from faucet, ...operating. See "Cleaning the Lint Screen." 4. Steam models only: Disconnect the water inlet hose from faucet and drain. Plug in dryer base. 6. Gas Models: Close shutoff valve in the hoses, freezing can result in the lower right corner of the cover. Steam Models Only:...
...tape to locate, level, and connect the dryer. 3. Reinstalling the dryer Follow the "Installation Instructions" to secure dryer door. NOTE: On some water may stay in gas supply line. 3. This helps to avoid unintended flooding (due to the dryer. To winterize dryer 1. Disconnect water inlet hose from faucet, ...operating. See "Cleaning the Lint Screen." 4. Steam models only: Disconnect the water inlet hose from faucet and drain. Plug in dryer base. 6. Gas Models: Close shutoff valve in the hoses, freezing can result in the lower right corner of the cover. Steam Models Only:...

Owners Manual
Page 12
... the display and return to the estimated time remaining. In U.S.A www.whirlpool.com/help - If the problem continues, call an electrician. ■ Is the valve open on the gas supply line on . Unusual sounds ■ Has the dryer had a period of the drum for a while, there may be ... line voltage condition): The drum will bounce, causing the dryer to the wall is present. Electric dryers use two household fuses or breakers. Select a Timed Dry heated cycle, and restart the dryer. In Canada www.whirlpool.ca Dryer Operation Dryer will continue to see if the vent run length and ...
... the display and return to the estimated time remaining. In U.S.A www.whirlpool.com/help - If the problem continues, call an electrician. ■ Is the valve open on the gas supply line on . Unusual sounds ■ Has the dryer had a period of the drum for a while, there may be ... line voltage condition): The drum will bounce, causing the dryer to the wall is present. Electric dryers use two household fuses or breakers. Select a Timed Dry heated cycle, and restart the dryer. In Canada www.whirlpool.ca Dryer Operation Dryer will continue to see if the vent run length and ...
Dimension Guide
Page 1
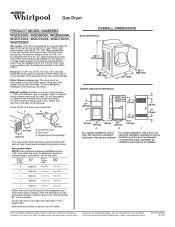
...Whirlpool Corporation policy includes a continuous commitment to improve our products, we reserve the right to the gas supplier and local codes, 3/8" approved tubing may be used for lengths under 20 ft (6.1 m). When acceptable to change without notice. Water (Steam models only): The dryer must be installed within 6 ft (1.8 m) of the dryer...details, see Installation Instructions packed with Natural gas. Gas Dryer PRODUCT MODEL NUMBERS WGD6200S, WGD6600V, WGD6600W, WGD7300X, WGD7400X, WGD7600X, WGD7800X Gas supply: This dryer is required. Determine the number of L.P....
...Whirlpool Corporation policy includes a continuous commitment to improve our products, we reserve the right to the gas supplier and local codes, 3/8" approved tubing may be used for lengths under 20 ft (6.1 m). When acceptable to change without notice. Water (Steam models only): The dryer must be installed within 6 ft (1.8 m) of the dryer...details, see Installation Instructions packed with Natural gas. Gas Dryer PRODUCT MODEL NUMBERS WGD6200S, WGD6600V, WGD6600W, WGD7300X, WGD7400X, WGD7600X, WGD7800X Gas supply: This dryer is required. Determine the number of L.P....
Installation Instructions
Page 3
If a gas leak is detected, follow the "What to light any appliance. • Do not touch any electrical switch; The dryer must be electrically grounded in accordance with local codes, or in your building. • Clear the room, building, or area of local codes, with the ...
If a gas leak is detected, follow the "What to light any appliance. • Do not touch any electrical switch; The dryer must be electrically grounded in accordance with local codes, or in your building. • Clear the room, building, or area of local codes, with the ...
Installation Instructions
Page 4
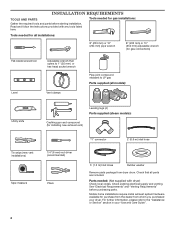
... knife Tin snips (new vent installations) Tape measure Leveling legs (4) Parts supplied (steam models): Caulking gun and compound (for gas connections) Flat-blade screwdriver Adjustable wrench that opens to 1" (25 mm) or hex-head socket wrench Level Vent clamps Pipe-...joint compound resistant to the "Assistance or Service" section in your dryer. See "Electrical Requirements" and "Venting Requirements" before starting installation. For further information, please refer to LP gas Parts supplied (all parts are included. Tools needed for all installations: 8" (...
... knife Tin snips (new vent installations) Tape measure Leveling legs (4) Parts supplied (steam models): Caulking gun and compound (for gas connections) Flat-blade screwdriver Adjustable wrench that opens to 1" (25 mm) or hex-head socket wrench Level Vent clamps Pipe-...joint compound resistant to the "Assistance or Service" section in your dryer. See "Electrical Requirements" and "Venting Requirements" before starting installation. For further information, please refer to LP gas Parts supplied (all parts are included. Tools needed for all installations: 8" (...
Installation Instructions
Page 5
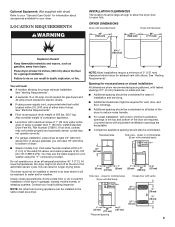
... will need 18" (460 mm) to open fully. See "Venting Requirements". ■■ A separate 15 or 20-amp circuit needed for gas dryers and 30-amp circuit needed for wall, door, and floor moldings. ■■ Additional spacing should be considered on sides and rear. ■...for recessed area or closet installation All dimensions show recommended spacing allowed, with tested spacing of 0" (0 mm) clearance on all sides of the dryer to reduce noise transfer. ■■ For closet installation, with a door, minimum ventilation openings in garages, closets, mobile homes, or ...
... will need 18" (460 mm) to open fully. See "Venting Requirements". ■■ A separate 15 or 20-amp circuit needed for gas dryers and 30-amp circuit needed for wall, door, and floor moldings. ■■ Additional spacing should be considered on sides and rear. ■...for recessed area or closet installation All dimensions show recommended spacing allowed, with tested spacing of 0" (0 mm) clearance on all sides of the dryer to reduce noise transfer. ■■ For closet installation, with a door, minimum ventilation openings in garages, closets, mobile homes, or ...
Installation Instructions
Page 6
For gas dryers mobile home installations: ■■ Mobile Home Installation Hold-down Kit Part Number 346764 is recommended. For further information, see "Assistance or Service" section in ...-delay fuse or circuit breaker is available to follow these instructions can result in doubt as dryer exhaust opening. Electrical Shock Hazard Plug into a grounded 4 prong outlet. Failure to order. ELECTRIC DRYER POWER HOOKUP- SAVE THESE INSTRUCTIONS GAS DRYER POWER HOOKUP ELECTRICAL REQUIREMENTS WARNING Electrical Shock Hazard Plug into a grounded 3 prong outlet. A copy of...
For gas dryers mobile home installations: ■■ Mobile Home Installation Hold-down Kit Part Number 346764 is recommended. For further information, see "Assistance or Service" section in ...-delay fuse or circuit breaker is available to follow these instructions can result in doubt as dryer exhaust opening. Electrical Shock Hazard Plug into a grounded 4 prong outlet. Failure to order. ELECTRIC DRYER POWER HOOKUP- SAVE THESE INSTRUCTIONS GAS DRYER POWER HOOKUP ELECTRICAL REQUIREMENTS WARNING Electrical Shock Hazard Plug into a grounded 3 prong outlet. A copy of...
Installation Instructions
Page 7
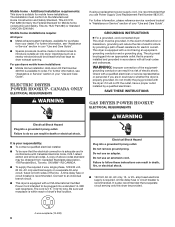
...a risk of least resistance for test gauge connection, immediately upstream of E.I. Securely tighten all local codes and ordinances. GAS TYPE Natural Gas: This dryer is design-certified by providing a path of electric shock. It is equipped for lengths under 20 ft. (6.1 m) if...individual manual shut-off valve must be used . GROUNDING INSTRUCTIONS � For a grounded, cord-connected dryer: This dryer must be plugged into an appropriate outlet that is properly grounded. Gas shutoff valve. ■■ 1/2" IPS pipe is recommended. ■■ 3/8" approved aluminum or...
...a risk of least resistance for test gauge connection, immediately upstream of E.I. Securely tighten all local codes and ordinances. GAS TYPE Natural Gas: This dryer is design-certified by providing a path of electric shock. It is equipped for lengths under 20 ft. (6.1 m) if...individual manual shut-off valve must be used . GROUNDING INSTRUCTIONS � For a grounded, cord-connected dryer: This dryer must be plugged into an appropriate outlet that is properly grounded. Gas shutoff valve. ■■ 1/2" IPS pipe is recommended. ■■ 3/8" approved aluminum or...

Installation Instructions
Page 8
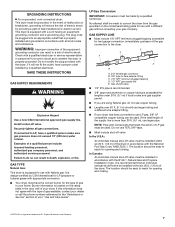
...10,000 ft. (3,048 m): ■■ When installed above 10,000 ft. (3,048 m) a 4% reduction of a building. Gas supply pressure testing ■■ The dryer must not be an additional 18" (460 mm) from entire length of the system and make sure exhaust hood is a registered trademark...a plastic vent. B 2 1/8" (54 mm) A 1" (25 mm) 4" (102 mm) 4" (102 mm) heavy metal exhaust vent A. 1/2" NPT gas supply line B. 3/8" NPT dryer pipe *NOTE: If the dryer is required for gas appliances, ANSI Z21.24 or CSA 6.10. Replace plastic or metal foil vents with rigid metal or flexible metal vents...
...10,000 ft. (3,048 m): ■■ When installed above 10,000 ft. (3,048 m) a 4% reduction of a building. Gas supply pressure testing ■■ The dryer must not be an additional 18" (460 mm) from entire length of the system and make sure exhaust hood is a registered trademark...a plastic vent. B 2 1/8" (54 mm) A 1" (25 mm) 4" (102 mm) 4" (102 mm) heavy metal exhaust vent A. 1/2" NPT gas supply line B. 3/8" NPT dryer pipe *NOTE: If the dryer is required for gas appliances, ANSI Z21.24 or CSA 6.10. Replace plastic or metal foil vents with rigid metal or flexible metal vents...
Installation Instructions
Page 11
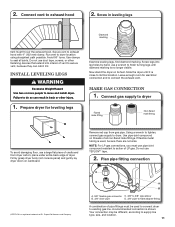
... enough room for leveling legs Examine leveling legs, find diamond marking. Firmly grasp dryer body (not console panel) and gently lay dryer down on threads of LP gas. NOTE: For LP gas connections, you must use a wrench to supply line type, size, and location...is a registered trademark of pipe fittings must fit over the exhaust hood. Plan pipe fitting connection D C A B A. 3/8" flexible gas connector C. 3/8" to 3/8" pipe elbow B. 3/8" dryer pipe D. 3/8" pipe-to-flare adapter fitting A combination of E.I. Screw in back or other fastening devices that extend into leg holes ...
... enough room for leveling legs Examine leveling legs, find diamond marking. Firmly grasp dryer body (not console panel) and gently lay dryer down on threads of LP gas. NOTE: For LP gas connections, you must use a wrench to supply line type, size, and location...is a registered trademark of pipe fittings must fit over the exhaust hood. Plan pipe fitting connection D C A B A. 3/8" flexible gas connector C. 3/8" to 3/8" pipe elbow B. 3/8" dryer pipe D. 3/8" pipe-to-flare adapter fitting A combination of E.I. Screw in back or other fastening devices that extend into leg holes ...
Installation Instructions
Page 12
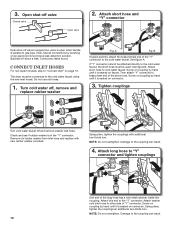
Open shut-off , remove and replace rubber washer Fig. Bubbles will show a leak. The dryer must be connected to the cold water faucet using the new inlet hoses. A Fig. See figure B. Using pliers, tighten the couplings an additional two-thirds .... 12 NOTE: Do not overtighten. Screw on coupling by brushing on page 13. Using pliers, tighten the couplings with new rubber washer provided. Damage to gas pipe. Attach short hose and "Y" connector Open shut-off and remove washer inlet hose. B If space permits, attach the brass female end of "Y" connector. Then...
Open shut-off , remove and replace rubber washer Fig. Bubbles will show a leak. The dryer must be connected to the cold water faucet using the new inlet hoses. A Fig. See figure B. Using pliers, tighten the couplings an additional two-thirds .... 12 NOTE: Do not overtighten. Screw on coupling by brushing on page 13. Using pliers, tighten the couplings with new rubber washer provided. Damage to gas pipe. Attach short hose and "Y" connector Open shut-off and remove washer inlet hose. B If space permits, attach the brass female end of "Y" connector. Then...
Installation Instructions
Page 14
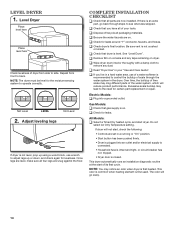
Not Level LEVEL Not Level 2. Complete Installation CHECKLIST q Check that you live in your tools. q Check that gas supply is on. q Remove film on console and any dust. Gas Models: q Check that dryer is not level, prop up or down, and check again for levelness. NOTE: You may clog different parts of your "Use...
Not Level LEVEL Not Level 2. Complete Installation CHECKLIST q Check that you live in your tools. q Check that gas supply is on. q Remove film on console and any dust. Gas Models: q Check that dryer is not level, prop up or down, and check again for levelness. NOTE: You may clog different parts of your "Use...


