
Use and Care Guide
Page 4
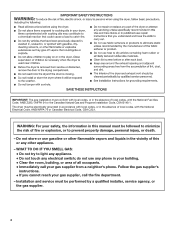
... in the absence of this manual must be performed by a qualified installer, service agency, or the gas supplier. 4 do not use gasoline or other appliance. - Do not store or use any phone in your safety, the information in the vicinity of local codes, with the National Fuel Gas Code, ANSI Z223.1/NFPA 54 or the Canadian Natural Gas and Propane Installation Code, CSA B149.1.
... in the absence of this manual must be performed by a qualified installer, service agency, or the gas supplier. 4 do not use gasoline or other appliance. - Do not store or use any phone in your safety, the information in the vicinity of local codes, with the National Fuel Gas Code, ANSI Z223.1/NFPA 54 or the Canadian Natural Gas and Propane Installation Code, CSA B149.1.
Use and Care Guide
Page 5
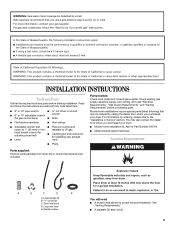
... dryer. ■ Mobile home installation kit. You may be ordered by UL or CSA. "Y" connector C. See "Venting Requirements." ■ A separate 30-amp circuit. 5 If a gas leak is detected, follow the instructions provided with any tools listed here. ■ 8" or 10" pipe wrench ■ ¼" nut driver or socket ■ 8" or 10" adjustable wrench wrench (for installing new exhaust ■ Level vent) ■ Pliers Parts needed: Check local codes...
... dryer. ■ Mobile home installation kit. You may be ordered by UL or CSA. "Y" connector C. See "Venting Requirements." ■ A separate 30-amp circuit. 5 If a gas leak is detected, follow the instructions provided with any tools listed here. ■ 8" or 10" pipe wrench ■ ¼" nut driver or socket ■ 8" or 10" adjustable wrench wrench (for installing new exhaust ■ Level vent) ■ Pliers Parts needed: Check local codes...
Use and Care Guide
Page 6
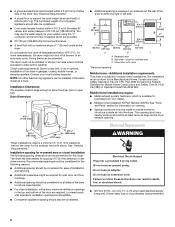
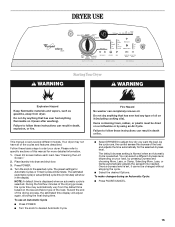
... outside air into a grounded 3 prong outlet. A time-delay fuse or circuit breaker is required. You may use the water supply for your dealer. ■ Mobile home Installation Kit Part Number 346764. NOTE: No other fuel-burning appliance can be installed in an area where it will be installed or stored in the same closet as the dryer exhaust opening. This dryer has been tested for information on the sides and rear. Side view...
... outside air into a grounded 3 prong outlet. A time-delay fuse or circuit breaker is required. You may use the water supply for your dealer. ■ Mobile home Installation Kit Part Number 346764. NOTE: No other fuel-burning appliance can be installed in an area where it will be installed or stored in the same closet as the dryer exhaust opening. This dryer has been tested for information on the sides and rear. Side view...
Use and Care Guide
Page 7
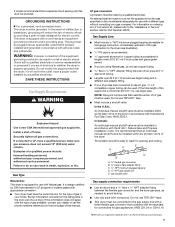
... gas connector that complies with appropriate conversion. ■ Your dryer must be provided. It is also recommended that a separate circuit serving only this manual. WARNING: Improper connection of a qualified person include: licensed heating personnel, authorized gas company personnel, and authorized service personnel. SAVE THESE INSTRUCTIONS Gas Supply Requirements WARNING Explosion Hazard Use a new CSA International approved gas supply line. If connected to flare adapter fitting C. 1/8" NPT minimum plugged...
... gas connector that complies with appropriate conversion. ■ Your dryer must be provided. It is also recommended that a separate circuit serving only this manual. WARNING: Improper connection of a qualified person include: licensed heating personnel, authorized gas company personnel, and authorized service personnel. SAVE THESE INSTRUCTIONS Gas Supply Requirements WARNING Explosion Hazard Use a new CSA International approved gas supply line. If connected to flare adapter fitting C. 1/8" NPT minimum plugged...

Use and Care Guide
Page 8
... be used. Do not use a plastic vent. If this dryer MUST BE EXHAUSTED OUTDOORS. Burner Input Requirements: Elevations above 10,000 ft (3,048 m): ■ When installed above 10,000 ft (3,048 m) a 4% reduction of the burner Btu rating shown on the model/serial number plate is required for cleaning. ■ Flexible metal vent must be fully extended and supported when the dryer is in its final location. ■ Remove excess...
... be used. Do not use a plastic vent. If this dryer MUST BE EXHAUSTED OUTDOORS. Burner Input Requirements: Elevations above 10,000 ft (3,048 m): ■ When installed above 10,000 ft (3,048 m) a 4% reduction of the burner Btu rating shown on the model/serial number plate is required for cleaning. ■ Flexible metal vent must be fully extended and supported when the dryer is in its final location. ■ Remove excess...
Use and Care Guide
Page 9
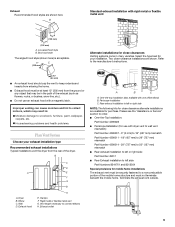
... problems. Plan Vent System Choose your installation. Dryer B. Exhaust hood C D E F G B H E. Rigid metal or flexible metal vent G. Exhaust outlet A B C A. Rear exhaust installation to left or right side NOTE: The following kits for close clearance alternate installations are available for close -clearance installations are shown here. Select the type best for mobile home installations The exhaust vent must be in the path of the exhaust (such as flowers, rocks, or bushes, snow line...
... problems. Plan Vent System Choose your installation. Dryer B. Exhaust hood C D E F G B H E. Rigid metal or flexible metal vent G. Exhaust outlet A B C A. Rear exhaust installation to left or right side NOTE: The following kits for close clearance alternate installations are available for close -clearance installations are shown here. Select the type best for mobile home installations The exhaust vent must be in the path of the exhaust (such as flowers, rocks, or bushes, snow line...

Use and Care Guide
Page 10
... its final location. Failure to do so can catch lint. Using a wrench to tighten, connect the gas supply to move and install dryer. NOTE: Do not use . To determine maximum exhaust length, add one elbow. A. Determine vent length and elbows needed for information on the cardboard. Vent system chart NOTE: Performance of rear exhaust to either side of vent material and hood combinations acceptable to use vent runs longer than...
... its final location. Failure to do so can catch lint. Using a wrench to tighten, connect the gas supply to move and install dryer. NOTE: Do not use . To determine maximum exhaust length, add one elbow. A. Determine vent length and elbows needed for information on the cardboard. Vent system chart NOTE: Performance of rear exhaust to either side of vent material and hood combinations acceptable to use vent runs longer than...

Use and Care Guide
Page 11
... attached directly to cold water NOTE: Do not overtighten. Inlet to the cold water faucet, the short hose must fit over the dryer exhaust outlet and inside the coupling. Screw on coupling by brushing on fill valve connector. 10. NOTE: Do not overtighten. Open the shutoff valve in the supply line. Turn cold water faucet off and remove washer inlet hose. 2. One end of the long hose has a wire mesh...
... attached directly to cold water NOTE: Do not overtighten. Inlet to the cold water faucet, the short hose must fit over the dryer exhaust outlet and inside the coupling. Screw on coupling by brushing on fill valve connector. 10. NOTE: Do not overtighten. Open the shutoff valve in the supply line. Turn cold water faucet off and remove washer inlet hose. 2. One end of the long hose has a wire mesh...

Use and Care Guide
Page 12
... the dryer using a wood block. B. Place a towel or soft cloth on top of the dryer and the dryer cabinet, check the levelness from front to the front panel of the dryer. 6. Remove remaining 2 loose screws from each of the 2 hinges in Step 2. Reverse Door Swing You can change your door swing from each of the 2 hinges that attach the dryer door to back. Remove the door assembly 1. Level Dryer Check the...
... the dryer using a wood block. B. Place a towel or soft cloth on top of the dryer and the dryer cabinet, check the levelness from front to the front panel of the dryer. 6. Remove remaining 2 loose screws from each of the 2 hinges in Step 2. Reverse Door Swing You can change your door swing from each of the 2 hinges that attach the dryer door to back. Remove the door assembly 1. Level Dryer Check the...

Use and Care Guide
Page 14
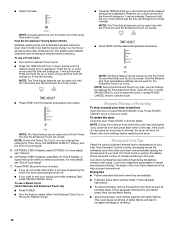
... parts of a water softener is closed , open , contact a qualified technician. 14 Do not remove ground prong. Test dryer operation by selecting a Timed Dry heated cycle and starting the dryer. If you feel for 5 minutes, open . ■ If the gas supply line shutoff valve is closed . 14. If you do not select the Air Only modifier. WARNING Electrical Shock Hazard Plug into a grounded 3 prong outlet. Turn on the dryer. When the dryer has been running for heat. Do not use...
... parts of a water softener is closed , open , contact a qualified technician. 14 Do not remove ground prong. Test dryer operation by selecting a Timed Dry heated cycle and starting the dryer. If you feel for 5 minutes, open . ■ If the gas supply line shutoff valve is closed . 14. If you do not select the Air Only modifier. WARNING Electrical Shock Hazard Plug into a grounded 3 prong outlet. Turn on the dryer. When the dryer has been running for heat. Do not use...
Use and Care Guide
Page 15
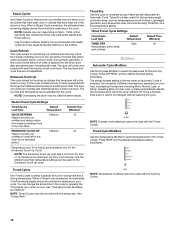
..., away from the default time based on the size and fabric type of the load and adjusts the time automatically for the selected dryness level. This manual covers several different models. Please refer to adjust how dry you want the load. Clean lint screen before each load. See "Cleaning the Lint Screen." 2. Place laundry into dryer and shut door. 3. Once a dryness level is set, it cannot be dried on it (including cooking...
..., away from the default time based on the size and fabric type of the load and adjusts the time automatically for the selected dryness level. This manual covers several different models. Please refer to adjust how dry you want the load. Clean lint screen before each load. See "Cleaning the Lint Screen." 2. Place laundry into dryer and shut door. 3. Once a dryness level is set, it cannot be dried on it (including cooking...
Use and Care Guide
Page 16
... AccelerCare® Drying System Works Moisture-sensing strips and temperature sensors inside the dryer drum monitor how fast the load is displayed. To use a Steam Cycle (Quick Refresh and Enhanced Touch Up) ■ Press POWER. ■ Turn the knob to help save time and avoid overdrying. NOTE: The Temp feature can be and when clothes are available. ■ If desired, add a fabric softener sheet. Only...
... AccelerCare® Drying System Works Moisture-sensing strips and temperature sensors inside the dryer drum monitor how fast the load is displayed. To use a Steam Cycle (Quick Refresh and Enhanced Touch Up) ■ Press POWER. ■ Turn the knob to help save time and avoid overdrying. NOTE: The Temp feature can be and when clothes are available. ■ If desired, add a fabric softener sheet. Only...
Use and Care Guide
Page 18
... amount of wrinkle-free cotton, cotton-polyester blend, common knits, and synthetic garments. NOTE: Overloading the dryer may also be used with heat. Timed Cycles Use Timed Cycles to select a specific amount of 40 minutes. Timed Dry is sprayed into the dryer drum after an Automatic Cycle. Lightweight garments, such as bedspreads and work clothes Modifiers Automatic Cycle Modifiers Use the Dryness Modifier to select dryness levels for drying heavyweight and...
... amount of wrinkle-free cotton, cotton-polyester blend, common knits, and synthetic garments. NOTE: Overloading the dryer may also be used with heat. Timed Cycles Use Timed Cycles to select a specific amount of 40 minutes. Timed Dry is sprayed into the dryer drum after an Automatic Cycle. Lightweight garments, such as bedspreads and work clothes Modifiers Automatic Cycle Modifiers Use the Dryness Modifier to select dryness levels for drying heavyweight and...
Use and Care Guide
Page 19
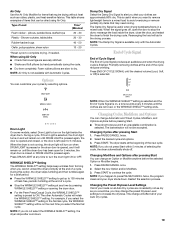
... Start 1. NOTE: Air Only is useful when drying bedsheets/linens in a mixed load to dry. Press END OF CYCLE SIGNAL until the dryer door has been open for 5 minutes, the dryer door is closed , or the door is selected, the drum light turns on and will not be dried using Air Only ■ Check that coverings are consistently not as dry as rubber, plastic, and heat-sensitive fabrics. WRINKLE SHIELD™ Setting The WRINKLE SHIELD™ setting...
... Start 1. NOTE: Air Only is useful when drying bedsheets/linens in a mixed load to dry. Press END OF CYCLE SIGNAL until the dryer door has been open for 5 minutes, the dryer door is closed , or the door is selected, the drum light turns on and will not be dried using Air Only ■ Check that coverings are consistently not as dry as rubber, plastic, and heat-sensitive fabrics. WRINKLE SHIELD™ Setting The WRINKLE SHIELD™ setting...

Use and Care Guide
Page 20
... ) START button (about 1 second). Items containing foam, rubber, or plastic must be changed while the dryer is shown. Actual drying time will flash. 4. Time* Wool Sweaters Timed Dry Low 60 Block to different installations, environmental conditions, or personal preference. Dryer back panel 20 Press START to the following chart). Drying Rack Option Use the Drying Rack to purchase one for 1 second followed by the current drying setting. 3. The drum turns, but the other settings will...
... ) START button (about 1 second). Items containing foam, rubber, or plastic must be changed while the dryer is shown. Actual drying time will flash. 4. Time* Wool Sweaters Timed Dry Low 60 Block to different installations, environmental conditions, or personal preference. Dryer back panel 20 Press START to the following chart). Drying Rack Option Use the Drying Rack to purchase one for 1 second followed by the current drying setting. 3. The drum turns, but the other settings will...

Use and Care Guide
Page 21
... dryer during removal, check the exhaust hood and remove the lint. If storing or moving your inlet hoses, record the date of the dryer. Unplug dryer or disconnect power. 2. DRYER CARE Cleaning the Dryer Location Keep dryer area clear and free from faucet and drain. 21 Cleaning the Lint Screen Clean the lint screen before each load. Every load cleaning 1. Pull the lint screen toward you are not harmful to the stained area of clothes. Thoroughly dry lint screen with a damp cloth. 3. Wipe drum...
... dryer during removal, check the exhaust hood and remove the lint. If storing or moving your inlet hoses, record the date of the dryer. Unplug dryer or disconnect power. 2. DRYER CARE Cleaning the Dryer Location Keep dryer area clear and free from faucet and drain. 21 Cleaning the Lint Screen Clean the lint screen before each load. Every load cleaning 1. Pull the lint screen toward you are not harmful to the stained area of clothes. Thoroughly dry lint screen with a damp cloth. 3. Wipe drum...

Use and Care Guide
Page 22
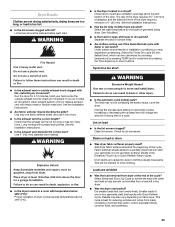
... care 1. Disconnect the water inlet hose from faucet, then drain the hose. Reinstalling the dryer Follow the "Installation Instructions" to gas supply line. Open the dryer door. Remove the screw located in dryer base. 8. Replace the fuse or reset the circuit breaker. Use a time-delay fuse. ■ Is the dryer door firmly closed? ■ Was the Start button firmly pressed? No heat ■ Has a household fuse blown, or has a circuit breaker tripped? Check the front and rear edges of the drum for 2-5 seconds. The gas valve...
... care 1. Disconnect the water inlet hose from faucet, then drain the hose. Reinstalling the dryer Follow the "Installation Instructions" to gas supply line. Open the dryer door. Remove the screw located in dryer base. 8. Replace the fuse or reset the circuit breaker. Use a time-delay fuse. ■ Is the dryer door firmly closed? ■ Was the Start button firmly pressed? No heat ■ Has a household fuse blown, or has a circuit breaker tripped? Check the front and rear edges of the drum for 2-5 seconds. The gas valve...
Use and Care Guide
Page 23
... be cleaned before each load. Lint on fabric type. Dry smaller loads that the exhaust vent is too hot ■ Is the lint screen clogged with Quick Refresh Cycle. Smaller loads of dryer cycles requires temperatures above 45ºF (7ºC). ■ Is the dryer located in the Enhanced Touch Up or Quick Refresh Steam cycles. Closet doors must have ventilation openings at the top and bottom of the Quick Refresh cycle with water and heat to check air...
... be cleaned before each load. Lint on fabric type. Dry smaller loads that the exhaust vent is too hot ■ Is the lint screen clogged with Quick Refresh Cycle. Smaller loads of dryer cycles requires temperatures above 45ºF (7ºC). ■ Is the dryer located in the Enhanced Touch Up or Quick Refresh Steam cycles. Closet doors must have ventilation openings at the top and bottom of the Quick Refresh cycle with water and heat to check air...

Use and Care Guide
Page 24
... to order, call 1-800-807-6777, or your request. Part Number Accessory 20-48KITRC 4 ft (1.2 m) gas line dryer connector installation kit PT220L 4 ft (1.2 m) dryer cord, 3-wire, 30 amp PT400L 4 ft (1.2 m) dryer cord, 4-wire, 30 amp PT600L 6 ft (1.8 m) dryer cord, 4-wire, 30 amp 8212614 Dryer vent lint brush 31682 All-purpose appliance cleaner 1903WH Laundry supply storage cart 49572 LP Gas conversion kit W10071550A Drying rack W10044609A Steam hose kit 24 For more high-quality items or to your...
... to order, call 1-800-807-6777, or your request. Part Number Accessory 20-48KITRC 4 ft (1.2 m) gas line dryer connector installation kit PT220L 4 ft (1.2 m) dryer cord, 3-wire, 30 amp PT400L 4 ft (1.2 m) dryer cord, 4-wire, 30 amp PT600L 6 ft (1.8 m) dryer cord, 4-wire, 30 amp 8212614 Dryer vent lint brush 31682 All-purpose appliance cleaner 1903WH Laundry supply storage cart 49572 LP Gas conversion kit W10071550A Drying rack W10044609A Steam hose kit 24 For more high-quality items or to your...
Use and Care Guide
Page 25
... correct the installation of the Use & Care Guide. Service calls to the appliance. 8. Replacement parts or repair labor on how to province. Write down the following information about your major appliance, to instruct you ever need it is installed in an inaccessible location or is not installed in accordance with original model/serial numbers that have been removed, altered, or cannot be repaired in materials or workmanship that...
... correct the installation of the Use & Care Guide. Service calls to the appliance. 8. Replacement parts or repair labor on how to province. Write down the following information about your major appliance, to instruct you ever need it is installed in an inaccessible location or is not installed in accordance with original model/serial numbers that have been removed, altered, or cannot be repaired in materials or workmanship that...


