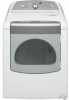
Use and Care Guide
Page 3
... gas connector, when used, must be killed or seriously injured if you and others are not followed. DRYER SAFETY Your safety and the safety of others . do not use gasoline or other appliance. - Installation and service must not exceed 3 feet. 3 This symbol alerts you to prevent property damage, personal injury, or death. - All safety messages will follow instructions...
... gas connector, when used, must be killed or seriously injured if you and others are not followed. DRYER SAFETY Your safety and the safety of others . do not use gasoline or other appliance. - Installation and service must not exceed 3 feet. 3 This symbol alerts you to prevent property damage, personal injury, or death. - All safety messages will follow instructions...
Use and Care Guide
Page 4
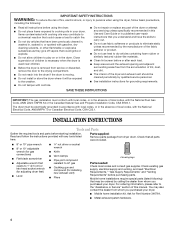
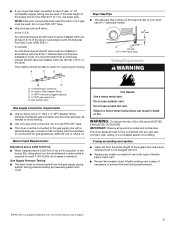
... used near children. ■ Before the dryer is removed from service or discarded, remove the door to the drying compartment. ■ Do not reach into the dryer if the drum is moving. ■ Do not install or store the dryer where it will be cleaned periodically by qualified service personnel. ■ See installation instructions for installing new exhaust vent) ■ Pliers 4 leveling legs Parts needed: Check local codes and consult gas supplier. Parts supplied: Remove parts...
... used near children. ■ Before the dryer is removed from service or discarded, remove the door to the drying compartment. ■ Do not reach into the dryer if the drum is moving. ■ Do not install or store the dryer where it will be cleaned periodically by qualified service personnel. ■ See installation instructions for installing new exhaust vent) ■ Pliers 4 leveling legs Parts needed: Check local codes and consult gas supplier. Parts supplied: Remove parts...
Use and Care Guide
Page 5
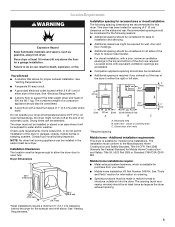
... exhaust vent with a door, minimum ventilation openings in .2* (155 cm2) 1" (2.5 cm) 29" 1" 1"* 29¼" 5" (73.7 cm) (2.5 cm) (2.5 cm) (74.3 cm) (12.7 cm) A B C A. Side view - Do not operate your dealer. ■ Mobile home Installation Kit Part Number 346764. Contact your local building inspector. The installation must not be installed or stored in an area where it will need ■ A location that allows for purchase from dryer. See "Venting Requirements." 5 Closet door...
... exhaust vent with a door, minimum ventilation openings in .2* (155 cm2) 1" (2.5 cm) 29" 1" 1"* 29¼" 5" (73.7 cm) (2.5 cm) (2.5 cm) (74.3 cm) (12.7 cm) A B C A. Side view - Do not operate your dealer. ■ Mobile home Installation Kit Part Number 346764. Contact your local building inspector. The installation must not be installed or stored in an area where it will need ■ A location that allows for purchase from dryer. See "Venting Requirements." 5 Closet door...
Use and Care Guide
Page 6
... your dryer. Check with Natural gas. Securely tighten all local codes and ordinances. If connected to whether the dryer is located on the model/serial rating plate for the type of electric shock by a qualified technician. IPS pipe is recommended approved aluminum or copper tubing is required. Failure to follow these instructions can result in accordance with a cord having an equipmentgrounding conductor and a grounding plug. This dryer is...
... your dryer. Check with Natural gas. Securely tighten all local codes and ordinances. If connected to whether the dryer is located on the model/serial rating plate for the type of electric shock by a qualified technician. IPS pipe is recommended approved aluminum or copper tubing is required. Failure to follow these instructions can result in accordance with a cord having an equipmentgrounding conductor and a grounding plug. This dryer is...
Use and Care Guide
Page 7
...; Replace any gas vent, chimney, wall, ceiling or a concealed space of fire, this dryer MUST BE EXHAUSTED OUTDOORS. IMPORTANT: Observe all governing codes and ordinances. The dryer exhaust must be easy to reach for each 1,000 ft (305 m) increase in accordance with a listed flexible gas connector that an individual manual shutoff valve be disconnected from the entire length of the burner Btu rating shown on the model/serial number...
...; Replace any gas vent, chimney, wall, ceiling or a concealed space of fire, this dryer MUST BE EXHAUSTED OUTDOORS. IMPORTANT: Observe all governing codes and ordinances. The dryer exhaust must be easy to reach for each 1,000 ft (305 m) increase in accordance with a listed flexible gas connector that an individual manual shutoff valve be disconnected from the entire length of the burner Btu rating shown on the model/serial number...
Use and Care Guide
Page 8
... calling Whirlpool Parts and Accessories. Clamp Exhaust Recommended hood styles are recommended. Do not use an exhaust hood with screws or other fastening devices that may result in reduced airflow and poor performance. ■ Do not install flexible metal vent in : Moisture damage to avoid crushing and kinking. Rigid metal vent ■ For best drying performance, rigid metal vents are...
... calling Whirlpool Parts and Accessories. Clamp Exhaust Recommended hood styles are recommended. Do not use an exhaust hood with screws or other fastening devices that may result in reduced airflow and poor performance. ■ Do not install flexible metal vent in : Moisture damage to avoid crushing and kinking. Rigid metal vent ■ For best drying performance, rigid metal vents are...
Use and Care Guide
Page 9
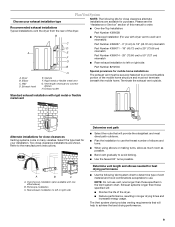
... elbow) B. Exhaust outlet Special provisions for close -clearance installations are available for your exhaust installation type Recommended exhaust installations Typical installations vent the dryer from the rear of the mobile home structure and must be securely fastened to use vent runs longer than those specified in longer drying times and increased energy usage. Terminate the exhaust vent outside. The Vent system chart provides venting requirements that will help to the manufacturer's instructions. Wall D. Standard exhaust installation with...
... elbow) B. Exhaust outlet Special provisions for close -clearance installations are available for your exhaust installation type Recommended exhaust installations Typical installations vent the dryer from the rear of the mobile home structure and must be securely fastened to use vent runs longer than those specified in longer drying times and increased energy usage. Terminate the exhaust vent outside. The Vent system chart provides venting requirements that will help to the manufacturer's instructions. Wall D. Standard exhaust installation with...

Use and Care Guide
Page 10
... home use Gas dryers must be sure there are no longer visible. 5. Mobile home installations require a Mobile Home Installation Kit. Flared male thread B. Du Pont De Nemours and Company. 10 See "Tools and Parts" section for information on the cardboard. Use pipe-joint compound on the corner posts until the diamond marking is no kinks. To determine maximum exhaust length, add...
... home use Gas dryers must be sure there are no longer visible. 5. Mobile home installations require a Mobile Home Installation Kit. Flared male thread B. Du Pont De Nemours and Company. 10 See "Tools and Parts" section for information on the cardboard. Use pipe-joint compound on the corner posts until the diamond marking is no kinks. To determine maximum exhaust length, add...
Use and Care Guide
Page 11
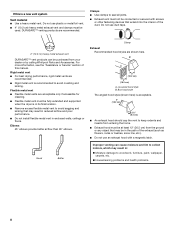
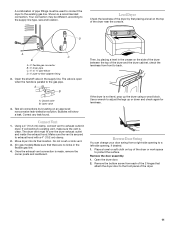
... legs up the dryer using a wood block. Shown is made, remove the corner posts and cardboard. D A C B A. ³⁄₈" flexible gas connector B. ³⁄₈" dryer pipe C. ³⁄₈" to ³⁄₈" pipe elbow D. ³⁄₈" pipe-to the supply line type, size and location. Using a 4" (10.2 cm) clamp, connect vent to exhaust outlet in the supply line. Reverse Door Swing You can change your door swing from...
... legs up the dryer using a wood block. Shown is made, remove the corner posts and cardboard. D A C B A. ³⁄₈" flexible gas connector B. ³⁄₈" dryer pipe C. ³⁄₈" to ³⁄₈" pipe elbow D. ³⁄₈" pipe-to the supply line type, size and location. Using a 4" (10.2 cm) clamp, connect vent to exhaust outlet in the supply line. Reverse Door Swing You can change your door swing from...

Use and Care Guide
Page 12
... the door. 6. Loosen the top screw from the dryer door. 2. Cosmetic screw 3. A B A B A. Remove these screws. Replace the 4 screws in Step 4. 12 Install 4 plastic plugs into screw holes in the dryer left where the hinges were removed in the same holes. 3. A. Loosen these screws. 4. Remove the door strike from dryer front panel. 5. Remove the 4 screws and 2 hinges from each of the dryer door opening . B. Lay the door on the door.
... the door. 6. Loosen the top screw from the dryer door. 2. Cosmetic screw 3. A B A B A. Remove these screws. Replace the 4 screws in Step 4. 12 Install 4 plastic plugs into screw holes in the dryer left where the hinges were removed in the same holes. 3. A. Loosen these screws. 4. Remove the door strike from dryer front panel. 5. Remove the 4 screws and 2 hinges from each of the dryer door opening . B. Lay the door on the door.
Use and Care Guide
Page 13
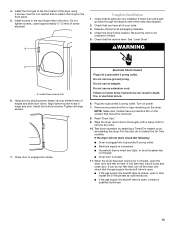
... door by selecting a Timed Dry heated cycle and starting the dryer. If the dryer will not start, check the following: ■ Dryer is plugged into a grounded 3 prong outlet. Check that should be removed. 8. Install these instructions can result in hinge and door. Electrical Shock Hazard Plug into top slotted holes of your tools. 3. For this test, do not feel heat, turn off the dryer and check that the gas supply line shutoff valve is open. ■ If the gas supply line shutoff valve...
... door by selecting a Timed Dry heated cycle and starting the dryer. If the dryer will not start, check the following: ■ Dryer is plugged into a grounded 3 prong outlet. Check that should be removed. 8. Install these instructions can result in hinge and door. Electrical Shock Hazard Plug into top slotted holes of your tools. 3. For this test, do not feel heat, turn off the dryer and check that the gas supply line shutoff valve is open. ■ If the gas supply line shutoff valve...
Use and Care Guide
Page 14
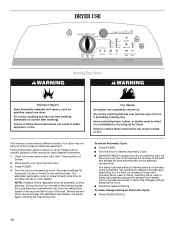
... No washer can result in death or fire. Follow these basic steps to follow these instructions can completely remove oil. See "Cleaning the Lint Screen." 2. Place laundry into dryer and shut door. 3. NOTE: A default time is displayed when an automatic cycle is selected. To use an Automatic Cycle ■ Press POWER. ■ Turn the knob to desired Automatic Cycle. ■ Select DRYNESS to specific sections of the load...
... No washer can result in death or fire. Follow these basic steps to follow these instructions can completely remove oil. See "Cleaning the Lint Screen." 2. Place laundry into dryer and shut door. 3. NOTE: A default time is displayed when an automatic cycle is selected. To use an Automatic Cycle ■ Press POWER. ■ Turn the knob to desired Automatic Cycle. ■ Select DRYNESS to specific sections of the load...

Use and Care Guide
Page 15
... the dryer Close the door. NOTE: Drying will change by 1-minute intervals. Select new cycle settings before restarting the dryer. If an Automatic Cycle is interrupted for permanent press, knits and synthetic fabrics. ■ Avoid drying heavy work clothes together with Timed Cycles. Follow package instructions. ■ To reduce wrinkling, remove the load from where the cycle was interrupted if you choose an Automatic Cycle. Adjust the temperature of a Timed Cycle by...
... the dryer Close the door. NOTE: Drying will change by 1-minute intervals. Select new cycle settings before restarting the dryer. If an Automatic Cycle is interrupted for permanent press, knits and synthetic fabrics. ■ Avoid drying heavy work clothes together with Timed Cycles. Follow package instructions. ■ To reduce wrinkling, remove the load from where the cycle was interrupted if you choose an Automatic Cycle. Adjust the temperature of a Timed Cycle by...
Use and Care Guide
Page 17
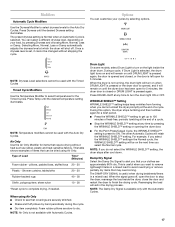
... dryer door. ■ For the Perm Press/Casual Cycle, the WRINKLE SHIELD™ setting is available only with Automatic Cycles. NOTE: The Damp Dry Signal is preset to complete drying, if needed. The preset dryness setting is Normal when an Automatic Cycle is opened , and it cannot be used with the Timed Cycles Timed Cycle Modifiers Use the Temperature Modifier to finish the drying cycle. Once a dryness level is selected, the drum light turns...
... dryer door. ■ For the Perm Press/Casual Cycle, the WRINKLE SHIELD™ setting is available only with Automatic Cycles. NOTE: The Damp Dry Signal is preset to complete drying, if needed. The preset dryness setting is Normal when an Automatic Cycle is opened , and it cannot be used with the Timed Cycles Timed Cycle Modifiers Use the Temperature Modifier to finish the drying cycle. Once a dryness level is selected, the drum light turns...
Use and Care Guide
Page 18
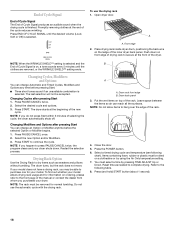
Open dryer door. NOTE: When the WRINKLE SHIELD™ setting is selected and the End of Cycle Signal is selected. Press START to dry items such as needed to the following chart). The drum turns, but the rack does not move. Do not use the drying rack 1. Leave space between the items so air can change Automatic and Timed Cycles, Modifiers and Options any time before the selected Option or Modifier...
Open dryer door. NOTE: When the WRINKLE SHIELD™ setting is selected and the End of Cycle Signal is selected. Press START to dry items such as needed to the following chart). The drum turns, but the rack does not move. Do not use the drying rack 1. Leave space between the items so air can change Automatic and Timed Cycles, Modifiers and Options any time before the selected Option or Modifier...

Use and Care Guide
Page 19
... dryer usage. 19 Rack Dry Setting Temp. Time* Wool Sweaters Timed Low 60 Block to dry the drum. Wet a nylon brush with the lint screen loose, damaged, blocked or missing. Removing Accumulated Lint From Inside the Dryer Cabinet Lint should be removed every 2 years, or more often, depending on the amount of the dryer. Roll lint off the screen with hot water. 3. Dry unstable dye items inside-out to remove residue buildup. 4. DRYER CARE Cleaning the Dryer Location Keep dryer...
... dryer usage. 19 Rack Dry Setting Temp. Time* Wool Sweaters Timed Low 60 Block to dry the drum. Wet a nylon brush with the lint screen loose, damaged, blocked or missing. Removing Accumulated Lint From Inside the Dryer Cabinet Lint should be removed every 2 years, or more often, depending on the amount of the dryer. Roll lint off the screen with hot water. 3. Dry unstable dye items inside-out to remove residue buildup. 4. DRYER CARE Cleaning the Dryer Location Keep dryer...
Use and Care Guide
Page 20
... dryer. Clean lint screen. Cap the open the door. Replace the bulb with the screw. 4. Replace the fuse or reset the circuit breaker. Replace the fuse or reset the circuit breaker. Press and hold START to secure dryer door. Use masking tape to restart the dryer. ■ "F" Variable (F1, F2, F20, etc.) service codes: Call for service. 20 Unplug dryer or disconnect power. 2. Turn bulb counterclockwise. Use a time-delay fuse. ■ Is the dryer door firmly closed? ■ Was the Start button firmly pressed? Check the front and rear...
... dryer. Clean lint screen. Cap the open the door. Replace the bulb with the screw. 4. Replace the fuse or reset the circuit breaker. Replace the fuse or reset the circuit breaker. Press and hold START to secure dryer door. Use masking tape to restart the dryer. ■ "F" Variable (F1, F2, F20, etc.) service codes: Call for service. 20 Unplug dryer or disconnect power. 2. Turn bulb counterclockwise. Use a time-delay fuse. ■ Is the dryer door firmly closed? ■ Was the Start button firmly pressed? Check the front and rear...

Use and Care Guide
Page 21
... dryer located in a cycle. Level the dryer. Drum stains are gone from dryer. Failure to move and install dryer. Check for the types of the door. See the Installation Instructions. ■ Are fabric softener sheets blocking the grille? Check that can stain your garments. WARNING Explosion Hazard Keep flammable materials and vapors, such as gasoline, away from the area, rewash and dry the clothing. 21 Change the dryness level setting...
... dryer located in a cycle. Level the dryer. Drum stains are gone from dryer. Failure to move and install dryer. Check for the types of the door. See the Installation Instructions. ■ Are fabric softener sheets blocking the grille? Check that can stain your garments. WARNING Explosion Hazard Keep flammable materials and vapors, such as gasoline, away from the area, rewash and dry the clothing. 21 Change the dryness level setting...
Use and Care Guide
Page 22
... the complete model and serial number of appliances ■ Referrals to local dealers, repair parts distributors, and service companies. To locate FSP® replacement parts in Canada. Call the Whirlpool Customer eXperience Center toll free: 1-800-253-1301. If you need to Whirlpool Corporation with : ■ Use and maintenance procedures ■ Accessory and repair parts sales ■ Features and specifications on our full line of a service call the Whirlpool Customer eXperience...
... the complete model and serial number of appliances ■ Referrals to local dealers, repair parts distributors, and service companies. To locate FSP® replacement parts in Canada. Call the Whirlpool Customer eXperience Center toll free: 1-800-253-1301. If you need to Whirlpool Corporation with : ■ Use and maintenance procedures ■ Accessory and repair parts sales ■ Features and specifications on our full line of a service call the Whirlpool Customer eXperience...
Use and Care Guide
Page 23
... repair or replace appliance light bulbs, air filters or water filters. THIS WARRANTY GIVES YOU SPECIFIC LEGAL RIGHTS AND YOU MAY ALSO HAVE OTHER RIGHTS, WHICH VARY FROM STATE TO STATE OR PROVINCE TO PROVINCE. Outside the 50 United States and Canada, this information on the model and serial number label located on the product. Dealer name Address Phone number Model number Serial number Purchase date 23 Service calls to correct the installation...
... repair or replace appliance light bulbs, air filters or water filters. THIS WARRANTY GIVES YOU SPECIFIC LEGAL RIGHTS AND YOU MAY ALSO HAVE OTHER RIGHTS, WHICH VARY FROM STATE TO STATE OR PROVINCE TO PROVINCE. Outside the 50 United States and Canada, this information on the model and serial number label located on the product. Dealer name Address Phone number Model number Serial number Purchase date 23 Service calls to correct the installation...


