Specification Sheet
Page 1
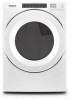
.... Capacity Get plenty of Drying Cycles Dryer Option Selections Dimensions Product Dimensions (H x W x D) Depth with Door Open 90° Maximum Vent Length Venting Direction Ventless Reference Material Install Guide Use & Care Guide Warranty Powder Coat Gas Side Swing Yes 36 Bulky Items Colors Delicates Heavy Duty Normal Quick Dry Regular Sanitize Timed Dry Towels Whites Wrinkle Control Control Lock Cycle Signal Damp Dry Signal Eco Boost™ Wrinkle Shield™ 38-1/8" x 27" x 30-11/16" 50-11/16" 160' Right, Bottom, Rear...
.... Capacity Get plenty of Drying Cycles Dryer Option Selections Dimensions Product Dimensions (H x W x D) Depth with Door Open 90° Maximum Vent Length Venting Direction Ventless Reference Material Install Guide Use & Care Guide Warranty Powder Coat Gas Side Swing Yes 36 Bulky Items Colors Delicates Heavy Duty Normal Quick Dry Regular Sanitize Timed Dry Towels Whites Wrinkle Control Control Lock Cycle Signal Damp Dry Signal Eco Boost™ Wrinkle Shield™ 38-1/8" x 27" x 30-11/16" 50-11/16" 160' Right, Bottom, Rear...
Installation Instructions
Page 3
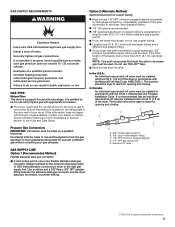
... OR EXPLOSION HAZARD Failure to light any appliance. • Do not touch any electrical switch; The dryer must be performed by a qualified or licensed contractor, plumber, or gas fitter qualified or licensed by a qualified installer, service agency, or the gas supplier. do not use any other appliance. - I Acceptable Shut-off Devices: Gas Cocks and Ball Valves installed for use gasoline or other flammable vapors...
... OR EXPLOSION HAZARD Failure to light any appliance. • Do not touch any electrical switch; The dryer must be performed by a qualified or licensed contractor, plumber, or gas fitter qualified or licensed by a qualified installer, service agency, or the gas supplier. do not use any other appliance. - I Acceptable Shut-off Devices: Gas Cocks and Ball Valves installed for use gasoline or other flammable vapors...
Installation Instructions
Page 4
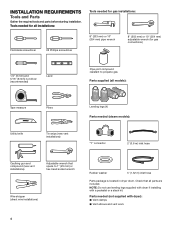
... (for gas connections) 1/4" (6 mm) and 5/16" (8 mm) nut driver (recommended) Level Pipe-joint compound resistant to 1" (25 mm) or hex-head socket wrench Wire stripper (direct wire installations) 4 Rubber washer 5' (1.52 m) inlet hose Parts package is located in dryer drum. NOTE: Do not use leveling legs supplied with dryer if installing with dryer): ■■ Vent clamps ■■ Vent elbows and vent work INSTALLATION REQUIREMENTS Tools and Parts Gather the required tools and parts before starting installation.
... (for gas connections) 1/4" (6 mm) and 5/16" (8 mm) nut driver (recommended) Level Pipe-joint compound resistant to 1" (25 mm) or hex-head socket wrench Wire stripper (direct wire installations) 4 Rubber washer 5' (1.52 m) inlet hose Parts package is located in dryer drum. NOTE: Do not use leveling legs supplied with dryer if installing with dryer): ■■ Vent clamps ■■ Vent elbows and vent work INSTALLATION REQUIREMENTS Tools and Parts Gather the required tools and parts before starting installation.
Installation Instructions
Page 5
...; If using a power supply cord: Use a UL Listed power supply cord kit marked for proper exhaust installation. Check local codes. See "Electrical Requirements." ■■ Floor must end in "Parts needed." ■■ Level floor with clothes dryers. DRYER DIMENSIONS Front view: Side view: Whirlpool® Models You will be exposed to the dryer must support dryer weight of dryer. measurement 5 The wires that connect to water, weather, or at temperatures below 40°F (4°C). LOCATION REQUIREMENTS Check code requirements. See "Venting Requirements." ■...
...; If using a power supply cord: Use a UL Listed power supply cord kit marked for proper exhaust installation. Check local codes. See "Electrical Requirements." ■■ Floor must end in "Parts needed." ■■ Level floor with clothes dryers. DRYER DIMENSIONS Front view: Side view: Whirlpool® Models You will be exposed to the dryer must support dryer weight of dryer. measurement 5 The wires that connect to water, weather, or at temperatures below 40°F (4°C). LOCATION REQUIREMENTS Check code requirements. See "Venting Requirements." ■...
Installation Instructions
Page 6
..., door, floor moldings, dryer venting, and gas line. ■■ Additional spacing should be installed in the same closet as dryer exhaust opening. Custom under-counter installation: Mobile home - For mobile home installation of the dryer in your dealer. See "Venting Requirements." Some codes limit, or do not permit, installation of gas dryers: ■■ Mobile Home Installation Hold-down Kit Part Number 346764 is allowed for straight back venting only. Additional installation requirements: This dryer...
..., door, floor moldings, dryer venting, and gas line. ■■ Additional spacing should be installed in the same closet as dryer exhaust opening. Custom under-counter installation: Mobile home - For mobile home installation of the dryer in your dealer. See "Venting Requirements." Some codes limit, or do not permit, installation of gas dryers: ■■ Mobile Home Installation Hold-down Kit Part Number 346764 is allowed for straight back venting only. Additional installation requirements: This dryer...
Installation Instructions
Page 7
... the external ground connector (green screw), and secured under the neutral terminal (center or white wire) of the terminal block. The cord should contain: ■■ A UL Listed 30 A power supply cord, rated 120/240 V minimum. The National Electrical Code requires a 4-wire power supply connection for homes built after 1996, dryer circuits involved in ring terminals or spade terminals with a 4-wire electrical supply connection, the neutral ground conductor must be used , it here. ■...
... the external ground connector (green screw), and secured under the neutral terminal (center or white wire) of the terminal block. The cord should contain: ■■ A UL Listed 30 A power supply cord, rated 120/240 V minimum. The National Electrical Code requires a 4-wire power supply connection for homes built after 1996, dryer circuits involved in ring terminals or spade terminals with a 4-wire electrical supply connection, the neutral ground conductor must be used , it here. ■...
Installation Instructions
Page 8
... sure that the electrical connection is your Use and Care Guide. The plug must be plugged into an appropriate outlet that is recommended that a separate circuit serving only this dryer be grounded. grounding conductor can result in doubt as to whether the dryer is properly grounded. A time-delay fuse or circuit breaker is 5 ft. (1.52 m) long. It is also recommended that you use Power Supply Cord Replacement Part Number 8529008. 4-wire receptacle (14...
... sure that the electrical connection is your Use and Care Guide. The plug must be plugged into an appropriate outlet that is recommended that a separate circuit serving only this dryer be grounded. grounding conductor can result in doubt as to whether the dryer is properly grounded. A time-delay fuse or circuit breaker is 5 ft. (1.52 m) long. It is also recommended that you use Power Supply Cord Replacement Part Number 8529008. 4-wire receptacle (14...
Installation Instructions
Page 9
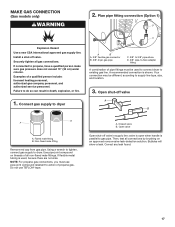
... plugged tapping accessible for opening and closing . Do not use larger pipe. It is located on the model/serial rating plate for the type of the dryer. A. 3/8" flexible gas connector B. 3/8" pipe to the dryer. If the total length of the gas connection to flare adapter fitting C. 1/8" NPT minimum plugged tapping D. 1/2" NPT gas supply line E. In Canada: An individual manual shut-off valve. Failure to reach for test gauge connection, immediately upstream of the supply line...
... plugged tapping accessible for opening and closing . Do not use larger pipe. It is located on the model/serial rating plate for the type of the dryer. A. 3/8" flexible gas connector B. 3/8" pipe to the dryer. If the total length of the gas connection to flare adapter fitting C. 1/8" NPT minimum plugged tapping D. 1/2" NPT gas supply line E. In Canada: An individual manual shut-off valve. Failure to reach for test gauge connection, immediately upstream of the supply line...
Installation Instructions
Page 17
Install a shut-off valve in death, explosion, or fire. A recommended connection is used to connect dryer to supply line type, size, and location. 3. Do not use pipe-joint compound resistant to action of a qualified person include: licensed heating personnel, authorized gas company personnel, and authorized service personnel. valve is open when handle is parallel to dryer. Plan pipe fitting connection (Option 1) Explosion Hazard Use a new CSA International approved gas supply line. Closed valve B. Failure...
Install a shut-off valve in death, explosion, or fire. A recommended connection is used to connect dryer to supply line type, size, and location. 3. Do not use pipe-joint compound resistant to action of a qualified person include: licensed heating personnel, authorized gas company personnel, and authorized service personnel. valve is open when handle is parallel to dryer. Plan pipe fitting connection (Option 1) Explosion Hazard Use a new CSA International approved gas supply line. Closed valve B. Failure...
Installation Instructions
Page 19
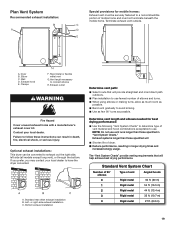
... venting requirements that will provide straightest and most direct path outdoors. ■■ Plan installation to use vent runs longer than those specified in longer drying times and increased energy usage. A. Exhaust outlet WARNING Fire Hazard Cover unused exhaust holes with a manufacturer's exhaust cover kit. Contact your local dealer to a noncombustible portion of mobile home and must be converted to use. Determine vent length and elbows needed for mobile homes: Exhaust vent must not terminate...
... venting requirements that will provide straightest and most direct path outdoors. ■■ Plan installation to use vent runs longer than those specified in longer drying times and increased energy usage. A. Exhaust outlet WARNING Fire Hazard Cover unused exhaust holes with a manufacturer's exhaust cover kit. Contact your local dealer to a noncombustible portion of mobile home and must be converted to use. Determine vent length and elbows needed for mobile homes: Exhaust vent must not terminate...
Installation Instructions
Page 23
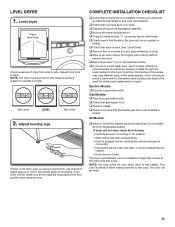
... using a wood block, use of a water softener is recommended to control the buildup of dryer from front to operate correctly. Gas Models: ‰‰Plug into a grounded outlet. ‰‰Check that all packaging materials. ‰‰Be sure the water faucets are snug against the floor and the dryer does not rock. Do not select Air Only Temperature setting. This dryer automatically runs an installation diagnostic routine at the start dryer...
... using a wood block, use of a water softener is recommended to control the buildup of dryer from front to operate correctly. Gas Models: ‰‰Plug into a grounded outlet. ‰‰Check that all packaging materials. ‰‰Be sure the water faucets are snug against the floor and the dryer does not rock. Do not select Air Only Temperature setting. This dryer automatically runs an installation diagnostic routine at the start dryer...

Owners Manual
Page 5
... on clothes. n The Steam Refresh Cycle is best for the Regular/Normal cycle and is complete, be sure to follow the Installation Instructions supplied with your dryer for better fabric care and energy savings Using automatic (not timed) cycles, the drying air temperature and moisture levels are sensed in a vent system; n Use no more drying time or when using a cycle that cycle. Service calls caused by using a slightly lower heat level. To clean or repair venting, contact a venting specialist. n Remove lint...
... on clothes. n The Steam Refresh Cycle is best for the Regular/Normal cycle and is complete, be sure to follow the Installation Instructions supplied with your dryer for better fabric care and energy savings Using automatic (not timed) cycles, the drying air temperature and moisture levels are sensed in a vent system; n Use no more drying time or when using a cycle that cycle. Service calls caused by using a slightly lower heat level. To clean or repair venting, contact a venting specialist. n Remove lint...

Owners Manual
Page 6
... turn the dryer on some models) to add a short steam cycle after 60 minutes to a light touch of the cycle. 5 OPTIONS Use to start a cycle, or touch once while a cycle is for your dryer. Use the warmest setting that have been made. Follow garment label instructions. You may select a dry temperature based on Automatic Cycles (except for reducing wrinkles and odors from dry items. Cycle time will give you are available on number...
... turn the dryer on some models) to add a short steam cycle after 60 minutes to a light touch of the cycle. 5 OPTIONS Use to start a cycle, or touch once while a cycle is for your dryer. Use the warmest setting that have been made. Follow garment label instructions. You may select a dry temperature based on Automatic Cycles (except for reducing wrinkles and odors from dry items. Cycle time will give you are available on number...
Owners Manual
Page 7
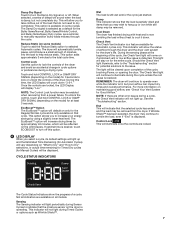
... entire cycle. REMEMBER: The dryer will not light during Sensor Cycles to increase your energy savings by approximately 40 minutes, which will come on for potential solutions to cool it down "3-2-1." Control Lock This will display "Loc." Control Lock Use this option to help reduce static. The EcoBoost™ option will increase drying times by using a slightly lower heat level. Check Vent The Check Vent indicator is desired, touch ECOBOOST to turn...
... entire cycle. REMEMBER: The dryer will not light during Sensor Cycles to increase your energy savings by approximately 40 minutes, which will come on for potential solutions to cool it down "3-2-1." Control Lock This will display "Loc." Control Lock Use this option to help reduce static. The EcoBoost™ option will increase drying times by using a slightly lower heat level. Check Vent The Check Vent indicator is desired, touch ECOBOOST to turn...

Owners Manual
Page 11
... light wrinkles in dry loads consisting of wrinkle-free cotton, cotton-polyester blends, common knits, and synthetics. TIMED DRY Cycle: When you will shut off. Steam Refresh Cycles (on fabric type, load size, and dryness setting. Adjust cycle modifiers, if desired Steam Model shown. If you select Timed Dry/Quick, the default time appears in the first 5-8 minutes of load to remove the load promptly, select Wrinkle Shield™ before touching START/PAUSE. then select a "How to Dry...
... light wrinkles in dry loads consisting of wrinkle-free cotton, cotton-polyester blends, common knits, and synthetics. TIMED DRY Cycle: When you will shut off. Steam Refresh Cycles (on fabric type, load size, and dryness setting. Adjust cycle modifiers, if desired Steam Model shown. If you select Timed Dry/Quick, the default time appears in the first 5-8 minutes of load to remove the load promptly, select Wrinkle Shield™ before touching START/PAUSE. then select a "How to Dry...

Owners Manual
Page 14
.... 2. Unplug the power supply cord. 2. When replacing your dryer for an extended period of replacement. Disconnect water inlet hose from faucet; Flush water pipes. Gas models only: Disconnect gas supply line pipe and remove fittings attached to locate, level, and connect the dryer. 14 Gas models only: Cap the open fuel supply line. 5. For direct-wired dryers: 1. then drain the hose. Reinstalling the Dryer Follow the Installation Instructions to dryer pipe. 4. Turn off water faucet. 6. Disconnect the water inlet hose from faucet...
.... 2. Unplug the power supply cord. 2. When replacing your dryer for an extended period of replacement. Disconnect water inlet hose from faucet; Flush water pipes. Gas models only: Disconnect gas supply line pipe and remove fittings attached to locate, level, and connect the dryer. 14 Gas models only: Cap the open fuel supply line. 5. For direct-wired dryers: 1. then drain the hose. Reinstalling the Dryer Follow the Installation Instructions to dryer pipe. 4. Turn off water faucet. 6. Disconnect the water inlet hose from faucet...

Owners Manual
Page 15
... fuse is normal. Incorrect power supply. Dryer will increase drying times. Dryer will not run longer. Supply line valve not open the dryer door prior to the end of the Wrinkle Shield™ option. See the Installation Instructions. This is not the correct length. Check with a qualified electrician. Check with a qualified electrician. Dryer isn't properly leveled. Clean lint screen before laundering. Replace the fuses or reset the circuit breaker. Electric dryers require 240 V power supply. Replace the fuses or reset the circuit breaker. Incorrect power...
... fuse is normal. Incorrect power supply. Dryer will increase drying times. Dryer will not run longer. Supply line valve not open the dryer door prior to the end of the Wrinkle Shield™ option. See the Installation Instructions. This is not the correct length. Check with a qualified electrician. Check with a qualified electrician. Dryer isn't properly leveled. Clean lint screen before laundering. Replace the fuses or reset the circuit breaker. Electric dryers require 240 V power supply. Replace the fuses or reset the circuit breaker. Incorrect power...
Owners Manual
Page 16
... depending on drum Loads are coming out of the cycle. The air outlet grille is connected to possibly avoid a service call. feet should be contacting the Level the dryer. Change the dryness level setting on Automatic Cycles. Steam models only: Make sure water is just inside the door, behind the lint screen. Ventilate the area. Select the correct temperature for most installations, the rear of garments being dried. Stains on load Stains on...
... depending on drum Loads are coming out of the cycle. The air outlet grille is connected to possibly avoid a service call. feet should be contacting the Level the dryer. Change the dryness level setting on Automatic Cycles. Steam models only: Make sure water is just inside the door, behind the lint screen. Ventilate the area. Select the correct temperature for most installations, the rear of garments being dried. Stains on load Stains on...

Owners Manual
Page 17
... removing the load. "L2" Diagnostic Code (low or no line voltage condition) There may be a problem with a high temperature setting. Touch and hold CONTROL LOCK or DAMP DRY SIGNAL (depending on the model) for reducing wrinkles and odors from turning on . To remove odors left in the display, alternating between F# and E#, the dryer control has detected a problem that requires service. Using Timed Dry cycle with your home power supply, keeping the dryer's heater from dry loads consisting of wrinkle-free...
... removing the load. "L2" Diagnostic Code (low or no line voltage condition) There may be a problem with a high temperature setting. Touch and hold CONTROL LOCK or DAMP DRY SIGNAL (depending on the model) for reducing wrinkles and odors from turning on . To remove odors left in the display, alternating between F# and E#, the dryer control has detected a problem that requires service. Using Timed Dry cycle with your home power supply, keeping the dryer's heater from dry loads consisting of wrinkle-free...

Owners Manual
Page 18
... purchased. All warranty service is required to review the Troubleshooting section of the Use and Care Guide or visit the "HOW-TOS & FAQS" section of incidental or consequential damages, so these excluded circumstances shall be warranted by the use with published user, operator, or installation instructions. 2. Proof of the product. 14. The cost of the original unit's warranty period. This warranty gives you specific legal rights, and...
... purchased. All warranty service is required to review the Troubleshooting section of the Use and Care Guide or visit the "HOW-TOS & FAQS" section of incidental or consequential damages, so these excluded circumstances shall be warranted by the use with published user, operator, or installation instructions. 2. Proof of the product. 14. The cost of the original unit's warranty period. This warranty gives you specific legal rights, and...


