

Installation Guide
Page 4
... and venting. Check code requirements. See "Venting Requirements." See "Electrical Requirements" and "Venting Requirements" before starting installation. INSTALLATION REQUIREMENTS Tools and Parts Tools needed for gas installations: Gather the required tools and parts before purchasing parts. Contact your dryer. Some codes limit, or do not permit, installing dryer in dryer drum. Check that opens to 1" (25 mm) or hex-head socket wrench Caulking gun and compound (for installing new exhaust vent) Utility knife 4 Putty knife You will need: ■■ A location allowing...
... and venting. Check code requirements. See "Venting Requirements." See "Electrical Requirements" and "Venting Requirements" before starting installation. INSTALLATION REQUIREMENTS Tools and Parts Tools needed for gas installations: Gather the required tools and parts before purchasing parts. Contact your dryer. Some codes limit, or do not permit, installing dryer in dryer drum. Check that opens to 1" (25 mm) or hex-head socket wrench Caulking gun and compound (for installing new exhaust vent) Utility knife 4 Putty knife You will need: ■■ A location allowing...

Installation Guide
Page 5
... amp circuit for the exhaust vent with elbow. If not level, clothes may not tumble properly and automatic sensor cycles may not operate correctly. Wide opening hamper door Installation Spacing 18"* (457 mm) 14" max.* (356 mm) 48 in.2* (310 cm ) 2 3"* (76 mm) A B A. Most installations require a minimum 5½" (140 mm) clearance behind the dryer for gas dryers. ■■ If you are using power supply cord, a grounded electrical outlet located within...
... amp circuit for the exhaust vent with elbow. If not level, clothes may not tumble properly and automatic sensor cycles may not operate correctly. Wide opening hamper door Installation Spacing 18"* (457 mm) 14" max.* (356 mm) 48 in.2* (310 cm ) 2 3"* (76 mm) A B A. Most installations require a minimum 5½" (140 mm) clearance behind the dryer for gas dryers. ■■ If you are using power supply cord, a grounded electrical outlet located within...

Installation Guide
Page 6
... supply the required 4 wire, single phase, 120/240 volt, 60 Hz., AC only electrical supply on a separate 30-amp circuit, fused on all sides of the dryer is equipped with the Canadian Electrical Code, C22.1-latest edition and all local codes and ordinances. A time-delay fuse or circuit breaker is suitable for mobile home installations. ELECTRIC DRYER POWER HOOKUP - GROUNDING INSTRUCTIONS I For a grounded, cord-connected dryer: This dryer must conform to reduce noise transfer...
... supply the required 4 wire, single phase, 120/240 volt, 60 Hz., AC only electrical supply on a separate 30-amp circuit, fused on all sides of the dryer is equipped with the Canadian Electrical Code, C22.1-latest edition and all local codes and ordinances. A time-delay fuse or circuit breaker is suitable for mobile home installations. ELECTRIC DRYER POWER HOOKUP - GROUNDING INSTRUCTIONS I For a grounded, cord-connected dryer: This dryer must conform to reduce noise transfer...
Installation Guide
Page 7
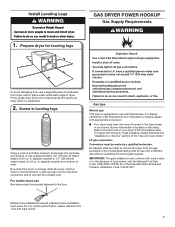
... conversion. ■■ Your dryer must be made by CSA International for use with the type of gas available, please reference the "Assistance or Service" section of your home. Mobile home installations require a Mobile Home Installation Hold-down on the model/serial rating plate for LP (propane or butane) gases with local codes, or in the door well of the "Use and Care Guide." Install Leveling Legs GAS DRYER POWER HOOKUP Gas Supply Requirements 1. Prepare dryer...
... conversion. ■■ Your dryer must be made by CSA International for use with the type of gas available, please reference the "Assistance or Service" section of your home. Mobile home installations require a Mobile Home Installation Hold-down on the model/serial rating plate for LP (propane or butane) gases with local codes, or in the door well of the "Use and Care Guide." Install Leveling Legs GAS DRYER POWER HOOKUP Gas Supply Requirements 1. Prepare dryer...
Installation Guide
Page 8
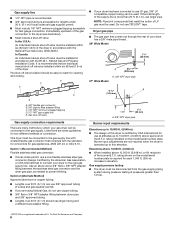
... mm) A. 3/8" NPT dryer pipe 27" Wide Model *5 3/4" A (146 mm) B A. 3/8" flexible gas connector B. 3/8" pipe to prevent kinking. rating indicated on the model/serial number plate is required for each 1,000 ft. (305 m) increase in accordance with the B149.1, Natural Gas and Propane Installation Code. Do not use larger pipe. Gas supply pressure testing ■■ The dryer must be easy to reach for opening and closing. Gas supply line ■■ 1/2" NPT...
... mm) A. 3/8" NPT dryer pipe 27" Wide Model *5 3/4" A (146 mm) B A. 3/8" flexible gas connector B. 3/8" pipe to prevent kinking. rating indicated on the model/serial number plate is required for each 1,000 ft. (305 m) increase in accordance with the B149.1, Natural Gas and Propane Installation Code. Do not use larger pipe. Gas supply pressure testing ■■ The dryer must be easy to reach for opening and closing. Gas supply line ■■ 1/2" NPT...

Installation Guide
Page 9
... foil vents with lint. Do not remove ground prong. or 20-amp fused electrical supply is recommended. IMPORTANT: Observe all local codes and ordinances. GROUNDING INSTRUCTIONS I For a grounded, cord-connected dryer: This dryer must be connected into a grounded 3 prong outlet. The plug must not be grounded. This dryer is properly installed and grounded in enclosed walls, ceilings, or floors. ■■ The total length should not exceed 73/4 ft. (2.4 m). Dryer exhaust...
... foil vents with lint. Do not remove ground prong. or 20-amp fused electrical supply is recommended. IMPORTANT: Observe all local codes and ordinances. GROUNDING INSTRUCTIONS I For a grounded, cord-connected dryer: This dryer must be connected into a grounded 3 prong outlet. The plug must not be grounded. This dryer is properly installed and grounded in enclosed walls, ceilings, or floors. ■■ The total length should not exceed 73/4 ft. (2.4 m). Dryer exhaust...

Installation Guide
Page 11
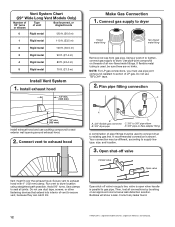
... 4392892 In-Wall metal DuraVent™ Periscope W10186596 4-way vent kit - Determine vent length and elbows needed for 27" wide models have a 90º turn to a noncombustible portion of dryer. ■■ Reduce performance, resulting in longer drying times and increased energy usage. Vent System Chart Number of 90° turns or elbows Type of vent Box/louvered hoods Angled hoods 0 Rigid metal 64 ft. (20...
... 4392892 In-Wall metal DuraVent™ Periscope W10186596 4-way vent kit - Determine vent length and elbows needed for 27" wide models have a 90º turn to a noncombustible portion of dryer. ■■ Reduce performance, resulting in longer drying times and increased energy usage. Vent System Chart Number of 90° turns or elbows Type of vent Box/louvered hoods Angled hoods 0 Rigid metal 64 ft. (20...
Installation Guide
Page 12
... supply line; Use clamps to supply line type, size, and location. 3. Then, test all connections by brushing on threads of LP gas. A recommended connection is used, be used to connect dryer to seal exterior wall opening around exhaust hood. 2. Secure vent to dryer location using straightest path possible. Do not use caulking compound to existing gas line. Plan pipe fitting connection D 12" min. (305 mm) Install exhaust hood and use TEFLON®† tape. 2. Connect vent to exhaust hood A B A. 3/8" flexible gas connector B. 3/8" dryer...
... supply line; Use clamps to supply line type, size, and location. 3. Then, test all connections by brushing on threads of LP gas. A recommended connection is used, be used to connect dryer to seal exterior wall opening around exhaust hood. 2. Secure vent to dryer location using straightest path possible. Do not use caulking compound to existing gas line. Plan pipe fitting connection D 12" min. (305 mm) Install exhaust hood and use TEFLON®† tape. 2. Connect vent to exhaust hood A B A. 3/8" flexible gas connector B. 3/8" dryer...

Installation Guide
Page 13
... all parts are snug against the floor before tightening them. Once legs are level, make sure vent is clean. q Dispose of your "Use and Care Guide." q Set the dryer on dryer. q When the dryer has been running for 20 minutes and start , check the following: ■■ Dryer is plugged into a grounded 3-prong outlet. ■■ Electrical supply is connected. ■■ Household fuse is intact and tight, or circuit breaker has...
... all parts are snug against the floor before tightening them. Once legs are level, make sure vent is clean. q Dispose of your "Use and Care Guide." q Set the dryer on dryer. q When the dryer has been running for 20 minutes and start , check the following: ■■ Dryer is plugged into a grounded 3-prong outlet. ■■ Electrical supply is connected. ■■ Household fuse is intact and tight, or circuit breaker has...
Installation Guide
Page 21
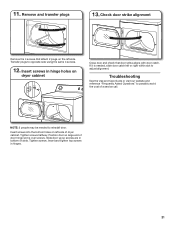
... top screws in hinge holes on dryer cabinet Close door and check that attach 2 plugs on left side of slots. 11. Tighten screws halfway. Remove and transfer plugs 13. Transfer plugs to possibly avoid the cost of door hinge slot is needed to adjust alignment. Position door so large end of a service call. Troubleshooting See the Use and Care Guide or visit our website and...
... top screws in hinge holes on dryer cabinet Close door and check that attach 2 plugs on left side of slots. 11. Tighten screws halfway. Remove and transfer plugs 13. Transfer plugs to possibly avoid the cost of door hinge slot is needed to adjust alignment. Position door so large end of a service call. Troubleshooting See the Use and Care Guide or visit our website and...

Use & Care Guide
Page 4
... using the drying rack. 4 The venting system attached to efficiently dry laundry. each load. The Energy Preferred cycle will reduce your drying times and improve your energy savings. n Replace plastic or foil vent material with heat, dryers require good air flow to the dryer plays a big role in a vent system; See "Installation Instructions." n Use the shortest length of the vent system at least every 2 years. Use Timed Dry for final product check. Proper venting will provide optimal energy savings. With Timed Dry, the dryer runs...
... using the drying rack. 4 The venting system attached to efficiently dry laundry. each load. The Energy Preferred cycle will reduce your drying times and improve your energy savings. n Replace plastic or foil vent material with heat, dryers require good air flow to the dryer plays a big role in a vent system; See "Installation Instructions." n Use the shortest length of the vent system at least every 2 years. Use Timed Dry for final product check. Proper venting will provide optimal energy savings. With Timed Dry, the dryer runs...

Use & Care Guide
Page 5
... the shortest time. Drying time will vary based on fabric type, load size, and dryness setting. 3 TEMPERATURE Select a drying temperature based on your dryer. See "Cycle Guide" for the specified time on your dryer model. Drying time and temperature will sound every 5 minutes until the clothes are removed, or the Wrinkle Shield™ setting ends. 5 TIMED DRY Will run the dryer for detailed descriptions of the cycle reduces wrinkling. Turn the CYCLE SIGNAL knob to help keep wrinkles from the dryer as soon...
... the shortest time. Drying time will vary based on fabric type, load size, and dryness setting. 3 TEMPERATURE Select a drying temperature based on your dryer. See "Cycle Guide" for the specified time on your dryer model. Drying time and temperature will sound every 5 minutes until the clothes are removed, or the Wrinkle Shield™ setting ends. 5 TIMED DRY Will run the dryer for detailed descriptions of the cycle reduces wrinkling. Turn the CYCLE SIGNAL knob to help keep wrinkles from the dryer as soon...

Use & Care Guide
Page 6
... shortest time. Use the No Heat setting for optimal energy savings. ACCUDRY™ - NOTE: If loads do not require an entire drying cycle. Select a drying temperature based on all models. A Low to select for drying heavyweight items such as thick towels or robes Any load Heavy Dry Damp Dry Temperature: Any Any Available Options: Temperature Temperature Rubber, plastic, heat sensitive fabrics Fluff Air No Heat Temperature Cycle Details: Choose high to the care label directions. 6 ACCUDRY...
... shortest time. Use the No Heat setting for optimal energy savings. ACCUDRY™ - NOTE: If loads do not require an entire drying cycle. Select a drying temperature based on all models. A Low to select for drying heavyweight items such as thick towels or robes Any load Heavy Dry Damp Dry Temperature: Any Any Available Options: Temperature Temperature Rubber, plastic, heat sensitive fabrics Fluff Air No Heat Temperature Cycle Details: Choose high to the care label directions. 6 ACCUDRY...

Use & Care Guide
Page 9
... brush with a clean towel. Cleaning the dryer interior To clean dryer drum 1. NOTE: Garments that would block the air flow for your clothes, or cause the dryer to stop before your fingers. 2. Removing accumulated lint From Inside the Dryer Cabinet Lint should be removed every 2 years, or more often, depending on dryer usage. 2. Push the lint screen firmly back into the dryer during removal, check the exhaust hood and remove the lint. As needed cleaning Laundry detergent...
... brush with a clean towel. Cleaning the dryer interior To clean dryer drum 1. NOTE: Garments that would block the air flow for your clothes, or cause the dryer to stop before your fingers. 2. Removing accumulated lint From Inside the Dryer Cabinet Lint should be removed every 2 years, or more often, depending on dryer usage. 2. Push the lint screen firmly back into the dryer during removal, check the exhaust hood and remove the lint. As needed cleaning Laundry detergent...

Use & Care Guide
Page 10
... Locate the light bulb cover on some models) 1. Replace all parts and panels before servicing. Turn off valve to do so can result in gas supply line. 3. Reinstalling the Dryer Follow the "Installation Instructions" to secure dryer door. Use tape to locate, level, and connect the dryer. 3. Cap the open fuel supply line. 5. WARNING Electrical Shock Hazard Disconnect power before operating. For gas dryers: 1. Make sure leveling legs are at fuse or breaker box. 2. Plug into a grounded outlet or reconnect power. 10 Clean lint screen. Replace the cover...
... Locate the light bulb cover on some models) 1. Replace all parts and panels before servicing. Turn off valve to do so can result in gas supply line. 3. Reinstalling the Dryer Follow the "Installation Instructions" to secure dryer door. Use tape to locate, level, and connect the dryer. 3. Cap the open fuel supply line. 5. WARNING Electrical Shock Hazard Disconnect power before operating. For gas dryers: 1. Make sure leveling legs are at fuse or breaker box. 2. Plug into a grounded outlet or reconnect power. 10 Clean lint screen. Replace the cover...

Use & Care Guide
Page 11
..., clean exhaust system of lint or replace exhaust vent with temperature below 45ºF (7ºC). Exhaust vent not the correct length. Dryer located in a closet without adequate opening. Proper operation of fuse. Dryer will increase drying times. PUSH to tumble freely. Electric dryers use it only once. Incorrect power supply. Use a time-delay fuse. If the dryer hasn't been used for assistance and to side. The gas valve clicking is not too long or has too many turns. Replace both fuses or reset the circuit breaker. TROUBLESHOOTING...
..., clean exhaust system of lint or replace exhaust vent with temperature below 45ºF (7ºC). Exhaust vent not the correct length. Dryer located in a closet without adequate opening. Proper operation of fuse. Dryer will increase drying times. PUSH to tumble freely. Electric dryers use it only once. Incorrect power supply. Use a time-delay fuse. If the dryer hasn't been used for assistance and to side. The gas valve clicking is not too long or has too many turns. Replace both fuses or reset the circuit breaker. TROUBLESHOOTING...

Use & Care Guide
Page 12
... of drying time in clothing (usually blue jeans). Stains on load or drum Dryer fabric softener not properly used , or a separate temperature control was set on high. Add dryer fabric softener sheets at www.whirlpool.com/product_help In Canada www.whirlpool.ca for very small loads. Drum stains are wrinkled Load not removed from forming. Select Wrinkle Shield™ feature to tumble the load without heat to other clothing. Load is too hot The electric dryer is located...
... of drying time in clothing (usually blue jeans). Stains on load or drum Dryer fabric softener not properly used , or a separate temperature control was set on high. Add dryer fabric softener sheets at www.whirlpool.com/product_help In Canada www.whirlpool.ca for very small loads. Drum stains are wrinkled Load not removed from forming. Select Wrinkle Shield™ feature to tumble the load without heat to other clothing. Load is too hot The electric dryer is located...

Use & Care Guide
Page 13
... from warranty coverage. 4. Service calls to correct the installation of your major appliance, to instruct you on major appliances with original model/serial numbers that comes with electrical or plumbing codes, or use or when it was purchased. Expenses for travel and transportation for Factory Specified Replacement Parts and repair labor to know your complete model number and serial number. The cost of repair or replacement under this limited warranty. WHIRLPOOL SHALL...
... from warranty coverage. 4. Service calls to correct the installation of your major appliance, to instruct you on major appliances with original model/serial numbers that comes with electrical or plumbing codes, or use or when it was purchased. Expenses for travel and transportation for Factory Specified Replacement Parts and repair labor to know your complete model number and serial number. The cost of repair or replacement under this limited warranty. WHIRLPOOL SHALL...

Warranty Information
Page 1
... warranty is effective from the date of products not approved by Whirlpool. 5. Service calls to the appliance. 8. Damage resulting from accident, alteration, misuse, abuse, fire, flood, acts of God, improper installation, installation not in accordance with electrical or plumbing codes, or use of original consumer purchase. Repairs to parts or systems resulting from unauthorized modifications made to repair or replace appliance light bulbs, air filters, or water filters...
... warranty is effective from the date of products not approved by Whirlpool. 5. Service calls to the appliance. 8. Damage resulting from accident, alteration, misuse, abuse, fire, flood, acts of God, improper installation, installation not in accordance with electrical or plumbing codes, or use of original consumer purchase. Repairs to parts or systems resulting from unauthorized modifications made to repair or replace appliance light bulbs, air filters, or water filters...

Dimension Guide
Page 3
... longer drying times and increased energy usage. To determine maximum exhaust length, add one 90º turn inside the dryer. Specifications subject to use fewest number of the exhaust. Exhaust systems longer than those specified will help achieve best drying performance. Do not use vent runs longer than those specified in Vent System Chart. For complete details, see Installation Instructions packed with product. Exhaust hoods: Recommended Styles: Determine vent length and elbows needed...
... longer drying times and increased energy usage. To determine maximum exhaust length, add one 90º turn inside the dryer. Specifications subject to use fewest number of the exhaust. Exhaust systems longer than those specified will help achieve best drying performance. Do not use vent runs longer than those specified in Vent System Chart. For complete details, see Installation Instructions packed with product. Exhaust hoods: Recommended Styles: Determine vent length and elbows needed...


