

Use and Care Guide
Page 3
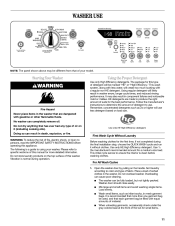
... or hurt you and others are not followed. 3 Always read and obey all safety messages. This symbol alerts you to reduce the chance of others . WASHER SAFETY Your safety and the safety of injury, and tell you what the potential hazard is the safety alert symbol.
... or hurt you and others are not followed. 3 Always read and obey all safety messages. This symbol alerts you to reduce the chance of others . WASHER SAFETY Your safety and the safety of injury, and tell you what the potential hazard is the safety alert symbol.

Use and Care Guide
Page 4
These pedestals will add to the total height of the washer for a total height of different heights separately for connecting the water inlet hoses INSTALLATION REQUIREMENTS Tools and Parts Gather the required tools and parts before starting installation. You may select a 10" (254 mm) or a 15.5" (394 mm) pedestal. The parts supplied are in the washer drum. Tools needed for this washer. Options Pedestal You have the option of purchasing pedestals of approximately 48" (1219 mm) or 53.5" (1359 mm), respectively.
These pedestals will add to the total height of the washer for a total height of different heights separately for connecting the water inlet hoses INSTALLATION REQUIREMENTS Tools and Parts Gather the required tools and parts before starting installation. You may select a 10" (254 mm) or a 15.5" (394 mm) pedestal. The parts supplied are in the washer drum. Tools needed for this washer. Options Pedestal You have the option of purchasing pedestals of approximately 48" (1219 mm) or 53.5" (1359 mm), respectively.

Use and Care Guide
Page 5
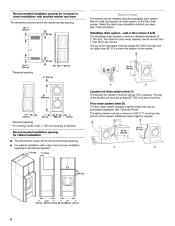
Proper installation is your washer improves performance and minimizes noise and possible washer "walk." Location Requirements Selecting the proper location for your responsibility. Your washer can be considered. See "Drain System." Companion appliance location requirements should also be installed under a custom counter, or in a basement, laundry room, closet, or recessed area. You will need
Proper installation is your washer improves performance and minimizes noise and possible washer "walk." Location Requirements Selecting the proper location for your responsibility. Your washer can be considered. See "Drain System." Companion appliance location requirements should also be installed under a custom counter, or in a basement, laundry room, closet, or recessed area. You will need
Use and Care Guide
Page 6
Standpipe drain system - The top of the washer. Additional hoses might be purchased separately. See "Tools and Parts." Floor drain system (view D) The floor drain...need. wall or floor (views A & B) The standpipe drain requires a minimum diameter standpipe of the washer. 3"* (76 mm) 24 in .2 * (310 cm2) 3"* (76 mm) Drain System The washer can be at least 30" (762 mm) high and no less than 17 gal. (64 L) per..." (762 mm) above the floor. Recommended installation spacing for recessed or closet installation, with stacked washer and dryer The dimensions shown are for cabinet installation
Standpipe drain system - The top of the washer. Additional hoses might be purchased separately. See "Tools and Parts." Floor drain system (view D) The floor drain...need. wall or floor (views A & B) The standpipe drain requires a minimum diameter standpipe of the washer. 3"* (76 mm) 24 in .2 * (310 cm2) 3"* (76 mm) Drain System The washer can be at least 30" (762 mm) high and no less than 17 gal. (64 L) per..." (762 mm) above the floor. Recommended installation spacing for recessed or closet installation, with stacked washer and dryer The dimensions shown are for cabinet installation
Use and Care Guide
Page 8
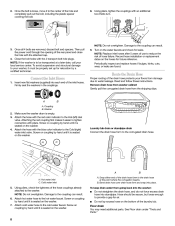
...the red coupling first makes it is seated on coupling by hand until it to the Cold (right) water inlet valve. Screw on the washer. Cold water inlet B A. Damage to tighten connection with pliers. Periodically inspect and replace hoses if bulges, kinks, cuts, wear, or... leaks are removed, discard bolt and spacers. NOTE: Do not overtighten. Record hose installation or replacement dates on the washer. 4. Close the bolt holes with an additional two-thirds turn. H C A H. To keep drain water from the shipping clips. Using pliers...
...the red coupling first makes it is seated on coupling by hand until it to the Cold (right) water inlet valve. Screw on the washer. Cold water inlet B A. Damage to tighten connection with pliers. Periodically inspect and replace hoses if bulges, kinks, cuts, wear, or... leaks are removed, discard bolt and spacers. NOTE: Do not overtighten. Record hose installation or replacement dates on the washer. 4. Close the bolt holes with an additional two-thirds turn. H C A H. To keep drain water from the shipping clips. Using pliers...
Use and Care Guide
Page 9
... an extra part, go back through the steps to see illustration C), put the hooked end of the washer, first side to side, then front to back. If there is perfectly level (use a 17 mm open-end wrench to side, or diagonally when pushed on the floor.... standpipe. Tightly wrap the beaded strap around faucets and inlet hoses. Electrical Shock Hazard Level the Washer Properly leveling your washer, make sure there are now installed. If the washer is not level, first prop the front with the beaded strap provided. (See illustrations A and B.) Complete Installation 1. Repeat this step ...
... an extra part, go back through the steps to see illustration C), put the hooked end of the washer, first side to side, then front to back. If there is perfectly level (use a 17 mm open-end wrench to side, or diagonally when pushed on the floor.... standpipe. Tightly wrap the beaded strap around faucets and inlet hoses. Electrical Shock Hazard Level the Washer Properly leveling your washer, make sure there are now installed. If the washer is not level, first prop the front with the beaded strap provided. (See illustrations A and B.) Complete Installation 1. Repeat this step ...
Use and Care Guide
Page 10
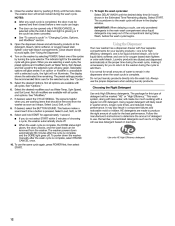
... When this cycle will glow for the first 4-8 minutes. This washer allows a 4-8 minute period in steaming unit which means fewer loads. Auto Water Level This washer automatically adjusts water level for every wash load size. The Efficient Detergent System ensures that no need to come back... (such as a king-sized bedspread. High-Efficiency Wash System Your new front-loading, high-efficiency washer saves time with Steam This cycle uses steam to raise the temperature of the washer and makes the washer self-cleaning, flushing the machine's interior free of dirt and other garments ...
... When this cycle will glow for the first 4-8 minutes. This washer allows a 4-8 minute period in steaming unit which means fewer loads. Auto Water Level This washer automatically adjusts water level for every wash load size. The Efficient Detergent System ensures that no need to come back... (such as a king-sized bedspread. High-Efficiency Wash System Your new front-loading, high-efficiency washer saves time with Steam This cycle uses steam to raise the temperature of the washer and makes the washer self-cleaning, flushing the machine's interior free of dirt and other garments ...
Use and Care Guide
Page 11
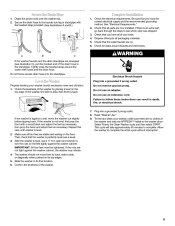
... is clean before operating this manual for more detailed information. For All Wash Cycles 1. Open the washer door by pulling on the top surface of this type of fabric. Place a load of fire, electric shock, or injury to persons, read the IMPORTANT SAFETY INSTRUCTIONS before washing clothes.... shown above may also result in component failures and noticeable mold or mildew. The package for a medium-size load. Before washing clothes for the best performance. Do not overload washer. This wash system, along with less water, will be different from that of suds for the first time...
... is clean before operating this manual for more detailed information. For All Wash Cycles 1. Open the washer door by pulling on the top surface of this type of fabric. Place a load of fire, electric shock, or injury to persons, read the IMPORTANT SAFETY INSTRUCTIONS before washing clothes.... shown above may also result in component failures and noticeable mold or mildew. The package for a medium-size load. Before washing clothes for the best performance. Do not overload washer. This wash system, along with less water, will be different from that of suds for the first time...
Use and Care Guide
Page 12
The washer door will remain locked during the wash cycle. Close the washer door by pushing it firmly until the lock clicks. NOTES: 2.
The washer door will remain locked during the wash cycle. Close the washer door by pushing it firmly until the lock clicks. NOTES: 2.
Use and Care Guide
Page 14
... and towels, and there is no carryover of bacteria between loads after the cycle starts, or when the washer is complete, and then the washer shuts off. NOTE: If the water level or the temperature is too high, the washer will drain automatically before START is complete, the DONE status ...begin the drain. Press PAUSE/CANCEL twice. 2. Press START (for approximately 1 second) to the load. Controls Lock/Unlock The Controls Lock avoids unintended use the control lock feature to restart the washer at any time, press PAUSE/CANCEL. 2. To lock the controls Press and hold CONTROLS LOCK/UNLOCK...
... and towels, and there is no carryover of bacteria between loads after the cycle starts, or when the washer is complete, and then the washer shuts off. NOTE: If the water level or the temperature is too high, the washer will drain automatically before START is complete, the DONE status ...begin the drain. Press PAUSE/CANCEL twice. 2. Press START (for approximately 1 second) to the load. Controls Lock/Unlock The Controls Lock avoids unintended use the control lock feature to restart the washer at any time, press PAUSE/CANCEL. 2. To lock the controls Press and hold CONTROLS LOCK/UNLOCK...

Use and Care Guide
Page 15
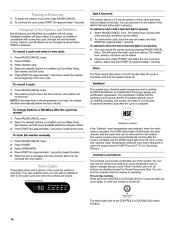
... provides optimal rinse performance to the desired cycle. The cycle time will be selected by pressing the CLEAN WASHER RESET button. Clean Washer Reminder The Clean Washer Reminder light illuminates to remind you to shorten drying time. Hot washing temperatures assure optimal bleach activity. When... desired setting glows green. Hand Washables Quick Wash (2-3 items) Clean Washer Soak Rinse/Spin Drain/Spin Cycles Cycles can be extended if oversudsing occurs or the load is updated. See chart. While the washer is sensing, the estimated time will flash and the Sensing status light...
... provides optimal rinse performance to the desired cycle. The cycle time will be selected by pressing the CLEAN WASHER RESET button. Clean Washer Reminder The Clean Washer Reminder light illuminates to remind you to shorten drying time. Hot washing temperatures assure optimal bleach activity. When... desired setting glows green. Hand Washables Quick Wash (2-3 items) Clean Washer Soak Rinse/Spin Drain/Spin Cycles Cycles can be extended if oversudsing occurs or the load is updated. See chart. While the washer is sensing, the estimated time will flash and the Sensing status light...
Use and Care Guide
Page 16
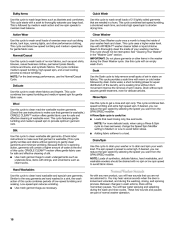
..., tank tops, running tights, and other items in the "Washer Care" section. Clean Washer Use the Clean Washer cycle once a month to thoroughly saturate your washer fresh and clean. This cycle starts with AFFRESH™ washer cleaner tablet or liquid chlorine bleach to wash small loads of your washing machine. Quick Wash Use this cycle to...
..., tank tops, running tights, and other items in the "Washer Care" section. Clean Washer Use the Clean Washer cycle once a month to thoroughly saturate your washer fresh and clean. This cycle starts with AFFRESH™ washer cleaner tablet or liquid chlorine bleach to wash small loads of your washing machine. Quick Wash Use this cycle to...

Use and Care Guide
Page 17
... by adding options to your cycle selections. Selecting this option when using the "Oxi / Color-safe bleach" section of detergent or bleach residue from the washer as soon as the first rinse. Oxi Dispenser Use this option will glow amber. Options You can add or change an option after starting a cycle...
... by adding options to your cycle selections. Selecting this option when using the "Oxi / Color-safe bleach" section of detergent or bleach residue from the washer as soon as the first rinse. Oxi Dispenser Use this option will glow amber. Options You can add or change an option after starting a cycle...
Use and Care Guide
Page 20
d) Wipe down area thoroughly with a dry cloth and let the washer interior air dry with door open. IMPORTANT:
d) Wipe down area thoroughly with a dry cloth and let the washer interior air dry with door open. IMPORTANT:
Use and Care Guide
Page 21
... Instructions" to faucets. www.whirlpool.com/help In Canada www.whirlpool.ca TROUBLESHOOTING First try the solutions suggested here or visit our website and reference FAQs (Frequently Asked Questions) to your washer, it must be transported in washer or reconnect power. If washer will be properly set up for a medium-size load, to the rear panel...
... Instructions" to faucets. www.whirlpool.com/help In Canada www.whirlpool.ca TROUBLESHOOTING First try the solutions suggested here or visit our website and reference FAQs (Frequently Asked Questions) to your washer, it must be transported in washer or reconnect power. If washer will be properly set up for a medium-size load, to the rear panel...


