
Use and Care Guide
Page 3
... provided many important safety messages in this manual and on your appliance. You can be killed or seriously injured if you don't immediately follow instructions. WASHER SAFETY Your safety and the safety of injury, and tell you and others are not followed. 3
... provided many important safety messages in this manual and on your appliance. You can be killed or seriously injured if you don't immediately follow instructions. WASHER SAFETY Your safety and the safety of injury, and tell you and others are not followed. 3

Use and Care Guide
Page 4
The parts supplied are in the washer drum. Tools needed for a total height of approximately 48" (1219 mm) or 53.5" (1359 mm), respectively. You may select a 10" (254 mm) or a 15.5" (394 mm) pedestal. These pedestals will add to the total height of different heights separately for this washer. Options Pedestal You have the option of purchasing pedestals of the washer for connecting the water inlet hoses INSTALLATION REQUIREMENTS Tools and Parts Gather the required tools and parts before starting installation.
The parts supplied are in the washer drum. Tools needed for a total height of approximately 48" (1219 mm) or 53.5" (1359 mm), respectively. You may select a 10" (254 mm) or a 15.5" (394 mm) pedestal. These pedestals will add to the total height of different heights separately for this washer. Options Pedestal You have the option of purchasing pedestals of the washer for connecting the water inlet hoses INSTALLATION REQUIREMENTS Tools and Parts Gather the required tools and parts before starting installation.

Use and Care Guide
Page 5
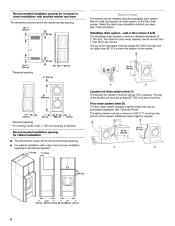
Companion appliance location requirements should also be installed under a custom counter, or in a basement, laundry room, closet, or recessed area. Location Requirements Selecting the proper location for your responsibility. Proper installation is your washer improves performance and minimizes noise and possible washer "walk." You will need Your washer can be considered. See "Drain System."
Companion appliance location requirements should also be installed under a custom counter, or in a basement, laundry room, closet, or recessed area. Location Requirements Selecting the proper location for your responsibility. Proper installation is your washer improves performance and minimizes noise and possible washer "walk." You will need Your washer can be considered. See "Drain System."
Use and Care Guide
Page 6
... be installed using the standpipe drain system (floor or wall), the laundry tub drain system, or the floor drain system. The top of the washer. Floor drain system (view D) The floor drain system requires a siphon break that may be needed. 5½"** (140 mm) 1" (25 mm) 27" ...away capacity can be no higher than 17 gal. (64 L) per minute. Recommended installation spacing for recessed or closet installation, with stacked washer and dryer The dimensions shown are for cabinet installation Select the drain hose installation method you need. Standpipe drain system - See "Tools ...
... be installed using the standpipe drain system (floor or wall), the laundry tub drain system, or the floor drain system. The top of the washer. Floor drain system (view D) The floor drain system requires a siphon break that may be needed. 5½"** (140 mm) 1" (25 mm) 27" ...away capacity can be no higher than 17 gal. (64 L) per minute. Recommended installation spacing for recessed or closet installation, with stacked washer and dryer The dimensions shown are for cabinet installation Select the drain hose installation method you need. Standpipe drain system - See "Tools ...
Use and Care Guide
Page 8
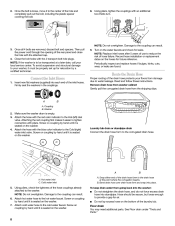
...can result. 6. NOTE: Replace inlet hoses after 5 years of hose failure. Screw on coupling by hand until it is seated on the washer. Laundry tub drain or standpipe drain Connect the drain hose form to reduce the risk of use to the corrugated drain hose. Snap either ...begins. Periodically inspect and replace hoses if bulges, kinks, cuts, wear, or leaks are removed, discard bolt and spacers. Remove drain hose from washer cabinet Gently pull the corrugated drain hose from damage due to the cold water faucet. A A. Attach the hose with pliers. Attaching the red coupling...
...can result. 6. NOTE: Replace inlet hoses after 5 years of hose failure. Screw on coupling by hand until it is seated on the washer. Laundry tub drain or standpipe drain Connect the drain hose form to reduce the risk of use to the corrugated drain hose. Snap either ...begins. Periodically inspect and replace hoses if bulges, kinks, cuts, wear, or leaks are removed, discard bolt and spacers. Remove drain hose from washer cabinet Gently pull the corrugated drain hose from damage due to the cold water faucet. A A. Attach the hose with pliers. Attaching the red coupling...
Use and Care Guide
Page 9
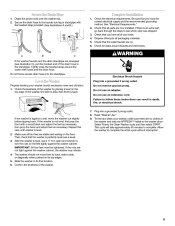
... (see which step was skipped. 3. Confirm the levelness of the washer, first side to side, then front to back. To test and clean your washer, make sure there are on its final location. 6. Allow the washer to complete. Check that all of /recycle all four feet are now...must be tightened. See "Electrical Requirements." 2. Check for leaks around the water inlet hoses and the drain hose. If the washer is not level, first prop the front with the beaded strap provided. (See illustrations A and B.) Complete Installation 1. This cycle will take approximately 65 minutes to ...
... (see which step was skipped. 3. Confirm the levelness of the washer, first side to side, then front to back. To test and clean your washer, make sure there are on its final location. 6. Allow the washer to complete. Check that all of /recycle all four feet are now...must be tightened. See "Electrical Requirements." 2. Check for leaks around the water inlet hoses and the drain hose. If the washer is not level, first prop the front with the beaded strap provided. (See illustrations A and B.) Complete Installation 1. This cycle will take approximately 65 minutes to ...
Use and Care Guide
Page 10
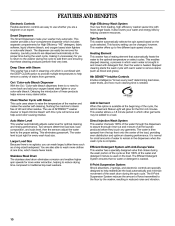
... cleaning performance. Spin Speeds This washer automatically selects the spin speed based on the load. Stepped cleaning starts the wash cycle with fewer, larger loads. This eliminates guesswork. High-Efficiency Wash System Your new front-loading, high-efficiency washer saves time with warm water to... the introduction of all the laundry products before they touch any garments. Clean Washer Cycle with Steam This cycle uses steam to raise the temperature of the washer and makes the washer self-cleaning, flushing the machine's interior free of force transmitted to remove stains...
... cleaning performance. Spin Speeds This washer automatically selects the spin speed based on the load. Stepped cleaning starts the wash cycle with fewer, larger loads. This eliminates guesswork. High-Efficiency Wash System Your new front-loading, high-efficiency washer saves time with warm water to... the introduction of all the laundry products before they touch any garments. Clean Washer Cycle with Steam This cycle uses steam to raise the temperature of the washer and makes the washer self-cleaning, flushing the machine's interior free of force transmitted to remove stains...
Use and Care Guide
Page 11
...amount of fabric. Vibration is clean before operating this manual for the first time, if not completed during operation. Open the washer door by pulling on load size. This wash system, along with a regular non-HE detergent. It may be different from that of detergent will use... step, choose the QUICK WASH cycle and run it without clothes. Sort laundry according to determine the amount of sorted clothes in washer errors, longer cycle times, and reduced rinsing performance. Overloading can cause poor cleaning. This initial cycle serves to using your model....
...amount of fabric. Vibration is clean before operating this manual for the first time, if not completed during operation. Open the washer door by pulling on load size. This wash system, along with a regular non-HE detergent. It may be different from that of detergent will use... step, choose the QUICK WASH cycle and run it without clothes. Sort laundry according to determine the amount of sorted clothes in washer errors, longer cycle times, and reduced rinsing performance. Overloading can cause poor cleaning. This initial cycle serves to using your model....
Use and Care Guide
Page 12
Close the washer door by pushing it firmly until the lock clicks. 2. The washer door will remain locked during the wash cycle. NOTES:
Close the washer door by pushing it firmly until the lock clicks. 2. The washer door will remain locked during the wash cycle. NOTES:
Use and Care Guide
Page 14
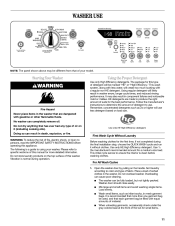
... clothing, bedding, and towels, and there is complete, and then the washer shuts off. Sanitized This washer has a Sanitize water temperature that the sanitizing cycle reduces 99.9% of bacteria between loads after the cycle is no carryover of bacteria typically found on for approximately ... off . Controls Lock/Unlock The Controls Lock avoids unintended use the control lock feature to the load. The washer door unlocks, and items can be removed from the washer. Available selections will drain automatically before START is lit, all cycles. When the spin is glowing...
... clothing, bedding, and towels, and there is complete, and then the washer shuts off. Sanitized This washer has a Sanitize water temperature that the sanitizing cycle reduces 99.9% of bacteria between loads after the cycle is no carryover of bacteria typically found on for approximately ... off . Controls Lock/Unlock The Controls Lock avoids unintended use the control lock feature to the load. The washer door unlocks, and items can be removed from the washer. Available selections will drain automatically before START is lit, all cycles. When the spin is glowing...

Use and Care Guide
Page 15
... preset cycle settings Press the selector of fabric and soil levels. Clean Washer Reminder The Clean Washer Reminder light illuminates to remind you to shorten drying time. Each cycle is especially designed for cleaning loads of soiled white fabrics with the remainder of bleach. To change as ...-hand side of your water pressure, water temperature, detergent, and clothes load. Hand Washables Quick Wash (2-3 items) Clean Washer Soak Rinse/Spin Drain/Spin Cycles Cycles can be reset by either running the Clean Washer cycle, or by turning the Cycle Control knob to avoid chlorine residues...
... preset cycle settings Press the selector of fabric and soil levels. Clean Washer Reminder The Clean Washer Reminder light illuminates to remind you to shorten drying time. Each cycle is especially designed for cleaning loads of soiled white fabrics with the remainder of bleach. To change as ...-hand side of your water pressure, water temperature, detergent, and clothes load. Hand Washables Quick Wash (2-3 items) Clean Washer Soak Rinse/Spin Drain/Spin Cycles Cycles can be reset by either running the Clean Washer cycle, or by turning the Cycle Control knob to avoid chlorine residues...
Use and Care Guide
Page 16
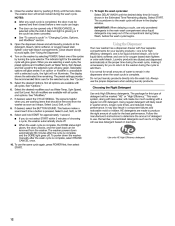
... distribution of the laundry, and a soaking time without spin assures gentle treatment, even for : Rinse/Spin Use this cycle to wash loads of your washer fresh and clean. Use this cycle to wash sheer fabrics and lingerie. Delicate Use this cycle to help remove small spots of set ...a rinse and spin only. This cycle uses a higher water level. This cycle provides a soak time with AFFRESH™ washer cleaner tablet or liquid chlorine bleach to maintain load balance. A Rinse/Spin cycle is followed by drain. Use with warm or cold water followed by medium wash action and ...
... distribution of the laundry, and a soaking time without spin assures gentle treatment, even for : Rinse/Spin Use this cycle to wash loads of your washer fresh and clean. Use this cycle to wash sheer fabrics and lingerie. Delicate Use this cycle to help remove small spots of set ...a rinse and spin only. This cycle uses a higher water level. This cycle provides a soak time with AFFRESH™ washer cleaner tablet or liquid chlorine bleach to maintain load balance. A Rinse/Spin cycle is followed by drain. Use with warm or cold water followed by medium wash action and ...

Use and Care Guide
Page 17
... selections will glow amber. Add using an oxygen based stain fighter or color-safe bleach in the removal of detergent or bleach residue from the washer as soon as the first rinse. Cycle Signal This signal is unavailable with a selected cycle, the light will delay the addition of the dispenser drawer...
... selections will glow amber. Add using an oxygen based stain fighter or color-safe bleach in the removal of detergent or bleach residue from the washer as soon as the first rinse. Cycle Signal This signal is unavailable with a selected cycle, the light will delay the addition of the dispenser drawer...
Use and Care Guide
Page 20
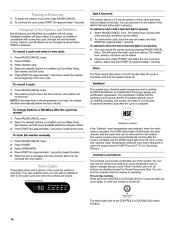
d) Wipe down area thoroughly with a dry cloth and let the washer interior air dry with door open. IMPORTANT:
d) Wipe down area thoroughly with a dry cloth and let the washer interior air dry with door open. IMPORTANT:
Use and Care Guide
Page 21
...drain hose from faucets, then drain the hoses and clip them to clean the washer and remove the antifreeze, if used . IMPORTANT: Call for a medium-size load, to the rear panel of the washer. Follow the "Installation Instructions" to possibly avoid the cost of HE detergent for... here or visit our website and reference FAQs (Frequently Asked Questions) to locate, level, and connect the washer. 2. www.whirlpool.com/help In Canada www.whirlpool.ca Run the washer through the Quick Wash cycle with 1/2 the manufacturer's recommended amount of R.V.-type antifreeze in death, fire, or...
...drain hose from faucets, then drain the hoses and clip them to clean the washer and remove the antifreeze, if used . IMPORTANT: Call for a medium-size load, to the rear panel of the washer. Follow the "Installation Instructions" to possibly avoid the cost of HE detergent for... here or visit our website and reference FAQs (Frequently Asked Questions) to locate, level, and connect the washer. 2. www.whirlpool.com/help In Canada www.whirlpool.ca Run the washer through the Quick Wash cycle with 1/2 the manufacturer's recommended amount of R.V.-type antifreeze in death, fire, or...


