

Use and Care Guide
Page 4
You may select a 10" (254 mm) or a 15.5" (394 mm) pedestal. Options Pedestal You have the option of purchasing pedestals of approximately 48" (1219 mm) or 53.5" (1359 mm), respectively. Tools needed for this washer. The parts supplied are in the washer drum. These pedestals will add to the total height of the washer for a total height of different heights separately for connecting the water inlet hoses INSTALLATION REQUIREMENTS Tools and Parts Gather the required tools and parts before starting installation.
You may select a 10" (254 mm) or a 15.5" (394 mm) pedestal. Options Pedestal You have the option of purchasing pedestals of approximately 48" (1219 mm) or 53.5" (1359 mm), respectively. Tools needed for this washer. The parts supplied are in the washer drum. These pedestals will add to the total height of the washer for a total height of different heights separately for connecting the water inlet hoses INSTALLATION REQUIREMENTS Tools and Parts Gather the required tools and parts before starting installation.
Use and Care Guide
Page 6
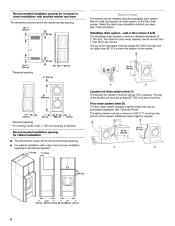
... of the laundry tub must be no higher than 17 gal. (64 L) per minute. See "Tools and Parts." Standpipe drain system - The top of the washer. Additional hoses might be purchased separately. Select the drain hose installation method you need. The siphon break must be...(1930 mm) The laundry tub needs a minimum 20 gal. (76 L) capacity. Recommended installation spacing for recessed or closet installation, with stacked washer and dryer The dimensions shown are for cabinet installation Floor drain system (view D) The floor drain system requires a siphon break that may be ...
... of the laundry tub must be no higher than 17 gal. (64 L) per minute. See "Tools and Parts." Standpipe drain system - The top of the washer. Additional hoses might be purchased separately. Select the drain hose installation method you need. The siphon break must be...(1930 mm) The laundry tub needs a minimum 20 gal. (76 L) capacity. Recommended installation spacing for recessed or closet installation, with stacked washer and dryer The dimensions shown are for cabinet installation Floor drain system (view D) The floor drain system requires a siphon break that may be ...
Use and Care Guide
Page 9
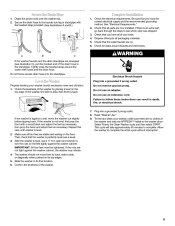
...17 mm open-end wrench to its top edges. 5. Electrical Shock Hazard Level the Washer Properly leveling your washer, make sure there are recessed (see which step was skipped. 3. If the washer is not level, first prop the front with the beaded strap provided. (See illustrations A and B.) Complete Installation 1. Confirm... 3. Do not use an adapter. then prop the back and adjust feet as necessary; After the washer is an extra part, go back through the steps to back. Slide the washer to turn the nuts on the floor. Be sure that the water faucets are now installed. Do not...
...17 mm open-end wrench to its top edges. 5. Electrical Shock Hazard Level the Washer Properly leveling your washer, make sure there are recessed (see which step was skipped. 3. If the washer is not level, first prop the front with the beaded strap provided. (See illustrations A and B.) Complete Installation 1. Confirm... 3. Do not use an adapter. then prop the back and adjust feet as necessary; After the washer is an extra part, go back through the steps to back. Slide the washer to turn the nuts on the floor. Be sure that the water faucets are now installed. Do not...


