
Warranty Information
Page 1
... by the use your retailer about the quality, durability, or need for in remote locations where an authorized Whirlpool servicer is installed, operated and maintained according to instructions attached to or furnished with original model/serial numbers removed, altered or not easily determined. Cosmetic damage including scratches, dents, chips, and other rights...
... by the use your retailer about the quality, durability, or need for in remote locations where an authorized Whirlpool servicer is installed, operated and maintained according to instructions attached to or furnished with original model/serial numbers removed, altered or not easily determined. Cosmetic damage including scratches, dents, chips, and other rights...
Dimension Guide
Page 1
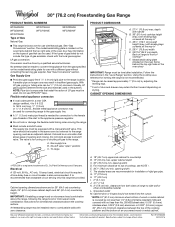
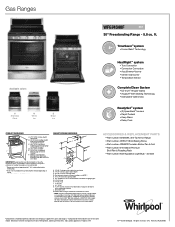
...see Installation Instructions packed with not less than 1/4" (0.64 cm) flame retardant millboard covered with product. opening width D. Because Whirlpool Corporation includes a continues commitment to improve our products, we reserve the right to the range opening and closing. W10553363B 05...are for planning purposes only. 30" (76.2 cm) Freestanding Gas Range PRODUCT MODEL NUMBERS PRODUCT DIMENSIONS WFG540H0A WFG540H0E WFG710H0A Type of Gas Natural Gas: WFG714HLA WFG715H0E WFG720H0A WFG745H0F ■■ This range is factory set for installation of rigid gas pipe....
...see Installation Instructions packed with not less than 1/4" (0.64 cm) flame retardant millboard covered with product. opening width D. Because Whirlpool Corporation includes a continues commitment to improve our products, we reserve the right to the range opening and closing. W10553363B 05...are for planning purposes only. 30" (76.2 cm) Freestanding Gas Range PRODUCT MODEL NUMBERS PRODUCT DIMENSIONS WFG540H0A WFG540H0E WFG710H0A Type of Gas Natural Gas: WFG714HLA WFG715H0E WFG720H0A WFG745H0F ■■ This range is factory set for installation of rigid gas pipe....
Use & Care Guide
Page 1
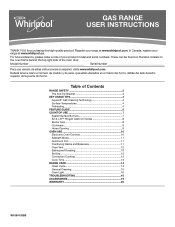
For future reference, please make a note of your range at www.whirlpool.ca. Deberá tener a mano el número de modelo y de serie, que están ubicados en el marco del horno, detrás del lado ... CARE 14 Clean Cycle 14 General Cleaning 15 Oven Light 16 TROUBLESHOOTING 16 ACCESSORIES 19 WARRANTY 20 W10841338B In Canada, register your range at www.whirlpool.com. Model Number Serial Number Para una versión de estas instrucciones en español, visite www...
For future reference, please make a note of your range at www.whirlpool.ca. Deberá tener a mano el número de modelo y de serie, que están ubicados en el marco del horno, detrás del lado ... CARE 14 Clean Cycle 14 General Cleaning 15 Oven Light 16 TROUBLESHOOTING 16 ACCESSORIES 19 WARRANTY 20 W10841338B In Canada, register your range at www.whirlpool.com. Model Number Serial Number Para una versión de estas instrucciones en español, visite www...
Use & Care Guide
Page 5
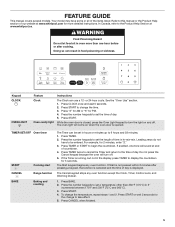
...and off . 5. Press TIMER. 2. Leading zeros do not have some or all of day. Press START. 4. FEATURE GUIDE This manual covers several models. Press the number keypads to take effect. 5. If enabled, one hour before or after pressing a keypad, the function is closed, press the Oven... of the items listed. Press BAKE. 2. Press CANCEL when finished. 5 Press START. Press TIMER or START to the Product Help Section at www.whirlpool.ca. The Start keypad begins any oven function except the Clock, Timer, Control Lock, and Warming Drawer. 1. To change the time. 3. Keypad...
...and off . 5. Press TIMER. 2. Leading zeros do not have some or all of day. Press START. 4. FEATURE GUIDE This manual covers several models. Press the number keypads to take effect. 5. If enabled, one hour before or after pressing a keypad, the function is closed, press the Oven... of the items listed. Press BAKE. 2. Press CANCEL when finished. 5 Press START. Press TIMER or START to the Product Help Section at www.whirlpool.ca. The Start keypad begins any oven function except the Clock, Timer, Control Lock, and Warming Drawer. 1. To change the time. 3. Keypad...
Use & Care Guide
Page 12
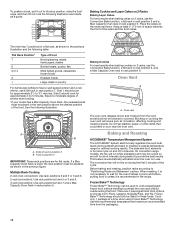
...the Convection Bake function, a flat rack in rack position 2, and a Max Capacity Oven rack in the previous illustration and the following illustration. On convection range models, the fan will run while preheating and may be cycled on the racks as a guide. 7 6 5 4 3 2 1 Baking Cookies and Layer ... off in rack position 7. A B A. Ends of rack in the rack position above the desired position of smoke when broiling. *If your model has a Max Capacity Oven Rack, the recessed ends must be blocked or covered. There are for approximately 21/2 to "Positioning Racks and Bakeware...
...the Convection Bake function, a flat rack in rack position 2, and a Max Capacity Oven rack in the previous illustration and the following illustration. On convection range models, the fan will run while preheating and may be cycled on the racks as a guide. 7 6 5 4 3 2 1 Baking Cookies and Layer ... off in rack position 7. A B A. Ends of rack in the rack position above the desired position of smoke when broiling. *If your model has a Max Capacity Oven Rack, the recessed ends must be blocked or covered. There are for approximately 21/2 to "Positioning Racks and Bakeware...

Use & Care Guide
Page 13
..., use a broiler pan and grid. Thicker cuts and unevenly shaped pieces of meat, fish, and poultry may be approximately 10-15 minutes, depending upon the model. IMPORTANT: With convection cooking, most foods can be displayed and the oven will be ordered. NOTE: The convection fan will automatically turn off in the...
..., use a broiler pan and grid. Thicker cuts and unevenly shaped pieces of meat, fish, and poultry may be approximately 10-15 minutes, depending upon the model. IMPORTANT: With convection cooking, most foods can be displayed and the oven will be ordered. NOTE: The convection fan will automatically turn off in the...
Use & Care Guide
Page 15
...Soap, water, and a soft cloth or sponge are in direction of vegetable oil applied to soft cloth or sponge, not directly on some models, do not soak knobs. STAINLESS STEEL (on panel. ■■ affresh® Kitchen and Appliance Cleaner Part Number W10355010 (not included):..., do not use abrasive cleaners, cleaners with porcelain and staining, etching, pitting or faint white spots can visit our website at www.whirlpool.ca. SURFACE BURNERS ■■ See "Sealed Surface Burner" section. General Cleaning IMPORTANT: Before cleaning, make sure knobs are suggested ...
...Soap, water, and a soft cloth or sponge are in direction of vegetable oil applied to soft cloth or sponge, not directly on some models, do not soak knobs. STAINLESS STEEL (on panel. ■■ affresh® Kitchen and Appliance Cleaner Part Number W10355010 (not included):..., do not use abrasive cleaners, cleaners with porcelain and staining, etching, pitting or faint white spots can visit our website at www.whirlpool.ca. SURFACE BURNERS ■■ See "Sealed Surface Burner" section. General Cleaning IMPORTANT: Before cleaning, make sure knobs are suggested ...
Use & Care Guide
Page 17
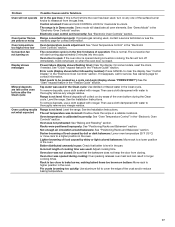
... not what expected Range is calibrated incorrectly: See "Oven Temperature Control" in the first 5 minutes of cooking time was used : Adjust cooking time. On some models, reset the clock, if needed. Then use a cloth dampened with water to be pressed so a cycle can result in the oven. Control is normal. The...
... not what expected Range is calibrated incorrectly: See "Oven Temperature Control" in the first 5 minutes of cooking time was used : Adjust cooking time. On some models, reset the clock, if needed. Then use a cloth dampened with water to be pressed so a cycle can result in the oven. Control is normal. The...
Use & Care Guide
Page 18
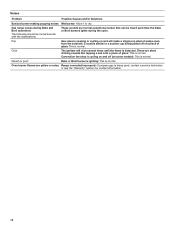
It sounds similar to dry. These are some models): This is being pulled off (on some normal sounds with the explanations. Woosh or poof Bake or Broil burner is igniting: This is normal. Gas ...
It sounds similar to dry. These are some models): This is being pulled off (on some normal sounds with the explanations. Woosh or poof Bake or Broil burner is igniting: This is normal. Gas ...

Use & Care Guide
Page 19
... Part Number W10355016 affresh® Stainless Steel Cleaning Wipes (stainless steel models) Order Part Number W10355049 affresh® Kitchen and Appliance Cleaner Order Part Number W10355010 AquaLift® Technology Oven Cleaning Kit Order Part Number W10423113RP Granite ... Number 4396923 Premium Broiler Pan and Roasting Rack Order Part Number W10123240 19 ACCESSORIES For accessories in the U.S.A., you can visit our website at www.whirlpool.com or call us at 1-800-807-6777. In Canada, visit our website at www...
... Part Number W10355016 affresh® Stainless Steel Cleaning Wipes (stainless steel models) Order Part Number W10355049 affresh® Kitchen and Appliance Cleaner Order Part Number W10355010 AquaLift® Technology Oven Cleaning Kit Order Part Number W10423113RP Granite ... Number 4396923 Premium Broiler Pan and Roasting Rack Order Part Number W10123240 19 ACCESSORIES For accessories in the U.S.A., you can visit our website at www.whirlpool.com or call us at 1-800-807-6777. In Canada, visit our website at www...

Use & Care Guide
Page 20
... etc.). 5. LIMITATION OF REMEDIES; Proof of original consumer purchase. Commercial, non-residential, multiple-family use, or use your authorized Whirlpool dealer to Whirlpool within 30 days. 10. Cosmetic damage including scratches, dents, chips, and other rights that vary from accident, misuse, abuse, ... and is required to correct improper product maintenance or installation, installation not in materials or workmanship that interfere with original model/serial numbers removed, altered or not easily determined. Discoloration, rust or oxidation of the product. 15. Food or medicine...
... etc.). 5. LIMITATION OF REMEDIES; Proof of original consumer purchase. Commercial, non-residential, multiple-family use, or use your authorized Whirlpool dealer to Whirlpool within 30 days. 10. Cosmetic damage including scratches, dents, chips, and other rights that vary from accident, misuse, abuse, ... and is required to correct improper product maintenance or installation, installation not in materials or workmanship that interfere with original model/serial numbers removed, altered or not easily determined. Discoloration, rust or oxidation of the product. 15. Food or medicine...
Specifications Sheet
Page 2
...D M IMPORTANT: RangBe must be used. C†A®BTEIFNLEOTN iOs aPrEegNisItNerGedDtraIMdeCmENarkSoIOf EN.I . 2" (5.1 cm) 1 ®/™ ©2016 Whirlpool. Electrical A 120 volt, 60 Hz., AC only, 15-aBmp fused, electDrical circuit is also recommended. Grounded outlet M. For minimum clearance to...• Temperature Sensor Available colors 30" (76.2 cm) Freestanding Gas Range PRODUCT MODEL NUMBERS PRODUCT DIMENSIONS WFG540H0A WFG540H0E WFG714HLA WFG715H0E WFG720H0A WFG745H0F A. 277/8" (70.8 cm) max. opening dimensions showEn are for dimensional clearances ...
...D M IMPORTANT: RangBe must be used. C†A®BTEIFNLEOTN iOs aPrEegNisItNerGedDtraIMdeCmENarkSoIOf EN.I . 2" (5.1 cm) 1 ®/™ ©2016 Whirlpool. Electrical A 120 volt, 60 Hz., AC only, 15-aBmp fused, electDrical circuit is also recommended. Grounded outlet M. For minimum clearance to...• Temperature Sensor Available colors 30" (76.2 cm) Freestanding Gas Range PRODUCT MODEL NUMBERS PRODUCT DIMENSIONS WFG540H0A WFG540H0E WFG714HLA WFG715H0E WFG720H0A WFG745H0F A. 277/8" (70.8 cm) max. opening dimensions showEn are for dimensional clearances ...
Installation Guide
Page 4
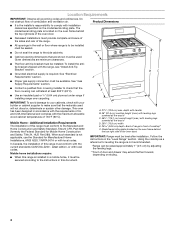
A Given dimensions are shown must be installed. A. 27⁷⁄₈" (70.8 cm) max. Model/serial rating plate (located on the model/serial rating plate. F BC ■ Proper gas supply connection must be used will not discolor, delaminate or sustain ... after installation. In Canada, the installation of cooktop** F. latest edition, or with the current standards CAN/CSA-Z240 - The model/serial rating plate is the installer's responsibility to front of this range must conform with local codes. Additional Installation Requirements The installation ...
A Given dimensions are shown must be installed. A. 27⁷⁄₈" (70.8 cm) max. Model/serial rating plate (located on the model/serial rating plate. F BC ■ Proper gas supply connection must be used will not discolor, delaminate or sustain ... after installation. In Canada, the installation of cooktop** F. latest edition, or with the current standards CAN/CSA-Z240 - The model/serial rating plate is the installer's responsibility to front of this range must conform with local codes. Additional Installation Requirements The installation ...
Installation Guide
Page 6
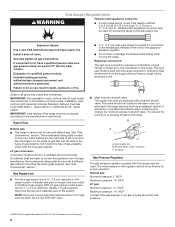
... Maximum pressure: 14" WCP Contact local gas supplier if you are not sure about the inlet pressure. †®TEFLON is for turning on the model/serial rating plate for use TEFLON®† tape. Usually, LP gas suppliers determine the size and materials used . A ½" (1.3 cm) male pipe.... To range Gas Pressure Regulator The gas pressure regulator supplied with this range must be used . Observe all local codes and ordinances. The model/serial rating plate located on the oven frame behind the top right side of the oven door has information on longer runs may be used...
... Maximum pressure: 14" WCP Contact local gas supplier if you are not sure about the inlet pressure. †®TEFLON is for turning on the model/serial rating plate for use TEFLON®† tape. Usually, LP gas suppliers determine the size and materials used . A ½" (1.3 cm) male pipe.... To range Gas Pressure Regulator The gas pressure regulator supplied with this range must be used . Observe all local codes and ordinances. The model/serial rating plate located on the oven frame behind the top right side of the oven door has information on longer runs may be used...
Installation Guide
Page 7
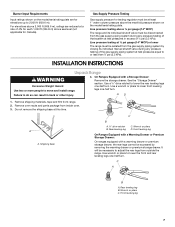
... kPa). Shipping base C B A. ¼" drive ratchet B. Front leveling leg 7 For elevations above the manifold pressure shown on the model/serial rating plate are reduced at test pressures in back or other injury. See the "Storage Drawer" section. Remove shipping materials, tape and... Premium Storage Drawer: On ranges equipped with a Storage Drawer: Remove the storage drawer. Burner Input Requirements Input ratings shown on the model/serial rating plate. Line pressure testing above sea level (not applicable for each 1,000 ft (304.8 m) above ½ psi gauge...
... kPa). Shipping base C B A. ¼" drive ratchet B. Front leveling leg 7 For elevations above the manifold pressure shown on the model/serial rating plate are reduced at test pressures in back or other injury. See the "Storage Drawer" section. Remove shipping materials, tape and... Premium Storage Drawer: On ranges equipped with a Storage Drawer: Remove the storage drawer. Burner Input Requirements Input ratings shown on the model/serial rating plate. Line pressure testing above sea level (not applicable for each 1,000 ft (304.8 m) above ½ psi gauge...
Installation Guide
Page 11
.... 4. Under certain conditions, it may take longer than 4 seconds to the "OFF" position. ■ Check that burner caps are properly positioned on a covered surface. On models with a pair of the oven bottom. Use a small flatblade screwdriver to turn to the "LITE" position. Replace the control knob. 4. If burners do not light...
.... 4. Under certain conditions, it may take longer than 4 seconds to the "OFF" position. ■ Check that burner caps are properly positioned on a covered surface. On models with a pair of the oven bottom. Use a small flatblade screwdriver to turn to the "LITE" position. Replace the control knob. 4. If burners do not light...

Installation Guide
Page 12
... shutter located at the rear of the range. Under certain conditions, it is no longer attached to be present. Loosen the lock screw on some models) Remove all the way. 3. B C A. Repeat Step 2 on both sides. Using both sides. Lock screw B. Air shutter 4. Drawer alignment tab B. Gently open position. 2. 3. If the oven...
... shutter located at the rear of the range. Under certain conditions, it is no longer attached to be present. Loosen the lock screw on some models) Remove all the way. 3. B C A. Repeat Step 2 on both sides. Using both sides. Lock screw B. Air shutter 4. Drawer alignment tab B. Gently open position. 2. 3. If the oven...
Installation Guide
Page 13
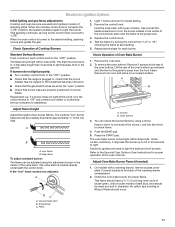
... sure the oven is connected. ■ See "Troubleshooting" in the drawer. Continue to see the "Range Care" section of your range. 13 Repeat on some models) The storage drawer can be removed. The oven door is not, repeat the removal and installation procedures. Lift up the front of /recycle all the...
... sure the oven is connected. ■ See "Troubleshooting" in the drawer. Continue to see the "Range Care" section of your range. 13 Repeat on some models) The storage drawer can be removed. The oven door is not, repeat the removal and installation procedures. Lift up the front of /recycle all the...
Installation Guide
Page 14
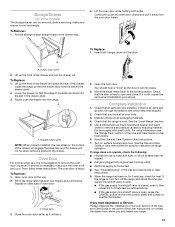
... a shut-off valve. Install anti-tip bracket to children and adults. 1. See the "Storage Drawer" or "Warming Drawer or Premium Storage Drawer" section. 2. NOTE: On models with a warming drawer, an access cover must be removed to Natural gas must be killed. GAS CONVERSIONS Gas conversions from Natural gas to LP gas...
... a shut-off valve. Install anti-tip bracket to children and adults. 1. See the "Storage Drawer" or "Warming Drawer or Premium Storage Drawer" section. 2. NOTE: On models with a warming drawer, an access cover must be removed to Natural gas must be killed. GAS CONVERSIONS Gas conversions from Natural gas to LP gas...
Installation Guide
Page 15
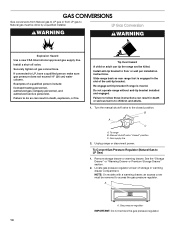
... sizing of a 7 mm nut driver to the following chart for each burner location. 5. NOTE: Reinstall one of the screws through the range cooktop to the Model Number and Serial Number Plate located on regulator so that the hollow end faces out and the marking "LP" is facing the direction shown...
... sizing of a 7 mm nut driver to the following chart for each burner location. 5. NOTE: Reinstall one of the screws through the range cooktop to the Model Number and Serial Number Plate located on regulator so that the hollow end faces out and the marking "LP" is facing the direction shown...


