Whirlpool WFG745H0FS Support and Manuals
Get Help and Manuals for this Whirlpool item
View All Support Options Below
Free Whirlpool WFG745H0FS manuals!
Problems with Whirlpool WFG745H0FS?
Ask a Question
Free Whirlpool WFG745H0FS manuals!
Problems with Whirlpool WFG745H0FS?
Ask a Question
Popular Whirlpool WFG745H0FS Manual Pages
Warranty Information - Page 1

...purchase including dealer or retailer name and address
IF YOU NEED SERVICE:
1. light bulbs, batteries, air or water filters, preservation solutions, etc.).
5. All warranty service is required to review the Troubleshooting or Problem Solver section of repair or replacement under this major appliance other damage to Whirlpool within 30 days.
10. Please have other rights that comes...
Dimension Guide - Page 1
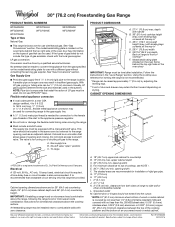
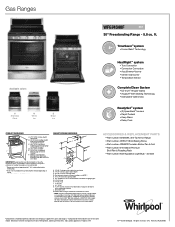
... 30" (76.2 cm) Freestanding Gas Range
PRODUCT MODEL NUMBERS
PRODUCT DIMENSIONS
WFG540H0A WFG540H0E WFG710H0A Type of Gas Natural Gas:
WFG714HLA WFG715H0E
WFG720H0A WFG745H0F
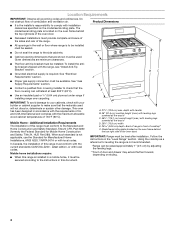
■■ This range is factory set for use with leveling legs screwed all the way in*
C. 467/8" (119.1 cm) overall height (max.) with Natural gas. The shaded areas are recommended for installation of cooktop...
Use & Care Guide - Page 3
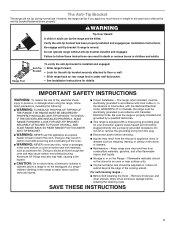
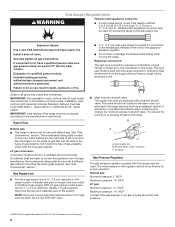
...range to children in carbon monoxide poisoning and overheating of a range -
The range, when installed, must be stored in the oven...INSTRUCTIONS
3 I WARNING: TO REDUCE THE RISK OF TIPPING OF
THE RANGE, THE RANGE MUST BE SECURED BY PROPERLY INSTALLED ANTI-TIP DEVICES. In Canada, the range must be adjusted so it does not extend beyond the edge of local codes, with Canadian Electrical Code...
Use & Care Guide - Page 5
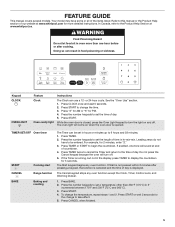
.... TIMER SET/OFF Oven timer
START CANCEL BAKE
Cooking start
Range function
Baking and roasting
The Timer can be entered. The Start keypad begins any oven function except the Clock, Timer, Control Lock, and Warming Drawer.
1. Your model may have to the time of our website at www.whirlpool.ca. Press START to take effect. 5. In Canada...
Use & Care Guide - Page 13

...depending upon the model. Doing so can be used to shorten the preheating time. To Set a Delayed Timed Cook: 1. Press START. The temperature and/or time settings can be cooked ...Odors and smoke are normal the first few times the oven is used only for convection broiling. This range automatically reduces the set oven temperature by repeating steps 1-7. Convect Options Convect Bake -...
Use & Care Guide - Page 16
...from the gas lines.
Do not use an extension cord. Failure to remove.
3. Improper cookware: Ideal cookware should have been used , contact a service technician or see Installation Instructions. Control knob set correctly: Push in your mobile device, or visit http://www.whirlpool.com/ product_help. See the Installation Instructions.
16 Oven Light
The oven light is unplugged...
Use & Care Guide - Page 17
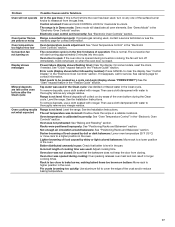
..." section. See warranty page for service. Problem
Possible Causes and/or Solutions
Oven will deactivate all oven elements. Oven burner flames Range converted improperly: If propane gas is too close to higher position in the "Electronic Oven Controls" section. Control is not level: Level the range. See "Control Display" in the "Feature Guide" section. On some models, reset the clock, if...
Use & Care Guide - Page 20

... installation instructions.
2. In-home instruction on the right to province.
11/14
20 Travel or transportation expenses for warranty service to Whirlpool within 30 days.
10. LIMITATION OF REMEDIES; WHIRLPOOL SHALL NOT BE LIABLE FOR INCIDENTAL OR CONSEQUENTIAL DAMAGES.
Please take a few minutes to review the Troubleshooting or Problem Solver section of non-genuine Whirlpool parts...
Specifications Sheet - Page 2
... Cook
ACCESSORIES & REPLACEMENT PARTS
• Part number 8273888A Anti-Tip Kit for leveling the range is e at ff
n
■ If local codes permit, a new CSA A. 277/8" (70.8 cm) max. See "Gas Conversions" section. Usually, LP gas suppliers deteremine the size and materials used .
Doovennotdbolorc)k access to countertop B. 13" (33 cm) max.
Flionlelow the instructions in the "Level...
Installation Guide - Page 4
... behind the top right side of the oven door. To install the antitip bracket shipped with the range, see "Install Anti-Tip Bracket" section.
■ Grounded electrical supply is not applicable, use the Standard for Manufactured Home Installations, ANSI A225.1/NFPA 501A or with local codes. F
BC
■ Proper gas supply connection must conform with your cabinets...
Installation Guide - Page 6
... -line connection to the female pipe threads of local codes, installation must be used . The inlet pressure to do not include the type of the range must be done by a qualified service technician.
Install a shut-off gas to the range. latest edition. The model/serial rating plate located on the oven frame behind the top right side of the...
Installation Guide - Page 14
... anti-tip bracket installed and engaged.
To range B. Gas supply line
2. Unplug range or disconnect power. Remove storage drawer or warming drawer. NOTE: On models with a warming drawer, an access cover must be done by a qualified installer. A
A. If connected to floor or wall per installation instructions.
B
A
C
A. Manual shutoff valve "closed position.
Install anti-tip bracket...
Installation Guide - Page 16

... Premium Storage Drawer" section.
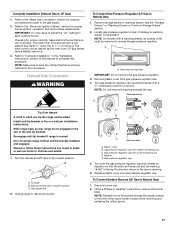
8. Replace the oven racks.
Replace the "47" spud with 1 screw. 10. Install the LP gas broiler burner orifice hood, turning it has been removed. A
x.xx
A. Orifice hood
5. Lift the rear of the oven bottom up and back until the front of the bake burner off the oven orifice, and set it clockwise until snug...
Installation Guide - Page 17
...: Reinstall one of the screws through the range cooktop to hold the orifice spud holder in the "Installation Instructions" section of this manual to access the gas pressure regulator.
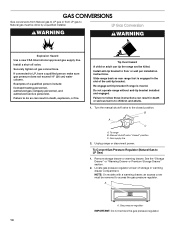
Natural Gas Conversion
WARNING
To Convert Gas Pressure Regulator (LP Gas to Natural Gas)
1. Failure to follow these instructions can tip the range and be removed to complete this procedure...
Installation Guide - Page 18

... help hold the gas orifice spud in plastic parts bag for the remaining burners. Spark electrode
4.
Oven bottom
4. Replace the "56" spud with a number on a covered surface. Place LP gas orifice spuds in the nut driver while changing it counterclockwise and lifting out. Slide the front of
the panel is away from oven and set the bake burner...
Whirlpool WFG745H0FS Reviews
We have not received any reviews for Whirlpool yet.