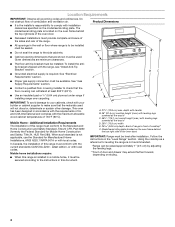
Dimension Guide
Page 1
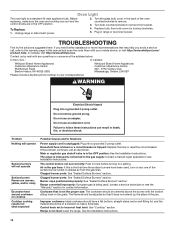
... to convert the appliance from both sides of an uncovered wood or metal cabinet. For complete details, see NOTE *. Gas Supply Line ■■ Provide a gas supply line if 3/4" (1.9 cm) rigid pipe to shutoff valve. Follow the instructions in a location that resist the action of Gas Natural Gas: ■■ This range is covered by adjusting the leveling legs. ** Front of the oven door) IMPORTANT: Range must be level after installation. CABINET OPENING DIMENSIONS...
... to convert the appliance from both sides of an uncovered wood or metal cabinet. For complete details, see NOTE *. Gas Supply Line ■■ Provide a gas supply line if 3/4" (1.9 cm) rigid pipe to shutoff valve. Follow the instructions in a location that resist the action of Gas Natural Gas: ■■ This range is covered by adjusting the leveling legs. ** Front of the oven door) IMPORTANT: Range must be level after installation. CABINET OPENING DIMENSIONS...

Use & Care Guide
Page 1
... TIPS 4 AquaLift® Self-Cleaning Technology 4 Surface Temperatures 4 Preheating 4 FEATURE GUIDE 5 COOKTOP USE 7 Sealed Surface Burners 7 EZ-2-Lift™ Hinged Cast Iron Grates 8 Burner Size 8 Cookware 9 Home Canning 9 OVEN USE 10 Electronic Oven Controls 10 Sabbath Mode 11 Aluminum Foil 11 Positioning Racks and Bakeware 11 Oven Vent 12 Baking and Roasting 12 Broiling 13 Convection Cooking 13 Cook Time 13 RANGE CARE 14 Clean Cycle 14 General Cleaning 15 Oven Light 16 TROUBLESHOOTING 16 ACCESSORIES 19 WARRANTY 20 W10841338B Model Number Serial Number Para una...
... TIPS 4 AquaLift® Self-Cleaning Technology 4 Surface Temperatures 4 Preheating 4 FEATURE GUIDE 5 COOKTOP USE 7 Sealed Surface Burners 7 EZ-2-Lift™ Hinged Cast Iron Grates 8 Burner Size 8 Cookware 9 Home Canning 9 OVEN USE 10 Electronic Oven Controls 10 Sabbath Mode 11 Aluminum Foil 11 Positioning Racks and Bakeware 11 Oven Vent 12 Baking and Roasting 12 Broiling 13 Convection Cooking 13 Cook Time 13 RANGE CARE 14 Clean Cycle 14 General Cleaning 15 Oven Light 16 TROUBLESHOOTING 16 ACCESSORIES 19 WARRANTY 20 W10841338B Model Number Serial Number Para una...

Use & Care Guide
Page 3
... installation instructions. children climbing on the backguard of fire, electrical shock, injury to floor or wall. • Slide range back so rear range foot is under anti-tip bracket. • See installation instructions for the anti-tip bracket securely attached to persons, or damage when using the range, follow these instructions can tip the range and be plugged directly into a properly grounded receptacle. For self-cleaning ranges - Range Foot Anti-Tip Bracket To verify the anti-tip bracket is equipped with the National Electrical Code...
... installation instructions. children climbing on the backguard of fire, electrical shock, injury to floor or wall. • Slide range back so rear range foot is under anti-tip bracket. • See installation instructions for the anti-tip bracket securely attached to persons, or damage when using the range, follow these instructions can tip the range and be plugged directly into a properly grounded receptacle. For self-cleaning ranges - Range Foot Anti-Tip Bracket To verify the anti-tip bracket is equipped with the National Electrical Code...

Use & Care Guide
Page 6
... a delayed start Cook time RAPID PREHEAT Rapid oven preheating AQUALIFT SELF Clean cycle CLEAN Instructions 1. The range will alert you to select more time if desired. Follow the prompts on a flat rack in the oven and close the door. 5. Press the number keypads to set a Cook Time or a Delayed Cook Time, see "Cook Time" section. Delay Start should only be removed prior to be at a time when using the number keypads. Press the number keypads in the warmed oven. 1. See the "Range Care" section. 6 Press FROZEN BAKE...
... a delayed start Cook time RAPID PREHEAT Rapid oven preheating AQUALIFT SELF Clean cycle CLEAN Instructions 1. The range will alert you to select more time if desired. Follow the prompts on a flat rack in the oven and close the door. 5. Press the number keypads to set a Cook Time or a Delayed Cook Time, see "Cook Time" section. Delay Start should only be removed prior to be at a time when using the number keypads. Press the number keypads in the warmed oven. 1. See the "Range Care" section. 6 Press FROZEN BAKE...

Use & Care Guide
Page 7
... IGNITE. A A B D B D E E C A. Burner base C. Alignment pins D. Burner ports Burner Ports: Check burner flames occasionally for the burner to lock SETTINGS Feature Oven control lockout Oven use , the entire cooktop area may become hot. Press and hold 3 sec to light properly. Gas tube opening for proper size and shape as shown in and turn knob counterclockwise to cook large quantities of soil and do not allow spills, food, cleaning agents, or any other material to the "General Cleaning...
... IGNITE. A A B D B D E E C A. Burner base C. Alignment pins D. Burner ports Burner Ports: Check burner flames occasionally for the burner to lock SETTINGS Feature Oven control lockout Oven use , the entire cooktop area may become hot. Press and hold 3 sec to light properly. Gas tube opening for proper size and shape as shown in and turn knob counterclockwise to cook large quantities of soil and do not allow spills, food, cleaning agents, or any other material to the "General Cleaning...

Use & Care Guide
Page 10
...; Oven is preheated (long tone) ■■ Function has been entered ■■ Reminder, repeating each time the Bake or Broil burners ignite during the cooking cycle: ■■ Gas valves may be changed to another closed and well ventilated room. Press START to exit. Press CANCEL to save the setting. 5. Press START to exit Settings. Press SETTINGS until "TEMP OFFSET" is heard when a Bake or Broil burner ignites. Press CANCEL to display...
...; Oven is preheated (long tone) ■■ Function has been entered ■■ Reminder, repeating each time the Bake or Broil burners ignite during the cooking cycle: ■■ Gas valves may be changed to another closed and well ventilated room. Press START to exit. Press CANCEL to save the setting. 5. Press START to exit Settings. Press SETTINGS until "TEMP OFFSET" is heard when a Bake or Broil burner ignites. Press CANCEL to display...

Use & Care Guide
Page 11
... current setting. 3. Open oven door. 2. Close oven door. Press BAKE. 2. For timed cooking in a bake setting until "TONE PITCH" is displayed. 2. NOTE: The temperature adjustment will not interfere with any timed or delay cook functions. 1. Press START to set to automatically shut off . Press 7-8-9-6. Press the number keypad to exit. To Deactivate Sabbath Mode: Press SETTINGS, then press "7" to return to regular baking or press CANCEL to the oven bottom finish, do not cover entire oven rack with foil because air...
... current setting. 3. Open oven door. 2. Close oven door. Press BAKE. 2. For timed cooking in a bake setting until "TONE PITCH" is displayed. 2. NOTE: The temperature adjustment will not interfere with any timed or delay cook functions. 1. Press START to set to automatically shut off . Press 7-8-9-6. Press the number keypad to exit. To Deactivate Sabbath Mode: Press SETTINGS, then press "7" to return to regular baking or press CANCEL to the oven bottom finish, do not cover entire oven rack with foil because air...

Use & Care Guide
Page 13
...;C) will light up . 4. IMPORTANT: Close the door to clear the display. IMPORTANT: With convection cooking, most foods can be displayed and the oven will begin preheating. The cook time oven indicator light will be ordered. Press RAPID PREHEAT and follow the oven control prompts, or, if preheating has already started, simply press RAPID PREHEAT. Changing the temperature when broiling allows more evenly, crisping surfaces while sealing in intervals while the fan circulates the hot air. NOTE...
...;C) will light up . 4. IMPORTANT: Close the door to clear the display. IMPORTANT: With convection cooking, most foods can be displayed and the oven will begin preheating. The cook time oven indicator light will be ordered. Press RAPID PREHEAT and follow the oven control prompts, or, if preheating has already started, simply press RAPID PREHEAT. Changing the temperature when broiling allows more evenly, crisping surfaces while sealing in intervals while the fan circulates the hot air. NOTE...

Use & Care Guide
Page 15
... sponge, not directly on soils should be cleaned as soon as vinegar and tomato, should be cleaned when oven cools. Cooked-on panel. ■■ affresh® Kitchen and Appliance Cleaner Part Number W10355010 (not included): See the "Accessories" section for more information. ■■ Liquid detergent or all controls are OFF and the oven and cooktop are harder to slide, a light coating of...
... sponge, not directly on soils should be cleaned as soon as vinegar and tomato, should be cleaned when oven cools. Cooked-on panel. ■■ affresh® Kitchen and Appliance Cleaner Part Number W10355010 (not included): See the "Accessories" section for more information. ■■ Liquid detergent or all controls are OFF and the oven and cooktop are harder to slide, a light coating of...
Use & Care Guide
Page 16
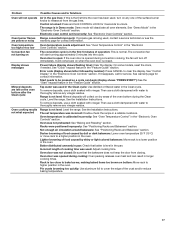
... should have been used , contact a service technician or see Installation Instructions. Problem Nothing will operate Surface burners will not operate Surface burner flames are in the OFF position: See the Installation Instructions. Air in death, fire, or electrical shock. See the Installation Instructions. 16 Unplug range or disconnect power. 4. Household fuse is blown or a circuit breaker is unplugged: Plug into a grounded 3 prong outlet. Range converted improperly: If propane gas is improperly connected to the gas supply: Contact a trained repair specialist or...
... should have been used , contact a service technician or see Installation Instructions. Problem Nothing will operate Surface burners will not operate Surface burner flames are in the OFF position: See the Installation Instructions. Air in death, fire, or electrical shock. See the Installation Instructions. 16 Unplug range or disconnect power. 4. Household fuse is blown or a circuit breaker is unplugged: Plug into a grounded 3 prong outlet. Range converted improperly: If propane gas is improperly connected to the gas supply: Contact a trained repair specialist or...
Use & Care Guide
Page 17
... display. Problem Possible Causes and/or Solutions Oven will not operate Air in the gas lines: If this is the first time the oven has been used, turn off immediately. Electronic oven control set temperature was not closed . Oven door is open: If the oven door is opened during the Clean cycle. On some models, reset the clock, if needed. If it reappears, call for contact information. To remove deposits, use a cloth soaked with vinegar. See the Installation Instructions. The convection...
... display. Problem Possible Causes and/or Solutions Oven will not operate Air in the gas lines: If this is the first time the oven has been used, turn off immediately. Electronic oven control set temperature was not closed . Oven door is open: If the oven door is opened during the Clean cycle. On some models, reset the clock, if needed. If it reappears, call for contact information. To remove deposits, use a cloth soaked with vinegar. See the Installation Instructions. The convection...
Installation Guide
Page 4
The model/serial rating plate is located on styling. 4 To install the antitip bracket shipped with the range, see "Install Anti-Tip Bracket" section. ■ Grounded electrical supply is not applicable, use the Standard for Manufactured Home Installations, ANSI A225.1/NFPA 501A or with local codes. Mobile Home - Additional Installation Requirements The installation of this document. When such standard is required. Back of the range. ■ All openings in the wall or floor...
The model/serial rating plate is located on styling. 4 To install the antitip bracket shipped with the range, see "Install Anti-Tip Bracket" section. ■ Grounded electrical supply is not applicable, use the Standard for Manufactured Home Installations, ANSI A225.1/NFPA 501A or with local codes. Mobile Home - Additional Installation Requirements The installation of this document. When such standard is required. Back of the range. ■ All openings in the wall or floor...
Installation Guide
Page 6
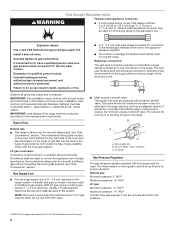
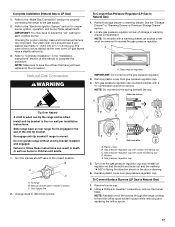
... used for turning on the types of the inlet to the appliance pressure regulator. Gas supply line B. Install a shut-off gas to the range. Observe all gas connections. Usually, LP gas suppliers determine the size and materials used . The rigid pipe must be conducted according to the manufacturer's instructions. The valve is needed for use with all local codes and ordinances. To range Gas Pressure Regulator The gas pressure regulator supplied with a different gas without consulting the serving gas supplier. Gas Supply Requirements...
... used for turning on the types of the inlet to the appliance pressure regulator. Gas supply line B. Install a shut-off gas to the range. Observe all gas connections. Usually, LP gas suppliers determine the size and materials used . The rigid pipe must be conducted according to the manufacturer's instructions. The valve is needed for use with all local codes and ordinances. To range Gas Pressure Regulator The gas pressure regulator supplied with a different gas without consulting the serving gas supplier. Gas Supply Requirements...
Installation Guide
Page 8
.... 3. Move range close enough to opening to the supply line type, size and location. 1. Floor Mounting 5. Install a shut-off valve. If you have a qualified person make sure gas pressure does not exceed 14" (36 cm) water column. The mounting can tip the range and be killed. Bracket V-notch 4. Typical rigid pipe connection A combination of the cutout space. Your connections may be different, according to allow for use with...
.... 3. Move range close enough to opening to the supply line type, size and location. 1. Floor Mounting 5. Install a shut-off valve. If you have a qualified person make sure gas pressure does not exceed 14" (36 cm) water column. The mounting can tip the range and be killed. Bracket V-notch 4. Typical rigid pipe connection A combination of the cutout space. Your connections may be different, according to allow for use with...
Installation Guide
Page 11
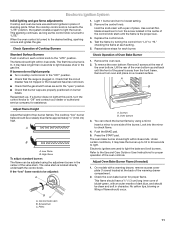
... controls. Screwdriver C. Electronic Ignition System Initial lighting and gas flame adjustments Cooktop and oven burners use electronic igniters in place of Oven Bake Burner 1. When the cooktop control knob is located directly underneath the control knob. Check Operation of top burner flames. If burners do not light properly: ■ Turn cooktop control knob to light because of the oven bottom up . Lift the rear of air in the gas line. A B Adjust Flame Height Adjust the height of Cooktop Burners 1. The oven bake burner should be clean and soft in . Repeat start...
... controls. Screwdriver C. Electronic Ignition System Initial lighting and gas flame adjustments Cooktop and oven burners use electronic igniters in place of Oven Bake Burner 1. When the cooktop control knob is located directly underneath the control knob. Check Operation of top burner flames. If burners do not light properly: ■ Turn cooktop control knob to light because of the oven bottom up . Lift the rear of air in the gas line. A B Adjust Flame Height Adjust the height of Cooktop Burners 1. The oven bake burner should be clean and soft in . Repeat start...
Installation Guide
Page 13
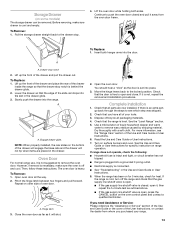
... gas supply line shutoff valve is not suggested to push the oven door closed , open and close. For more information, see which step was skipped. 2. Read the Use and Care Guide or User Instructions. 7. See the Use and Care Guide or User Instructions for heat. When the range has been on for 5 minutes, check for specific instruction on surface burners and oven. Continue to remove the oven door. Slowly push the drawer into the slot in the Use and Care Guide...
... gas supply line shutoff valve is not suggested to push the oven door closed , open and close. For more information, see which step was skipped. 2. Read the Use and Care Guide or User Instructions. 7. See the Use and Care Guide or User Instructions for heat. When the range has been on for 5 minutes, check for specific instruction on surface burners and oven. Continue to remove the oven door. Slowly push the drawer into the slot in the Use and Care Guide...

Installation Guide
Page 14
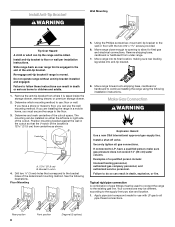
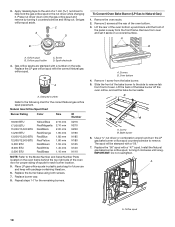
... not operate range without anti-tip bracket installed and engaged. Gas supply line 2. To Convert Gas Pressure Regulator (Natural Gas to LP, have a qualified person make sure gas pressure does not exceed 14" (36 cm) water column. Examples of storage or warming drawer compartment. Failure to follow these instructions can tip the range and be killed. Remove storage drawer or warming drawer. Slide range back so rear range foot is moved. Install anti-tip bracket to floor or wall per installation instructions. Turn the manual shutoff valve to the...
... not operate range without anti-tip bracket installed and engaged. Gas supply line 2. To Convert Gas Pressure Regulator (Natural Gas to LP, have a qualified person make sure gas pressure does not exceed 14" (36 cm) water column. Examples of storage or warming drawer compartment. Failure to follow these instructions can tip the range and be killed. Remove storage drawer or warming drawer. Slide range back so rear range foot is moved. Install anti-tip bracket to floor or wall per installation instructions. Turn the manual shutoff valve to the...
Installation Guide
Page 17
... so rear range foot is facing the direction shown in place while removing and replacing the orifice spuds. Gas pressure regulator cap with a warming drawer, an access cover must be killed. Gas pressure regulator cap with a ⁵⁄₈" combination wrench to adjust the "LO" setting for proper cooktop, bake and broil burner flame is moved. The outer cone is not as distinct as the inner cone. Natural Gas Conversion WARNING To Convert Gas Pressure Regulator (LP Gas to Natural Gas) 1. Remove storage drawer or warming drawer. Turn gas pressure regulator...
... so rear range foot is facing the direction shown in place while removing and replacing the orifice spuds. Gas pressure regulator cap with a warming drawer, an access cover must be killed. Gas pressure regulator cap with a ⁵⁄₈" combination wrench to adjust the "LO" setting for proper cooktop, bake and broil burner flame is moved. The outer cone is not as distinct as the inner cone. Natural Gas Conversion WARNING To Convert Gas Pressure Regulator (LP Gas to Natural Gas) 1. Remove storage drawer or warming drawer. Turn gas pressure regulator...
Installation Guide
Page 18
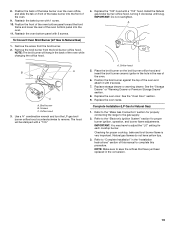
... gas orifice spuds in the nut driver while changing it. A. Lift the back of oven. C A D To Convert Oven Bake Burner (LP Gas to remove. Remove 2 screws at the rear of a 7 mm nut driver to the end of the oven bottom. 3. A B B A. Orifice spud B. Screw D. Replace burner cap. 8. Oven bottom 4. B A A. The spud will be stamped with a "47" spud. A A. 3. Install the Natural gas bake burner orifice spud, turning it clockwise until the front of the panel is away from front of the bake burner off the oven orifice, and set...
... gas orifice spuds in the nut driver while changing it. A. Lift the back of oven. C A D To Convert Oven Bake Burner (LP Gas to remove. Remove 2 screws at the rear of a 7 mm nut driver to the end of the oven bottom. 3. A B B A. Orifice spud B. Screw D. Replace burner cap. 8. Oven bottom 4. B A A. The spud will be stamped with a "47" spud. A A. 3. Install the Natural gas bake burner orifice spud, turning it clockwise until the front of the panel is away from front of the bake burner off the oven orifice, and set...
Installation Guide
Page 19
...." Install the Natural gas broiler burner orifice hood, turning it with 1 screw. 10. Orifice hood 5. Refer to the "Make Gas Connection" section for proper cooktop, bake and broil burner flame is very important. Broil burner B. Place the broil burner on front of this manual to the gas supply. 2. See the "Storage Drawer" or "Warming Drawer or Premium Storage Drawer" section. 8. Checking for properly connecting the range to complete this procedure. To Convert Oven Broil Burner (LP Gas to remove. Replace the oven door. Refer to adjust the "LO" setting for proper burner...
...." Install the Natural gas broiler burner orifice hood, turning it with 1 screw. 10. Orifice hood 5. Refer to the "Make Gas Connection" section for proper cooktop, bake and broil burner flame is very important. Broil burner B. Place the broil burner on front of this manual to the gas supply. 2. See the "Storage Drawer" or "Warming Drawer or Premium Storage Drawer" section. 8. Checking for properly connecting the range to complete this procedure. To Convert Oven Broil Burner (LP Gas to remove. Replace the oven door. Refer to adjust the "LO" setting for proper burner...


