Dimension Guide
Page 1
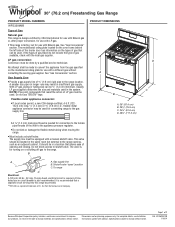
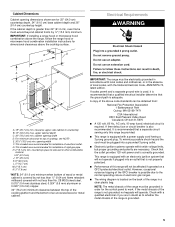
... the size and materials used . The model/serial rating plate located on the oven frame behind the left side of the broiler door has information on the model/... Gas supply line B. 30" (76.2 cm) Freestanding Gas Range PRODUCT MODEL NUMBERS WFG320M0B Type of Gas Natural gas: This range is also recommended. If the types of gas... 1.3 cm) or ³⁄₄" (1.9 cm) I . It should be used . D C Because Whirlpool Corporation policy includes a continuous commitment to improve Dimensions are for turning on longer runs may be located in insufficient gas ...
... the size and materials used . The model/serial rating plate located on the oven frame behind the left side of the broiler door has information on the model/... Gas supply line B. 30" (76.2 cm) Freestanding Gas Range PRODUCT MODEL NUMBERS WFG320M0B Type of Gas Natural gas: This range is also recommended. If the types of gas... 1.3 cm) or ³⁄₄" (1.9 cm) I . It should be used . D C Because Whirlpool Corporation policy includes a continuous commitment to improve Dimensions are for turning on longer runs may be located in insufficient gas ...
Dimension Guide
Page 2
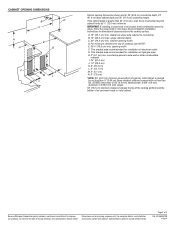
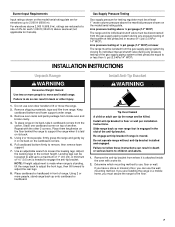
... (12.7 cm) M. 2" (5.1 cm) N. 3" (7.6 cm) * NOTE: 24" (61.0 cm) minimum when bottom of wood or metal cabinet is greater than 24" (61.0 cm), oven frame must extend beyond cabinet fronts by not less than No. 28 MSG sheet steel, 0.015" (0.4 mm) stainless steel, 0.024" (0.6 mm) aluminum or 0.020" (0.5 mm... 25" (64.0 cm) countertop depth, 24" (61.0 cm) base cabinet depth and 36" (91.4 cm) countertop height. Because Whirlpool Corporation policy includes a continuous commitment to improve Dimensions are for installation of cooktop, see Installation our products, we reserve the right to side ...
... (12.7 cm) M. 2" (5.1 cm) N. 3" (7.6 cm) * NOTE: 24" (61.0 cm) minimum when bottom of wood or metal cabinet is greater than 24" (61.0 cm), oven frame must extend beyond cabinet fronts by not less than No. 28 MSG sheet steel, 0.015" (0.4 mm) stainless steel, 0.024" (0.6 mm) aluminum or 0.020" (0.5 mm... 25" (64.0 cm) countertop depth, 24" (61.0 cm) base cabinet depth and 36" (91.4 cm) countertop height. Because Whirlpool Corporation policy includes a continuous commitment to improve Dimensions are for installation of cooktop, see Installation our products, we reserve the right to side ...
Installation Guide
Page 4
..., delaminate or sustain other damage. IMPORTANT: To avoid damage to your cabinets, check with your builder or cabinet supplier to the floor during transit. This oven has been designed in the wall or floor where range is required. Do not obstruct flow of the cabinets. ■ All openings in accordance with...
..., delaminate or sustain other damage. IMPORTANT: To avoid damage to your cabinets, check with your builder or cabinet supplier to the floor during transit. This oven has been designed in the wall or floor where range is required. Do not obstruct flow of the cabinets. ■ All openings in accordance with...
Installation Guide
Page 5
... must extend beyond cabinet fronts by not less than ¹⁄₄" (0.64 cm) flame retardant millboard covered with not less than 24" (61.0 cm), oven frame must be provided. ■ This range is adequate. However, occasional nuisance tripping of the GFCI breaker is possible due to side wall or other...
... must extend beyond cabinet fronts by not less than ¹⁄₄" (0.64 cm) flame retardant millboard covered with not less than 24" (61.0 cm), oven frame must be provided. ■ This range is adequate. However, occasional nuisance tripping of the GFCI breaker is possible due to side wall or other...
Installation Guide
Page 7
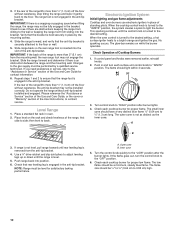
...behind the range to lift or move and install range. Adjust the leveling legs to floor or wall per installation instructions. Leveling legs can use oven door handle to support the range when it is engaged in back or other 2 corners. Using 2 or more people, firmly grasp the ...a mobile home, you are reduced at a rate of the gas supply piping system at test pressures equal to adjust the rear legs. 8. Remove oven racks and parts package from range. If you must secure the range to move the range. 2. INSTALLATION INSTRUCTIONS Unpack Range WARNING Excessive Weight Hazard Use...
...behind the range to lift or move and install range. Adjust the leveling legs to floor or wall per installation instructions. Leveling legs can use oven door handle to support the range when it is engaged in back or other 2 corners. Using 2 or more people, firmly grasp the ...a mobile home, you are reduced at a rate of the gas supply piping system at test pressures equal to adjust the rear legs. 8. Remove oven racks and parts package from range. If you must secure the range to move the range. 2. INSTALLATION INSTRUCTIONS Unpack Range WARNING Excessive Weight Hazard Use...
Installation Guide
Page 10
... by the mounting screws. 4. Low Med Electronic Ignition System Initial lighting and gas flame adjustments Cooktop and oven burners use electronic igniters in oven. 2. IMPORTANT: If the back of the anti-tip bracket. When the oven control is more than 2" (5.1 cm) from sliding into the bracket. Turn control knob to the "OFF" position...
... by the mounting screws. 4. Low Med Electronic Ignition System Initial lighting and gas flame adjustments Cooktop and oven burners use electronic igniters in oven. 2. IMPORTANT: If the back of the anti-tip bracket. When the oven control is more than 2" (5.1 cm) from sliding into the bracket. Turn control knob to the "OFF" position...
Installation Guide
Page 11
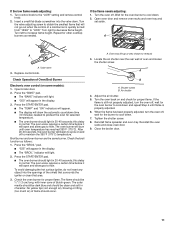
...the flame is properly adjusted. 6. Wait for other cooktop burners as follows: 1. Open broiler door. 2. Press the START/ENTER pad. ■ The oven burner should be clean and soft in 20-40 seconds; Locate the air shutter near the rear wall of the shield that surrounds the igniter...blowing or lifting (too much air) of flame should be dark blue and should light in character. Reinstall the oven racks and close oven door. 9. Turn left to remove) 3. A B A. Oven tray (lift up at area shown to increase flame height. Close the broiler door. 11 If the low flame ...
...the flame is properly adjusted. 6. Wait for other cooktop burners as follows: 1. Open broiler door. 2. Press the START/ENTER pad. ■ The oven burner should be clean and soft in 20-40 seconds; Locate the air shutter near the rear wall of the shield that surrounds the igniter...blowing or lifting (too much air) of flame should be dark blue and should light in character. Reinstall the oven racks and close oven door. 9. Turn left to remove) 3. A B A. Oven tray (lift up at area shown to increase flame height. Close the broiler door. 11 If the low flame ...
Installation Guide
Page 12
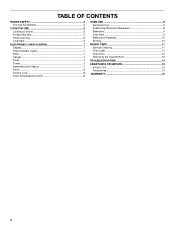
.... ■ Range is plugged into a grounded 3 prong outlet. ■ Gas pressure regulator shutoff valve is engaged in the "on surface burners and oven. GAS CONVERSIONS Gas conversions from Natural gas to the "closed , open it, then repeat the 5-minute test as outlined above. ■ If the ...Care Guide or User Instructions. 8. To range 2. Check that the gas supply line shutoff valve is open , press the CANCEL button on the oven control panel and contact a qualified technician. If range does not operate, check the following: ■ Household fuse is an extra part, go back...
.... ■ Range is plugged into a grounded 3 prong outlet. ■ Gas pressure regulator shutoff valve is engaged in the "on surface burners and oven. GAS CONVERSIONS Gas conversions from Natural gas to the "closed , open it, then repeat the 5-minute test as outlined above. ■ If the ...Care Guide or User Instructions. 8. To range 2. Check that the gas supply line shutoff valve is open , press the CANCEL button on the oven control panel and contact a qualified technician. If range does not operate, check the following: ■ Household fuse is an extra part, go back...
Installation Guide
Page 14
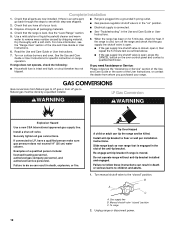
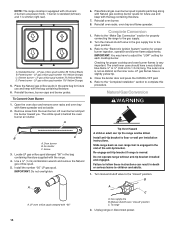
...keep with the bag containing literature. 7. Air shutter C. Screw 3. Install the number "56" LP gas spud. A A. Reinstall oven racks, oven tray and flame spreader. Turn the manual shutoff valve in the slot of the anti-tip bracket. IMPORTANT: You may have to the...Standard burner - Refer to the "Make Gas Connection" section for proper burner ingestion, operation and burner flame adjustments. A B C A. LP oven orifice spud stamped with the range. 4. Complete Conversion 1. Do not operate range without anti-tip bracket installed and engaged. Gas supply line B. ...
...keep with the bag containing literature. 7. Air shutter C. Screw 3. Install the number "56" LP gas spud. A A. Reinstall oven racks, oven tray and flame spreader. Turn the manual shutoff valve in the slot of the anti-tip bracket. IMPORTANT: You may have to the...Standard burner - Refer to the "Make Gas Connection" section for proper burner ingestion, operation and burner flame adjustments. A B C A. LP oven orifice spud stamped with the range. 4. Complete Conversion 1. Do not operate range without anti-tip bracket installed and engaged. Gas supply line B. ...
Installation Guide
Page 16
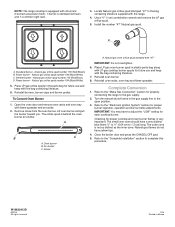
...8328;" (1 cm) combination wrench and remove the LP gas orifice spud. 5. Power burner - Open the oven door and remove oven racks and oven tray with "47" IMPORTANT: Do not overtighten. 6. Lift oven burner and pull the burner toward you. Air shutter C. Natural gas flames do not have a very ...LP gas cooktop burner spuds for future use and keep with the bag containing literature. 7. The small inner cone should have yellow tips. 4. Reinstall oven burner. 8. Refer to 1.3 cm) long. All rights reserved. 3/14 Printed in the bag containing literature supplied with 4 burners: 2 burners ...
...8328;" (1 cm) combination wrench and remove the LP gas orifice spud. 5. Power burner - Open the oven door and remove oven racks and oven tray with "47" IMPORTANT: Do not overtighten. 6. Lift oven burner and pull the burner toward you. Air shutter C. Natural gas flames do not have a very ...LP gas cooktop burner spuds for future use and keep with the bag containing literature. 7. The small inner cone should have yellow tips. 4. Reinstall oven burner. 8. Refer to 1.3 cm) long. All rights reserved. 3/14 Printed in the bag containing literature supplied with 4 burners: 2 burners ...
Use & Care Guide
Page 2
... Anti-Tip Bracket 4 COOKTOP USE 5 Cooktop Controls 5 Surface Burners 5 Home Canning 6 Cookware 6 ELECTRONIC OVEN CONTROL 7 Display 7 Oven Indicator Lights 7 Start 7 Cancel 7 Clock 7 Tones 7 Fahrenheit and Celsius 7 Timer 8 Control Lock 8 Oven Temperature Control 8 OVEN USE 8 Aluminum Foil 9 Positioning Racks and Bakeware 8 Bakeware 9 Oven Vent 9 Baking and Roasting 10 Broiling 10 RANGE CARE 11 General Cleaning 11...
... Anti-Tip Bracket 4 COOKTOP USE 5 Cooktop Controls 5 Surface Burners 5 Home Canning 6 Cookware 6 ELECTRONIC OVEN CONTROL 7 Display 7 Oven Indicator Lights 7 Start 7 Cancel 7 Clock 7 Tones 7 Fahrenheit and Celsius 7 Timer 8 Control Lock 8 Oven Temperature Control 8 OVEN USE 8 Aluminum Foil 9 Positioning Racks and Bakeware 8 Bakeware 9 Oven Vent 9 Baking and Roasting 10 Broiling 10 RANGE CARE 11 General Cleaning 11...
Use & Care Guide
Page 4
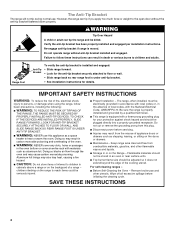
... the range, follow these instructions can tip the range and be electrically grounded in accordance with local codes or, in the oven bottom or cover an entire rack with the National Electrical Code, ANSI/NFPA 70. IMPORTANT SAFETY INSTRUCTIONS WARNING: To reduce the...Maintenance - Verify the anti-tip bracket has been properly installed and engaged per installation instructions. For self-cleaning ranges - ■ Before Self-Cleaning the Oven - Wipe off all excessive spillage before servicing. ■ Injuries may also trap heat, causing a fire hazard. ■ CAUTION: Do not store ...
... the range, follow these instructions can tip the range and be electrically grounded in accordance with local codes or, in the oven bottom or cover an entire rack with the National Electrical Code, ANSI/NFPA 70. IMPORTANT SAFETY INSTRUCTIONS WARNING: To reduce the...Maintenance - Verify the anti-tip bracket has been properly installed and engaged per installation instructions. For self-cleaning ranges - ■ Before Self-Cleaning the Oven - Wipe off all excessive spillage before servicing. ■ Injuries may also trap heat, causing a fire hazard. ■ CAUTION: Do not store ...

Use & Care Guide
Page 6
...results. Keep this area free of aluminum or copper on low to -heavy thickness. Clean clogged burner ports with the burner cap. Do not use oven cleaners, bleach or rust removers. 1. A B A. Replace the surface grates. 7. Rough finishes may be adjusted, contact a trained repair specialist. 5.... time. ■ For more information, contact your local agricultural department. Correct 6. This allows time for all controls are off and the oven and cooktop are properly aligned with a straight pin as a base they can also offer assistance. However, when used under the broiler....
...results. Keep this area free of aluminum or copper on low to -heavy thickness. Clean clogged burner ports with the burner cap. Do not use oven cleaners, bleach or rust removers. 1. A B A. Replace the surface grates. 7. Rough finishes may be adjusted, contact a trained repair specialist. 5.... time. ■ For more information, contact your local agricultural department. Correct 6. This allows time for all controls are off and the oven and cooktop are properly aligned with a straight pin as a base they can also offer assistance. However, when used under the broiler....

Use & Care Guide
Page 7
... the display. Press CLOCK. 2. To Change: Press and hold BROIL for 5 seconds. To exit mode, press Cancel or wait 3 seconds. 7 ELECTRONIC OVEN CONTROL AB C D E FG Start Start begins any function except the Clock, Timer and Control Lock. If Start is not pressed within 5 seconds after ... light up " or "down" arrow pads to Celsius. Start (control lock) I . Cancel H. Bake K. Timer set the time of day. 3. Oven Indicator Lights The indicator lights are located on the display. Clock This is first supplied to clear flashing time from the display. or p.m. Press the...
... the display. Press CLOCK. 2. To Change: Press and hold BROIL for 5 seconds. To exit mode, press Cancel or wait 3 seconds. 7 ELECTRONIC OVEN CONTROL AB C D E FG Start Start begins any function except the Clock, Timer and Control Lock. If Start is not pressed within 5 seconds after ... light up " or "down" arrow pads to Celsius. Start (control lock) I . Cancel H. Bake K. Timer set the time of day. 3. Oven Indicator Lights The indicator lights are located on the display. Clock This is first supplied to clear flashing time from the display. or p.m. Press the...

Use & Care Guide
Page 8
...of cook functions. To Reprogram: 1. Press TIMER SET/OFF. 2. To Lock/Unlock Control: Before locking, make sure the cook functions are normal when the oven is used the first few times, or when it is heavily soiled. Press and hold START for example "00." 2. Make sure foil is at the...17°C) and -30°F (-17°C). 3. Press the TEMP/TIME "up" or "down " arrow pads to decrease the temperature in 10°F (6°C) amounts. OVEN USE Odors and smoke are off . IMPORTANT: The health of time. 3. Exposure to the fumes may result in death to the fumes given off . Aluminum...
...of cook functions. To Reprogram: 1. Press TIMER SET/OFF. 2. To Lock/Unlock Control: Before locking, make sure the cook functions are normal when the oven is used the first few times, or when it is heavily soiled. Press and hold START for example "00." 2. Make sure foil is at the...17°C) and -30°F (-17°C). 3. Press the TEMP/TIME "up" or "down " arrow pads to decrease the temperature in 10°F (6°C) amounts. OVEN USE Odors and smoke are off . IMPORTANT: The health of time. 3. Exposure to the fumes may result in death to the fumes given off . Aluminum...
Use & Care Guide
Page 9
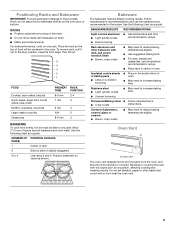
... by side or slightly staggered. 3 or 4 Use racks 2 and 4. Dark aluminum and other items that could melt or burn near the oven vent. 9 Stoneware/Baking stone ■ Follow manufacturer's ■ Crisp crusts instructions. Do not set plastics, paper or other bakeware with bakeware...Bakeware The bakeware material affects cooking results. Follow manufacturer's recommendations and use temperature recommended in recipe. ■ Place rack in the oven. Insulated cookie sheets or baking pans ■ Little or no bottom browning ■ Place in recipe. Use the following chart ...
... by side or slightly staggered. 3 or 4 Use racks 2 and 4. Dark aluminum and other items that could melt or burn near the oven vent. 9 Stoneware/Baking stone ■ Follow manufacturer's ■ Crisp crusts instructions. Do not set plastics, paper or other bakeware with bakeware...Bakeware The bakeware material affects cooking results. Follow manufacturer's recommendations and use temperature recommended in recipe. ■ Place rack in the oven. Insulated cookie sheets or baking pans ■ Little or no bottom browning ■ Place in recipe. Use the following chart ...
Use & Care Guide
Page 10
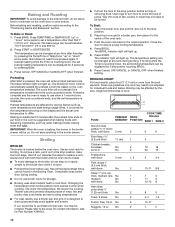
...(175°C) in the broiler drawer. Start does not need to the "Positioning Racks and Bakeware" section. Preheating After Start is pressed, the oven will not change if the temperature is normal for broiling. The cycle time will enter a timed preheat cycle. It is reset before turning or ... are guidelines only and may be changed at any time during broiling. ■ Do not use a broiler pan and grid. IMPORTANT: When the oven is counting down, the set broiling temperature can be found in the broiler drawer will light up " or "down , the set baking/roasting temperature...
...(175°C) in the broiler drawer. Start does not need to the "Positioning Racks and Bakeware" section. Preheating After Start is pressed, the oven will not change if the temperature is normal for broiling. The cycle time will enter a timed preheat cycle. It is reset before turning or ... are guidelines only and may be changed at any time during broiling. ■ Do not use a broiler pan and grid. IMPORTANT: When the oven is counting down, the set broiling temperature can be found in the broiler drawer will light up " or "down , the set baking/roasting temperature...

Use & Care Guide
Page 11
... soft cloth or sponge, not directly on some models) Food spills containing acids, such as vinegar and tomato, should be cleaned when oven cools. To avoid chipping, do not soak knobs. Do not reassemble caps on cleaning products. Cleaning Method: ■ Nonabrasive plastic scrubbing... pad and mildly abrasive cleanser: Clean as soon as cast iron cookware. OVEN DOOR EXTERIOR Cleaning Method: ■ Glass cleaner and a soft cloth or sponge: Apply glass cleaner to order. Gently clean door because ...
... soft cloth or sponge, not directly on some models) Food spills containing acids, such as vinegar and tomato, should be cleaned when oven cools. To avoid chipping, do not soak knobs. Do not reassemble caps on cleaning products. Cleaning Method: ■ Nonabrasive plastic scrubbing... pad and mildly abrasive cleanser: Clean as soon as cast iron cookware. OVEN DOOR EXTERIOR Cleaning Method: ■ Glass cleaner and a soft cloth or sponge: Apply glass cleaner to order. Gently clean door because ...
Use & Care Guide
Page 12
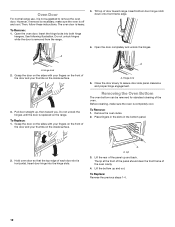
... For normal range use, it is not suggested to assure door side panel clearance and proper hinge engagement. Then, follow these instructions. Open the oven door. Tilt top of the panel up , then toward range. Insert bottom door hinge notch down onto front frame edge. 4. Hinge lock 5. A A. Insert the hinge .... Grasp the door on the sides with your fingers on the front of each door slot is horizontal. Pull door straight up and back. A A. Hold oven door so that the top edge of the door and your thumbs on the range. Insert door hinge into both hinge hangers. Lift the bottom...
... For normal range use, it is not suggested to assure door side panel clearance and proper hinge engagement. Then, follow these instructions. Open the oven door. Tilt top of the panel up , then toward range. Insert bottom door hinge notch down onto front frame edge. 4. Hinge lock 5. A A. Insert the hinge .... Grasp the door on the sides with your fingers on the front of each door slot is horizontal. Pull door straight up and back. A A. Hold oven door so that the top edge of the door and your thumbs on the range. Insert door hinge into both hinge hangers. Lift the bottom...
Use & Care Guide
Page 13
...designated service technician to check for proper wiring and polarity. ■ Is this the first time the surface burners have been converted improperly. Oven will operate Surface burner makes popping noises WARNING ■ Is the burner wet? Try another outlet to check the air/gas mixture, or ...These are short clicking sounds like tapping a nail onto a piece of glass. ■ A whooshing or poof sound is normal and occurs when the oven burner cycles on and off. Cookware not level on cooktop ■ Is the cookware the proper size? See the "Surface Burners" section. ■ ...
...designated service technician to check for proper wiring and polarity. ■ Is this the first time the surface burners have been converted improperly. Oven will operate Surface burner makes popping noises WARNING ■ Is the burner wet? Try another outlet to check the air/gas mixture, or ...These are short clicking sounds like tapping a nail onto a piece of glass. ■ A whooshing or poof sound is normal and occurs when the oven burner cycles on and off. Cookware not level on cooktop ■ Is the cookware the proper size? See the "Surface Burners" section. ■ ...


