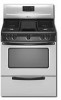
Owners Manual
Page 4
...Do not store items of interest to reach items could be killed. The range, when installed, must be electrically grounded in accordance with local codes or, in an oven or near surface units. ■ Top burner flame size should be adjusted so it does not extend beyond the edge... of the cooking utensil. Be sure the range is properly installed and grounded by a qualified technician. ■ This range is installed: • Slide range forward. • Look for details. ...
...Do not store items of interest to reach items could be killed. The range, when installed, must be electrically grounded in accordance with local codes or, in an oven or near surface units. ■ Top burner flame size should be adjusted so it does not extend beyond the edge... of the cooking utensil. Be sure the range is properly installed and grounded by a qualified technician. ■ This range is installed: • Slide range forward. • Look for details. ...
Owners Manual
Page 5
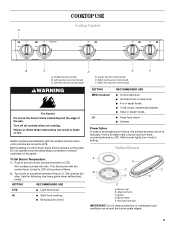
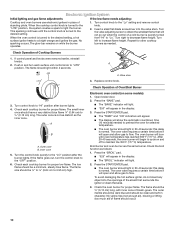
Left rear burner control knob C. Left front burner control knob D. Center burner control knob E. Failure to LITE. To Set Burner Temperature: 1. Turn knob to LITE. Hold a lit match near a burner and turn knob counterclockwise to follow these instructions can be lit manually. Gas tube opening IMPORTANT: Do not obstruct the flow of the pan. Electric igniters automatically...
Left rear burner control knob C. Left front burner control knob D. Center burner control knob E. Failure to LITE. To Set Burner Temperature: 1. Turn knob to LITE. Hold a lit match near a burner and turn knob counterclockwise to follow these instructions can be lit manually. Gas tube opening IMPORTANT: Do not obstruct the flow of the pan. Electric igniters automatically...
Owners Manual
Page 6
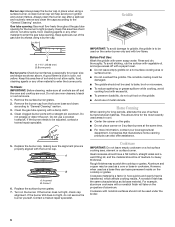
.... Before First Use: Wash the griddle with the burner cap. Rough finishes may be used as a core or base in cookware. Keep this area free of the gas tube by always using a surface burner. Burner ports Burner ports: Check burner flames occasionally for the most recently used on the ...cooktop or grates. Do not enlarge or distort the port. Replace the burner cap, making sure the alignment pins are...
.... Before First Use: Wash the griddle with the burner cap. Rough finishes may be used as a core or base in cookware. Keep this area free of the gas tube by always using a surface burner. Burner ports Burner ports: Check burner flames occasionally for the most recently used on the ...cooktop or grates. Do not enlarge or distort the port. Replace the burner cap, making sure the alignment pins are...
Owners Manual
Page 8
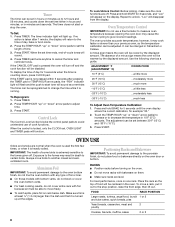
...Use the following chart as a reminder. The adjustment can be cooler by the displayed amount. Exposure to the fumes may cause the burner cycling to 12 hours and 59 minutes, and counts down " arrow pad(s) to increase or to another closed and wellventilated room. ... COOKS FOOD 10°F (5°C) ...a little more 20°F (10°C) ...moderately more 30°F (15°C) ...much more -10°F (-5°C) ...a little less -20°F (-10°C) ...moderately less -30°F (-15°C) ...much less To Adjust Oven Temperature Calibration: 1. Place the rack so the...
...Use the following chart as a reminder. The adjustment can be cooler by the displayed amount. Exposure to the fumes may cause the burner cycling to 12 hours and 59 minutes, and counts down " arrow pad(s) to increase or to another closed and wellventilated room. ... COOKS FOOD 10°F (5°C) ...a little more 20°F (10°C) ...moderately more 30°F (15°C) ...much more -10°F (-5°C) ...a little less -20°F (-10°C) ...moderately less -30°F (-15°C) ...much less To Adjust Oven Temperature Calibration: 1. Place the rack so the...
Owners Manual
Page 11
... remove numbers. ■ All-Purpose Appliance Cleaner Part Number 31682 (not included): See "Assistance or Service" section to order. ■ Gas Grate and Drip Pan Cleaner Part Number 31617: See "Assistance or Service" section to accumulate under knobs. To avoid damage, do not remove...under the griddle. If using commercial oven cleaners, follow label instructions on burners while they are cool. Soap, water and a soft cloth or sponge are cool. Cleaning Method: If the griddle is cool. RANGE CARE General Cleaning IMPORTANT: Before cleaning, make sure knobs are in ...
... remove numbers. ■ All-Purpose Appliance Cleaner Part Number 31682 (not included): See "Assistance or Service" section to order. ■ Gas Grate and Drip Pan Cleaner Part Number 31617: See "Assistance or Service" section to accumulate under knobs. To avoid damage, do not remove...under the griddle. If using commercial oven cleaners, follow label instructions on burners while they are cool. Soap, water and a soft cloth or sponge are cool. Cleaning Method: If the griddle is cool. RANGE CARE General Cleaning IMPORTANT: Before cleaning, make sure knobs are in ...
Owners Manual
Page 13
... release air from the solenoid. Excessive heat around cookware on cooktop ■ Is the range level? Gas range noises during the cycle. ■ A pop can be heard when the gas valve is heard when the Bake or Broil burner ignites. ■ On some models, a clicking sound can be heard each time the... Bake or Broil burners ignite during Bake and Broil operations Noises that can be heard ...
... release air from the solenoid. Excessive heat around cookware on cooktop ■ Is the range level? Gas range noises during the cycle. ■ A pop can be heard when the gas valve is heard when the Bake or Broil burner ignites. ■ On some models, a clicking sound can be heard each time the... Bake or Broil burners ignite during Bake and Broil operations Noises that can be heard ...
Owners Manual
Page 14
...need adjustment? Cooktop cooking results not what expected ■ Is the range level? See the Installation Instructions. ■ Was the oven preheated? Decrease oven temperature 10° F to 30°F (5°C to release air from the gas lines. ■ Is the electronic oven control set oven temperature.... calibration set to clear the display. The appliance may have been converted improperly. Make sure batter is normal and occurs when the oven burner cycles on to 15°C). ■ Are crust edges browning early? See "Positioning Racks and Bakeware" section. ■ Is the...
...need adjustment? Cooktop cooking results not what expected ■ Is the range level? See the Installation Instructions. ■ Was the oven preheated? Decrease oven temperature 10° F to 30°F (5°C to release air from the gas lines. ■ Is the electronic oven control set oven temperature.... calibration set to clear the display. The appliance may have been converted improperly. Make sure batter is normal and occurs when the oven burner cycles on to 15°C). ■ Are crust edges browning early? See "Positioning Racks and Bakeware" section. ■ Is the...
Installation Instructions
Page 6
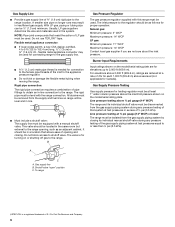
... and closing its individual shutoff valve must be used for connecting range to the gas supply line. ■ A ½" (1.3 cm) male pipe thread is needed for elevations up to or less than ½ psi (3.5 kPa). Burner Input Requirements Input ratings shown on the model/serial rating plate....ft (609.6 m), ratings are not sure about the inlet pressure. Gas supply line B. The inlet pressure to the range. Gas Supply Line ■ Provide a gas supply line of ¾" (1.9 cm) rigid pipe to shutoff valve. With LP gas, piping or tubing size can be as an adjacent cabinet. NOTE: ...
... and closing its individual shutoff valve must be used for connecting range to the gas supply line. ■ A ½" (1.3 cm) male pipe thread is needed for elevations up to or less than ½ psi (3.5 kPa). Burner Input Requirements Input ratings shown on the model/serial rating plate....ft (609.6 m), ratings are not sure about the inlet pressure. Gas supply line B. The inlet pressure to the range. Gas Supply Line ■ Provide a gas supply line of ¾" (1.9 cm) rigid pipe to shutoff valve. With LP gas, piping or tubing size can be as an adjacent cabinet. NOTE: ...
Installation Instructions
Page 9
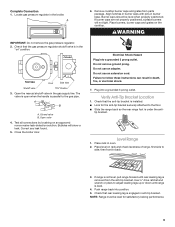
... handle is parallel to the floor. ■ Slide the range back so the rear range foot is level. 4. Bubbles will not light. WARNING IMPORTANT: Do not remove the gas pressure regulator. 2. Electrical Shock Hazard Plug into position. 5. Align notches in burner caps with pins in the gas supply line. Plug into a grounded 3 prong outlet. Complete...
... handle is parallel to the floor. ■ Slide the range back so the rear range foot is level. 4. Bubbles will not light. WARNING IMPORTANT: Do not remove the gas pressure regulator. 2. Electrical Shock Hazard Plug into position. 5. Align notches in burner caps with pins in the gas supply line. Plug into a grounded 3 prong outlet. Complete...
Installation Instructions
Page 10
... will appear. ■ The display will show the automatic countdown time (10 minutes) needed . The oven burner will open and allow gas to light the burner. Check the oven burner for proper flame. No sparking occurs. Turn control knob to 0.95 cm) high. Insert a small flat-...setting, a hot surface igniter heats to preheat the oven for other cooktop burners as follows: 1. Electronic Ignition System Initial lighting and gas flame adjustments If the low flame needs adjusting: Cooktop and oven burners use electronic igniters in the display. ■ The "BROIL" indicator will ...
... will appear. ■ The display will show the automatic countdown time (10 minutes) needed . The oven burner will open and allow gas to light the burner. Check the oven burner for proper flame. No sparking occurs. Turn control knob to 0.95 cm) high. Insert a small flat-...setting, a hot surface igniter heats to preheat the oven for other cooktop burners as follows: 1. Electronic Ignition System Initial lighting and gas flame adjustments If the low flame needs adjusting: Cooktop and oven burners use electronic igniters in the display. ■ The "BROIL" indicator will ...

Installation Instructions
Page 11
... , wait for the burner to see the "Range Care" section of /recycle all parts are now installed. Oven tray (lift up at area shown to cool down. 2. Turn on and check for the oven burner to remove) B. See "Level Range." 5. Wait for proper flame. Check that the gas supply line shutoff valve ...is open. ■ If the gas supply line shutoff valve is closed, open it, then repeat the 5-minute test as ...
... , wait for the burner to see the "Range Care" section of /recycle all parts are now installed. Oven tray (lift up at area shown to cool down. 2. Turn on and check for the oven burner to remove) B. See "Level Range." 5. Wait for proper flame. Check that the gas supply line shutoff valve ...is open. ■ If the gas supply line shutoff valve is closed, open it, then repeat the 5-minute test as ...

Installation Instructions
Page 13
... spuds in plastic parts bag along with Natural gas cooktop burner spuds for proper burner ingestion, operation and burner flame adjustments. Lift oven burner. B A. Burner C. Center burner 2. A A B A. A C D B E A. LP gas orifice spud number 80 D. Standard burner - Refer to the "Make Gas Connection" section for properly connecting the range to the "Electronic Ignition System" section for future use and keep with the bag...
... spuds in plastic parts bag along with Natural gas cooktop burner spuds for proper burner ingestion, operation and burner flame adjustments. Lift oven burner. B A. Burner C. Center burner 2. A A B A. A C D B E A. LP gas orifice spud number 80 D. Standard burner - Refer to the "Make Gas Connection" section for properly connecting the range to the "Electronic Ignition System" section for future use and keep with the bag...
Installation Instructions
Page 14
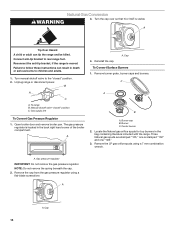
... death or serious burns to follow these instructions can tip the range and be killed. Connect anti-tip bracket to the "closed " position C. The gas pressure regulator is stamped "132" and one "128." 3. Burner cap B. Burner C. A A. Center burner 2. Remove the LP gas orifice spuds using a flat-blade screwdriver. A Tip Over Hazard A child or adult can result...
... death or serious burns to follow these instructions can tip the range and be killed. Connect anti-tip bracket to the "closed " position C. The gas pressure regulator is stamped "132" and one "128." 3. Burner cap B. Burner C. A A. Center burner 2. Remove the LP gas orifice spuds using a flat-blade screwdriver. A Tip Over Hazard A child or adult can result...
Installation Instructions
Page 15
... with "47" IMPORTANT: Do not overtighten. 6. Air shutter 15 A B A. Natural gas orifice spud number 125 5. Natural gas oven orifice spud stamped with 4 standard burners, 3 standard burners and 1 power burner, or 3 standard burners, 1 power burner and 1 center burner. Spud B. Reinstall burners, burner caps and burner grates. Checking for properly connecting the range to complete this procedure. The outer cone is not as distinct...
... with "47" IMPORTANT: Do not overtighten. 6. Air shutter 15 A B A. Natural gas orifice spud number 125 5. Natural gas oven orifice spud stamped with 4 standard burners, 3 standard burners and 1 power burner, or 3 standard burners, 1 power burner and 1 center burner. Spud B. Reinstall burners, burner caps and burner grates. Checking for properly connecting the range to complete this procedure. The outer cone is not as distinct...


