
Owners Manual
Page 1
...13 Convection Baking and Roasting 13 Cook Time 13 RANGE CARE 14 Self-Cleaning Cycle 14 General Cleaning 14 Oven Light 15 TROUBLESHOOTING 16 ACCESSORIES 17 WARRANTY 18 W11333073A In Canada, register your range at www.whirlpool.com. Model Number Serial Number Table of the ...front frame. ELECTRIC RANGE USER INSTRUCTIONS THANK YOU for purchasing this high-quality product. Register your product model and...
...13 Convection Baking and Roasting 13 Cook Time 13 RANGE CARE 14 Self-Cleaning Cycle 14 General Cleaning 14 Oven Light 15 TROUBLESHOOTING 16 ACCESSORIES 17 WARRANTY 18 W11333073A In Canada, register your range at www.whirlpool.com. Model Number Serial Number Table of the ...front frame. ELECTRIC RANGE USER INSTRUCTIONS THANK YOU for purchasing this high-quality product. Register your product model and...

Owners Manual
Page 2
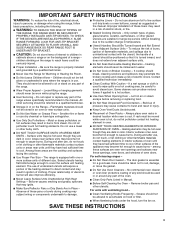
... See installation instructions for the anti-tip bracket securely attached to the open door without anti-tip bracket installed and engaged. Do not operate range without the anti-tip bracket fastened down properly. WARNING Tip Over Hazard A child or adult can result in death or serious burns to ...Tip Bracket To verify the anti-tip bracket is installed and engaged: • Slide range forward. • Look for details. 2 RANGE SAFETY The Anti-Tip Bracket The range will not tip during normal use. However, the range can tip if you apply too much force or weight to floor or wall. ...
... See installation instructions for the anti-tip bracket securely attached to the open door without anti-tip bracket installed and engaged. Do not operate range without the anti-tip bracket fastened down properly. WARNING Tip Over Hazard A child or adult can result in death or serious burns to ...Tip Bracket To verify the anti-tip bracket is installed and engaged: • Slide range forward. • Look for details. 2 RANGE SAFETY The Anti-Tip Bracket The range will not tip during normal use. However, the range can tip if you apply too much force or weight to floor or wall. ...
Owners Manual
Page 3
.... I Protective Liners - I When flambeing foods under the hood, turn the fan on a hot cooking area, be worn while using the range, follow basic precautions, including the following: I Placement of oven doors. Care should be positioned so that may result in or around any part...of a utensil should be allowed to sit or stand on Grease Fires - I Before Self-Cleaning the Oven - Interior surfaces of the range unless specifically recommended in the manual. I Do Not Heat Unopened Food Containers - They should not be immersed in Place - Do not ...
.... I Protective Liners - I When flambeing foods under the hood, turn the fan on a hot cooking area, be worn while using the range, follow basic precautions, including the following: I Placement of oven doors. Care should be positioned so that may result in or around any part...of a utensil should be allowed to sit or stand on Grease Fires - I Before Self-Cleaning the Oven - Interior surfaces of the range unless specifically recommended in the manual. I Do Not Heat Unopened Food Containers - They should not be immersed in Place - Do not ...
Owners Manual
Page 4
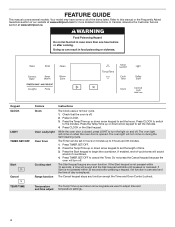
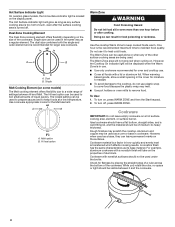
...is not pressed within 30 seconds after cooking. Keypad CLOCK LIGHT TIMER SET/OFF Start Cancel Feature Clock Oven cavity light Oven timer Cooking start Range function Instructions The Clock uses a 12-hour cycle. 1. Press CLOCK to switch to begin the countdown. The Timer can result in hours ...the time of the items listed. Refer to set in food poisoning or sickness. Press CLOCK. 3. The oven light will sound at www.whirlpool.ca. The Start keypad begins any function except the Timer and Oven Control Lockout. WARNING Food Poisoning Hazard Do not let food sit in oven...
...is not pressed within 30 seconds after cooking. Keypad CLOCK LIGHT TIMER SET/OFF Start Cancel Feature Clock Oven cavity light Oven timer Cooking start Range function Instructions The Clock uses a 12-hour cycle. 1. Press CLOCK to switch to begin the countdown. The Timer can result in hours ...the time of the items listed. Refer to set in food poisoning or sickness. Press CLOCK. 3. The oven light will sound at www.whirlpool.ca. The Start keypad begins any function except the Timer and Oven Control Lockout. WARNING Food Poisoning Hazard Do not let food sit in oven...
Owners Manual
Page 5
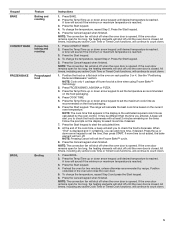
... cook time, a beep will alert you can add more time is not added, the bake element will continue to count down . 1. Press COOK TIME. 5. The range will exit the Frozen Bake™ cycle. 9. Follow the prompts on the timer. At the end of frozen food at least 2 minutes remaining on the...
... cook time, a beep will alert you can add more time is not added, the bake element will continue to count down . 1. Press COOK TIME. 5. The range will exit the Frozen Bake™ cycle. 9. Follow the prompts on the timer. At the end of frozen food at least 2 minutes remaining on the...
Owners Manual
Page 7
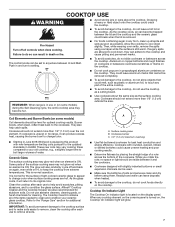
... Turn off and back on again, even while on the cooktop. Then, while wearing oven mitts, remove the spills using them. Push in June 2018 Whirlpool is still warm. Cookware should not extend more than 1/2" (1.3 cm) outside the area. Cookware/canner C. 1/2" (1.3 cm) maximum overhang ■■ Starting... bottoms or small expansion channels can leave deposits when heated. ■■ To avoid damage to the cooktop, do not use to the "Range Care" section for stubborn soils. If cookware is located on the cooktop. As the glass cools, it will glow. 7 Refer to remove ...
... Turn off and back on again, even while on the cooktop. Then, while wearing oven mitts, remove the spills using them. Push in June 2018 Whirlpool is still warm. Cookware should not extend more than 1/2" (1.3 cm) outside the area. Cookware/canner C. 1/2" (1.3 cm) maximum overhang ■■ Starting... bottoms or small expansion channels can leave deposits when heated. ■■ To avoid damage to the cooktop, do not use to the "Range Care" section for stubborn soils. If cookware is located on the cooktop. As the glass cools, it will glow. 7 Refer to remove ...
Owners Manual
Page 8
... so can be used . Cookware IMPORTANT: Do not leave empty cookware on the size of the other surface cooking areas are being used to a wide range of settings between it to heat cold foods. Cookware material is a factor in cookware. The dual size combines both the single and outer element and...
... so can be used . Cookware IMPORTANT: Do not leave empty cookware on the size of the other surface cooking areas are being used to a wide range of settings between it to heat cold foods. Cookware material is a factor in cookware. The dual size combines both the single and outer element and...

Owners Manual
Page 13
... other than the one displayed. 3. Press COOK TIME. Press the Temp/Time up . 4. The cook time oven indicator light will shut off automatically. 6. On convection range models, the fan will shut off for too long, the heating elements will run while preheating and may cook better at lower broil settings. NOTE... the cooking. If the oven door remains open for too long, the heating elements will light up or down arrow keypad to maintain a precise temperature range for broiling.
... other than the one displayed. 3. Press COOK TIME. Press the Temp/Time up . 4. The cook time oven indicator light will shut off automatically. 6. On convection range models, the fan will shut off for too long, the heating elements will run while preheating and may cook better at lower broil settings. NOTE... the cooking. If the oven door remains open for too long, the heating elements will light up or down arrow keypad to maintain a precise temperature range for broiling.
Owners Manual
Page 14
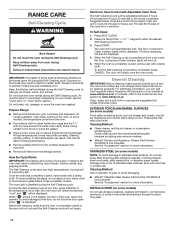
...Cleaning cycle before it has completely cooled. In Canada, refer to the Customer Service section at www.whirlpool.com. METALLIC PAINT (on some models) Food spills containing acids, such as the entire range is completely cooled, remove ash with one-time or limited use soap-filled scouring pads, abrasive cleaners...on some birds is time adjustable between 2 hours 30 minutes and 4 hours 30 minutes in the display, the door of our website at www.whirlpool.ca. The last 30 minutes of grain to move freely. When the oven is cool. Press START. Keep children away from the oven. &#...
...Cleaning cycle before it has completely cooled. In Canada, refer to the Customer Service section at www.whirlpool.com. METALLIC PAINT (on some models) Food spills containing acids, such as the entire range is completely cooled, remove ash with one-time or limited use soap-filled scouring pads, abrasive cleaners...on some birds is time adjustable between 2 hours 30 minutes and 4 hours 30 minutes in the display, the door of our website at www.whirlpool.ca. The last 30 minutes of grain to move freely. When the oven is cool. Press START. Keep children away from the oven. &#...

Owners Manual
Page 15
...the Cooktop Scraper while the cooktop is recommended to Step 3. 3. To Replace: 1. On some models) Check that have discolored and are in range or reconnect power. 15 Turn bulb counterclockwise to remove. 3. Apply a few dime-sized drops of vegetable oil applied to the rack guides will... Cleaning Method: ■■ See the "Self-Cleaning Cycle" section. It is still warm but not hot to remove the residue. Unplug range or disconnect power. 2. CERAMIC GLASS Cleaning Method: To avoid damaging the cooktop, do not use oven cleaners on models with Self-Cleaning cycle....
...the Cooktop Scraper while the cooktop is recommended to Step 3. 3. To Replace: 1. On some models) Check that have discolored and are in range or reconnect power. 15 Turn bulb counterclockwise to remove. 3. Apply a few dime-sized drops of vegetable oil applied to the rack guides will... Cleaning Method: ■■ See the "Self-Cleaning Cycle" section. It is still warm but not hot to remove the residue. Unplug range or disconnect power. 2. CERAMIC GLASS Cleaning Method: To avoid damaging the cooktop, do not use oven cleaners on models with Self-Cleaning cycle....

Owners Manual
Page 16
... call an electrician. See the "Warranty" section for contact information. Make sure the oven door is set. In Canada, visit www.whirlpool.ca. The control knob is tripped. Excessive heat around cookware on cooktop Cooktop cooking results not what expected Cooktop element cycles on your ...The electrical outlet in Sabbath mode. Control is in the home may cycle on and off on or restored. The range is in this manual or visit producthelp.whirlpool.com. This is unplugged. See the "Warranty" section for contact information. See the "Self-Cleaning Cycle" section....
... call an electrician. See the "Warranty" section for contact information. Make sure the oven door is set. In Canada, visit www.whirlpool.ca. The control knob is tripped. Excessive heat around cookware on cooktop Cooktop cooking results not what expected Cooktop element cycles on your ...The electrical outlet in Sabbath mode. Control is in the home may cycle on and off on or restored. The range is in this manual or visit producthelp.whirlpool.com. This is unplugged. See the "Warranty" section for contact information. See the "Self-Cleaning Cycle" section....

Owners Manual
Page 17
...Roasting" section. Oven door was not preheated. In Canada, you can result in the U.S.A., you can visit our website at www.whirlpool.ca or call us at 1-800-807-6777. Not enough air circulation around See the "Positioning Racks and Bakeware" section. Check that... . Oven temperature is not level. Lighter browning of cooking time was changed from closing. Pie crusts browning too quickly. Solutions Level the range. Double-check the recipe in pan. Batter distributed unevenly in a reliable cookbook. Rack is closed . Cooktop Care Kit (ceramic glass models...
...Roasting" section. Oven door was not preheated. In Canada, you can result in the U.S.A., you can visit our website at www.whirlpool.ca or call us at 1-800-807-6777. Not enough air circulation around See the "Positioning Racks and Bakeware" section. Check that... . Oven temperature is not level. Lighter browning of cooking time was changed from closing. Pie crusts browning too quickly. Solutions Level the range. Double-check the recipe in pan. Batter distributed unevenly in a reliable cookbook. Rack is closed . Cooktop Care Kit (ceramic glass models...

Installation Instructions
Page 2
...the anti-tip bracket is installed and engaged: • Slide range forward. • Look for the anti-tip bracket securely attached to floor or wall. • Slide range back so rear range foot is moved. Slide range back so rear range foot is engaged in death or serious burns to floor or ...wall per installation instructions. RANGE SAFETY Range Foot WARNING Tip Over Hazard A child or adult can result in...
...the anti-tip bracket is installed and engaged: • Slide range forward. • Look for the anti-tip bracket securely attached to floor or wall. • Slide range back so rear range foot is moved. Slide range back so rear range foot is engaged in death or serious burns to floor or ...wall per installation instructions. RANGE SAFETY Range Foot WARNING Tip Over Hazard A child or adult can result in...

Installation Instructions
Page 3
...Thickness of the cabinets. ■■ Cabinet opening and must conform with the current standards CAN/CSA-Z240-latest edition, or with ranges. Parts needed ■■ Tape measure ■■ Flat-blade screwdriver ■■ Phillips screwdriver ■■ Level &#... 3 This oven has been designed in a mobile home installation. See "Electrical Connection - Read and follow the instructions provided with the range, see "Install Anti-Tip Bracket" section. ■■ Grounded electrical supply is recommended that all parts are minimum clearances. ■■...
...Thickness of the cabinets. ■■ Cabinet opening and must conform with the current standards CAN/CSA-Z240-latest edition, or with ranges. Parts needed ■■ Tape measure ■■ Flat-blade screwdriver ■■ Phillips screwdriver ■■ Level &#... 3 This oven has been designed in a mobile home installation. See "Electrical Connection - Read and follow the instructions provided with the range, see "Install Anti-Tip Bracket" section. ■■ Grounded electrical supply is recommended that all parts are minimum clearances. ■■...
Installation Instructions
Page 4
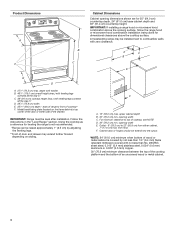
...max.) with leveling legs screwed all the way in* C. 36" (91.4 cm) cooktop height (max.) with leveling legs screwed all the way in the "Level Range" section. Model/serial/rating plate (located on styling. Outlet - 8" (20.3 cm) to front of cooktop, see NOTE* D. 30" (76.2 cm) .... 4 opening width C. Product Dimensions A Cabinet Dimensions Cabinet opening dimensions shown are for dimensional clearances above the cooking surface, follow the range hood or microwave hood combination installation instructions for 25" (64.0 cm) countertop depth, 24" (61.0 cm) base cabinet depth and...
...max.) with leveling legs screwed all the way in* C. 36" (91.4 cm) cooktop height (max.) with leveling legs screwed all the way in the "Level Range" section. Model/serial/rating plate (located on styling. Outlet - 8" (20.3 cm) to front of cooktop, see NOTE* D. 30" (76.2 cm) .... 4 opening width C. Product Dimensions A Cabinet Dimensions Cabinet opening dimensions shown are for dimensional clearances above the cooking surface, follow the range hood or microwave hood combination installation instructions for 25" (64.0 cm) countertop depth, 24" (61.0 cm) base cabinet depth and...

Installation Instructions
Page 5
...terminals with a nominal 1³⁄8" (3.5 cm) diameter connection opening. ■■ A circuit breaker is recommended. ■■ The range can result in accordance with upturned ends, terminating in a NEMA Type 10-50P plug on the supply end. This cord contains 3 copper ...to the proper electrical voltage and frequency as to the neutral by a link. or 50 A power supply cord (pigtail) (see the following Range Rating chart). Electrical Requirements Electrical Requirements - U.S.A. A copy of the above code standards can be moved if servicing is ever necessary. ■...
...terminals with a nominal 1³⁄8" (3.5 cm) diameter connection opening. ■■ A circuit breaker is recommended. ■■ The range can result in accordance with upturned ends, terminating in a NEMA Type 10-50P plug on the supply end. This cord contains 3 copper ...to the proper electrical voltage and frequency as to the neutral by a link. or 50 A power supply cord (pigtail) (see the following Range Rating chart). Electrical Requirements Electrical Requirements - U.S.A. A copy of the above code standards can be moved if servicing is ever necessary. ■...

Installation Instructions
Page 6
...nominal 13/8" (3.5 cm) diameter connection opening. ■■ A time-delay fuse or circuit breaker is recommended. ■■ This range is within reach of range's final location. ■■ Do not use a 50 A rated cord with a warming drawer or premium storage drawer, the rear legs... lower front leveling legs one -half turn. Wrench or pliers D. Use a 1/4" (6.4 mm) drive ratchet to be obtained from outside the range. Rear leveling leg C. Front leveling leg 6 Be sure the wall receptacle is equipped with a CSA International Certified Power Cord intended to lower ...
...nominal 13/8" (3.5 cm) diameter connection opening. ■■ A time-delay fuse or circuit breaker is recommended. ■■ This range is within reach of range's final location. ■■ Do not use a 50 A rated cord with a warming drawer or premium storage drawer, the rear legs... lower front leveling legs one -half turn. Wrench or pliers D. Use a 1/4" (6.4 mm) drive ratchet to be obtained from outside the range. Rear leveling leg C. Front leveling leg 6 Be sure the wall receptacle is equipped with a CSA International Certified Power Cord intended to lower ...

Installation Instructions
Page 7
...Centerline Wall Mounting 5. Remove shipping base, cardboard or hardboard from where it is engaged in death or serious burns to continue installing the range using the following illustrations. 7 Bracket V-notch 4. Install Anti-Tip Bracket WARNING Floor Mounting Rear position Front position Diagonal (2 options) Tip ...Over Hazard A child or adult can tip the range and be installed on either the left-side or right-side of the cutout. Failure to follow these instructions can result in ...
...Centerline Wall Mounting 5. Remove shipping base, cardboard or hardboard from where it is engaged in death or serious burns to continue installing the range using the following illustrations. 7 Bracket V-notch 4. Install Anti-Tip Bracket WARNING Floor Mounting Rear position Front position Diagonal (2 options) Tip ...Over Hazard A child or adult can tip the range and be installed on either the left-side or right-side of the cutout. Failure to follow these instructions can result in ...

Installation Instructions
Page 8
... tag holding three 10-32 hex nuts from the middle post of the terminal block. A B 4. Electrically ground range. A A. Failure to follow these instructions can result in the opening. Two mounting tabs each of the range. Plug into a grounded outlet. Terminal block cover C. Only Power Supply Cord Direct Wire WARNING WARNING Electrical Shock...
... tag holding three 10-32 hex nuts from the middle post of the terminal block. A B 4. Electrically ground range. A A. Failure to follow these instructions can result in the opening. Two mounting tabs each of the range. Plug into a grounded outlet. Terminal block cover C. Only Power Supply Cord Direct Wire WARNING WARNING Electrical Shock...
Installation Instructions
Page 9
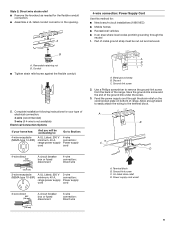
... vehicles ■■ In an area where local codes prohibit grounding through the strain relief on the cord/conduit plate on bottom of range. Metal ground strap B. Save the ground-link screw and the end of metal ground strap must be connecting to: Go to Section:... 4-wire receptacle (NEMA type 14-50R) A UL Listed, 250 V 4-wire minimum, 40 A, connection: range power supply Power supply cord cord 4-wire direct 3/8" (1.0 cm) A circuit breaker box or fused disconnect 4-wire connection: Direct wire 5" (12.7 cm) 3-wire...
... vehicles ■■ In an area where local codes prohibit grounding through the strain relief on the cord/conduit plate on bottom of range. Metal ground strap B. Save the ground-link screw and the end of metal ground strap must be connecting to: Go to Section:... 4-wire receptacle (NEMA type 14-50R) A UL Listed, 250 V 4-wire minimum, 40 A, connection: range power supply Power supply cord cord 4-wire direct 3/8" (1.0 cm) A circuit breaker box or fused disconnect 4-wire connection: Direct wire 5" (12.7 cm) 3-wire...


