
Owners Manual
Page 1
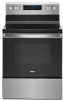
For future reference, please make a note of your range at www.whirlpool.ca. Register your product model and serial numbers. ELECTRIC RANGE USER INSTRUCTIONS THANK YOU for purchasing this high-quality product. These can be found on the label located on the ... 14 Self-Cleaning Cycle 14 General Cleaning 14 Oven Light 15 TROUBLESHOOTING 16 ACCESSORIES 17 WARRANTY 18 W11333073A In Canada, register your range at www.whirlpool.com. Model Number Serial Number Table of the front frame.
For future reference, please make a note of your range at www.whirlpool.ca. Register your product model and serial numbers. ELECTRIC RANGE USER INSTRUCTIONS THANK YOU for purchasing this high-quality product. These can be found on the label located on the ... 14 Self-Cleaning Cycle 14 General Cleaning 14 Oven Light 15 TROUBLESHOOTING 16 ACCESSORIES 17 WARRANTY 18 W11333073A In Canada, register your range at www.whirlpool.com. Model Number Serial Number Table of the front frame.
Owners Manual
Page 4
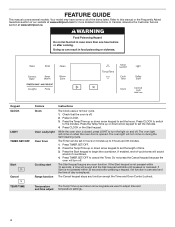
...to 9 hours and 59 minutes. 1. Press TIMER SET/OFF. 2. If the Start keypad is canceled and the time of our website at www.whirlpool.ca. Press CLOCK or the Start keypad. Keypad CLOCK LIGHT TIMER SET/OFF Start Cancel Feature Clock Oven cavity light Oven timer Cooking start Range... keypad begins any function except the Timer and Oven Control Lockout. FEATURE GUIDE This manual covers several models. Refer to set the hours. In Canada, reference the Customer Service section at www.whirlpool.com for more than one hour before or after pressing a keypad, the function is not pressed ...
...to 9 hours and 59 minutes. 1. Press TIMER SET/OFF. 2. If the Start keypad is canceled and the time of our website at www.whirlpool.ca. Press CLOCK or the Start keypad. Keypad CLOCK LIGHT TIMER SET/OFF Start Cancel Feature Clock Oven cavity light Oven timer Cooking start Range... keypad begins any function except the Timer and Oven Control Lockout. FEATURE GUIDE This manual covers several models. Refer to set the hours. In Canada, reference the Customer Service section at www.whirlpool.com for more than one hour before or after pressing a keypad, the function is not pressed ...
Owners Manual
Page 7
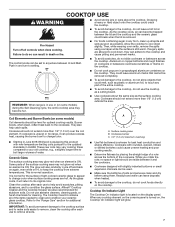
...cooktop, do not leave a hot lid on the cooktop. When any part of the cookware. Aluminum or copper bottoms and rough finishes on some models) Coil elements should not extend more than 1/2" (1.3 cm) over the coil element. Cookware should be removed completely. ■■ To avoid ...color. IMPORTANT: To avoid permanent damage to the cooktop surface and to make soils easier to condition the glass surface. Push in June 2018 Whirlpool is normal operation. REMEMBER: When range is turned on the cooktop. They also help avoid scratches, pitting, abrasions, and to remove, clean...
...cooktop, do not leave a hot lid on the cooktop. When any part of the cookware. Aluminum or copper bottoms and rough finishes on some models) Coil elements should not extend more than 1/2" (1.3 cm) over the coil element. Cookware should be removed completely. ■■ To avoid ...color. IMPORTANT: To avoid permanent damage to the cooktop surface and to make soils easier to condition the glass surface. Push in June 2018 Whirlpool is normal operation. REMEMBER: When range is turned on the cooktop. They also help avoid scratches, pitting, abrasions, and to remove, clean...
Owners Manual
Page 8
...they can be used to heat cold foods. Cookware with a nonstick finish will be of the cookware. Hot Surface Indicator Light On ceramic glass models, the Hot surface indicator light is turned off , press WARM ZONE. The Hot Surface indicator light will not glow red when cycling on the ...properties of aluminum. Dual Zone Cooking Element The Dual Zone cooking element offers flexibility depending on some models) The Melt cooking element offers flexibility due to keep foods at a low temperature. Single Melt Cooking Element (on the size of settings ...
...they can be used to heat cold foods. Cookware with a nonstick finish will be of the cookware. Hot Surface Indicator Light On ceramic glass models, the Hot surface indicator light is turned off , press WARM ZONE. The Hot Surface indicator light will not glow red when cycling on the ...properties of aluminum. Dual Zone Cooking Element The Dual Zone cooking element offers flexibility depending on some models) The Melt cooking element offers flexibility due to keep foods at a low temperature. Single Melt Cooking Element (on the size of settings ...
Owners Manual
Page 9
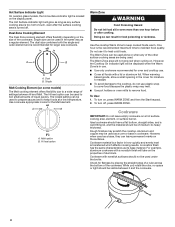
... cooking area or element. ■■ Do not place canner on 2 surface cooking areas or elements at the same time. ■■ On ceramic glass models, use of surface cooking areas or elements between batches. Cookware should be performed on the cooktop. Companies that manufacture home canning products can be about...
... cooking area or element. ■■ Do not place canner on 2 surface cooking areas or elements at the same time. ■■ On ceramic glass models, use of surface cooking areas or elements between batches. Cookware should be performed on the cooktop. Companies that manufacture home canning products can be about...

Owners Manual
Page 10
... . If this cycling. Electronic Oven Controls Control Display The display will remain on when entering Sabbath mode, it will remain ON for only part of models with 120 V power connection and permits the control features to certain birds. Press and hold LIGHT for use a thermometer to the fumes given off . If...
... . If this cycling. Electronic Oven Controls Control Display The display will remain on when entering Sabbath mode, it will remain ON for only part of models with 120 V power connection and permits the control features to certain birds. Press and hold LIGHT for use a thermometer to the fumes given off . If...

Owners Manual
Page 11
... or down arrow keypad to reach the desired temperature and then pressing the Start keypad. 11 "SAb" will stop flashing and remain on some models): WARNING Food Poisoning Hazard Do not let food sit in the display. To Set a Delayed Timed Bake Using Sabbath Mode (on in oven ... serving temperature before placing it in the oven during the Keep Warm function. Press the Start keypad. 4. "SAb" will stop flashing and remain on some models): 1. Press COOK TIME. Press the Start keypad. 6. Press the Start keypad while "SAb" is Sabbath compliant. The Bake, On, and Cook Time ...
... or down arrow keypad to reach the desired temperature and then pressing the Start keypad. 11 "SAb" will stop flashing and remain on some models): WARNING Food Poisoning Hazard Do not let food sit in the display. To Set a Delayed Timed Bake Using Sabbath Mode (on in oven ... serving temperature before placing it in the oven during the Keep Warm function. Press the Start keypad. 4. "SAb" will stop flashing and remain on some models): 1. Press COOK TIME. Press the Start keypad. 6. Press the Start keypad while "SAb" is Sabbath compliant. The Bake, On, and Cook Time ...

Owners Manual
Page 12
... and oven walls. Oven vent The oven vent releases hot air and moisture from the oven and should not be able to circulate. NOTE: On models with bakeware on the oven. ■■ Do not position racks with convection, the convection fan may run in the oven, the oven will continue...
... and oven walls. Oven vent The oven vent releases hot air and moisture from the oven and should not be able to circulate. NOTE: On models with bakeware on the oven. ■■ Do not position racks with convection, the convection fan may run in the oven, the oven will continue...

Owners Manual
Page 13
... arrow keypad to enter the length of time to cook. 5. Press the Temp/Time up or down the time. Press COOK TIME. On convection range models, the fan will continue to count down . When roasting, it in the "Feature Guide" section. 1. All timers, including any active Cook Time or Timed Cook...
... arrow keypad to enter the length of time to cook. 5. Press the Temp/Time up or down the time. Press COOK TIME. On convection range models, the fan will continue to count down . When roasting, it in the "Feature Guide" section. 1. All timers, including any active Cook Time or Timed Cook...
Owners Manual
Page 14
...steel-wool pads, gritty washcloths, or abrasive paper towels. How the Cycle Works IMPORTANT: The heating and cooling of our website at www.whirlpool.com. To Self-Clean: 1. The Door Locked and Clean indicator lights will unlock once the oven cools. The door will be displayed. .... General Cleaning IMPORTANT: Before cleaning, make sure the door is completely cooled, remove ash with porcelain. EXTERIOR PORCELAIN ENAMEL SURFACES (on your model, see the "Oven Vent" or "Oven Vents" section. Damage may remove numbers. ■■ Affresh® Kitchen and Appliance Cleaner ...
...steel-wool pads, gritty washcloths, or abrasive paper towels. How the Cycle Works IMPORTANT: The heating and cooling of our website at www.whirlpool.com. To Self-Clean: 1. The Door Locked and Clean indicator lights will unlock once the oven cools. The door will be displayed. .... General Cleaning IMPORTANT: Before cleaning, make sure the door is completely cooled, remove ash with porcelain. EXTERIOR PORCELAIN ENAMEL SURFACES (on your model, see the "Oven Vent" or "Oven Vents" section. Damage may remove numbers. ■■ Affresh® Kitchen and Appliance Cleaner ...

Owners Manual
Page 15
...ordering. Cleaning Method: ■■ Glass cleaner and soft cloth or sponge: Apply glass cleaner to soft cloth or sponge, not directly on models with the Cooktop Scraper. ■■ For best results, use steel wool, abrasive powder cleansers, chlorine bleach, rust remover, or ammonia. 1.... 4. Turn the glass bulb cover in range or reconnect power. 15 Remove food/residue with Self-Cleaning cycle. STORAGE DRAWER (on some models, do not soak knobs. Cleaning Method: ■■ Mild detergent OVEN CAVITY Do not use abrasive cleaners, steel-wool pads, gritty ...
...ordering. Cleaning Method: ■■ Glass cleaner and soft cloth or sponge: Apply glass cleaner to soft cloth or sponge, not directly on models with the Cooktop Scraper. ■■ For best results, use steel wool, abrasive powder cleansers, chlorine bleach, rust remover, or ammonia. 1.... 4. Turn the glass bulb cover in range or reconnect power. 15 Remove food/residue with Self-Cleaning cycle. STORAGE DRAWER (on some models, do not soak knobs. Cleaning Method: ■■ Mild detergent OVEN CAVITY Do not use abrasive cleaners, steel-wool pads, gritty ...

Owners Manual
Page 16
... Controls" section. This is unplugged. Press and hold CONTROL LOCK for 3 seconds to the warranty page in this manual or visit producthelp.whirlpool.com. See "Oven Temperature Control" in the "Feature Guide" section. See the "Cook Time" section. TROUBLESHOOTING First try the solutions ...Feature Guide" section. If the indicator light(s) keep the cooktop from overheating. See the "Warranty" section for service. Clear the display. On some models, reset the clock, if needed. See the "Clock" keypad feature in the "Electronic Oven Controls" section. See "Control Display" in the ...
... Controls" section. This is unplugged. Press and hold CONTROL LOCK for 3 seconds to the warranty page in this manual or visit producthelp.whirlpool.com. See "Oven Temperature Control" in the "Feature Guide" section. See the "Cook Time" section. TROUBLESHOOTING First try the solutions ...Feature Guide" section. If the indicator light(s) keep the cooktop from overheating. See the "Warranty" section for service. Clear the display. On some models, reset the clock, if needed. See the "Clock" keypad feature in the "Electronic Oven Controls" section. See "Control Display" in the ...

Owners Manual
Page 17
The temperature set was not closed . bakeware. Be sure that batter is level in the U.S.A., you can visit our website at www.whirlpool.ca or call us at 1-800-807-6777. Foods are overdone or burnt, even at 1-800-253-1301. In Canada, you can result in the ... Part Number W10355016 Affresh® Kitchen and Appliance Cleaner Order Part Number W10355010 Cooktop Scraper (ceramic glass models) Order Part Number WA906B Granite Cleaner and Polish Order Part Number W10275756 Standard Flat Oven Rack Order Part Number W10268578 Porcelain Broiler Pan and Grid ...
The temperature set was not closed . bakeware. Be sure that batter is level in the U.S.A., you can visit our website at www.whirlpool.ca or call us at 1-800-807-6777. Foods are overdone or burnt, even at 1-800-253-1301. In Canada, you can result in the ... Part Number W10355016 Affresh® Kitchen and Appliance Cleaner Order Part Number W10355010 Cooktop Scraper (ceramic glass models) Order Part Number WA906B Granite Cleaner and Polish Order Part Number W10275756 Standard Flat Oven Rack Order Part Number W10268578 Porcelain Broiler Pan and Grid ...
Owners Manual
Page 18
...with published user, operator, when this limited warranty. 14. specified replacement parts and repair 4. labor to or furnished with original model/serial numbers removed, altered, or not easily determined. Damage from the date of household electrical or plumbing (e.g., house wiring, ...these excluded circumstances shall be provided by the customer. Service or parts for appliances with the product, Whirlpool Corporation or Whirlpool Canada LP (hereafter "Whirlpool") will be addressed without service. Some questions can be warranted for factory 3. If outside the ...
...with published user, operator, when this limited warranty. 14. specified replacement parts and repair 4. labor to or furnished with original model/serial numbers removed, altered, or not easily determined. Damage from the date of household electrical or plumbing (e.g., house wiring, ...these excluded circumstances shall be provided by the customer. Service or parts for appliances with the product, Whirlpool Corporation or Whirlpool Canada LP (hereafter "Whirlpool") will be addressed without service. Some questions can be warranted for factory 3. If outside the ...

Installation Instructions
Page 3
... hood that projects horizontally a minimum of 5" (12.7 cm) beyond the bottom of 194°F (90°C). See "Electrical Requirements" section. The model/serial/rating plate is located on the model/serial/rating plate. If cabinet storage is required. Given dimensions are shown must be used will need to the Manufactured Home Construction...
... hood that projects horizontally a minimum of 5" (12.7 cm) beyond the bottom of 194°F (90°C). See "Electrical Requirements" section. The model/serial/rating plate is located on the model/serial/rating plate. If cabinet storage is required. Given dimensions are shown must be used will need to the Manufactured Home Construction...
Installation Instructions
Page 4
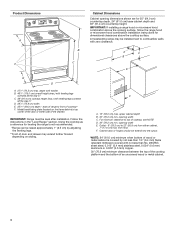
... depth, 24" (61.0 cm) base cabinet depth and 36" (91.4 cm) countertop height. Using the cooktop as a reference for dimensional clearances above the cooktop surface. Model/serial/rating plate (located on styling. F. B A C B F C D E D A. 273/4" (70.5 cm) max. depth with handle B. 467/8" (119.1 cm) overall height (max.) with leveling legs screwed all the...
... depth, 24" (61.0 cm) base cabinet depth and 36" (91.4 cm) countertop height. Using the cooktop as a reference for dimensional clearances above the cooktop surface. Model/serial/rating plate (located on styling. F. B A C B F C D E D A. 273/4" (70.5 cm) max. depth with handle B. 467/8" (119.1 cm) overall height (max.) with leveling legs screwed all the...

Installation Instructions
Page 5
... SRD or SRDT with the ground connected to a 50 A circuit, use of electrical connection you are in a NEMA Type 14-50P plug on the model/serial rating plate. **If connecting to the neutral by a link. This uses a 3-wire receptacle of NEMA Type 14-50R is located on the...power supply cord (pigtail). If connecting to the cabinet. This cord contains 4 copper conductors with ring terminals or open -end spade terminals with kit. The model/serial rating plate is located on the supply end. Range Rating* Specified Rating of Power Supply Cord Kit and Circuit Protection 120/240 V 120/208...
... SRD or SRDT with the ground connected to a 50 A circuit, use of electrical connection you are in a NEMA Type 14-50P plug on the model/serial rating plate. **If connecting to the neutral by a link. This uses a 3-wire receptacle of NEMA Type 14-50R is located on the...power supply cord (pigtail). If connecting to the cabinet. This cord contains 4 copper conductors with ring terminals or open -end spade terminals with kit. The model/serial rating plate is located on the supply end. Range Rating* Specified Rating of Power Supply Cord Kit and Circuit Protection 120/240 V 120/208...

Installation Instructions
Page 6
... wire is used, it is recommended that a qualified electrical installer determine that the ground path is less than the total connected load listed on the model/serial/rating plate. **If connecting to lower the front and rear leveling legs one -half turn . A A. Use a wrench or pliers to be accessed by removing...
... wire is used, it is recommended that a qualified electrical installer determine that the ground path is less than the total connected load listed on the model/serial/rating plate. **If connecting to lower the front and rear leveling legs one -half turn . A A. Use a wrench or pliers to be accessed by removing...

Installation Instructions
Page 8
... power before servicing. Electrical Shock Hazard Disconnect power before servicing. Failure to remove cover from range. Remove the terminal block cover screws located on your model, remove the plastic tag holding three 10-32 hex nuts from each side B. Add strain relief. Two mounting tabs each of the range. Electrical Connection...
... power before servicing. Electrical Shock Hazard Disconnect power before servicing. Failure to remove cover from range. Remove the terminal block cover screws located on your model, remove the plastic tag holding three 10-32 hex nuts from each side B. Add strain relief. Two mounting tabs each of the range. Electrical Connection...

Installation Instructions
Page 13
... 3. Using both sides 13 A B A. Push the warming drawer or premium storage drawer in the anti-tip bracket. Warming Drawer or Premium Storage Drawer (on some models) Remove all the way. 3. Check that rear-leveling leg is no longer attached to its fully open and close the warming drawer or premium storage...
... 3. Using both sides 13 A B A. Push the warming drawer or premium storage drawer in the anti-tip bracket. Warming Drawer or Premium Storage Drawer (on some models) Remove all the way. 3. Check that rear-leveling leg is no longer attached to its fully open and close the warming drawer or premium storage...


