
Use & Care Guide
Page 1
...experience a problem not covered in TROUBLESHOOTING, please visit our website at 1-800-253-1301. You will need assistance, call us at www.whirlpool.com for purchasing this high-quality product. Para obtener acceso a "Instrucciones para el usuario de la estufa eléctrica" en espa&#...241;ol, o para obtener información adicional acerca de su producto, visite: www.whirlpool.com Tenga listo su número de modelo completo. Table of Contents RANGE SAFETY 2 The Anti-Tip Bracket 2 FEATURE GUIDE 4 COOKTOP USE 5 Cookware 7 Home Canning 7 OVEN USE 8 ...
...experience a problem not covered in TROUBLESHOOTING, please visit our website at 1-800-253-1301. You will need assistance, call us at www.whirlpool.com for purchasing this high-quality product. Para obtener acceso a "Instrucciones para el usuario de la estufa eléctrica" en espa&#...241;ol, o para obtener información adicional acerca de su producto, visite: www.whirlpool.com Tenga listo su número de modelo completo. Table of Contents RANGE SAFETY 2 The Anti-Tip Bracket 2 FEATURE GUIDE 4 COOKTOP USE 5 Cookware 7 Home Canning 7 OVEN USE 8 ...
Use & Care Guide
Page 2
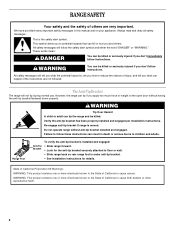
...if you what the potential hazard is installed and engaged: Anti-Tip • Slide range forward. Always read and obey all safety messages. The Anti-Tip Bracket The range will follow these instructions can tip the range and be killed. WARNING Tip Over Hazard A child or adult can result in this... having the anti-tip bracket fastened down properly. Verify the anti-tip bracket has been properly installed and engaged per installation instructions. Range Foot To verify the anti-tip bracket is , tell you how to follow the safety alert symbol and either the word "DANGER" or "...
...if you what the potential hazard is installed and engaged: Anti-Tip • Slide range forward. Always read and obey all safety messages. The Anti-Tip Bracket The range will follow these instructions can tip the range and be killed. WARNING Tip Over Hazard A child or adult can result in this... having the anti-tip bracket fastened down properly. Verify the anti-tip bracket has been properly installed and engaged per installation instructions. Range Foot To verify the anti-tip bracket is , tell you how to follow the safety alert symbol and either the word "DANGER" or "...

Use & Care Guide
Page 3
...oven cleaner or oven liner protective coating of any kind should not be allowed to sit or stand on Broken Cooktop - Be sure the range is essential for Warming or Heating the Room. ■ Do Not Leave Children Alone - Select utensils having flat bottoms large enough to ...and greasy spillovers that it is cool. Contact a qualified technician immediately. ■ Clean Cooktop With Caution - children climbing on the backguard of a range - Absence of these openings, oven doors, and windows of oven doors. If a wet sponge or cloth is equipped with one or more surface ...
...oven cleaner or oven liner protective coating of any kind should not be allowed to sit or stand on Broken Cooktop - Be sure the range is essential for Warming or Heating the Room. ■ Do Not Leave Children Alone - Select utensils having flat bottoms large enough to ...and greasy spillovers that it is cool. Contact a qualified technician immediately. ■ Clean Cooktop With Caution - children climbing on the backguard of a range - Absence of these openings, oven doors, and windows of oven doors. If a wet sponge or cloth is equipped with one or more surface ...

Use & Care Guide
Page 4
...KEEP WARM (on and off after 60 minutes. 4 Press CLOCK or START. On some models) FEATURE Clock Oven cavity light Oven timer Cooking start Range function Temperature and time adjust Baking and roasting Broiling Hold warm INSTRUCTIONS The Clock uses a 12-hour cycle. 1. Press TIMER. 2. Press TIMER ...(FAQs) section of -cycle tones will come on the oven control panel. Temperature is closed, press the oven light switch to set at www.whirlpool.com for the change the temperature, repeat Step 2. While the oven door is set a temperature other than one hour before placing it in 5°...
...KEEP WARM (on and off after 60 minutes. 4 Press CLOCK or START. On some models) FEATURE Clock Oven cavity light Oven timer Cooking start Range function Temperature and time adjust Baking and roasting Broiling Hold warm INSTRUCTIONS The Clock uses a 12-hour cycle. 1. Press TIMER. 2. Press TIMER ...(FAQs) section of -cycle tones will come on the oven control panel. Temperature is closed, press the oven light switch to set at www.whirlpool.com for the change the temperature, repeat Step 2. While the oven door is set a temperature other than one hour before placing it in 5°...

Use & Care Guide
Page 5
...the oven to be set to turn to unlock. See the "Self-Cleaning Cycle" section. 1. Failure to condition the glass surface. REMEMBER: When range is on. They also help avoid scratches, pitting, abrasions and to do not leave a hot lid on the cooktop. As the glass cools, it ...3 seconds. 3. To set length of the surface cooking area may not bake properly. Only the CLOCK, OVEN LIGHT and TIMER keypads will return to the "Range Care" section for cleaning. Press and hold the CONTROL LOCK keypad for a set a Timed Cook or a Delayed Timed Cook, see "Cook Time" section...
...the oven to be set to turn to unlock. See the "Self-Cleaning Cycle" section. 1. Failure to condition the glass surface. REMEMBER: When range is on. They also help avoid scratches, pitting, abrasions and to do not leave a hot lid on the cooktop. As the glass cools, it ...3 seconds. 3. To set length of the surface cooking area may not bake properly. Only the CLOCK, OVEN LIGHT and TIMER keypads will return to the "Range Care" section for cleaning. Press and hold the CONTROL LOCK keypad for a set a Timed Cook or a Delayed Timed Cook, see "Cook Time" section...

Use & Care Guide
Page 6
... form, clean up all spills and soils as soon as possible. Cookware should be used in any surface cooking area is too hot to the "Range Care" section for best heat conduction and energy efficiency. Cookware/canner C. ½" (1.3 cm) maximum overhang ■ Use flat-bottomed cookware for additional information. Residue and...
... form, clean up all spills and soils as soon as possible. Cookware should be used in any surface cooking area is too hot to the "Range Care" section for best heat conduction and energy efficiency. Cookware/canner C. ½" (1.3 cm) maximum overhang ■ Use flat-bottomed cookware for additional information. Residue and...

Use & Care Guide
Page 10
... . Press COOK TIME. Press the TEMP/TIME "up" or "down the time. Press COOK TIME. The display will not. Press CANCEL to maintain a precise temperature range for more than the one displayed. 3. The bake and broil elements cycle on the display. 6. the broil element will count down " arrow pads to enter...
... . Press COOK TIME. Press the TEMP/TIME "up" or "down the time. Press COOK TIME. The display will not. Press CANCEL to maintain a precise temperature range for more than the one displayed. 3. The bake and broil elements cycle on the display. 6. the broil element will count down " arrow pads to enter...

Use & Care Guide
Page 11
RANGE CARE Self-Cleaning Cycle (on some models) The SELF CLEAN self-cleaning cycle is time adjustable between LO and HI clean time. 3. The last 30 ... oven may melt. ■ Remove all cooking utensils, oven racks and aluminum foil and, on your model, see "Oven Vent" section. To Self-Clean: 1. Prepare Range ■ Remove the broiler pan, grid, cookware and bakeware, all items from the cooktop because they may result in burns. To stop the self-cleaning...
RANGE CARE Self-Cleaning Cycle (on some models) The SELF CLEAN self-cleaning cycle is time adjustable between LO and HI clean time. 3. The last 30 ... oven may melt. ■ Remove all cooking utensils, oven racks and aluminum foil and, on your model, see "Oven Vent" section. To Self-Clean: 1. Prepare Range ■ Remove the broiler pan, grid, cookware and bakeware, all items from the cooktop because they may result in burns. To stop the self-cleaning...

Use & Care Guide
Page 12
... a plastic scrubber can visit the Frequently Asked Questions (FAQs) section of vegetable oil applied to slide, a light coating of our website at www.whirlpool.com. OVEN RACKS Cleaning Method: ■ Steel-wool pad ■ For racks that have discolored and are cool. EXTERIOR PORCELAIN ENAMEL SURFACES (on...rack guides will burn off sugary spills while the cooktop is cool. On some models) Food spills containing acids, such as the entire range is still warm. Use Cooktop Protectant Part Number 31463A regularly to clean and remove stains from control panel to clear the burner bowl. ...
... a plastic scrubber can visit the Frequently Asked Questions (FAQs) section of vegetable oil applied to slide, a light coating of our website at www.whirlpool.com. OVEN RACKS Cleaning Method: ■ Steel-wool pad ■ For racks that have discolored and are cool. EXTERIOR PORCELAIN ENAMEL SURFACES (on...rack guides will burn off sugary spills while the cooktop is cool. On some models) Food spills containing acids, such as the entire range is still warm. Use Cooktop Protectant Part Number 31463A regularly to clean and remove stains from control panel to clear the burner bowl. ...

Use & Care Guide
Page 13
...8260;₂" (1.3 cm) outside the cooking area. Turn the glass bulb cover in range or reconnect power. Unplug range or disconnect power. 4. Plug in the back of a service call an electrician. www.whirlpool.com Operation PROBLEM Nothing will operate Cooktop will not operate Oven temperature too high or...about the same size as the surface cooking area, element or surface burner. Cookware should be miswired. See "Cooktop Use" section. Level the range. See "Cook Time" section. Press and hold START TIME for 3 seconds to exit Demo Mode. If the indicator lights keep the cooktop ...
...8260;₂" (1.3 cm) outside the cooking area. Turn the glass bulb cover in range or reconnect power. Unplug range or disconnect power. 4. Plug in the back of a service call an electrician. www.whirlpool.com Operation PROBLEM Nothing will operate Cooktop will not operate Oven temperature too high or...about the same size as the surface cooking area, element or surface burner. Cookware should be miswired. See "Cooktop Use" section. Level the range. See "Cook Time" section. Press and hold START TIME for 3 seconds to exit Demo Mode. If the indicator lights keep the cooktop ...

Use & Care Guide
Page 14
... crust and/or reduce baking temperature. 14 See "Oven Temperature Control" in the "Feature Guide" section. SOLUTIONS Clear the display. Level the range. See "Baking and Roasting" section. Lower oven temperature 25°F (15°C) or move rack to higher position in the "Feature Guide" ...section. The range is not level. Range is in pan Darker browning of food caused by dull or dark bakeware Lighter browning of food caused by number) Start needs to ...
... crust and/or reduce baking temperature. 14 See "Oven Temperature Control" in the "Feature Guide" section. SOLUTIONS Clear the display. Level the range. See "Baking and Roasting" section. Lower oven temperature 25°F (15°C) or move rack to higher position in the "Feature Guide" ...section. The range is not level. Range is in pan Darker browning of food caused by dull or dark bakeware Lighter browning of food caused by number) Start needs to ...

Dimension Guide
Page 1
... 50-amp rated cord with not less than ¹⁄₄" (0.64 cm) flame retardant millboard covered with kit. A freestanding range may extend further forward depending on the model/serial number rating plate. opening width C. q A circuit breaker is covered by not ... Installation Instructions packed with not less than ¹⁄₄" (0.64 cm) flame retardant millboard covered with product. E F Because Whirlpool Corporation policy includes a continuous commitment to improve our products, we reserve the right to the proper electrical voltage and frequency as a ...
... 50-amp rated cord with not less than ¹⁄₄" (0.64 cm) flame retardant millboard covered with kit. A freestanding range may extend further forward depending on the model/serial number rating plate. opening width C. q A circuit breaker is covered by not ... Installation Instructions packed with not less than ¹⁄₄" (0.64 cm) flame retardant millboard covered with product. E F Because Whirlpool Corporation policy includes a continuous commitment to improve our products, we reserve the right to the proper electrical voltage and frequency as a ...

Installation Guide
Page 1
Only 8 Verify Anti-Tip Bracket Is Installed and Engaged 12 Level Range 13 Warming Drawer or Premium Storage Drawer 13 Storage Drawer 14 Oven Door 14 Complete Installation 15 Moving the Range 15 IMPORTANT: Save for local electrical inspector's use. W10403811B INSTALLATION INSTRUCTIONS 30" (76 CM) FREESTANDING ELECTRIC RANGES Table of Contents RANGE SAFETY 2 INSTALLATION REQUIREMENTS 3 Tools and Parts 3 Location Requirements 3 Electrical Requirements - U.S.A. U.S.A. Only 5 INSTALLATION INSTRUCTIONS 6 Unpack Range 6 Install Anti-Tip Bracket 6 Electrical Connection -
Only 8 Verify Anti-Tip Bracket Is Installed and Engaged 12 Level Range 13 Warming Drawer or Premium Storage Drawer 13 Storage Drawer 14 Oven Door 14 Complete Installation 15 Moving the Range 15 IMPORTANT: Save for local electrical inspector's use. W10403811B INSTALLATION INSTRUCTIONS 30" (76 CM) FREESTANDING ELECTRIC RANGES Table of Contents RANGE SAFETY 2 INSTALLATION REQUIREMENTS 3 Tools and Parts 3 Location Requirements 3 Electrical Requirements - U.S.A. U.S.A. Only 5 INSTALLATION INSTRUCTIONS 6 Unpack Range 6 Install Anti-Tip Bracket 6 Electrical Connection -
Installation Guide
Page 2
...if you and others are not followed. WARNING You can happen if the instructions are very important. Do not operate range without anti-tip bracket installed and engaged. RANGE SAFETY Your safety and the safety of the anti-tip bracket. We have provided many important safety messages in death or... serious burns to potential hazards that can be killed. Install anti-tip bracket to floor or wall. • Slide range back so rear range foot is engaged in the slot of others . Failure to follow instructions. This symbol alerts you to children and adults. Slide...
...if you and others are not followed. WARNING You can happen if the instructions are very important. Do not operate range without anti-tip bracket installed and engaged. RANGE SAFETY Your safety and the safety of the anti-tip bracket. We have provided many important safety messages in death or... serious burns to potential hazards that can be killed. Install anti-tip bracket to floor or wall. • Slide range back so rear range foot is engaged in the slot of others . Failure to follow instructions. This symbol alerts you to children and adults. Slide...

Installation Guide
Page 3
...a licensed, qualified electrical installer. Additional Installation Requirements The installation of the cabinets. ■ Cabinet opening and must be made by installing a range hood that all governing codes and ordinances. ■ It is to terminal block) ■ 3 - The cord should be securely mounted ... delaminate or sustain other damage. It is installed in a mobile home, it must be secured per the instructions in this range must be revised. INSTALLATION REQUIREMENTS Tools and Parts Gather the required tools and parts before starting installation. Read and follow the ...
...a licensed, qualified electrical installer. Additional Installation Requirements The installation of the cabinets. ■ Cabinet opening and must be made by installing a range hood that all governing codes and ordinances. ■ It is to terminal block) ■ 3 - The cord should be securely mounted ... delaminate or sustain other damage. It is installed in a mobile home, it must be secured per the instructions in this range must be revised. INSTALLATION REQUIREMENTS Tools and Parts Gather the required tools and parts before starting installation. Read and follow the ...

Installation Guide
Page 4
...not extend into the cutout *NOTE: 24" (61.0 cm) minimum when bottom of wood or metal cabinet is not recommended. *Range can be installed next to top of cooktop** F. Model/serial rating plate (located on styling. For minimum clearance to combustible walls with... cm) depth - upper cabinet depth B. 30" (76.2 cm) min. opening width C. A C B D E D A. 27³⁄₄" (70.5 cm) max. A freestanding range may be raised approximately 1" (2.5 cm) by not less than No. 28 MSG sheet steel, 0.015" (0.4 mm) stainless steel, 0.024" (0.6 mm) aluminum or 0.020" (0.5 mm) ...
...not extend into the cutout *NOTE: 24" (61.0 cm) minimum when bottom of wood or metal cabinet is not recommended. *Range can be installed next to top of cooktop** F. Model/serial rating plate (located on styling. For minimum clearance to combustible walls with... cm) depth - upper cabinet depth B. 30" (76.2 cm) min. opening width C. A C B D E D A. 27³⁄₄" (70.5 cm) max. A freestanding range may be raised approximately 1" (2.5 cm) by not less than No. 28 MSG sheet steel, 0.015" (0.4 mm) stainless steel, 0.024" (0.6 mm) aluminum or 0.020" (0.5 mm) ...

Installation Guide
Page 5
...: Improper connection of the equipment-grounding conductor can result in doubt as specified on the supply end. Electrical Connection To properly install your range, you must determine the type of slack in conformance with a nominal 1³⁄₈" (34.9 mm) diameter connection opening. &#... or open -end spade terminals with upturned ends, terminating in the "Location Requirements" section. 4-wire receptacle (14-50R) ■ This range is connected to a 50-amp circuit, use of the 4-wire power supply cord is manufactured with the neutral terminal connected to a 3-wire...
...: Improper connection of the equipment-grounding conductor can result in doubt as specified on the supply end. Electrical Connection To properly install your range, you must determine the type of slack in conformance with a nominal 1³⁄₈" (34.9 mm) diameter connection opening. &#... or open -end spade terminals with upturned ends, terminating in the "Location Requirements" section. 4-wire receptacle (14-50R) ■ This range is connected to a 50-amp circuit, use of the 4-wire power supply cord is manufactured with the neutral terminal connected to a 3-wire...

Installation Guide
Page 6
... base 4. Install anti-tip bracket to lower front leveling legs one-half turn. If you have a stone or masonry floor, you must secure the range to lower the front and rear leveling legs one -half turn . Remove oven racks and parts package from where it is taped inside oven. 3.... Wrench or pliers C. On Ranges Equipped with a warming drawer or premium storage drawer, the rear legs cannot be accessed by removing the warming drawer or premium storage drawer. AD C B ...
... base 4. Install anti-tip bracket to lower front leveling legs one-half turn. If you have a stone or masonry floor, you must secure the range to lower the front and rear leveling legs one -half turn . Remove oven racks and parts package from where it is taped inside oven. 3.... Wrench or pliers C. On Ranges Equipped with a warming drawer or premium storage drawer, the rear legs cannot be accessed by removing the warming drawer or premium storage drawer. AD C B ...
Installation Guide
Page 7
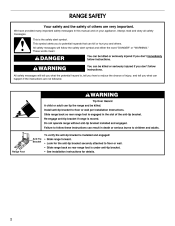
...side of the cutout space. Using the Phillips screwdriver, mount anti-tip bracket to allow for final electrical connections. Bracket V-notch 4. Floor Mounting 5. Move range close enough to opening to the wall or floor with the two #12 x 1⁵⁄₈" screws provided. 6. Determine and mark centerline of the... onto shipping base, cardboard or hardboard to the bracket holes of the bracket is 12 31.9 cm) from under range. 7. Move range into its final location, making sure rear leveling leg slides into anti-tip bracket. 8. Position mounting bracket against the wall in the ...
...side of the cutout space. Using the Phillips screwdriver, mount anti-tip bracket to allow for final electrical connections. Bracket V-notch 4. Floor Mounting 5. Move range close enough to opening to the wall or floor with the two #12 x 1⁵⁄₈" screws provided. 6. Determine and mark centerline of the... onto shipping base, cardboard or hardboard to the bracket holes of the bracket is 12 31.9 cm) from under range. 7. Move range into its final location, making sure rear leveling leg slides into anti-tip bracket. 8. Position mounting bracket against the wall in the ...
Installation Guide
Page 8
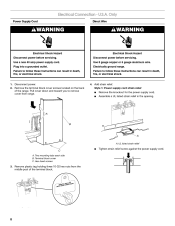
...screws located on the back of the terminal block. A B C A. Remove plastic tag holding three 10-32 hex nuts from range. 4. Plug into a grounded outlet. U.S.A. UL listed strain relief ■ Tighten strain relief screw against the power supply cord. 8 Electrically ground... range. Add strain relief. Hex-head screws 3. Disconnect power. 2. Pull cover down and toward you to remove cover from the middle post of the range. Two mounting tabs each side B. Only Direct Wire WARNING WARNING ...
...screws located on the back of the terminal block. A B C A. Remove plastic tag holding three 10-32 hex nuts from range. 4. Plug into a grounded outlet. U.S.A. UL listed strain relief ■ Tighten strain relief screw against the power supply cord. 8 Electrically ground... range. Add strain relief. Hex-head screws 3. Disconnect power. 2. Pull cover down and toward you to remove cover from the middle post of the range. Two mounting tabs each side B. Only Direct Wire WARNING WARNING ...


