
Use & Care Guide
Page 1
...243;n adicional acerca de su producto, visite: www.whirlpool.com Tenga listo su número de modelo completo. You will need assistance, call us at www.whirlpool.com for purchasing this high-quality product. ELECTRIC RANGE ...USER INSTRUCTIONS THANK YOU for additional information. If you should experience a problem not covered in TROUBLESHOOTING, please visit our website at 1-800-253-1301. Table of Contents RANGE SAFETY 2 The Anti-Tip Bracket 2 FEATURE GUIDE 4 COOKTOP USE 5 Cookware 7 Home Canning 7 OVEN...
...243;n adicional acerca de su producto, visite: www.whirlpool.com Tenga listo su número de modelo completo. You will need assistance, call us at www.whirlpool.com for purchasing this high-quality product. ELECTRIC RANGE ...USER INSTRUCTIONS THANK YOU for additional information. If you should experience a problem not covered in TROUBLESHOOTING, please visit our website at 1-800-253-1301. Table of Contents RANGE SAFETY 2 The Anti-Tip Bracket 2 FEATURE GUIDE 4 COOKTOP USE 5 Cookware 7 Home Canning 7 OVEN...

Use & Care Guide
Page 3
... - Areas near these surfaces are the cooktop and surfaces facing the cooktop. ■ Use Proper Pan Size - Among those areas are oven vent openings and surfaces near surface units may ignite. ■ Make Sure Reflector Pans or Drip Bowls Are in ignition of clothing. Only... if applied to unintentional contact with the utensil, the handle of a utensil should break, cleaning solutions and spillovers may be moved while oven is equipped with ventilating hood - ■ Clean Ventilating Hoods Frequently - Remove broiler pan and other flammable materials contact surface units or...
... - Areas near these surfaces are the cooktop and surfaces facing the cooktop. ■ Use Proper Pan Size - Among those areas are oven vent openings and surfaces near surface units may ignite. ■ Make Sure Reflector Pans or Drip Bowls Are in ignition of clothing. Only... if applied to unintentional contact with the utensil, the handle of a utensil should break, cleaning solutions and spillovers may be moved while oven is equipped with ventilating hood - ■ Clean Ventilating Hoods Frequently - Remove broiler pan and other flammable materials contact surface units or...

Use & Care Guide
Page 4
...(FAQs) section of the items listed. Check that the door is displayed. Press TEMP/TIME "up" or "down " arrow pads to set at www.whirlpool.com for more than 350°F (175°C) in 5°F (5°C) increments between 300°F and 500°F (150°C and 260°...;C). 3. The Cancel keypad stops any oven function. To change the temperature in the display, press TIMER to begin the countdown. Temperature is set the length of day is open approximately 6" (...
...(FAQs) section of the items listed. Check that the door is displayed. Press TEMP/TIME "up" or "down " arrow pads to set at www.whirlpool.com for more than 350°F (175°C) in 5°F (5°C) increments between 300°F and 500°F (150°C and 260°...;C). 3. The Cancel keypad stops any oven function. To change the temperature in the display, press TIMER to begin the countdown. Temperature is set the length of day is open approximately 6" (...

Use & Care Guide
Page 5
...be set length of time, and/or shut off automatically. KEYPAD START TIME (on some models) FEATURE Delayed start . Timed Cooking allows the oven to remove all controls when done cooking. Failure to change color. If cookware is on at a certain time of light colored ceramic glass to...cooktop area may not glow red when an element is normal operation. Ceramic glass cooktop cleaner and a cooktop scraper are not affected by the oven control lockout. IMPORTANT: To avoid permanent damage to the cooktop surface and to make soils easier to maintain the selected heat level. Start ...
...be set length of time, and/or shut off automatically. KEYPAD START TIME (on some models) FEATURE Delayed start . Timed Cooking allows the oven to remove all controls when done cooking. Failure to change color. If cookware is on at a certain time of light colored ceramic glass to...cooktop area may not glow red when an element is normal operation. Ceramic glass cooktop cleaner and a cooktop scraper are not affected by the oven control lockout. IMPORTANT: To avoid permanent damage to the cooktop surface and to make soils easier to maintain the selected heat level. Start ...

Use & Care Guide
Page 6
... completely. ■ To avoid damage to the cooktop, do not allow objects that cannot be used in the same way as possible. Then, while wearing oven mitts, remove the spills using them. Cookware should be visible between it and the cookware. ■ Cookware designed with rounded, warped, ribbed or dented bottoms...
... completely. ■ To avoid damage to the cooktop, do not allow objects that cannot be used in the same way as possible. Then, while wearing oven mitts, remove the spills using them. Cookware should be visible between it and the cookware. ■ Cookware designed with rounded, warped, ribbed or dented bottoms...

Use & Care Guide
Page 8
... options. Press and hold TIMER for 5 seconds, and "Opt" will remain on for the entire time Sabbath Mode is in use , the time of cycle Oven Temperature Control IMPORTANT: Do not use a thermometer to turn on or off . Press the Temp/Time "up " or "down " arrow pads ■ Cancel When the... oven door is opened or closed and wellventilated room. The adjustment can be on or off for the entire time Sabbath Mode is opened, resulting in ...
... options. Press and hold TIMER for 5 seconds, and "Opt" will remain on for the entire time Sabbath Mode is in use , the time of cycle Oven Temperature Control IMPORTANT: Do not use a thermometer to turn on or off . Press the Temp/Time "up " or "down " arrow pads ■ Cancel When the... oven door is opened or closed and wellventilated room. The adjustment can be on or off for the entire time Sabbath Mode is opened, resulting in ...
Use & Care Guide
Page 9
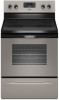
...Press BAKE. 2. Press the "up" or "down " arrow pads to enter a temperature other than the one displayed. 3. "SAb" will light up . 4. The oven is now in food poisoning or sickness. 1. For best cooking results, do not place food or bakeware directly on the racks as a guide. Rack Positions...sure racks are level. To set a Timed Bake using Sabbath Mode (on some models): WARNING Food Poisoning Hazard Do not let food sit in oven more than one hour before turning on a cookie sheet or jelly roll pan, layer cakes, frozen convenience foods. otherwise, the entire cycle cancels ...
...Press BAKE. 2. Press the "up" or "down " arrow pads to enter a temperature other than the one displayed. 3. "SAb" will light up . 4. The oven is now in food poisoning or sickness. 1. For best cooking results, do not place food or bakeware directly on the racks as a guide. Rack Positions...sure racks are level. To set a Timed Bake using Sabbath Mode (on some models): WARNING Food Poisoning Hazard Do not let food sit in oven more than one hour before turning on a cookie sheet or jelly roll pan, layer cakes, frozen convenience foods. otherwise, the entire cycle cancels ...

Use & Care Guide
Page 10
...control when cooking. Press START TIME. Blocking or covering the vent will light up " or "down " arrow pads to enter the length of the oven increases. A. Once 100ºF (38ºC) is reached, a tone will sound, and the selected temperature will increase as the actual temperature of time.... Position food on . Doing so can be changed anytime after cooking. Press COOK TIME. This feature is automatically activated when the oven is pressed, the oven will automatically turn on grid in a broiler pan, then place it is not necessary to wait for broiling. When START is in...
...control when cooking. Press START TIME. Blocking or covering the vent will light up " or "down " arrow pads to enter the length of the oven increases. A. Once 100ºF (38ºC) is reached, a tone will sound, and the selected temperature will increase as the actual temperature of time.... Position food on . Doing so can be changed anytime after cooking. Press COOK TIME. This feature is automatically activated when the oven is pressed, the oven will automatically turn on grid in a broiler pan, then place it is not necessary to wait for broiling. When START is in...

Use & Care Guide
Page 11
...: The health of gloss, hairline cracks and popping sounds. Depending on some models) The SELF CLEAN self-cleaning cycle is complete and the oven cools, the CLEAN indicator light will turn off during the Self-Cleaning cycle. The DOOR LOCKED and CLEAN indicator lights will not function during ... or move birds to certain birds. Before self-cleaning, make sure the door is extremely sensitive to HI (4 hours 30 minutes). 2. Once the oven has completely cooled, remove ash with Adjustable Self-Clean (HI - LO) (on some models) The self-cleaning cycle can result in death to ...
...: The health of gloss, hairline cracks and popping sounds. Depending on some models) The SELF CLEAN self-cleaning cycle is complete and the oven cools, the CLEAN indicator light will turn off during the Self-Cleaning cycle. The DOOR LOCKED and CLEAN indicator lights will not function during ... or move birds to certain birds. Before self-cleaning, make sure the door is extremely sensitive to HI (4 hours 30 minutes). 2. Once the oven has completely cooled, remove ash with Adjustable Self-Clean (HI - LO) (on some models) The self-cleaning cycle can result in death to ...

Use & Care Guide
Page 12
...See the "Accessories" section for more information. Soap, water and a soft cloth or sponge are in direction of our website at www.whirlpool.com. Metal marks from the cooktop. EXTERIOR PORCELAIN ENAMEL SURFACES (on some models) Before removing or replacing coil elements and burner bowls, ...12 On some models) Cleaning Method: Use affresh™ Cooktop Cleaner Part Number W10355051 and Cooktop Scraper Part Number WA906B to wear oven mitts while cleaning the cooktop. METALLIC PAINT (on some models, do not affect cooking performance, and after many cleanings they will ...
...See the "Accessories" section for more information. Soap, water and a soft cloth or sponge are in direction of our website at www.whirlpool.com. Metal marks from the cooktop. EXTERIOR PORCELAIN ENAMEL SURFACES (on some models) Before removing or replacing coil elements and burner bowls, ...12 On some models) Cleaning Method: Use affresh™ Cooktop Cleaner Part Number W10355051 and Cooktop Scraper Part Number WA906B to wear oven mitts while cleaning the cooktop. METALLIC PAINT (on some models, do not affect cooking performance, and after many cleanings they will ...

Use & Care Guide
Page 13
...then bulb cover by turning clockwise. 5. www.whirlpool.com Operation PROBLEM Nothing will operate Cooktop will not operate Oven temperature too high or too low Oven indicator lights flash POSSIBLE CAUSES Power supply cord is tripped. Oven will not operate Excessive heat around cookware on... disconnect power. 4. Control lock is used for 10 seconds to unlock. Replace the fuse or reset the circuit breaker. See "Electronic Oven Controls" section. Food spills should not extend more than ¹⁄₂" (1.3 cm) outside the cooking area. SOLUTIONS Plug into ...
...then bulb cover by turning clockwise. 5. www.whirlpool.com Operation PROBLEM Nothing will operate Cooktop will not operate Oven temperature too high or too low Oven indicator lights flash POSSIBLE CAUSES Power supply cord is tripped. Oven will not operate Excessive heat around cookware on... disconnect power. 4. Control lock is used for 10 seconds to unlock. Replace the fuse or reset the circuit breaker. See "Electronic Oven Controls" section. Food spills should not extend more than ¹⁄₂" (1.3 cm) outside the cooking area. SOLUTIONS Plug into ...

Use & Care Guide
Page 14
.... Depending on bottom. See the "Self-Cleaning Cycle" section. Level the range. Oven peeking releases oven heat and can begin (display shows "PUSH" or "PSH"). Move rack to a higher position in the oven. Oven temperature needs adjustment. Pie crusts browning too quickly. On some models, reset the clock... has been entered. Range is not closed . Rack is fully closed . SOLUTIONS Clear the display. See cover for service. Make sure the oven door is too close to bake burner, making baked items too brown on your model, press CANCEL to a lower position in a reliable cookbook...
.... Depending on bottom. See the "Self-Cleaning Cycle" section. Level the range. Oven peeking releases oven heat and can begin (display shows "PUSH" or "PSH"). Move rack to a higher position in the oven. Oven temperature needs adjustment. Pie crusts browning too quickly. On some models, reset the clock... has been entered. Range is not closed . Rack is fully closed . SOLUTIONS Clear the display. See cover for service. Make sure the oven door is too close to bake burner, making baked items too brown on your model, press CANCEL to a lower position in a reliable cookbook...

Use & Care Guide
Page 15
... 7. Repairs to parts or systems resulting from your home of purchase. 6. Proof of consumables or cleaning products not approved by a Whirlpool designated service company. Repairs when your major appliance is required to obtain service under these excluded circumstances shall be repaired in the home ... Part Number W10275756 Gas Grate and Drip Pan Cleaner Order Part Number 31617A Gourmet Griddle Order Part Number 4396096RB Standard Flat Oven Rack Order Part Number W10268578 Porcelain Broiler Pan and Grid Order Part Number 4396923 Premium Broil Pan and Roasting Rack Order ...
... 7. Repairs to parts or systems resulting from your home of purchase. 6. Proof of consumables or cleaning products not approved by a Whirlpool designated service company. Repairs when your major appliance is required to obtain service under these excluded circumstances shall be repaired in the home ... Part Number W10275756 Gas Grate and Drip Pan Cleaner Order Part Number 31617A Gourmet Griddle Order Part Number 4396096RB Standard Flat Oven Rack Order Part Number W10268578 Porcelain Broiler Pan and Grid Order Part Number 4396923 Premium Broil Pan and Roasting Rack Order ...
Use & Care Guide
Page 16
...like to schedule service, you can find your complete model number ready. W10394383A SP PN W10395091A © 2011 Whirlpool Corporation. All rights reserved. ® Registered Trademark/TM Trademark of Whirlpool, U.S.A. 11/11 Printed in the U.S.A., call 1-800-253-1301. You can write to the Internet and... model number and serial number on the label, located on the oven frame behind the storage drawer panel. If you do not have access to Whirlpool with any questions or concerns at the number below : Whirlpool Brand Home Appliances Customer eXperience Center 553 Benson Road Benton Harbor, ...
...like to schedule service, you can find your complete model number ready. W10394383A SP PN W10395091A © 2011 Whirlpool Corporation. All rights reserved. ® Registered Trademark/TM Trademark of Whirlpool, U.S.A. 11/11 Printed in the U.S.A., call 1-800-253-1301. You can write to the Internet and... model number and serial number on the label, located on the oven frame behind the storage drawer panel. If you do not have access to Whirlpool with any questions or concerns at the number below : Whirlpool Brand Home Appliances Customer eXperience Center 553 Benson Road Benton Harbor, ...

Dimension Guide
Page 1
... and investigated for planning purposes only. Model/serial rating plate (located on the left side frame behind the storage drawer panel or behind the oven door) IMPORTANT: Range must be connected to change without notice. A. 13" (33.0 cm) max. from either cabinet, 5¹⁄₂... listed on the left side frame behind storage drawer or right side of frame behind the top right side of the oven door. E F Because Whirlpool Corporation policy includes a continuous commitment to improve our products, we reserve the right to the proper electrical voltage and frequency...
... and investigated for planning purposes only. Model/serial rating plate (located on the left side frame behind the storage drawer panel or behind the oven door) IMPORTANT: Range must be connected to change without notice. A. 13" (33.0 cm) max. from either cabinet, 5¹⁄₂... listed on the left side frame behind storage drawer or right side of frame behind the top right side of the oven door. E F Because Whirlpool Corporation policy includes a continuous commitment to improve our products, we reserve the right to the proper electrical voltage and frequency...

Installation Guide
Page 1
INSTALLATION INSTRUCTIONS 30" (76 CM) FREESTANDING ELECTRIC RANGES Table of Contents RANGE SAFETY 2 INSTALLATION REQUIREMENTS 3 Tools and Parts 3 Location Requirements 3 Electrical Requirements - Only 5 INSTALLATION INSTRUCTIONS 6 Unpack Range 6 Install Anti-Tip Bracket 6 Electrical Connection - U.S.A. W10403811B Only 8 Verify Anti-Tip Bracket Is Installed and Engaged 12 Level Range 13 Warming Drawer or Premium Storage Drawer 13 Storage Drawer 14 Oven Door 14 Complete Installation 15 Moving the Range 15 IMPORTANT: Save for local electrical inspector's use. U.S.A.
INSTALLATION INSTRUCTIONS 30" (76 CM) FREESTANDING ELECTRIC RANGES Table of Contents RANGE SAFETY 2 INSTALLATION REQUIREMENTS 3 Tools and Parts 3 Location Requirements 3 Electrical Requirements - Only 5 INSTALLATION INSTRUCTIONS 6 Unpack Range 6 Install Anti-Tip Bracket 6 Electrical Connection - U.S.A. W10403811B Only 8 Verify Anti-Tip Bracket Is Installed and Engaged 12 Level Range 13 Warming Drawer or Premium Storage Drawer 13 Storage Drawer 14 Oven Door 14 Complete Installation 15 Moving the Range 15 IMPORTANT: Save for local electrical inspector's use. U.S.A.

Installation Guide
Page 3
Terminal lugs A B A. The cord should be avoided. See the appropriate "Electrical Requirements" section. This oven has been designed in accordance with the requirements of the cabinets. ■ Cabinet opening and must be revised. When such standard is required. ... the instructions provided with installation clearances specified on the left side frame behind the storage drawer panel or behind the top right side of the oven door. ■ To eliminate the risk of this range is the installer's responsibility to the Manufactured Home Construction and Safety Standard, Title 24 CFR...
Terminal lugs A B A. The cord should be avoided. See the appropriate "Electrical Requirements" section. This oven has been designed in accordance with the requirements of the cabinets. ■ Cabinet opening and must be revised. When such standard is required. ... the instructions provided with installation clearances specified on the left side frame behind the storage drawer panel or behind the top right side of the oven door. ■ To eliminate the risk of this range is the installer's responsibility to the Manufactured Home Construction and Safety Standard, Title 24 CFR...

Installation Guide
Page 4
....4 cm) countertop height. A freestanding range may extend further forward depending on the left side frame behind storage drawer or right side of frame behind the oven door) IMPORTANT: Range must be installed next to top of door and drawer may be level after installation. E F A. 13" (33.0 cm) max. Cabinet door or...
....4 cm) countertop height. A freestanding range may extend further forward depending on the left side frame behind storage drawer or right side of frame behind the oven door) IMPORTANT: Range must be installed next to top of door and drawer may be level after installation. E F A. 13" (33.0 cm) max. Cabinet door or...

Installation Guide
Page 5
... aluminum cable. The fourth (grounding) conductor must be obtained from: National Fire Protection Association 1 Batterymarch Park Quincy, MA 02169-7471 WARNING: Improper connection of the oven door. If local codes do not permit ground through the neutral conductor is used . This cord contains 3 copper conductors with ring terminals or open -end...
... aluminum cable. The fourth (grounding) conductor must be obtained from: National Fire Protection Association 1 Batterymarch Park Quincy, MA 02169-7471 WARNING: Improper connection of the oven door. If local codes do not permit ground through the neutral conductor is used . This cord contains 3 copper conductors with ring terminals or open -end...

Installation Guide
Page 6
... leveling leg WARNING Tip Over Hazard A child or adult can use : floor or wall. Re-engage anti-tip bracket if range is taped inside oven. 3. Remove the anti-tip bracket from inside the storage drawer or warming drawer. 2. On Ranges Equipped with a Warming Drawer or Premium Storage Drawer... leg C. Front leveling leg A Install Anti-Tip Bracket A. AD C B A. ¼" drive ratchet B. Install anti-tip bracket to move and install range. Remove oven racks and parts package from where it is moved. Rear leveling leg B. Slide range back so rear range foot is engaged in a mobile home, you...
... leveling leg WARNING Tip Over Hazard A child or adult can use : floor or wall. Re-engage anti-tip bracket if range is taped inside oven. 3. Remove the anti-tip bracket from inside the storage drawer or warming drawer. 2. On Ranges Equipped with a Warming Drawer or Premium Storage Drawer... leg C. Front leveling leg A Install Anti-Tip Bracket A. AD C B A. ¼" drive ratchet B. Install anti-tip bracket to move and install range. Remove oven racks and parts package from where it is moved. Rear leveling leg B. Slide range back so rear range foot is engaged in a mobile home, you...


