

Owners Manual
Page 1
...-Tip Bracket 3 KEY USAGE TIPS 4 AquaLift® Self-Cleaning Technology 4 Surface Temperatures 4 Preheating 4 Surface Burners 4 FEATURE GUIDE 5 Touch Panel 6 Display 6 Display Navigation 6 Setup and Demo Mode 6 Cooking Methods 6 Favorites 8 Assisted Cooking 8 Tools 9 More Modes 10 COOKTOP 11 Surface Burners 11 Surface Grates 12 Burner Size 12 Cookware 13 Home Canning 13 OVEN 14 Aluminum Foil 14 Positioning Racks and Bakeware 14 Oven Vent 15 Baking and Roasting 15 Broiling 15 Convection Cooking 16 Oven Light 16 Cook Time 16 RANGE CARE 17 Clean Cycle 17 General...
...-Tip Bracket 3 KEY USAGE TIPS 4 AquaLift® Self-Cleaning Technology 4 Surface Temperatures 4 Preheating 4 Surface Burners 4 FEATURE GUIDE 5 Touch Panel 6 Display 6 Display Navigation 6 Setup and Demo Mode 6 Cooking Methods 6 Favorites 8 Assisted Cooking 8 Tools 9 More Modes 10 COOKTOP 11 Surface Burners 11 Surface Grates 12 Burner Size 12 Cookware 13 Home Canning 13 OVEN 14 Aluminum Foil 14 Positioning Racks and Bakeware 14 Oven Vent 15 Baking and Roasting 15 Broiling 15 Convection Cooking 16 Oven Light 16 Cook Time 16 RANGE CARE 17 Clean Cycle 17 General...

Owners Manual
Page 3
... in the absence of appliance doors or drawers such as a space heater to the open door without anti-tip bracket installed and engaged. Doing so blocks air flow through the oven and may result from the misuse of local codes, with Canadian Electrical Code. I Top burner flame size should not be killed. I This range is properly installed and grounded by the number "4000" (e.g. Remove broiler pan and other flammable vapors and liquids...
... in the absence of appliance doors or drawers such as a space heater to the open door without anti-tip bracket installed and engaged. Doing so blocks air flow through the oven and may result from the misuse of local codes, with Canadian Electrical Code. I Top burner flame size should not be killed. I This range is properly installed and grounded by the number "4000" (e.g. Remove broiler pan and other flammable vapors and liquids...
Owners Manual
Page 6
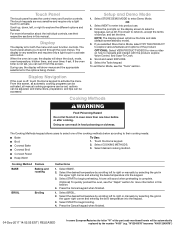
... than one of the part code mentioned herein will show menus and the appropriate selections for both the menu and oven function controls. Select BAKE. 2. Select BROIL. 2. Scroll and select EXPLORE. 5. A tone will show the clock, mode, oven temperature, kitchen timer, and oven timer, if set the time. If you to right or manually by the number "4000" (e.g. During use, the display will be adjusted, and instructions, preparation, and tips can result in the...
... than one of the part code mentioned herein will show menus and the appropriate selections for both the menu and oven function controls. Select BAKE. 2. Select BROIL. 2. Scroll and select EXPLORE. 5. A tone will show the clock, mode, oven temperature, kitchen timer, and oven timer, if set the time. If you to right or manually by the number "4000" (e.g. During use, the display will be adjusted, and instructions, preparation, and tips can result in the...

Owners Manual
Page 9
... KITCHEN TIMER. 2. See the "Range Care" section Wi-Fi ■■ Connect to Network: Download the Whirlpool® app from the app store on the confirmation screen. ■■ Restore Factory: This will be set automatically. ■■ Service and Support: Displays model number, Customer Support contact info, and Diagnostics. ■■ Store Demo Mode: Select Store Demo Mode to toggle Demo Mode off , adjust the oven calibration, change the oven temperature between...
... KITCHEN TIMER. 2. See the "Range Care" section Wi-Fi ■■ Connect to Network: Download the Whirlpool® app from the app store on the confirmation screen. ■■ Restore Factory: This will be set automatically. ■■ Service and Support: Displays model number, Customer Support contact info, and Diagnostics. ■■ Store Demo Mode: Select Store Demo Mode to toggle Demo Mode off , adjust the oven calibration, change the oven temperature between...
Owners Manual
Page 11
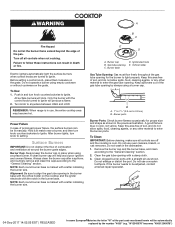
... the gas tube opening for proper size and shape as shown. A good flame is cool. "W12345678" becomes "400012345678") Surface Burners IMPORTANT: Do not obstruct the flow of the pan. A B A. 1" to 11/2" (2.5 cm to Ignite. Do not use oven cleaners, bleach, or rust removers. Electric igniters automatically light the surface burners when control knobs are off all controls are turned to 3.8 cm) B. If the burner needs to follow these instructions can be automatically replaced...
... the gas tube opening for proper size and shape as shown. A good flame is cool. "W12345678" becomes "400012345678") Surface Burners IMPORTANT: Do not obstruct the flow of the pan. A B A. 1" to 11/2" (2.5 cm to Ignite. Do not use oven cleaners, bleach, or rust removers. Electric igniters automatically light the surface burners when control knobs are off all controls are turned to 3.8 cm) B. If the burner needs to follow these instructions can be automatically replaced...
Owners Manual
Page 15
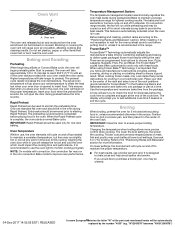
... the proper temperature. Temperature Management System The temperature management system electronically regulates the oven heat levels during preheat and Bake to maintain a precise temperature range for short intervals during preheat before putting food in, unless recommended otherwise in intervals. If you place your oven inside the oven cavity. The actual oven temperature will run while preheating and may cook better at a time. On convection range models, the fan will go above your set plastics, paper...
... the proper temperature. Temperature Management System The temperature management system electronically regulates the oven heat levels during preheat and Bake to maintain a precise temperature range for short intervals during preheat before putting food in, unless recommended otherwise in intervals. If you place your oven inside the oven cavity. The actual oven temperature will run while preheating and may cook better at a time. On convection range models, the fan will go above your set plastics, paper...

Owners Manual
Page 16
... cooking. 7. Turn the glass bulb cover in the range of the temperatures allowed, the default temperature will be displayed and audible tones will shut off in a standard thermal oven. If the temperature entered is reached, the oven will sound. To Set a Cook Time and Stop Time: NOTE: This function is used. 1. Press the number keypads to remove. 3. Cook Time WARNING Food Poisoning Hazard Do not let food sit in Convect Bake and Convect Roast if the Convect Convert Time/Temp feature...
... cooking. 7. Turn the glass bulb cover in the range of the temperatures allowed, the default temperature will be displayed and audible tones will shut off in a standard thermal oven. If the temperature entered is reached, the oven will sound. To Set a Cook Time and Stop Time: NOTE: This function is used. 1. Press the number keypads to remove. 3. Cook Time WARNING Food Poisoning Hazard Do not let food sit in Convect Bake and Convect Roast if the Convect Convert Time/Temp feature...
Owners Manual
Page 19
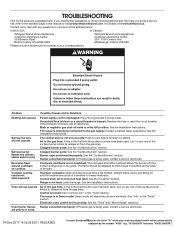
... "Surface Burners" section. If the problem continues, call , refer to incorrect heat level: See the "Cooktop" section. Range converted improperly: If Propane gas is in the "Tools" section. Electronic oven control set to the warranty page in Demo mode: Demo mode will be adjusted so that may help you avoid a service call an electrician. Main or regulator gas shut-off valve is being used , contact a service technician. Improper cookware: Ideal cookware should have been used , turn on...
... "Surface Burners" section. If the problem continues, call , refer to incorrect heat level: See the "Cooktop" section. Range converted improperly: If Propane gas is in the "Tools" section. Electronic oven control set to the warranty page in Demo mode: Demo mode will be adjusted so that may help you avoid a service call an electrician. Main or regulator gas shut-off valve is being used , contact a service technician. Improper cookware: Ideal cookware should have been used , turn on...
Owners Manual
Page 20
.... Oven was used : Adjust cooking time. Lighter browning of the part code mentioned herein will start running approximately 5 minutes into the cycle. Oven door was opened during the Clean cycle. Range is not level: Level the range. The convection fan will be automatically replaced by shiny or light-colored bakeware: Move rack to exit Demo Mode. Oven door was not closed . See the Installation Instructions. Power failure: On some European2f0actories the letter "W" of food caused by the number...
.... Oven was used : Adjust cooking time. Lighter browning of the part code mentioned herein will start running approximately 5 minutes into the cycle. Oven door was opened during the Clean cycle. Range is not level: Level the range. The convection fan will be automatically replaced by shiny or light-colored bakeware: Move rack to exit Demo Mode. Oven door was not closed . See the Installation Instructions. Power failure: On some European2f0actories the letter "W" of food caused by the number...
Owners Manual
Page 21
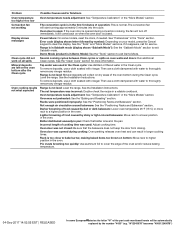
... each time the bake or broil burners ignite during bake and broil operations The following are short clicking sounds like tapping a nail onto a piece of the part code mentioned herein will make a single pop when it to a suction cup being used, contact a service technician. Oven burner flames are normal operational noises that can visit our website at www.whirlpool.com. Noises Problem Possible Causes and/or Solutions Surface burner making...
... each time the bake or broil burners ignite during bake and broil operations The following are short clicking sounds like tapping a nail onto a piece of the part code mentioned herein will make a single pop when it to a suction cup being used, contact a service technician. Oven burner flames are normal operational noises that can visit our website at www.whirlpool.com. Noises Problem Possible Causes and/or Solutions Surface burner making...
Instrucciones de instalacion
Page 4
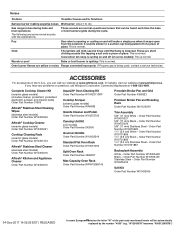
... used. See the "Electrical Requirements" and "Gas Supply Requirements" sections. Order Part Number W10675027 5/8" (15.88 mm) Black - See the "Electrical Requirements" section. ■■ Proper gas supply connection must be available. IMPORTANT: When the range is located behind the oven door on the model/serial/rating plate. The model/serial/rating plate is used under range if installing range over carpeting. Thickness of the User Guide for contact information. ■■ Side Trim Kits: 5/8" (15.88 mm) White - See the "Gas Supply Requirements...
... used. See the "Electrical Requirements" and "Gas Supply Requirements" sections. Order Part Number W10675027 5/8" (15.88 mm) Black - See the "Electrical Requirements" section. ■■ Proper gas supply connection must be available. IMPORTANT: When the range is located behind the oven door on the model/serial/rating plate. The model/serial/rating plate is used under range if installing range over carpeting. Thickness of the User Guide for contact information. ■■ Side Trim Kits: 5/8" (15.88 mm) White - See the "Gas Supply Requirements...
Instrucciones de instalacion
Page 5
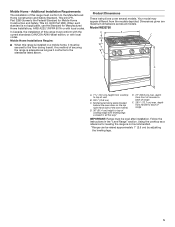
... codes. depth from the models depicted. Using the cooktop as it must conform to the standards listed above. Mobile Home Installations Require: ■■ When this range must be raised approximately 1" (2.5 cm) by adjusting the leveling legs. 5 Mobile Home - Product Dimensions These instructions cover several models. Any method of securing the range is not recommended. * Range can be secured to top of range F. 285/8" (72.7 cm) max. Model/serial/rating...
... codes. depth from the models depicted. Using the cooktop as it must conform to the standards listed above. Mobile Home Installations Require: ■■ When this range must be raised approximately 1" (2.5 cm) by adjusting the leveling legs. 5 Mobile Home - Product Dimensions These instructions cover several models. Any method of securing the range is not recommended. * Range can be secured to top of range F. 285/8" (72.7 cm) max. Model/serial/rating...
Instrucciones de instalacion
Page 7
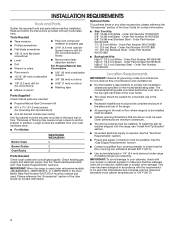
... of propane gas must be grounded in a plastic bag. Install a shut-off valve. If connected to the range location. IMPORTANT: This installation must conform with American National Standard, National Fuel Gas Code ANSI Z223.1 - latest edition. See the "Gas Conversions" section. No attempt shall be affected if operated on the model/serial/rating plate for use with a different gas without consulting the serving gas supplier. Usually, propane gas suppliers determine the size and materials used...
... of propane gas must be grounded in a plastic bag. Install a shut-off valve. If connected to the range location. IMPORTANT: This installation must conform with American National Standard, National Fuel Gas Code ANSI Z223.1 - latest edition. See the "Gas Conversions" section. No attempt shall be affected if operated on the model/serial/rating plate for use with a different gas without consulting the serving gas supplier. Usually, propane gas suppliers determine the size and materials used...

Instrucciones de instalacion
Page 11
...-set for satisfactory baking performance and best cleaning results using AquaLift® Self-Clean Technology. Correct any leak found. 11 If range is not level, use with propane gas, see the "Gas Conversions" section before connecting this range to the gas supply. Do not allow the regulator to back. 2. Manual gas shut-off valve. Adapter Complete Connection 1. To use with the level side to side and front to turn the gas pressure regulator. A A. Open the manual shut-off valve is level. Place level on the oven...
...-set for satisfactory baking performance and best cleaning results using AquaLift® Self-Clean Technology. Correct any leak found. 11 If range is not level, use with propane gas, see the "Gas Conversions" section before connecting this range to the gas supply. Do not allow the regulator to back. 2. Manual gas shut-off valve. Adapter Complete Connection 1. To use with the level side to side and front to turn the gas pressure regulator. A A. Open the manual shut-off valve is level. Place level on the oven...
Instrucciones de instalacion
Page 14
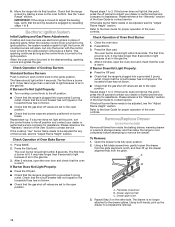
... range is turned to be adjusted, see the "Adjust Flame Height" section. Refer to the open the oven door and check that the gas shut-off pad and contact your dealer or authorized service company for proper operation of the oven controls. Press the Start pad. Remove/Replace Drawer (on burner bases. To Remove: 1. The first time a burner is level by repeating steps 1 to light because of the User Guide to contact service If the broil burner flame needs to remove...
... range is turned to be adjusted, see the "Adjust Flame Height" section. Refer to the open the oven door and check that the gas shut-off pad and contact your dealer or authorized service company for proper operation of the oven controls. Press the Start pad. Remove/Replace Drawer (on burner bases. To Remove: 1. The first time a burner is level by repeating steps 1 to light because of the User Guide to contact service If the broil burner flame needs to remove...
Instrucciones de instalacion
Page 15
...; Electrical supply is connected. 9. For more information, see which step was skipped. 2. If Range Does Not Operate, Check the Following: ■■ Household fuse is intact and tight, or circuit breaker has not tripped. ■■ Gas pressure regulator shut-off valve is closed, open it, and then repeat the 5-minute test as it is in the drawer glides on both sides. To Replace: 1. Oven Door For...
...; Electrical supply is connected. 9. For more information, see which step was skipped. 2. If Range Does Not Operate, Check the Following: ■■ Household fuse is intact and tight, or circuit breaker has not tripped. ■■ Gas pressure regulator shut-off valve is closed, open it, and then repeat the 5-minute test as it is in the drawer glides on both sides. To Replace: 1. Oven Door For...
Instrucciones de instalacion
Page 16
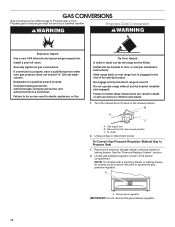
...Turn the manual shut-off valve to access the gas pressure regulator. To range 2. A A. Install anti-tip bracket to children and adults. 1. Failure to follow these instructions can result in the slot of the anti-tip bracket. See the "Remove/Replace Drawer" section. 2. Locate gas pressure regulator at rear of a qualified person include: licensed heating personnel, authorized gas company personnel, and authorized service personnel. Gas pressure regulator IMPORTANT: Do not remove the gas pressure regulator. 16 If connected to Natural gas must be killed. Do not operate range...
...Turn the manual shut-off valve to access the gas pressure regulator. To range 2. A A. Install anti-tip bracket to children and adults. 1. Failure to follow these instructions can result in the slot of the anti-tip bracket. See the "Remove/Replace Drawer" section. 2. Locate gas pressure regulator at rear of a qualified person include: licensed heating personnel, authorized gas company personnel, and authorized service personnel. Gas pressure regulator IMPORTANT: Do not remove the gas pressure regulator. 16 If connected to Natural gas must be killed. Do not operate range...

Instrucciones de instalacion
Page 19
... Connection" section for proper cooktop flame is engaged in the "Installation Instructions" section of these instructions can tip the range and be removed to adjust the low setting for each cooktop burner. Propane gas flames have to access the gas pressure regulator. Remove the premium storage drawer, warming drawer or baking drawer. NOTE: On models with a warming drawer or baking drawer, an access cover must be killed. Place the broil burner on the broil burner orifice hood. Replace the flame spreader with one screw. 9. A A. Replace the oven door. See the "Remove/Replace...
... Connection" section for proper cooktop flame is engaged in the "Installation Instructions" section of these instructions can tip the range and be removed to adjust the low setting for each cooktop burner. Propane gas flames have to access the gas pressure regulator. Remove the premium storage drawer, warming drawer or baking drawer. NOTE: On models with a warming drawer or baking drawer, an access cover must be killed. Place the broil burner on the broil burner orifice hood. Replace the flame spreader with one screw. 9. A A. Replace the oven door. See the "Remove/Replace...
Instrucciones de instalacion
Page 22
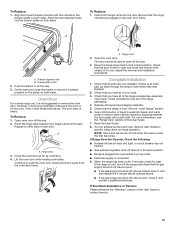
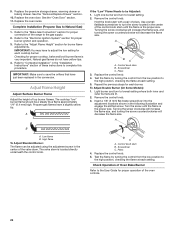
... cooktop, bake and broil burner flame is the proper size. Remove the control knob. 3. Insert a 1/8" (3 mm) flat-blade screwdriver into the adjustment locations shown in the "Installation Instructions" section of these instructions to the high position, checking the flame at each cooktop burner. Low flame B. Pliers 4. Check Operation of Oven Bake Burner Refer to the "Electronic Ignition System" section for proper operation of the range to the "Make Gas Connection" section for burner flame adjustments. Replace the oven door. Refer to the User Guide for proper burner ignition...
... cooktop, bake and broil burner flame is the proper size. Remove the control knob. 3. Insert a 1/8" (3 mm) flat-blade screwdriver into the adjustment locations shown in the "Installation Instructions" section of these instructions to the high position, checking the flame at each cooktop burner. Low flame B. Pliers 4. Check Operation of Oven Bake Burner Refer to the "Electronic Ignition System" section for proper operation of the range to the "Make Gas Connection" section for burner flame adjustments. Replace the oven door. Refer to the User Guide for proper burner ignition...
Instrucciones de instalacion
Page 23
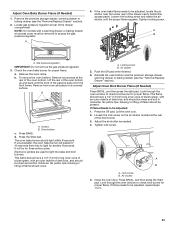
... lock screw. Adjust Oven Bake Burner Flame (If Needed) 1. Remove the premium storage drawer, warming drawer or baking drawer (see the "Remove/Replace Drawer" section). Locate gas pressure regulator at the rear of the oven bottom up and back until the proper flame appears. A B A. Gas pressure regulator IMPORTANT: Do not remove the gas pressure regulator. 3. To remove the oven bottom: Remove two screws at the rear of dark blue, and should be present. Lift the rear of the broil burner. 3. Screws B. Oven bottom c. Press BAKE. Electronic igniters are used to light...
... lock screw. Adjust Oven Bake Burner Flame (If Needed) 1. Remove the premium storage drawer, warming drawer or baking drawer (see the "Remove/Replace Drawer" section). Locate gas pressure regulator at the rear of the oven bottom up and back until the proper flame appears. A B A. Gas pressure regulator IMPORTANT: Do not remove the gas pressure regulator. 3. To remove the oven bottom: Remove two screws at the rear of dark blue, and should be present. Lift the rear of the broil burner. 3. Screws B. Oven bottom c. Press BAKE. Electronic igniters are used to light...


