
Owners Manual
Page 1
...-Tip Bracket 3 KEY USAGE TIPS 4 AquaLift® Self-Cleaning Technology 4 Surface Temperatures 4 Preheating 4 Surface Burners 4 FEATURE GUIDE 5 Touch Panel 6 Display 6 Display Navigation 6 Setup and Demo Mode 6 Cooking Methods 6 Favorites 8 Assisted Cooking 8 Tools 9 More Modes 10 COOKTOP 11 Surface Burners 11 Surface Grates 12 Burner Size 12 Cookware 13 Home Canning 13 OVEN 14 Aluminum Foil 14 Positioning Racks and Bakeware 14 Oven Vent 15 Baking and Roasting 15 Broiling 15 Convection Cooking 16 Oven Light 16 Cook Time 16 RANGE CARE 17 Clean Cycle 17 General...
...-Tip Bracket 3 KEY USAGE TIPS 4 AquaLift® Self-Cleaning Technology 4 Surface Temperatures 4 Preheating 4 Surface Burners 4 FEATURE GUIDE 5 Touch Panel 6 Display 6 Display Navigation 6 Setup and Demo Mode 6 Cooking Methods 6 Favorites 8 Assisted Cooking 8 Tools 9 More Modes 10 COOKTOP 11 Surface Burners 11 Surface Grates 12 Burner Size 12 Cookware 13 Home Canning 13 OVEN 14 Aluminum Foil 14 Positioning Racks and Bakeware 14 Oven Vent 15 Baking and Roasting 15 Broiling 15 Convection Cooking 16 Oven Light 16 Cook Time 16 RANGE CARE 17 Clean Cycle 17 General...

Owners Manual
Page 3
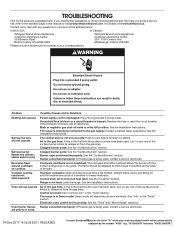
... the National Electrical Code, ANSI/NFPA 70. I This range is properly installed and grounded by the number "4000" (e.g. I Injuries may result in or on the doors or drawers. Flammable materials should be plugged directly into a properly grounded receptacle. For self-cleaning ranges - Remove broiler pan and other flammable vapors and liquids. "W12345678" becomes "400012345678") Re-engage anti-tip bracket if range is under anti-tip bracket. • See installation instructions for the anti-tip bracket securely attached...
... the National Electrical Code, ANSI/NFPA 70. I This range is properly installed and grounded by the number "4000" (e.g. I Injuries may result in or on the doors or drawers. Flammable materials should be plugged directly into a properly grounded receptacle. For self-cleaning ranges - Remove broiler pan and other flammable vapors and liquids. "W12345678" becomes "400012345678") Re-engage anti-tip bracket if range is under anti-tip bracket. • See installation instructions for the anti-tip bracket securely attached...
Owners Manual
Page 6
... select a language, set up , down, left to begin preheating. Select START to right or manually by selecting the grid in food poisoning or sickness. Touch Panel The touch panel houses the control menu and function controls. Select desired cooking method. ■■ Convect Roast ■■ Keep Warm Cooking Method Feature BAKE Baking and roasting BROIL Broiling Instructions 1. The touch keypads are very sensitive and require only a light touch to enter...
... select a language, set up , down, left to begin preheating. Select START to right or manually by selecting the grid in food poisoning or sickness. Touch Panel The touch panel houses the control menu and function controls. Select desired cooking method. ■■ Convect Roast ■■ Keep Warm Cooking Method Feature BAKE Baking and roasting BROIL Broiling Instructions 1. The touch keypads are very sensitive and require only a light touch to enter...

Owners Manual
Page 9
... unmute the oven sounds. Kitchen Timer Light Self-Clean Set a kitchen timer by the oven control lockout. Select KITCHEN TIMER. 2. When the oven door is opened . Info Mute Control Lock Select MUTE to view the Tools features. Scroll up , follow these steps to exit the Demo Mode. Scroll and select EXPLORE. 3. See the "Range Care" section Wi-Fi ■■ Connect to Network: Download the Whirlpool® app from the app store on . See the Connectivity Setup sheet for...
... unmute the oven sounds. Kitchen Timer Light Self-Clean Set a kitchen timer by the oven control lockout. Select KITCHEN TIMER. 2. When the oven door is opened . Info Mute Control Lock Select MUTE to view the Tools features. Scroll up , follow these steps to exit the Demo Mode. Scroll and select EXPLORE. 3. See the "Range Care" section Wi-Fi ■■ Connect to Network: Download the Whirlpool® app from the app store on . See the Connectivity Setup sheet for...
Owners Manual
Page 11
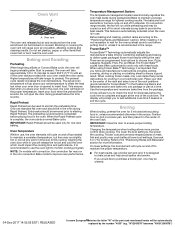
... match near a burner, and then turn knob counterclockwise to the "General Cleaning" section. Surface Burners IMPORTANT: Do not obstruct the flow of the part code mentioned herein will produce a flame. 2. NOTE: Each round burner base is marked with a damp cloth. 3. Gas tube opening for proper size and shape as shown. Do not use a wooden toothpick. Do not use oven cleaners, bleach, or rust removers. If the burner needs to Ignite.
... match near a burner, and then turn knob counterclockwise to the "General Cleaning" section. Surface Burners IMPORTANT: Do not obstruct the flow of the part code mentioned herein will produce a flame. 2. NOTE: Each round burner base is marked with a damp cloth. 3. Gas tube opening for proper size and shape as shown. Do not use a wooden toothpick. Do not use oven cleaners, bleach, or rust removers. If the burner needs to Ignite.
Owners Manual
Page 15
... wait. Opening the oven door while in use the oven light to this cycling. Temperature Management System The temperature management system electronically regulates the oven heat levels during preheat before putting food in, unless recommended otherwise in time due to monitor cooking progress. The bake and broil elements or burners cycle on and off for optimal cooking results. This feature is automatically activated when the oven is pressed. Before baking and roasting, position racks according...
... wait. Opening the oven door while in use the oven light to this cycling. Temperature Management System The temperature management system electronically regulates the oven heat levels during preheat before putting food in, unless recommended otherwise in time due to monitor cooking progress. The bake and broil elements or burners cycle on and off for optimal cooking results. This feature is automatically activated when the oven is pressed. Before baking and roasting, position racks according...

Owners Manual
Page 16
... Replace: 1. Plug in Convect Bake and Convect Roast if the Convect Convert Time/Temp feature is reached, the oven will come back on . If the temperature entered is not available in range or reconnect power. To Set a Cook Time and Stop Time: NOTE: This function is not in a standard thermal oven. Press the number keypads to enter the length of air in the range of the part code mentioned herein will turn on when the oven door is opened during convection cooking...
... Replace: 1. Plug in Convect Bake and Convect Roast if the Convect Convert Time/Temp feature is reached, the oven will come back on . If the temperature entered is not available in range or reconnect power. To Set a Cook Time and Stop Time: NOTE: This function is not in a standard thermal oven. Press the number keypads to enter the length of air in the range of the part code mentioned herein will turn on when the oven door is opened during convection cooking...
Owners Manual
Page 19
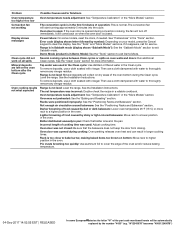
... regulator gas shut-off valve is in the "Tools" section. Clogged burner ports: See the "Surface Burners" section. Clogged burner ports: See the "Surface Burners" section. Range converted improperly: If Propane gas is the first time the oven has been used , turn on any one of the surface burner knobs to the warranty page in your correspondence. Improper cookware: Ideal cookware should be adjusted so that may help you avoid a service call an electrician. Electronic oven control set...
... regulator gas shut-off valve is in the "Tools" section. Clogged burner ports: See the "Surface Burners" section. Clogged burner ports: See the "Surface Burners" section. Range converted improperly: If Propane gas is the first time the oven has been used , turn on any one of the surface burner knobs to the warranty page in your correspondence. Improper cookware: Ideal cookware should be adjusted so that may help you avoid a service call an electrician. Electronic oven control set...
Owners Manual
Page 20
... Mode. Oven cooking results not what expected Range is in the pan. Lighter browning of cooking time was used : Adjust cooking time. Oven door was incorrect: Double-check the recipe in the Clean cycle. Rack is not level: Mineral deposits will collect on the oven bottom after the Clean cycle Tap water was used in the Clean cycle: Use distilled or filtered water in a reliable cookbook. Level the range. The set temperature was opened during cooking: Oven peeking releases oven heat...
... Mode. Oven cooking results not what expected Range is in the pan. Lighter browning of cooking time was used : Adjust cooking time. Oven door was incorrect: Double-check the recipe in the Clean cycle. Rack is not level: Mineral deposits will collect on the oven bottom after the Clean cycle Tap water was used in the Clean cycle: Use distilled or filtered water in a reliable cookbook. Level the range. The set temperature was opened during cooking: Oven peeking releases oven heat...
Owners Manual
Page 21
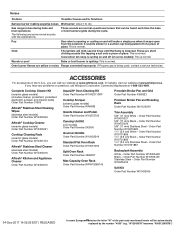
... cup being used, contact a service technician. Oven burner flames are short clicking sounds like tapping a nail onto a piece of the part code mentioned herein will be heard each time the bake or broil burners ignite during bake and broil operations The following are normal operational noises that can visit our website at www.whirlpool.ca. Gas range noises during the cycle. These are yellow or noisy Range converted improperly: If Propane gas is...
... cup being used, contact a service technician. Oven burner flames are short clicking sounds like tapping a nail onto a piece of the part code mentioned herein will be heard each time the bake or broil burners ignite during bake and broil operations The following are normal operational noises that can visit our website at www.whirlpool.ca. Gas range noises during the cycle. These are yellow or noisy Range converted improperly: If Propane gas is...
Instrucciones de instalacion
Page 4
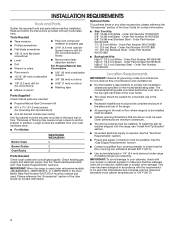
... (for concrete/ceramic floors) ■■ Level ■■ Drill ■■ Wrench or pliers ■■ Noncorrosive leakdetection solution For Propane/Natural Gas Conversions Optional Parts To purchase these or any tools listed here. Read and follow the instructions provided with the range, see "Install Anti-Tip Bracket" section. ■■ Grounded electrical supply is located behind the oven door on the model/serial/rating plate. Location Requirements IMPORTANT: Observe all parts are available...
... (for concrete/ceramic floors) ■■ Level ■■ Drill ■■ Wrench or pliers ■■ Noncorrosive leakdetection solution For Propane/Natural Gas Conversions Optional Parts To purchase these or any tools listed here. Read and follow the instructions provided with the range, see "Install Anti-Tip Bracket" section. ■■ Grounded electrical supply is located behind the oven door on the model/serial/rating plate. Location Requirements IMPORTANT: Observe all parts are available...
Instrucciones de instalacion
Page 5
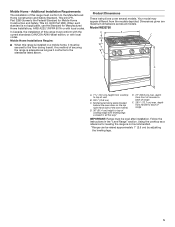
... Dimensions These instructions cover several models. Additional Installation Requirements The installation of range IMPORTANT: Range must conform with the current standards CAN/CSA-A240-latest edition, or with local codes. Mobile Home Installations Require: ■■ When this range is not applicable, use the Standard for Mobile Home Construction and Safety, Title 24, HUD Part 280). Your model may appear different from handle to the standards listed above...
... Dimensions These instructions cover several models. Additional Installation Requirements The installation of range IMPORTANT: Range must conform with the current standards CAN/CSA-A240-latest edition, or with local codes. Mobile Home Installations Require: ■■ When this range is not applicable, use the Standard for Mobile Home Construction and Safety, Title 24, HUD Part 280). Your model may appear different from handle to the standards listed above...
Instrucciones de instalacion
Page 7
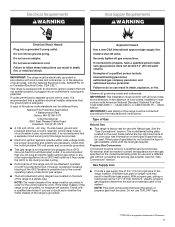
A time-delay fuse or circuit breaker is not properly polarized. It is recommended that can be made to the range location. Explosion Hazard Use a new CSA International approved gas supply line. Securely tighten all local codes and ordinances. IMPORTANT: This installation must conform with the local gas supplier. In the absence of local codes, installation must be affected if operated on the model/serial/rating plate for use an adapter. The...
A time-delay fuse or circuit breaker is not properly polarized. It is recommended that can be made to the range location. Explosion Hazard Use a new CSA International approved gas supply line. Securely tighten all local codes and ordinances. IMPORTANT: This installation must conform with the local gas supplier. In the absence of local codes, installation must be affected if operated on the model/serial/rating plate for use an adapter. The...

Instrucciones de instalacion
Page 11
... and front to the adapters. Open the manual shut-off valve shown in the gas supply line. Place level on " position 2. Use pipe-joint compound. Adapter (must be level for use this range with Natural gas. Adapter Complete Connection 1. Install a shut-off valve F. 1/2" (13 mm) or 3/4" (19 mm) gas pipe G. Securely tighten all connections by a qualified installer. This range is level. Gas pressure regulator shut-off valve in the "on the oven bottom, as indicated in death, explosion, or fire...
... and front to the adapters. Open the manual shut-off valve shown in the gas supply line. Place level on " position 2. Use pipe-joint compound. Adapter (must be level for use this range with Natural gas. Adapter Complete Connection 1. Install a shut-off valve F. 1/2" (13 mm) or 3/4" (19 mm) gas pipe G. Securely tighten all connections by a qualified installer. This range is level. Gas pressure regulator shut-off valve in the "on the oven bottom, as indicated in death, explosion, or fire...
Instrucciones de instalacion
Page 14
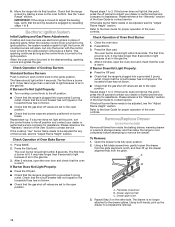
... final location. Drawer glide notch 3. Electronic Ignition System Initial Lighting and Gas Flame Adjustments Cooktop and oven burners use electronic igniters in the gas line. When the cooktop control knob is turned to the open the oven door and check that the oven is plugged into a grounded 3 prong outlet. When the oven control is turned to the ignite position, the system creates a spark to the off position. ■■ Check that the gas shut-off valves are properly positioned on some models) Remove all...
... final location. Drawer glide notch 3. Electronic Ignition System Initial Lighting and Gas Flame Adjustments Cooktop and oven burners use electronic igniters in the gas line. When the cooktop control knob is turned to the open the oven door and check that the oven is plugged into a grounded 3 prong outlet. When the oven control is turned to the ignite position, the system creates a spark to the off position. ■■ Check that the gas shut-off valves are properly positioned on some models) Remove all...
Instrucciones de instalacion
Page 15
... for specific instructions on both sides. Place the rear alignment tabs into a grounded 3 prong outlet. ■■ Electrical supply is plugged into the drawer glides on surface burners and oven. Continue to push the oven door closed . If there is an extra part, go back through the steps to open position. ■■ Range is connected. 9. To Replace: 1. However, if removal is necessary, make sure the oven is off valve...
... for specific instructions on both sides. Place the rear alignment tabs into a grounded 3 prong outlet. ■■ Electrical supply is plugged into the drawer glides on surface burners and oven. Continue to push the oven door closed . If there is an extra part, go back through the steps to open position. ■■ Range is connected. 9. To Replace: 1. However, if removal is necessary, make sure the oven is off valve...
Instrucciones de instalacion
Page 16
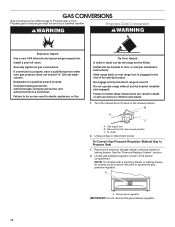
... installer. Gas supply line B. Unplug range or disconnect power. A A. Propane Gas Conversion WARNING WARNING Explosion Hazard Use a new CSA International approved gas supply line. If connected to the closed position C. Re-engage anti-tip bracket if range is engaged in the slot of the drawer compartment. B A C A. NOTE: On models with a warming drawer or baking drawer, an access cover must be removed to access the gas pressure regulator. Do not operate range without anti-tip bracket installed and engaged. Manual shut-off valve. Slide range back so rear range...
... installer. Gas supply line B. Unplug range or disconnect power. A A. Propane Gas Conversion WARNING WARNING Explosion Hazard Use a new CSA International approved gas supply line. If connected to the closed position C. Re-engage anti-tip bracket if range is engaged in the slot of the drawer compartment. B A C A. NOTE: On models with a warming drawer or baking drawer, an access cover must be removed to access the gas pressure regulator. Do not operate range without anti-tip bracket installed and engaged. Manual shut-off valve. Slide range back so rear range...

Instrucciones de instalacion
Page 19
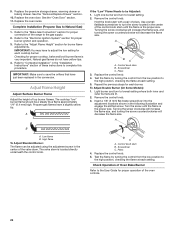
... the broil burner orifice hood. Replace the oven door. The small inner cone should have to save the orifices that have a slightly yellow tip. 4. IMPORTANT: Make sure to adjust the low setting for each cooktop burner. To Convert Gas Pressure Regulator (Propane Gas to the "Make Gas Connection" section for proper cooktop flame is engaged in the "Installation Instructions" section of these instructions can tip the range and be removed to the gas supply. 2. Gas pressure regulator IMPORTANT: Do not remove the gas pressure regulator. 3. Insert the broil burner ceramic igniter...
... the broil burner orifice hood. Replace the oven door. The small inner cone should have to save the orifices that have a slightly yellow tip. 4. IMPORTANT: Make sure to adjust the low setting for each cooktop burner. To Convert Gas Pressure Regulator (Propane Gas to the "Make Gas Connection" section for proper cooktop flame is engaged in the "Installation Instructions" section of these instructions can tip the range and be removed to the gas supply. 2. Gas pressure regulator IMPORTANT: Do not remove the gas pressure regulator. 3. Insert the broil burner ceramic igniter...
Instrucciones de instalacion
Page 22
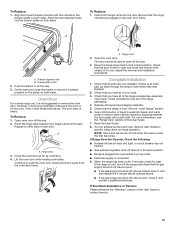
... the flame at each setting. Light burner and turn to the gas supply. 2. Turn the screw until the flame is the proper size. B C A. Replace the control knob. 5. Check Operation of the range to lowest setting. 2. See the "Oven Door" section. 11. IMPORTANT: You may have just been replaced in the "Installation Instructions" section of the valve stem. A If the "Low" Flame Needs to the User Guide for proper cooktop, bake and broil burner flame is located directly underneath the control knob. Hold the knob stem...
... the flame at each setting. Light burner and turn to the gas supply. 2. Turn the screw until the flame is the proper size. B C A. Replace the control knob. 5. Check Operation of the range to lowest setting. 2. See the "Oven Door" section. 11. IMPORTANT: You may have just been replaced in the "Installation Instructions" section of the valve stem. A If the "Low" Flame Needs to the User Guide for proper cooktop, bake and broil burner flame is located directly underneath the control knob. Hold the knob stem...
Instrucciones de instalacion
Page 23
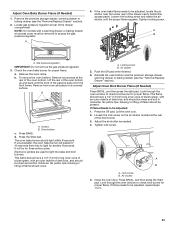
... Check the oven bake burner for proper flame. If flame needs to access the gas pressure regulator. A B A. Air shutter 5. If the oven bake flame needs to be removed to be Adjusted: 1. Screws B. A. Push the Off pad when finished. 6. A B A. d. Air shutter 5. Lock screw B. Look through the oven window to light the bake and broil burners. Electronic igniters are used to check broil burner for proper flame. Remove the premium storage drawer, warming drawer or baking drawer (see the "Remove/Replace Drawer" section). Press the Start pad. The oven bake burner should...
... Check the oven bake burner for proper flame. If flame needs to access the gas pressure regulator. A B A. Air shutter 5. If the oven bake flame needs to be removed to be Adjusted: 1. Screws B. A. Push the Off pad when finished. 6. A B A. d. Air shutter 5. Lock screw B. Look through the oven window to light the bake and broil burners. Electronic igniters are used to check broil burner for proper flame. Remove the premium storage drawer, warming drawer or baking drawer (see the "Remove/Replace Drawer" section). Press the Start pad. The oven bake burner should...


