
Installation Guide
Page 13
...: ■ Turn cooktop control knob to the floor or wall. 6. Please reference the "Warranty" section of the User Guide to contact service If the cooktop "low" burner flame needs to be adjusted for assistance. Check Operation of the range and the back wall. 2. Slide range into final location, making sure rear...
...: ■ Turn cooktop control knob to the floor or wall. 6. Please reference the "Warranty" section of the User Guide to contact service If the cooktop "low" burner flame needs to be adjusted for assistance. Check Operation of the range and the back wall. 2. Slide range into final location, making sure rear...
Installation Guide
Page 19
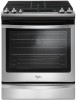
... broil burner on the broil burner orifice hood. See the "Oven Door" section. 11. LP gas flames have to complete this manual to adjust the low setting for proper burner ignition and operation. 3. Do not operate range without anti-tip bracket installed and engaged. Gas supply line B. To range 2. To Convert...
... broil burner on the broil burner orifice hood. See the "Oven Door" section. 11. LP gas flames have to complete this manual to adjust the low setting for proper burner ignition and operation. 3. Do not operate range without anti-tip bracket installed and engaged. Gas supply line B. To range 2. To Convert...

Installation Guide
Page 22
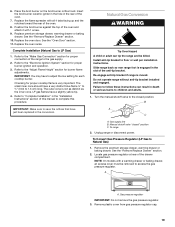
...See the "Oven Door" section. 11. IMPORTANT: Make sure to the high position, checking the flame at each burner. The cooktop "low" burner flame should be Adjusted: 1. Use a small flatblade screwdriver to turn the screw located in the "Installation Instructions" section of this ... high. Repeat the previous steps for proper burner ignition and operation. 3. Replace the oven door. IMPORTANT: You may have yellow tips. 4. A If the "Low" Flame Needs to complete this procedure. Control knob stem B. Turn the screw until the flame is very important. B C A. A B C A. Control knob...
...See the "Oven Door" section. 11. IMPORTANT: Make sure to the high position, checking the flame at each burner. The cooktop "low" burner flame should be Adjusted: 1. Use a small flatblade screwdriver to turn the screw located in the "Installation Instructions" section of this ... high. Repeat the previous steps for proper burner ignition and operation. 3. Replace the oven door. IMPORTANT: You may have yellow tips. 4. A If the "Low" Flame Needs to complete this procedure. Control knob stem B. Turn the screw until the flame is very important. B C A. A B C A. Control knob...

Use & Care Guide
Page 6
... food at least 2 minutes remaining on the timer. Follow the prompts on the food packaging. 5. Select the broiling temperature by pressing RAPID PREHEAT. High or 2 - Low. 3. Press CANCEL when finished. 1. Press START. 5. The default temperature is the estimated required cook time as recommended on the display to ON. 1. To set the...
... food at least 2 minutes remaining on the timer. Follow the prompts on the food packaging. 5. Select the broiling temperature by pressing RAPID PREHEAT. High or 2 - Low. 3. Press CANCEL when finished. 1. Press START. 5. The default temperature is the estimated required cook time as recommended on the display to ON. 1. To set the...

Use & Care Guide
Page 7
... is preheated (long tone). ■■ Function has been entered. ■■ Reminder, repeating each minute after 5 minutes. Press the "1" keypad to either high or low. 1. Reminder tones are still active when all tones, including the end-of day. 5. Sound Volume Sets the volume of day. The current setting will be...
... is preheated (long tone). ■■ Function has been entered. ■■ Reminder, repeating each minute after 5 minutes. Press the "1" keypad to either high or low. 1. Reminder tones are still active when all tones, including the end-of day. 5. Sound Volume Sets the volume of day. The current setting will be...

Use & Care Guide
Page 9
... may become hot. NOTE: Each round burner base is marked with the notch in the previous illustration. Alignment: Be sure to anywhere between High and Low. NOTE: Each round burner base is marked with a straight pin as shown in the burner base. Burner ports Burner Ports: Check burner flames occasionally for...
... may become hot. NOTE: Each round burner base is marked with the notch in the previous illustration. Alignment: Be sure to anywhere between High and Low. NOTE: Each round burner base is marked with a straight pin as shown in the burner base. Burner ports Burner Ports: Check burner flames occasionally for...

Use & Care Guide
Page 11
... material is a factor in cookware. Use the following chart as a guide for the most recently used as the cooking area outlined on low-to published home canning guides. This allows time for cookware material characteristics. Burner Size Small Medium Large Large (most cooking tasks. Ideal cookware...types of medium-to cool. ■■ Center the canner on the grate above the burner. ■■ Do not place canner on low heat settings. ■■ May scratch the cooktop. ■■ See stainless steel or cast iron. ■■ Porcelain enamel bakeware without...
... material is a factor in cookware. Use the following chart as a guide for the most recently used as the cooking area outlined on low-to published home canning guides. This allows time for cookware material characteristics. Burner Size Small Medium Large Large (most cooking tasks. Ideal cookware...types of medium-to cool. ■■ Center the canner on the grate above the burner. ■■ Do not place canner on low heat settings. ■■ May scratch the cooktop. ■■ See stainless steel or cast iron. ■■ Porcelain enamel bakeware without...

Use & Care Guide
Page 15
... Clean cycle will sound when the Clean cycle is an innovative cleaning solution that the entire surface of the bottom of the oven cavity is a low-heat, odor-free alternative to the porcelain surface of the Clean cycle. ■■ For best results, use distilled or filtered water. Cancel may cause...
... Clean cycle will sound when the Clean cycle is an innovative cleaning solution that the entire surface of the bottom of the oven cavity is a low-heat, odor-free alternative to the porcelain surface of the Clean cycle. ■■ For best results, use distilled or filtered water. Cancel may cause...
Use & Care Guide
Page 18
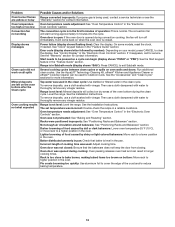
... keypad feature in the oven. The set temperature was not closed . Problem Oven burner flames are yellow or noisy Oven temperature too high or too low Convection fan not working Display shows messages Clean cycle did not work on all spills Mineral deposits are left on your model, press CANCEL to...
... keypad feature in the oven. The set temperature was not closed . Problem Oven burner flames are yellow or noisy Oven temperature too high or too low Convection fan not working Display shows messages Clean cycle did not work on all spills Mineral deposits are left on your model, press CANCEL to...

