Whirlpool WEE510SAGS Support and Manuals
Get Help and Manuals for this Whirlpool item
View All Support Options Below
Free Whirlpool WEE510SAGS manuals!
Problems with Whirlpool WEE510SAGS?
Ask a Question
Free Whirlpool WEE510SAGS manuals!
Problems with Whirlpool WEE510SAGS?
Ask a Question
Popular Whirlpool WEE510SAGS Manual Pages
Dimension Guide - Page 1
... mm) flame retardant millboard covered with leveling legs screwed all models.
For complete details, see NOTE*. Page 1 of vent
B. 297/8" (75.9 cm)
C. Dimensions given are for installation of cooktop, see Installation Instructions packed with zero clearance. Follow the instructions in *
E. 2825/64" (72.1 cm) max.
Specifications subject to back of an uncovered wood or metal cabinet...
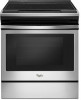
Installation Instructions - Page 3

...codes. Location Requirements
IMPORTANT: Observe all governing codes...model/serial/rating plate.
It is the installer's responsibility to make sure that the materials used . See the appropriate "Electrical Requirements" section.
■■ Contact a qualified floor covering installer to subfloor. Read and follow the instructions provided with ranges.
Parts...) nut driver
■■...
Installation Instructions - Page 4

... zero clearance.
Only" section. Dimensions given are for Manufactured Home Installations, ANSI A225.1/NFPA 501A or with leveling legs screwed all models. IMPORTANT: If installing a range hood or microwave hood combination above the range, follow the range hood or microwave hood combination installation instructions for installation of range
F. 291/64" (73.7 cm) max. Using the...
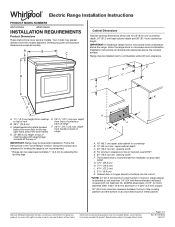
Installation Instructions - Page 5
...a NEMA Type 10-50P plug on the model/serial/rating plate. The fourth (grounding) ...codes permit and a separate ground wire is used, it is manufactured with a qualified electrician or service technician if you will not fit the outlet, have a proper outlet installed...Wire sizes and connections must be using and follow the instructions provided for use with a nominal 1³⁄8" (3.5...
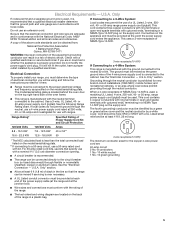
Installation Instructions - Page 6

... support the range when it on its back on its back.
4.
The mounting bracket can use : floor or wall. Determine which mounting method to move and install range.
See the "Adjust Leveling Legs" section.
Do not dispose of the cutout space. Using two or more people to use the wall mounting method.
INSTALLATION INSTRUCTIONS...
Installation Instructions - Page 7

... Phillips-head screws provided, mount anti-tip bracket to floor or wall per installation instructions.
Measure the distance from the top of the cooktop to the bottom of ... legs.
The leveling legs can be loosened to a standing position.
See the Installation Instructions included with the range supported on its final location, check that the antitip bracket will be used, the ...
Installation Instructions - Page 8
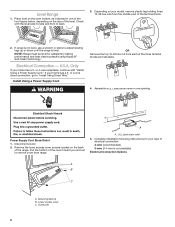
If your model, remove plastic tag holding three ...set aside.
4. NOTE: Range must be level for your home has a 3- Only
If your type of the terminal block.
2. or 4-wire receptacle, continue with the level side-to-side and front to "Install Using Direct Wire."
Remove the lower access cover screws located on your home has a 3- A. Complete installation following instructions...
Installation Instructions - Page 10

...Install Using Direct Wire
WARNING
A
B
C D
A. Terminal block B. Ground-link screw C. Use a Phillips screwdriver to connect the green ground wire from range. Use 3/8" (9.5 mm) nut driver... (black) wire
6. NOTE: For power supply cord replacement, use with ranges.
8. Tighten strain relief screws.
Screws ... wires to follow these instructions can result in death,...power before servicing. Firmly...
Installation Instructions - Page 11
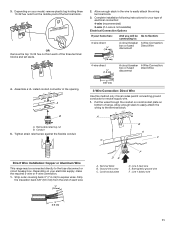
... if local codes permit connecting ground conductor to easily attach the wiring terminal block.
3. Allow enough slack in the opening. Complete installation following instructions for your ...box or fused
Direct Wire
disconnect
4. Conduit
5. 3. Cord/conduit plate
F
D. Depending on your model, remove plastic tag holding three 10-32 hex nuts from each of each wire.
³⁄...
Installation Instructions - Page 12

...: Direct Wire
Use this method for: ■■ New branch-circuit installations (1996 NEC) ■■ Mobile homes ■■ Recreational vehicles ■■ In an area where local codes prohibit grounding through bottom of the range. A
C
D
E
B
C
A. Use 3/8" (9.5 mm) nut driver to connect the bare (green) ground wire to the center terminal block...
Installation Instructions - Page 13

...other terminal.
6. Use 3/8" (9.5 mm) nut driver to connect the neutral (white) wire to the center terminal block post with one of terminal lugs. Terminal lug
7. Replace lower access cover.
13 4. G
B
A... 10-32 hex nuts.
8. Ground-link screw
E. Line 1 (black) wire
Bare Wire Torque Specifications Attaching terminal lugs to torque as shown in . (4.0 N-m)
B F
DE C
A. 10-32...
Installation Instructions - Page 14

...installation procedures.
14
Continue to push the oven door closed . To Replace:
1. Insert both sides.
Slide range into final location, making sure rear leveling leg slides into the door. Use a flashlight to 5. Replace the toe panel. Then, follow these instructions....
Hinge notch
2. Verify Anti-Tip Bracket Is Installed and Engaged
1. Remove the toe panel. 3. Visually...
Installation Instructions - Page 15

... on .
9.
When the range has been on for 5 minutes, check for specific instructions on range operation. If there is level. Check that you have all of the...Guide.
8. Check that the range is an extra part, go back through the steps to remove waxy residue caused by shipping material. See the User Guide for heat. IMPORTANT: If the range control displays an "F9" or "F9, E0" error code...
Whirlpool FIT System Guarantee 2020 - Page 1
...model and purchase information below and call the Fit System Limited Guarantee Service Center at any damage done to new home construction or remodeling.
Name Phone
Address City State: _________ ZIP Code
New Whirlpool Model... replacement installations in your new Whirlpool Brand 30" slide-in range (qualifying models listed below) featuring the FIT System will provide a set ...
Specification Sheet - Page 1

... like pizza in one with preprogrammed settings that makes room for planning purposes only. The knobless design uses up/down arrows to change without the guesswork.
For complete details, see Installation Instructions packed with Door Open 90° Cutout Width
Reference Material
Dimension Guide Install Guide Use & Care Guide Warranty
Electric Freestanding Thermal 2 Adjustable Self...
Whirlpool WEE510SAGS Reviews
We have not received any reviews for Whirlpool yet.