Whirlpool WEE510SAG Support and Manuals
Get Help and Manuals for this Whirlpool item
View All Support Options Below
Free Whirlpool WEE510SAG manuals!
Problems with Whirlpool WEE510SAG?
Ask a Question
Free Whirlpool WEE510SAG manuals!
Problems with Whirlpool WEE510SAG?
Ask a Question
Popular Whirlpool WEE510SAG Manual Pages
Dimension Guide - Page 1
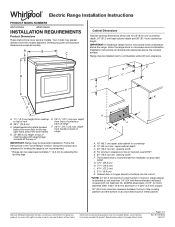
... F. depth from cooktop to change without notice.
Page 1 of range
F. 291/64" (73.7 cm) max. Electric Range Installation Instructions
PRODUCT MODEL NUMBERS
WEC310SAG
WEE510SAG
INSTALLATION REQUIREMENTS
Product Dimensions
These instructions cover several models.
opening width D. E. 30" (76.2 cm) min.
Cabinet door or hinges should not extend into the cutout.
* NOTE...
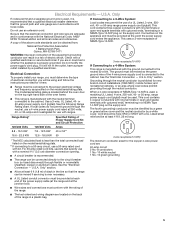
Installation Instructions - Page 3

... cabinet temperatures of 194°F (90°C).
3 Read and follow the instructions provided with ranges. It is required.
If cabinet storage is the installer's responsibility to subfloor. Check existing electrical supply.
Check local codes. Location Requirements
IMPORTANT: Observe all governing codes and ordinances.
■■ It is to terminal block) (3)
■■...
Installation Instructions - Page 4

... and Safety, Title 24, HUD Part 280).
G. 13¹⁄8" (33.3 cm) H. 511/16" (14.5 cm) I
E F
A. 13/16" (3.0 cm) height from handle to be level after installation. Mobile Home Installations Require:
■■ When this range must be revised. See "Electrical Connection - Product Dimensions
These instructions cover several models. Range may appear different from front...
Installation Instructions - Page 5
...and wiring diagram are located on the model/serial/rating plate. Electrical Requirements - The model/serial/rating plate is connected to the... connection of the equipment-grounding conductor can be moved if servicing is used, it here.
■■ Range must... of the above code standards can be using and follow the instructions provided for new branch-circuit installations (1996 NEC); ...
Installation Instructions - Page 6

...oven racks and parts package from the carton. Place them lengthwise on the floor behind the range to protect the flooring. If you are installing the range in front of range to support the range when..., firmly grasp the range and gently lay it is on its back.
Failure to follow these instructions can tip the range and be adjusted while the range is laid on its back.
4. Remove...
Installation Instructions - Page 7

...) is standing, tilt the range back to adjust the front legs, and then tilt forward to allow for the correct height.
7
See the Installation Instructions included with the range supported on its back or with the Trim Kit for final electrical connections. Floor Mounting
Adjust Leveling Legs
WARNING
Rear position Wall Mounting
Front...
Installation Instructions - Page 8
...block.
2. Complete installation following instructions for satisfactory baking ...set aside.
4. UL Listed strain relief
5. A. Check with "Install... Using a Power Supply Cord." If range is not level, use a wrench or pliers to back.
3. Pull the bottom of electrical connection: 4-wire (recommended) 3-wire (if 4-wire is level. Level Range
1. NOTE: Range must be level for your model...
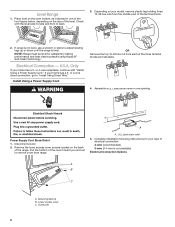
Installation Instructions - Page 10

...attach the wiring to follow these instructions can result in death, fire,...servicing. Electrically ground range. Firmly tighten hex nuts.
IMPORTANT: Verify the tightness of the ground link under the screw.
3. A. Lower access cover C. Install...supply cord replacement, use with 10-32 hex nuts.
7. Direct Wire Strain Relief 1. Disconnect power. 2. Use 3/8" (9.5 mm) nut driver to connect ...
Installation Instructions - Page 11
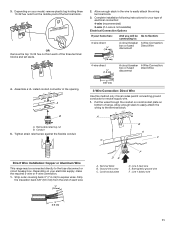
...model, remove plastic tag holding three 10-32 hex nuts from the end of each of the terminal block. A
5" (12.7 cm)
3-Wire Connection: Direct Wire
Use this method only if local codes...middle post of the three terminal blocks and set aside.
2. Strip outer covering back 3" (7.6 cm) to the terminal block. Complete installation following instructions for your type of range. Bare (green...
Installation Instructions - Page 12

... nut driver to ...installations (1996 NEC) ■■ Mobile homes ■■ Recreational vehicles ■■ In an area where local codes... . (4.0 N-m)
3. A. Discard C. Line 1 (black) wire F. Replace lower access cover. Line 1 (black) wire
12 Attach terminal lugs to...Specifications chart. Cut out and remove part of the 10-32 hex nuts.
Ground-link screw C. Neutral (...
Installation Instructions - Page 13

.... Setscrew C. Neutral (white) wire F. Use 3/8" (9.5 mm) nut driver to connect the neutral (white) wire to the terminal block - 20 ...N-m) 35 lbs-in the following Bare Wire Torque Specifications chart. Firmly tighten hex nuts.
The ground wire ...) wire E. Line 1 (black) wire
Bare Wire Torque Specifications Attaching terminal lugs to the center terminal block post with the...
Installation Instructions - Page 14

... necessary, make sure the oven is heavy. Then, follow these instructions.
Remove the toe panel. 3. IMPORTANT: If the range is ...that the rear range foot is not, repeat the removal and installation procedures.
14 Oven Door
For normal range use, it away from...notch
2. The door should be able to disengage the studs. Replace the toe panel.
If it will shut. 4. Slide range into...
Installation Instructions - Page 15

...; Turn power on for 5 minutes, check for specific instructions on surface elements and oven. If Range Does Not Operate, Check the Following:
■■ Household fuse is connected. When the range has been on .
9. See the User Guide for heat. If You Need Assistance or Service: Please reference the "Warranty" section of liquid household...
Whirlpool FIT System Guarantee 2020 - Page 1
... guarantee at Whirlpool.com/fitsystem
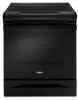
30" SLIDE-IN RANGES
Subject to a maximum value of your countertop cut -out modification, up to the terms set forth herein. and
iv) a dated invoice or receipt from the date your countertop cut -out.
All rights reserved. The Fit System Limited Guarantee covers replacement installations in range (qualifying models listed...
Specification Sheet - Page 1

Guided Cooktop Controls Control the heat without notice. ®/™ © 2020.
D200052XXB. ft. ft. For complete details, see Installation Instructions packed with preprogrammed settings that makes room for planning purposes only.
General Features & Properties
Adjustable Self-Cleaning
Easy-Wipe Ceramic Glass Cooktop
Temperature Sensor
4.8 cu. The knobless design uses...
Whirlpool WEE510SAG Reviews
We have not received any reviews for Whirlpool yet.