
Owners Manual
Page 3
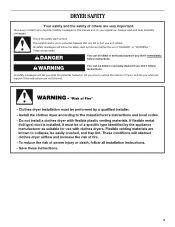
...'t follow the safety alert symbol and either the word "DANGER" or "WARNING." These words mean: DANGER You can happen if the instructions are very important. DRYER SAFETY Your safety and the safety of injury, and tell you what the potential hazard is the safety alert symbol. We have provided many important...
...'t follow the safety alert symbol and either the word "DANGER" or "WARNING." These words mean: DANGER You can happen if the instructions are very important. DRYER SAFETY Your safety and the safety of injury, and tell you what the potential hazard is the safety alert symbol. We have provided many important...
Owners Manual
Page 4
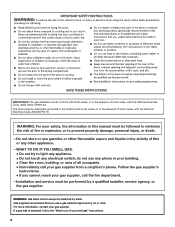
... the risk of fire or explosion, or to do not use any phone in your safety, the information in this or any electrical switch; The dryer must be detected by UL or CSA. For more information, contact your gas supplier from a neighbor's phone. WARNING: For your building. • Clear the room...
... the risk of fire or explosion, or to do not use any phone in your safety, the information in this or any electrical switch; The dryer must be detected by UL or CSA. For more information, contact your gas supplier from a neighbor's phone. WARNING: For your building. • Clear the room...

Owners Manual
Page 5
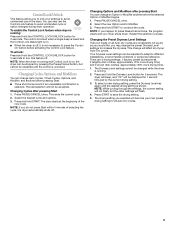
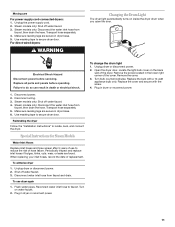
... WARNING Explosion Hazard Keep flammable materials and vapors, such as gasoline, away from dryer. Fire Hazard No washer can result in death or fire. 5 Failure to follow these instructions can completely remove oil. Failure to follow these instructions can ...
... WARNING Explosion Hazard Keep flammable materials and vapors, such as gasoline, away from dryer. Fire Hazard No washer can result in death or fire. 5 Failure to follow these instructions can completely remove oil. Failure to follow these instructions can ...

Owners Manual
Page 7
...Non-Steam models Cycle Control knob Automatic Cycles Automatic Cycles allow you to match the cycle to select a specific amount of Residential clothes Dryers Automatic Preset Cycle Settings Automatic Cycles Load Type Temperature Est. Each cycle dries certain fabrics at the recommended temperature. A sensor detects the ...Use this cycle for smoothing out wrinkles and reducing odors from clothes that have been starched. For best results, do not overload the dryer. ■ The Refresh Cycle time is set for 15 minutes and is best for optimal drying. Manual Cycles Use Manual Cycles to...
...Non-Steam models Cycle Control knob Automatic Cycles Automatic Cycles allow you to match the cycle to select a specific amount of Residential clothes Dryers Automatic Preset Cycle Settings Automatic Cycles Load Type Temperature Est. Each cycle dries certain fabrics at the recommended temperature. A sensor detects the ...Use this cycle for smoothing out wrinkles and reducing odors from clothes that have been starched. For best results, do not overload the dryer. ■ The Refresh Cycle time is set for 15 minutes and is best for optimal drying. Manual Cycles Use Manual Cycles to...

Owners Manual
Page 8
...for the duration of items that coverings are securely stitched. ■ Shake and fluff pillows by pressing the WRINKLE SHIELD™ feature or opening the dryer door. ■ For the Casual Cycle, the WRINKLE SHIELD™ feature is finished. The STEAM Status Light will be emitted every 5 minutes ...20 *Reset time to 140 minutes of Cycle Signal produces an audible sound when the drying cycle is preset to remove lightweight items in the dryer for the Enhanced Touch Up Cycle. WRINKLE SHIELD™ Feature When you that your clothes are not adjustable for the Quick Refresh Cycle, ...
...for the duration of items that coverings are securely stitched. ■ Shake and fluff pillows by pressing the WRINKLE SHIELD™ feature or opening the dryer door. ■ For the Casual Cycle, the WRINKLE SHIELD™ feature is finished. The STEAM Status Light will be emitted every 5 minutes ...20 *Reset time to 140 minutes of Cycle Signal produces an audible sound when the drying cycle is preset to remove lightweight items in the dryer for the Enhanced Touch Up Cycle. WRINKLE SHIELD™ Feature When you that your clothes are not adjustable for the Quick Refresh Cycle, ...
Owners Manual
Page 9
...by the current drying setting. 3. The control is locked when a single beep is heard and the Control Lock status light is on. ■ When the dryer is off, it is running and Control Lock is on all Auto Dry cycles are 3 drying settings: 1 (factory preset dryness level), 2 (slightly drier... 1. Restart the selection process. There are consistently not as dry as you would like, you do not press Start within 5 minutes of the dryer. Press and hold the Dryness Level button for 1 second followed by pressing the Pause/Cancel button, but the other settings will be restarted until ...
...by the current drying setting. 3. The control is locked when a single beep is heard and the Control Lock status light is on. ■ When the dryer is off, it is running and Control Lock is on all Auto Dry cycles are 3 drying settings: 1 (factory preset dryness level), 2 (slightly drier... 1. Restart the selection process. There are consistently not as dry as you would like, you do not press Start within 5 minutes of the dryer. Press and hold the Dryness Level button for 1 second followed by pressing the Pause/Cancel button, but the other settings will be restarted until ...
Owners Manual
Page 10
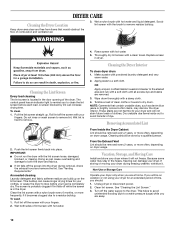
... a residue buildup. Rinse screen with your fingers. Make a paste with a damp cloth. 4. Removing Accumulated Lint From Inside the Dryer Cabinet Lint should : 1. Unplug dryer or disconnect power. 2. This helps to avoid unintended flooding (due to stop before each load. Scrub lint screen with a nylon ...inside out to dry drum. If you are removed. 3. Clean lint screen. See "Cleaning the Lint Screen." 3. DRYER CARE Cleaning the Dryer Location Keep dryer area clear and free from items that contain unstable dyes, such as denim blue jeans or brightly colored cotton items, ...
... a residue buildup. Rinse screen with your fingers. Make a paste with a damp cloth. 4. Removing Accumulated Lint From Inside the Dryer Cabinet Lint should : 1. Unplug dryer or disconnect power. 2. This helps to avoid unintended flooding (due to stop before each load. Scrub lint screen with a nylon ...inside out to dry drum. If you are removed. 3. Clean lint screen. See "Cleaning the Lint Screen." 3. DRYER CARE Cleaning the Dryer Location Keep dryer area clear and free from items that contain unstable dyes, such as denim blue jeans or brightly colored cotton items, ...
Owners Manual
Page 11
... operating. Make sure leveling legs are secure in dryer or reconnect power. Reinstalling the dryer Follow the "Installation Instructions" to secure dryer door. Plug in dryer base. 5. Steam models only: Shut off water faucet. 3. To winterize dryer 1. Disconnect water inlet hose from faucet, then ... inspect and replace inlet hoses if bulges, kinks, cuts, wear, or leaks are secure in dryer or reconnect power. 11 Reconnect water inlet hose to secure dryer door. Unplug dryer or disconnect power. 2. Replace all parts and panels before servicing. Use masking tape to faucet...
... operating. Make sure leveling legs are secure in dryer or reconnect power. Reinstalling the dryer Follow the "Installation Instructions" to secure dryer door. Plug in dryer base. 5. Steam models only: Shut off water faucet. 3. To winterize dryer 1. Disconnect water inlet hose from faucet, then ... inspect and replace inlet hoses if bulges, kinks, cuts, wear, or leaks are secure in dryer or reconnect power. 11 Reconnect water inlet hose to secure dryer door. Unplug dryer or disconnect power. 2. Replace all parts and panels before servicing. Use masking tape to faucet...
Owners Manual
Page 12
...with heavy metal or flexible metal vent. For additional recommendations, refer to your home power supply keeping the dryer's heater from the dryer to "Electrical Connection" for the dryer. Check that both fuses are intact and tight, or that both circuit breakers have your entire home ...there may be customized by selecting High temperature and/or additional cycle time by a power failure? Separate the load items and restart the dryer. Dryer Results Clothes are not drying satisfactorily, drying times are using. Separate the load to check air movement. If the message persists, consult...
...with heavy metal or flexible metal vent. For additional recommendations, refer to your home power supply keeping the dryer's heater from the dryer to "Electrical Connection" for the dryer. Check that both fuses are intact and tight, or that both circuit breakers have your entire home ...there may be customized by selecting High temperature and/or additional cycle time by a power failure? Separate the load items and restart the dryer. Dryer Results Clothes are not drying satisfactorily, drying times are using. Separate the load to check air movement. If the message persists, consult...
Owners Manual
Page 13
...bottom of the cycle? Dry smaller loads that the exhaust vent is best for air movement. Stains on . ■ Was the dryer overloaded? Long venting will not transfer to garment care label instructions. Dry clean only garments are not recommended. ■ Loads are ...load removed from loads consisting of 1-4 garments yield best results with temperature below 45ºF (7ºC)? Check that can stain your dryer is best for reducing wrinkles and odors from loads consisting of the cycle. Loads are still wrinkled following Steam Cycle? ■ Is...
...bottom of the cycle? Dry smaller loads that the exhaust vent is best for air movement. Stains on . ■ Was the dryer overloaded? Long venting will not transfer to garment care label instructions. Dry clean only garments are not recommended. ■ Loads are ...load removed from loads consisting of 1-4 garments yield best results with temperature below 45ºF (7ºC)? Check that can stain your dryer is best for reducing wrinkles and odors from loads consisting of the cycle. Loads are still wrinkled following Steam Cycle? ■ Is...

Installation Instructions
Page 1
...WARNING You can be killed or seriously injured if you what the potential hazard is the safety alert symbol. ELECTRIC DRYER INSTALLATION INSTRUCTIONS U.S.A. Always read and obey all safety messages. This symbol alerts you to reduce the chance of others ... una versión de estas instrucciones en español, visite www.Whirlpool.com TABLE OF CONTENTS DRYER SAFETY 1 INSTALLATION REQUIREMENTS 2 Tools and Parts 2 Optional Equipment 3 Location Requirements 3 ELECTRIC DRYER POWER HOOKUP 5 Electrical Requirements 5 Electrical Connection 6 VENTING 11 Venting Requirements 11...
...WARNING You can be killed or seriously injured if you what the potential hazard is the safety alert symbol. ELECTRIC DRYER INSTALLATION INSTRUCTIONS U.S.A. Always read and obey all safety messages. This symbol alerts you to reduce the chance of others ... una versión de estas instrucciones en español, visite www.Whirlpool.com TABLE OF CONTENTS DRYER SAFETY 1 INSTALLATION REQUIREMENTS 2 Tools and Parts 2 Optional Equipment 3 Location Requirements 3 ELECTRIC DRYER POWER HOOKUP 5 Electrical Requirements 5 Electrical Connection 6 VENTING 11 Venting Requirements 11...

Installation Instructions
Page 2
... ■ Wire stripper (direct wire installations) ■ Vent clamps ■ Caulking gun and compound (for purchase from the dealer from dryer drum. Leveling legs (4) B. Long inlet hose E. NOTE: Do not use leveling legs supplied with any tools listed here. ■ Flat... screwdriver ■ #2 Phillips screwdriver ■ Adjustable wrench that all parts are included. Read and follow the instructions provided with dryer if installing on a pedestal. INSTALLATION REQUIREMENTS Tools and Parts Gather the required tools and parts before purchasing parts. Rubber washer Remove...
... ■ Wire stripper (direct wire installations) ■ Vent clamps ■ Caulking gun and compound (for purchase from the dealer from dryer drum. Leveling legs (4) B. Long inlet hose E. NOTE: Do not use leveling legs supplied with any tools listed here. ■ Flat... screwdriver ■ #2 Phillips screwdriver ■ Adjustable wrench that all parts are included. Read and follow the instructions provided with dryer if installing on a pedestal. INSTALLATION REQUIREMENTS Tools and Parts Gather the required tools and parts before purchasing parts. Rubber washer Remove...

Installation Instructions
Page 3
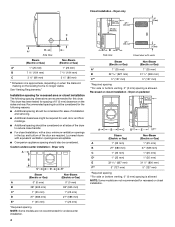
...below 45ºF (7ºC). Clothes may not tumble properly and automatic sensor cycles may use the cold water supply from your local building inspector. The dryer must be installed or stored in an area where it will need ■ A location that allows for the exhaust vent with a maximum slope of ...1" (25 mm) under entire dryer. Check code requirements. Steam (Electric or Gas) A 38" (965 mm) B 32 9/16" (827 mm) C 27" (686 mm) D 52 9/16" (1335 mm) Non-Steam...
...below 45ºF (7ºC). Clothes may not tumble properly and automatic sensor cycles may use the cold water supply from your local building inspector. The dryer must be installed or stored in an area where it will need ■ A location that allows for the exhaust vent with a maximum slope of ...1" (25 mm) under entire dryer. Check code requirements. Steam (Electric or Gas) A 38" (965 mm) B 32 9/16" (827 mm) C 27" (686 mm) D 52 9/16" (1335 mm) Non-Steam...
Installation Instructions
Page 4
... also be considered on all sides of 0" (0 mm) clearance on the sides and rear. This dryer has been tested for this dryer. Installation spacing for recessed area or closet installation The following reasons: ■ Additional spacing should be ...C** 5" (127 mm) 5" (127 mm) *Required spacing **For side or bottom venting, 0" (0 mm) spacing is allowed. Closet installation - Louvered doors with equivalent ventilation openings are required. Dryer only (460 mm) C A* B Side View Steam (Electric or Gas) Non-Steam (Electric or Gas) A* 1" (25 mm) 1" (25 mm) B 7 5/8" (194 mm) ...
... also be considered on all sides of 0" (0 mm) clearance on the sides and rear. This dryer has been tested for this dryer. Installation spacing for recessed area or closet installation The following reasons: ■ Additional spacing should be ...C** 5" (127 mm) 5" (127 mm) *Required spacing **For side or bottom venting, 0" (0 mm) spacing is allowed. Closet installation - Louvered doors with equivalent ventilation openings are required. Dryer only (460 mm) C A* B Side View Steam (Electric or Gas) Non-Steam (Electric or Gas) A* 1" (25 mm) 1" (25 mm) B 7 5/8" (194 mm) ...

Installation Instructions
Page 5
...or bottom venting, 0" (0 mm) spacing is available for mobile home installations. Recommended installation spacing for recessed or closet installation, with stacked washer and dryer The dimensions shown are for the recommended spacing. 48 in.2 * (310 cm2) 3"* (76 mm) 24 in the top of the above code... connection for Mobile Home Construction and Safety, Title 24, HUD Part 280) or Standard CAN/CSA-Z240 MH. Mobile home installations require: All Dryers: ■ Metal exhaust system hardware, which is allowed. The opening (such as a nearby window) should be sure that the electrical connection...
...or bottom venting, 0" (0 mm) spacing is available for mobile home installations. Recommended installation spacing for recessed or closet installation, with stacked washer and dryer The dimensions shown are for the recommended spacing. 48 in.2 * (310 cm2) 3"* (76 mm) 24 in the top of the above code... connection for Mobile Home Construction and Safety, Title 24, HUD Part 280) or Standard CAN/CSA-Z240 MH. Mobile home installations require: All Dryers: ■ Metal exhaust system hardware, which is allowed. The opening (such as a nearby window) should be sure that the electrical connection...

Installation Instructions
Page 6
...on both sides of the terminal block. The neutral ground conductor is installed in a location where grounding through the neutral conductors. If the dryer is installed with a 4-wire electrical supply connection, the neutral ground conductor must be removed from the external ground connector (green screw), and...). The wires that the ground path is prohibited. Use a UL listed strain relief. Connect neutral wire (white or center wire) to the dryer must be insulated. ■ 10-gauge solid copper wire (do so can result in ring terminals or spade terminals with a 3-wire electrical ...
...on both sides of the terminal block. The neutral ground conductor is installed in a location where grounding through the neutral conductors. If the dryer is installed with a 4-wire electrical supply connection, the neutral ground conductor must be removed from the external ground connector (green screw), and...). The wires that the ground path is prohibited. Use a UL listed strain relief. Connect neutral wire (white or center wire) to the dryer must be insulated. ■ 10-gauge solid copper wire (do so can result in ring terminals or spade terminals with a 3-wire electrical ...
Installation Instructions
Page 7
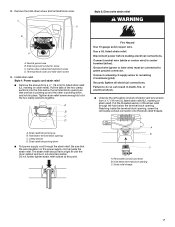
... the terminal block opening . Ground wire (green or bare wire) must be in place. C D B A A. Clamp section D. The strain relief should have a tight fit with the dryer cabinet and be connected to center terminal (silver). Reaching inside the strain relief. Hole below terminal block opening C. Strain relief threads 7 Strain relief tab pointing...
... the terminal block opening . Ground wire (green or bare wire) must be in place. C D B A A. Clamp section D. The strain relief should have a tight fit with the dryer cabinet and be connected to center terminal (silver). Reaching inside the strain relief. Hole below terminal block opening C. Strain relief threads 7 Strain relief tab pointing...

Installation Instructions
Page 8
...: And you will be in a horizontal position. Ground prong D. Dotted line shows position of 3-wire connections. Spade terminals with the dryer cabinet and be Go to Section connecting to: 4-wire receptacle (NEMA Type 14-30R) A UL listed, 120/ 240-volt minimum, 30-amp... 5" (127 mm) 3-wire receptacle (NEMA type 10-30R) A fused disconnect or circuit breaker box* A UL listed, 120/ 240-volt minimum, 30-amp, dryer power supply cord* 4-wire connection: Direct Wire 3-wire connection: Power supply cord 3-wire direct (89 mm) A fused disconnect or circuit breaker box* 3-wire connection:...
...: And you will be in a horizontal position. Ground prong D. Dotted line shows position of 3-wire connections. Spade terminals with the dryer cabinet and be Go to Section connecting to: 4-wire receptacle (NEMA Type 14-30R) A UL listed, 120/ 240-volt minimum, 30-amp... 5" (127 mm) 3-wire receptacle (NEMA type 10-30R) A fused disconnect or circuit breaker box* A UL listed, 120/ 240-volt minimum, 30-amp, dryer power supply cord* 4-wire connection: Direct Wire 3-wire connection: Power supply cord 3-wire direct (89 mm) A fused disconnect or circuit breaker box* 3-wire connection:...

Installation Instructions
Page 9
...direct wire cable wires under the outer terminal block screws (hooks facing right). Remove neutral ground wire from end of extra length so dryer can be moved if needed. Now go to outer terminal block screws. Strip insulation back 1" (25 mm). Neutral ground wire D....." 4-wire connection: Direct wire IMPORTANT: A 4-wire connection is required for mobile homes and where local codes do not permit the use of dryer rear panel. A D When connecting to external ground conductor screw. Neutral ground wire F. Shape ends of wires into slot of 3-wire connections....
...direct wire cable wires under the outer terminal block screws (hooks facing right). Remove neutral ground wire from end of extra length so dryer can be moved if needed. Now go to outer terminal block screws. Strip insulation back 1" (25 mm). Neutral ground wire D....." 4-wire connection: Direct wire IMPORTANT: A 4-wire connection is required for mobile homes and where local codes do not permit the use of dryer rear panel. A D When connecting to external ground conductor screw. Neutral ground wire F. Shape ends of wires into slot of 3-wire connections....

Installation Instructions
Page 10
... 5. Place the hooked ends of terminal block (hook facing right). 5. Tighten strain relief screw. 6. Insert tab of terminal block cover into slot of dryer rear panel. You have completed your electrical connection. Now go to outer terminal block screws. B D E A C GF A. 3-wire receptacle (NEMA type...center screw of the other wires to "Venting Requirements." Tighten screws. 4. Insert tab of terminal block cover into slot of dryer rear panel. You have completed your electrical connection. Now go to "Venting Requirements." 3-wire connection: Power supply cord Use ...
... 5. Place the hooked ends of terminal block (hook facing right). 5. Tighten strain relief screw. 6. Insert tab of terminal block cover into slot of dryer rear panel. You have completed your electrical connection. Now go to outer terminal block screws. B D E A C GF A. 3-wire receptacle (NEMA type...center screw of the other wires to "Venting Requirements." Tighten screws. 4. Insert tab of terminal block cover into slot of dryer rear panel. You have completed your electrical connection. Now go to "Venting Requirements." 3-wire connection: Power supply cord Use ...


