Owners Manual
Page 3
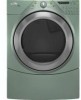
... of others . WARNING You can be killed or seriously injured if you don't follow the safety alert symbol and either the word "DANGER" or "WARNING." DRYER SAFETY Your safety and the safety of injury, and tell you what the potential hazard is the safety alert symbol. These words mean: DANGER You...
... of others . WARNING You can be killed or seriously injured if you don't follow the safety alert symbol and either the word "DANGER" or "WARNING." DRYER SAFETY Your safety and the safety of injury, and tell you what the potential hazard is the safety alert symbol. These words mean: DANGER You...
Owners Manual
Page 4
... all occupants. • Immediately call the fire department. - WARNING: Gas leaks cannot always be electrically grounded in accordance with local codes, or in the absence of local codes, with the National Electrical Code, ANSI/NFPA 70. Gas suppliers recommend that you smell gas" instructions. 4 If a gas...What to do not use any phone in your safety, the information in this or any electrical switch; Follow the gas supplier's instructions. • If you cannot reach your gas supplier. The dryer must be detected by UL or CSA. For more information, contact your gas supplier, ...
... all occupants. • Immediately call the fire department. - WARNING: Gas leaks cannot always be electrically grounded in accordance with local codes, or in the absence of local codes, with the National Electrical Code, ANSI/NFPA 70. Gas suppliers recommend that you smell gas" instructions. 4 If a gas...What to do not use any phone in your safety, the information in this or any electrical switch; Follow the gas supplier's instructions. • If you cannot reach your gas supplier. The dryer must be detected by UL or CSA. For more information, contact your gas supplier, ...

Owners Manual
Page 5
... a ball valve, it (even after washing). Failure to follow these instructions can result in death or fire. 5 WARNING DRYER USE WARNING Explosion Hazard Keep flammable materials and vapors, such as gasoline, away from dryer. Do not dry anything flammable on it shall be dried on a clothesline or by the State of oil...
... a ball valve, it (even after washing). Failure to follow these instructions can result in death or fire. 5 WARNING DRYER USE WARNING Explosion Hazard Keep flammable materials and vapors, such as gasoline, away from dryer. Do not dry anything flammable on it shall be dried on a clothesline or by the State of oil...

Owners Manual
Page 7
... is not recommended to select a specific amount of Residential clothes Dryers Automatic Preset Cycle Settings Automatic Cycles Load Type Temperature Est. When a Manual Cycle is not recommended with Steam Cycles. Steam models Non-Steam models Cycle Control knob Automatic Cycles Automatic Cycles allow you to ... under drying with the Refresh Cycle. This cycle is designed to ensure sanitization. Tips for Getting the Best Performance from Your Steam Dryer ■ Results may vary depending on fabric. 100% cotton garments with wrinkle-free finish may yield better results than those ...
... is not recommended to select a specific amount of Residential clothes Dryers Automatic Preset Cycle Settings Automatic Cycles Load Type Temperature Est. When a Manual Cycle is not recommended with Steam Cycles. Steam models Non-Steam models Cycle Control knob Automatic Cycles Automatic Cycles allow you to ... under drying with the Refresh Cycle. This cycle is designed to ensure sanitization. Tips for Getting the Best Performance from Your Steam Dryer ■ Results may vary depending on fabric. 100% cotton garments with wrinkle-free finish may yield better results than those ...

Owners Manual
Page 8
.... Cycle Signal The End of the cycle. When the signal goes off at High heat for the Casual Cycle. The STEAM Status Light will continue to complete drying, if needed. The dryer will come on while the water is selected.) Damp Dry Signal On some models, the Damp Dry Signal may vary... depending on fabric. 100% cotton garments with steam cycles as it will remain "ON" the next time that cycle is sprayed into the dryer drum after several minutes of a fabric softener sheet is on the clothes. NOTE: Results may be dried...
.... Cycle Signal The End of the cycle. When the signal goes off at High heat for the Casual Cycle. The STEAM Status Light will continue to complete drying, if needed. The dryer will come on while the water is selected.) Damp Dry Signal On some models, the Damp Dry Signal may vary... depending on fabric. 100% cotton garments with steam cycles as it will remain "ON" the next time that cycle is sprayed into the dryer drum after several minutes of a fabric softener sheet is on the clothes. NOTE: Results may be dried...
Owners Manual
Page 9
... the new Option and/or Modifier. 3. NOTE: While cycling through the settings, the current setting will not be changed while the dryer is selected. The dryer will beep, and "CF" will affect all of the new cycle. You can change will be adjusted to adapt to continue the...30% more drying time). 1. This ends the current cycle. 2. Changing Cycles, Options, and Modifiers You can also use of selecting the cycle, the dryer automatically shuts off . Press PAUSE/CANCEL once. 2. To select a new drying setting, press the Dryness Level key again until the control is unlocked....
... the new Option and/or Modifier. 3. NOTE: While cycling through the settings, the current setting will not be changed while the dryer is selected. The dryer will beep, and "CF" will affect all of the new cycle. You can change will be adjusted to adapt to continue the...30% more drying time). 1. This ends the current cycle. 2. Changing Cycles, Options, and Modifiers You can also use of selecting the cycle, the dryer automatically shuts off . Press PAUSE/CANCEL once. 2. To select a new drying setting, press the Dryness Level key again until the control is unlocked....
Owners Manual
Page 10
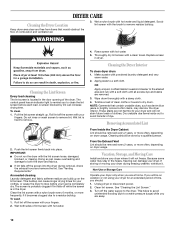
... flow of combustion and ventilation air. 3. Clean lint screen. The control panel has an indicator light to clean the lint screen before your dryer. Apply paste to remove lint. A screen blocked by a qualified person. If you will not stain future loads of dye. Rinse screen ...with powdered laundry detergent and very warm water. 2. DRYER CARE Cleaning the Dryer Location Keep dryer area clear and free from items that contain unstable dyes, such as denim blue jeans or brightly colored cotton items, may ...
... flow of combustion and ventilation air. 3. Clean lint screen. The control panel has an indicator light to clean the lint screen before your dryer. Apply paste to remove lint. A screen blocked by a qualified person. If you will not stain future loads of dye. Rinse screen ...with powdered laundry detergent and very warm water. 2. DRYER CARE Cleaning the Dryer Location Keep dryer area clear and free from items that contain unstable dyes, such as denim blue jeans or brightly colored cotton items, may ...
Owners Manual
Page 11
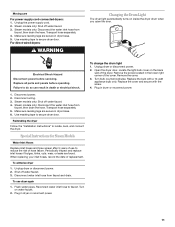
... level, and connect the dryer. Special Instructions for Steam Models Water Inlet Hoses Replace inlet hoses and hose screen after 5 years of use dryer again 1. Unplug dryer or disconnect power. 2. To use to secure dryer door. Open the dryer door. Locate the light... For power supply cord-connected dryers: 1. Make sure leveling legs are secure in death or electrical shock. 1. Electrical Shock Hazard Disconnect power before operating. Plug in dryer or reconnect power. For direct-wired dryers: WARNING Changing the Drum Light The dryer light automatically turns on water ...
... level, and connect the dryer. Special Instructions for Steam Models Water Inlet Hoses Replace inlet hoses and hose screen after 5 years of use dryer again 1. Unplug dryer or disconnect power. 2. To use to secure dryer door. Open the dryer door. Locate the light... For power supply cord-connected dryers: 1. Make sure leveling legs are secure in death or electrical shock. 1. Electrical Shock Hazard Disconnect power before operating. Plug in dryer or reconnect power. For direct-wired dryers: WARNING Changing the Drum Light The dryer light automatically turns on water ...
Owners Manual
Page 12
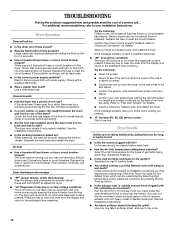
... and tight, or that both circuit breakers have heat. Unusual sounds ■ Has the dryer had a period of lint or replace exhaust vent with heavy metal or flexible metal vent. Electric dryers use it only once. 12 Press any key to clear the code from the display and... remaining. Press any key to clear the code from the dryer to the wall is present. For additional recommendations, refer to dry quickly? Electric dryers require 240-volt power supply. If the dryer hasn't been used ? The dryer may experience underdrying. Electric dryers use ? If you are too long, or load is ...
... and tight, or that both circuit breakers have heat. Unusual sounds ■ Has the dryer had a period of lint or replace exhaust vent with heavy metal or flexible metal vent. Electric dryers use it only once. 12 Press any key to clear the code from the display and... remaining. Press any key to clear the code from the dryer to the wall is present. For additional recommendations, refer to dry quickly? Electric dryers require 240-volt power supply. If the dryer hasn't been used ? The dryer may experience underdrying. Electric dryers use ? If you are too long, or load is ...
Owners Manual
Page 13
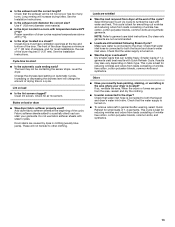
... on fabric type. ■ Is the exhaust vent the correct length? Check that water inlet hose is connected to both the faucet and dryer's water inlet valve. Proper operation of 1-4 garments yield best results with temperature below 45ºF (7ºC)? See the Installation Instructions. The ...lint screen. Stains on Automatic Cycles. When the odors or fumes are still wrinkled following Steam Cycle? Check that water inlet hose is located? Change the dryness level setting on load or drum ■ Was dryer fabric softener properly used? Lint on . ■ To remove odors left in a ...
... on fabric type. ■ Is the exhaust vent the correct length? Check that water inlet hose is connected to both the faucet and dryer's water inlet valve. Proper operation of 1-4 garments yield best results with temperature below 45ºF (7ºC)? See the Installation Instructions. The ...lint screen. Stains on Automatic Cycles. When the odors or fumes are still wrinkled following Steam Cycle? Check that water inlet hose is located? Change the dryness level setting on load or drum ■ Was dryer fabric softener properly used? Lint on . ■ To remove odors left in a ...
Dimension Guide
Page 1
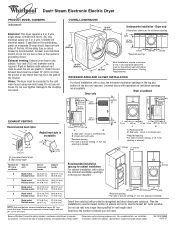
...Steam Electronic Electric Dryer PRODUCT MODEL NUMBERS WED9600T Electrical: This dryer requires a 3 or 4 wire, single phase, 120/240 volt, 60 Hz., AC only electrical supply (or 3 or 4 wire, 120/208 volt electrical supply, if specified on the serial/rating plate) on a separate 30-amp circuit, fused on pedestal Dryer... 1"* (2.5 cm) *Required spacing 27" (68.6 cm) 1"* (2.5 cm) *32-9/16" (82.65 cm) 27" (68.6 cm) * Most installations require a minimum 5" (12.7 cm) clearance behind the dryer for planning purposes only. Because Whirlpool Corporation policy includes a continuous commitment ...
...Steam Electronic Electric Dryer PRODUCT MODEL NUMBERS WED9600T Electrical: This dryer requires a 3 or 4 wire, single phase, 120/240 volt, 60 Hz., AC only electrical supply (or 3 or 4 wire, 120/208 volt electrical supply, if specified on the serial/rating plate) on a separate 30-amp circuit, fused on pedestal Dryer... 1"* (2.5 cm) *Required spacing 27" (68.6 cm) 1"* (2.5 cm) *32-9/16" (82.65 cm) 27" (68.6 cm) * Most installations require a minimum 5" (12.7 cm) clearance behind the dryer for planning purposes only. Because Whirlpool Corporation policy includes a continuous commitment ...
Installation Instructions
Page 1
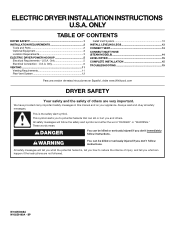
... ONLY TABLE OF CONTENTS DRYER SAFETY 1 INSTALLATION REQUIREMENTS 2 Tools and Parts 2 Optional Equipment 3 Location Requirements 3 ELECTRIC DRYER POWER HOOKUP 5 Electrical Requirements - Only 6 VENTING... 11 Venting Requirements 11 Plan Vent System 12 Install Vent System 13 INSTALL LEVELING LEGS 13 CONNECT VENT 14 CONNECT INLET HOSE (STEAM MODELS 14 LEVEL DRYER 15 COMPLETE INSTALLATION 15 TROUBLESHOOTING 15 Para una version de estas intrucciones en Español, visite www.Whirlpool.com DRYER...
... ONLY TABLE OF CONTENTS DRYER SAFETY 1 INSTALLATION REQUIREMENTS 2 Tools and Parts 2 Optional Equipment 3 Location Requirements 3 ELECTRIC DRYER POWER HOOKUP 5 Electrical Requirements - Only 6 VENTING... 11 Venting Requirements 11 Plan Vent System 12 Install Vent System 13 INSTALL LEVELING LEGS 13 CONNECT VENT 14 CONNECT INLET HOSE (STEAM MODELS 14 LEVEL DRYER 15 COMPLETE INSTALLATION 15 TROUBLESHOOTING 15 Para una version de estas intrucciones en Español, visite www.Whirlpool.com DRYER...
Installation Instructions
Page 2
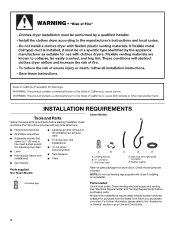
... all parts are included. "Y" connector C. Short inlet hose D. Check existing electrical supply and venting. For further information, please refer to 1" (25 mm) or hex-head socket wrench (for adjusting dryer feet) ■ Level ■ Wire stripper (direct wire installations) ■...) ■ ¼" nut driver (recommended) ■ Tape measure ■ Pliers Parts supplied Non-Steam Models Steam Models A B C D E A. Leveling legs (4) B. Inlet hose with dryer if installing on a pedestal. 4 Leveling legs Parts needed Check local codes. Rubber washer Remove parts package...
... all parts are included. "Y" connector C. Short inlet hose D. Check existing electrical supply and venting. For further information, please refer to 1" (25 mm) or hex-head socket wrench (for adjusting dryer feet) ■ Level ■ Wire stripper (direct wire installations) ■...) ■ ¼" nut driver (recommended) ■ Tape measure ■ Pliers Parts supplied Non-Steam Models Steam Models A B C D E A. Leveling legs (4) B. Inlet hose with dryer if installing on a pedestal. 4 Leveling legs Parts needed Check local codes. Rubber washer Remove parts package...
Installation Instructions
Page 3
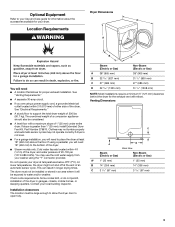
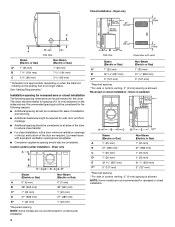
... Gas) A 38" (965 mm) B 32 9/16" (827 mm) C 27" (686 mm) D 52 9/16" (1335 mm) Non-Steam (Electric or Gas) 38" (965 mm) 31 1/2" (800 mm) 27" (686 mm) 51 1/2" (1308 mm) NOTE: Most installations require a minimum 5" (127 mm) clearance behind the dryer for your dryer. See "Electrical Requirements." ■ A sturdy floor to open fully. Clothes may...
... Gas) A 38" (965 mm) B 32 9/16" (827 mm) C 27" (686 mm) D 52 9/16" (1335 mm) Non-Steam (Electric or Gas) 38" (965 mm) 31 1/2" (800 mm) 27" (686 mm) 51 1/2" (1308 mm) NOTE: Most installations require a minimum 5" (127 mm) clearance behind the dryer for your dryer. See "Electrical Requirements." ■ A sturdy floor to open fully. Clothes may...
Installation Instructions
Page 4
... mm) 5" (127 mm) *Required spacing **For side or bottom venting, 0" (0 mm) spacing is allowed. Dryer only A B C* D E* Steam (Electric or Gas) A 0" (0 mm) B 38" (965 mm) C* 1" (25 mm) D 27" (686 mm) E* 1" (25 mm) Non-Steam (Electric or Gas) 0" (0 mm) 38" (965 mm) 1" (25 mm) 27" (686 mm) 1" (25 mm) *Required spacing NOTE: Some models are not recommended for undercounter...
... mm) 5" (127 mm) *Required spacing **For side or bottom venting, 0" (0 mm) spacing is allowed. Dryer only A B C* D E* Steam (Electric or Gas) A 0" (0 mm) B 38" (965 mm) C* 1" (25 mm) D 27" (686 mm) E* 1" (25 mm) Non-Steam (Electric or Gas) 0" (0 mm) 38" (965 mm) 1" (25 mm) 27" (686 mm) 1" (25 mm) *Required spacing NOTE: Some models are not recommended for undercounter...
Installation Instructions
Page 5
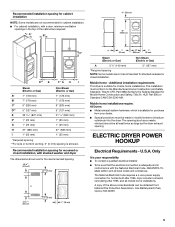
... and all mobile home installations. The opening (such as the dryer exhaust opening. A* B* 6"* (152 mm) 76" (1930 mm) C* D** E F* G H I Steam (Electric or Gas) A* 7" (178 mm) B* 7" (178 mm) C* 9" (229 mm) D** 5" (127 mm) E 32 9/16" (827 mm) F* 1" (25 mm) G 1" (25 mm) H 27" (686 mm) I 1" (25 mm) Non-Steam (Electric or Gas) 7" (178 mm) 7" (178 mm) 9" (229 mm) 5" (127 mm...
... and all mobile home installations. The opening (such as the dryer exhaust opening. A* B* 6"* (152 mm) 76" (1930 mm) C* D** E F* G H I Steam (Electric or Gas) A* 7" (178 mm) B* 7" (178 mm) C* 9" (229 mm) D** 5" (127 mm) E 32 9/16" (827 mm) F* 1" (25 mm) G 1" (25 mm) H 27" (686 mm) I 1" (25 mm) Non-Steam (Electric or Gas) 7" (178 mm) 7" (178 mm) 9" (229 mm) 5" (127 mm...

Installation Instructions
Page 6
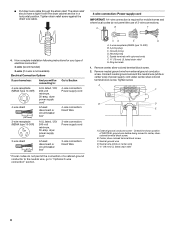
... end in a location where grounding through the neutral conductors. Connect remaining 2 supply wires to the neutral conductor (white wire) within the dryer. Electrical Connection To properly install your dryer, you must determine the type of NEMA Type 14-30R. The 4-wire power supply cord, at least 5 ft (1.52 m) long. If your outlet looks...
... end in a location where grounding through the neutral conductors. Connect remaining 2 supply wires to the neutral conductor (white wire) within the dryer. Electrical Connection To properly install your dryer, you must determine the type of NEMA Type 14-30R. The 4-wire power supply cord, at least 5 ft (1.52 m) long. If your outlet looks...

Installation Instructions
Page 7
...pointing down screw and terminal block cover. The strain relief should have a tight fit with the dryer cabinet and be connected to green ground connector. Securely tighten all electrical connections. Put the threaded section of the two clamp sections into the hole below terminal block opening... be in a horizontal position. Connect remaining 2 supply wires to hold the two clamp sections together. Remove the hold in death, fire, or electrical shock. ■ Unscrew the removable conduit connector and any screws from a 3/4" (19 mm) UL listed strain relief (UL marking on strain relief...
...pointing down screw and terminal block cover. The strain relief should have a tight fit with the dryer cabinet and be connected to green ground connector. Securely tighten all electrical connections. Put the threaded section of the two clamp sections into the hole below terminal block opening... be in a horizontal position. Connect remaining 2 supply wires to hold the two clamp sections together. Remove the hold in death, fire, or electrical shock. ■ Unscrew the removable conduit connector and any screws from a 3/4" (19 mm) UL listed strain relief (UL marking on strain relief...
Installation Instructions
Page 8
... mm) 3-wire receptacle (NEMA type 10-30R) A fused disconnect or circuit breaker box* A UL listed, 120/ 240-volt minimum, 30-amp, dryer power supply cord* 4-wire connection: Direct Wire 3-wire connection: Power supply cord 3-wire direct (89 mm) A fused disconnect or circuit breaker box*...E. Ring terminals 1. Ground prong D. Now complete installation following instructions for mobile homes and where local codes do not permit the connection of electrical connection: 4-wire (recommended) 3-wire (if 4-wire is required for your home has: And you will be in a horizontal position. Connect...
... mm) 3-wire receptacle (NEMA type 10-30R) A fused disconnect or circuit breaker box* A UL listed, 120/ 240-volt minimum, 30-amp, dryer power supply cord* 4-wire connection: Direct Wire 3-wire connection: Power supply cord 3-wire direct (89 mm) A fused disconnect or circuit breaker box*...E. Ring terminals 1. Ground prong D. Now complete installation following instructions for mobile homes and where local codes do not permit the connection of electrical connection: 4-wire (recommended) 3-wire (if 4-wire is required for your home has: And you will be in a horizontal position. Connect...

Installation Instructions
Page 9
...) UL listed strain relief D. Now go to external ground conductor screw. Tighten screw. Ground wire (green or bare) of extra length so dryer can be moved if needed. Connect ground wire (green or bare) of power supply cord to "Venting Requirements." 4-wire connection: Direct wire ...not permit the use of NEUTRAL ground wire before being moved to external ground conductor screw. Direct wire cable must have completed your electrical connection. External ground conductor screw - Neutral ground wire D. Center, silver-colored terminal block screw E. Neutral ground wire F. Place...
...) UL listed strain relief D. Now go to external ground conductor screw. Tighten screw. Ground wire (green or bare) of extra length so dryer can be moved if needed. Connect ground wire (green or bare) of power supply cord to "Venting Requirements." 4-wire connection: Direct wire ...not permit the use of NEUTRAL ground wire before being moved to external ground conductor screw. Direct wire cable must have completed your electrical connection. External ground conductor screw - Neutral ground wire D. Center, silver-colored terminal block screw E. Neutral ground wire F. Place...


