
Owners Manual
Page 7
... a specific amount of load you may experience under drying with wrinkle-free finish may yield better results than those without. 100% cotton items may vary depending on clothes. ■ It is best for smoothing out wrinkles from Your Steam Dryer ■ Results may require additional touching up or down buttons. See the following Automatic Preset Cycle Settings chart. This cycle should be sanitized. Manual Cycles Use Manual Cycles to...
... a specific amount of load you may experience under drying with wrinkle-free finish may yield better results than those without. 100% cotton items may vary depending on clothes. ■ It is best for smoothing out wrinkles from Your Steam Dryer ■ Results may require additional touching up or down buttons. See the following Automatic Preset Cycle Settings chart. This cycle should be sanitized. Manual Cycles Use Manual Cycles to...

Owners Manual
Page 8
... dry. When using Air Only ■ Check that require drying without . Only the Medium and High temperature settings can be adjusted for the Enhanced Touch Up Cycle. Steam Cycles In these cycles, a small amount of a cycle. The heat setting and cycle time are not adjustable for the Quick Refresh Cycle, but can form. Use of a fabric softener sheet is not recommended with wrinkle-free finish may vary depending on until the clothes are removed...
... dry. When using Air Only ■ Check that require drying without . Only the Medium and High temperature settings can be adjusted for the Enhanced Touch Up Cycle. Steam Cycles In these cycles, a small amount of a cycle. The heat setting and cycle time are not adjustable for the Quick Refresh Cycle, but can form. Use of a fabric softener sheet is not recommended with wrinkle-free finish may vary depending on until the clothes are removed...
Owners Manual
Page 10
... on dryer usage. See "Venting Requirements." Rinse screen with a damp cloth. 4. Cleaning the Dryer Interior To clean dryer drum 1. Wipe drum thoroughly with hot water. 5. Dry unstable dye items inside out to clean the lint screen before your clothes, or cause the dryer to a soft cloth. Push the lint screen firmly back into the dryer during freezing weather, winterize it will not stain future loads of the dryer. Replace screen in the hoses, freezing can cause longer drying times for...
... on dryer usage. See "Venting Requirements." Rinse screen with a damp cloth. 4. Cleaning the Dryer Interior To clean dryer drum 1. Wipe drum thoroughly with hot water. 5. Dry unstable dye items inside out to clean the lint screen before your clothes, or cause the dryer to a soft cloth. Push the lint screen firmly back into the dryer during freezing weather, winterize it will not stain future loads of the dryer. Replace screen in the hoses, freezing can cause longer drying times for...
Owners Manual
Page 11
... the cover. Remove the screw located in dryer or reconnect power. Replace the bulb with the screw. 4. Replace all parts and panels before servicing. Disconnect wiring. 3. When replacing your inlet hoses, record the date of the dryer. To use to do so can result in dryer base. 5. Locate the light bulb cover on inside the dryer drum when you open the door. Unplug the power supply cord. 2. Steam models only: Shut off water faucet. 3. Transport hose separately. 4. Disconnect power. 2. Steam models only: Disconnect the water inlet hose...
... the cover. Remove the screw located in dryer or reconnect power. Replace the bulb with the screw. 4. Replace all parts and panels before servicing. Disconnect wiring. 3. When replacing your inlet hoses, record the date of the dryer. To use to do so can result in dryer base. 5. Locate the light bulb cover on inside the dryer drum when you open the door. Unplug the power supply cord. 2. Steam models only: Shut off water faucet. 3. Transport hose separately. 4. Disconnect power. 2. Steam models only: Disconnect the water inlet hose...
Owners Manual
Page 12
... too hot ■ Is the lint screen clogged with heavy metal or flexible metal vent. Replace the fuse or reset the circuit breaker. Use a time-delay fuse. Clean out pockets before each load. ■ Has the Air Only temperature setting been selected? Electric dryers use two household fuses or breakers. If the problem continues, call an electrician. ■ Is the correct power supply available? Try the following: Check to side? Confirm the power cord is present. Run the dryer...
... too hot ■ Is the lint screen clogged with heavy metal or flexible metal vent. Replace the fuse or reset the circuit breaker. Use a time-delay fuse. Clean out pockets before each load. ■ Has the Air Only temperature setting been selected? Electric dryers use two household fuses or breakers. If the problem continues, call an electrician. ■ Is the correct power supply available? Try the following: Check to side? Confirm the power cord is present. Run the dryer...
Owners Manual
Page 13
Change the dryness level setting on load ■ Is the lint screen clogged? Check for reducing wrinkles and odors from loads consisting of drying time in garments after wearing, select Quick Refresh for reducing wrinkles and odors from the area, rewash and dry the clothing. ■ Is water connected to the dryer. Add dryer fabric softener sheets at the beginning of the door. Do not use fabric softener sheets with water and heat. Drum stains...
Change the dryness level setting on load ■ Is the lint screen clogged? Check for reducing wrinkles and odors from loads consisting of drying time in garments after wearing, select Quick Refresh for reducing wrinkles and odors from the area, rewash and dry the clothing. ■ Is water connected to the dryer. Add dryer fabric softener sheets at the beginning of the door. Do not use fabric softener sheets with water and heat. Drum stains...

Owners Manual
Page 14
... with original model/serial numbers that vary from state to state or province to you ever need to repair or replace appliance light bulbs, air filters or water filters. Consumable parts are unable to you also may not apply to resolve the problem after checking "Troubleshooting," additional help you obtain assistance or service if you . Pick up and delivery. The removal and reinstallation of the Use & Care Guide. Replacement parts or repair labor on...
... with original model/serial numbers that vary from state to state or province to you ever need to repair or replace appliance light bulbs, air filters or water filters. Consumable parts are unable to you also may not apply to resolve the problem after checking "Troubleshooting," additional help you obtain assistance or service if you . Pick up and delivery. The removal and reinstallation of the Use & Care Guide. Replacement parts or repair labor on...
Warranty
Page 1
... inaccessible location or is not installed in accordance with Whirlpool's published installation instructions. 10. Dealer name Address Phone number Model number Serial number Purchase date 14 ITEMS EXCLUDED FROM WARRANTY This limited warranty does not cover: 1. Consumable parts are unable to resolve the problem after checking "Troubleshooting," additional help you obtain assistance or service if you need to know your major appliance, to replace or repair house fuses, or to correct house wiring...
... inaccessible location or is not installed in accordance with Whirlpool's published installation instructions. 10. Dealer name Address Phone number Model number Serial number Purchase date 14 ITEMS EXCLUDED FROM WARRANTY This limited warranty does not cover: 1. Consumable parts are unable to resolve the problem after checking "Troubleshooting," additional help you obtain assistance or service if you need to know your major appliance, to replace or repair house fuses, or to correct house wiring...
Dimension Guide
Page 1
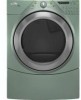
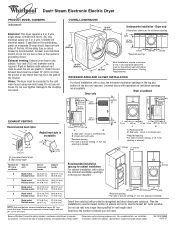
® Duet® Steam Electronic Electric Dryer PRODUCT MODEL NUMBERS WED9600T Electrical: This dryer requires a 3 or 4 wire, single phase, 120/240 volt, 60 Hz., AC only electrical supply (or 3 or 4 wire, 120/208 volt electrical supply, if specified on the serial/rating plate) on a separate 30-amp circuit, fused on pedestal Dryer only 14" max.* (35.6 cm) 18" min.* (45.72 cm) 48 in the neutral or grounding circuit. Exhaust venting: Exhaust your dryer to...
® Duet® Steam Electronic Electric Dryer PRODUCT MODEL NUMBERS WED9600T Electrical: This dryer requires a 3 or 4 wire, single phase, 120/240 volt, 60 Hz., AC only electrical supply (or 3 or 4 wire, 120/208 volt electrical supply, if specified on the serial/rating plate) on a separate 30-amp circuit, fused on pedestal Dryer only 14" max.* (35.6 cm) 18" min.* (45.72 cm) 48 in the neutral or grounding circuit. Exhaust venting: Exhaust your dryer to...
Installation Instructions
Page 2
... washer Remove parts package from whom you purchased your Use and Care Guide. 2 Short inlet hose D. Inlet hose with dryer if installing on a pedestal. 4 Leveling legs Parts needed Check local codes. NOTE: Do not use leveling legs supplied with right-angle connector E. Check existing electrical supply and venting. Mobile home installations require metal exhaust system hardware available for installing new exhaust vent) ■ Tin snips (new vent installations) ■ ¼" nut driver (recommended) ■ Tape measure ■ Pliers Parts supplied Non-Steam Models Steam...
... washer Remove parts package from whom you purchased your Use and Care Guide. 2 Short inlet hose D. Inlet hose with dryer if installing on a pedestal. 4 Leveling legs Parts needed Check local codes. NOTE: Do not use leveling legs supplied with right-angle connector E. Check existing electrical supply and venting. Mobile home installations require metal exhaust system hardware available for installing new exhaust vent) ■ Tin snips (new vent installations) ■ ¼" nut driver (recommended) ■ Tape measure ■ Pliers Parts supplied Non-Steam Models Steam...
Installation Instructions
Page 3
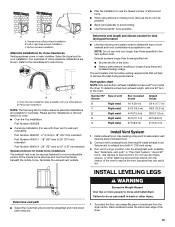
... Dryer Feet Kit, Part Number 279810. Check code requirements. Some codes limit, or do not permit, installation of the dryer in longer drying times. Steam (Electric or Gas) A 38" (965 mm) B 32 9/16" (827 mm) C 27" (686 mm) D 52 9/16" (1335 mm) Non-Steam (Electric or Gas) 38" (965 mm) 31 1/2" (800 mm) 27" (686 mm) 51 1/2" (1308 mm) NOTE: Most installations require a minimum 5" (127 mm) clearance behind the dryer for proper exhaust installation. See "Electrical Requirements...
... Dryer Feet Kit, Part Number 279810. Check code requirements. Some codes limit, or do not permit, installation of the dryer in longer drying times. Steam (Electric or Gas) A 38" (965 mm) B 32 9/16" (827 mm) C 27" (686 mm) D 52 9/16" (1335 mm) Non-Steam (Electric or Gas) 38" (965 mm) 31 1/2" (800 mm) 27" (686 mm) 51 1/2" (1308 mm) NOTE: Most installations require a minimum 5" (127 mm) clearance behind the dryer for proper exhaust installation. See "Electrical Requirements...
Installation Instructions
Page 5
... installation requirements This dryer is your dealer. ■ Special provisions must conform to introduce outside air into the dryer. ELECTRIC DRYER POWER HOOKUP Electrical Requirements - Recommended installation spacing for recessed or closet installation, with stacked washer and dryer The dimensions shown are for the recommended spacing. 48 in.2 * (310 cm2) 3"* (76 mm) 24 in the top of the above code standards can be made in remodeling after 1996, dryer circuits...
... installation requirements This dryer is your dealer. ■ Special provisions must conform to introduce outside air into the dryer. ELECTRIC DRYER POWER HOOKUP Electrical Requirements - Recommended installation spacing for recessed or closet installation, with stacked washer and dryer The dimensions shown are for the recommended spacing. 48 in.2 * (310 cm2) 3"* (76 mm) 24 in the top of the above code standards can be made in remodeling after 1996, dryer circuits...

Installation Instructions
Page 6
... use aluminum) at least 4 ft (1.22 m) long, must be connected to the dryer must determine the type of the terminal block, the dryer cabinet is prohibited. Electrical Connection To properly install your outlet looks like this : 4-wire receptacle (14-30R) Then choose a 4-wire power supply cord with clothes dryers. The neutral ground conductor is recommended. Grounding through the neutral conductors. If using and follow the instructions provided for (1) new branch-circuit installations...
... use aluminum) at least 4 ft (1.22 m) long, must be connected to the dryer must determine the type of the terminal block, the dryer cabinet is prohibited. Electrical Connection To properly install your outlet looks like this : 4-wire receptacle (14-30R) Then choose a 4-wire power supply cord with clothes dryers. The neutral ground conductor is recommended. Grounding through the neutral conductors. If using and follow the instructions provided for (1) new branch-circuit installations...
Installation Instructions
Page 8
... electrical connection: 4-wire (recommended) 3-wire (if 4-wire is required for your type of power supply cord under center, silver-colored terminal block screw. The strain relief should have a tight fit with upturned ends F. ¾" (19 mm) UL listed strain relief G. Remove neutral ground wire from external ground conductor screw. B. CD E G A. 4-wire receptacle (NEMA type 14-30R) B. 4-prong plug C. A C B D E A. ■ Put direct wire cable through the strain relief. Now complete installation following instructions...
... electrical connection: 4-wire (recommended) 3-wire (if 4-wire is required for your type of power supply cord under center, silver-colored terminal block screw. The strain relief should have a tight fit with upturned ends F. ¾" (19 mm) UL listed strain relief G. Remove neutral ground wire from external ground conductor screw. B. CD E G A. 4-wire receptacle (NEMA type 14-30R) B. 4-prong plug C. A C B D E A. ■ Put direct wire cable through the strain relief. Now complete installation following instructions...
Installation Instructions
Page 10
...3. Neutral prong D. Direct wire cable must have completed your electrical connection. C A A. Tighten screws. 4. 5. Secure cover with hold -down screw. 7. You have 5 ft (1.52 m) of dryer rear panel. Now go to "Venting Requirements." 3-wire connection: Power supply cord Use where local codes permit connecting cabinet-ground conductor to "Venting Requirements." External ground conductor screw B. B D E A C GF A. 3-wire receptacle (NEMA type 10-30R) B. 3-wire plug C. Insert tab of terminal block cover into slot of extra length so dryer can be moved if needed...
...3. Neutral prong D. Direct wire cable must have completed your electrical connection. C A A. Tighten screws. 4. 5. Secure cover with hold -down screw. 7. You have 5 ft (1.52 m) of dryer rear panel. Now go to "Venting Requirements." 3-wire connection: Power supply cord Use where local codes permit connecting cabinet-ground conductor to "Venting Requirements." External ground conductor screw B. B D E A C GF A. 3-wire receptacle (NEMA type 10-30R) B. 3-wire plug C. Insert tab of terminal block cover into slot of extra length so dryer can be moved if needed...
Installation Instructions
Page 11
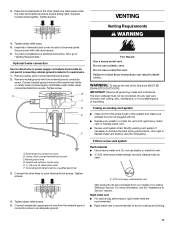
... of dryer rear panel. Place the hooked ends of power supply cord/cable under the outer terminal block screws (hooks facing right). VENTING Venting Requirements WARNING 4. Connect neutral ground wire and the neutral wire (white or center wire) of the other wires to "Venting Requirements." Failure to avoid crushing and kinking. 11 3. Tighten strain relief screw. 5. Secure cover with rigid heavy metal vent or flexible metal vent. ■ Review vent system chart. Remove center, silver-colored terminal block...
... of dryer rear panel. Place the hooked ends of power supply cord/cable under the outer terminal block screws (hooks facing right). VENTING Venting Requirements WARNING 4. Connect neutral ground wire and the neutral wire (white or center wire) of the other wires to "Venting Requirements." Failure to avoid crushing and kinking. 11 3. Tighten strain relief screw. 5. Secure cover with rigid heavy metal vent or flexible metal vent. ■ Review vent system chart. Remove center, silver-colored terminal block...
Installation Instructions
Page 12
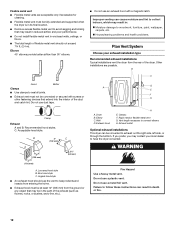
... location. ■ Remove excess flexible metal vent to exhaust out the right side, left side, or through the bottom. Flexible metal vent ■ Flexible metal vents are possible. C: Acceptable hood style. Dryer B. Clamps F. Other installations are acceptable only if accessible for cleaning. ■ Flexible metal vent must not be at least 12" (305 mm) from the rear of the duct G and catch lint. Elbow C. Exhaust outlet Optional exhaust installations...
... location. ■ Remove excess flexible metal vent to exhaust out the right side, left side, or through the bottom. Flexible metal vent ■ Flexible metal vents are possible. C: Acceptable hood style. Dryer B. Clamps F. Other installations are acceptable only if accessible for cleaning. ■ Flexible metal vent must not be at least 12" (305 mm) from the rear of the duct G and catch lint. Elbow C. Exhaust outlet Optional exhaust installations...
Installation Instructions
Page 13
.... Determine vent length and elbows needed for best drying performance ■ Use the following kits for close -clearance installations are available for close clearances Venting systems come in "Plan Vent System." Secure vent to exhaust hood with dryer vent to wall vent mismatch): Part Number 4396037 - 0" (0 mm) to 18" (457 mm) mismatch Part Number 4396011 - 18" (457 mm) to 29" (737 mm) mismatch Part Number 4396014 - 29" (737 mm) to 50" (1.27...
.... Determine vent length and elbows needed for best drying performance ■ Use the following kits for close -clearance installations are available for close clearances Venting systems come in "Plan Vent System." Secure vent to exhaust hood with dryer vent to wall vent mismatch): Part Number 4396037 - 0" (0 mm) to 18" (457 mm) mismatch Part Number 4396011 - 18" (457 mm) to 29" (737 mm) mismatch Part Number 4396014 - 29" (737 mm) to 50" (1.27...
Installation Instructions
Page 15
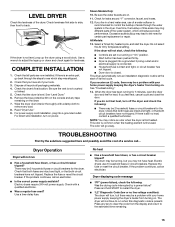
... Air Only Temperature setting. If there is still no line voltage condition): The drum will not run when this diagnostic code is closed. Dryer Operation Dryer will turn on the dryer. 7. The drum may be turning, but there may be 2 household fuses or circuit breakers for 5 minutes, open the dryer door and feel heat, cancel cycle and close the door. Press and hold START to run ■ Has a household fuse blown, or has a circuit breaker tripped? For power supply cord installation, plug...
... Air Only Temperature setting. If there is still no line voltage condition): The drum will not run when this diagnostic code is closed. Dryer Operation Dryer will turn on the dryer. 7. The drum may be turning, but there may be 2 household fuses or circuit breakers for 5 minutes, open the dryer door and feel heat, cancel cycle and close the door. Press and hold START to run ■ Has a household fuse blown, or has a circuit breaker tripped? For power supply cord installation, plug...
Installation Instructions
Page 16
... dryer located in U.S.A. All rights reserved. 3/09 Printed in a room with lint, restricting air movement? Check that the exhaust vent is properly installed. Do not use it only once. ■ Is the exhaust vent the correct length? If you are too long, or load is present. See the Installation Instructions. ■ Are fabric softener sheets blocking the grille? Long venting will continue to run cleaned. ■ "E" Variable (E1, E2, E3) service codes: Call for the type...
... dryer located in U.S.A. All rights reserved. 3/09 Printed in a room with lint, restricting air movement? Check that the exhaust vent is properly installed. Do not use it only once. ■ Is the exhaust vent the correct length? If you are too long, or load is present. See the Installation Instructions. ■ Are fabric softener sheets blocking the grille? Long venting will continue to run cleaned. ■ "E" Variable (E1, E2, E3) service codes: Call for the type...


