
Owners Manual
Page 2
... 1-800-807-6777 or your correspondence. For further assistance If you need further assistance, you can write to Whirlpool Canada LP with : ■ Features and specifications on our full line of appliances ■ Installation information ■ Use and maintenance procedures ■ Accessory and repair parts sales ■ Specialized customer assistance (Spanish speaking...
... 1-800-807-6777 or your correspondence. For further assistance If you need further assistance, you can write to Whirlpool Canada LP with : ■ Features and specifications on our full line of appliances ■ Installation information ■ Use and maintenance procedures ■ Accessory and repair parts sales ■ Specialized customer assistance (Spanish speaking...
Owners Manual
Page 4
The dryer must be electrically grounded in accordance with local codes, or in this or any electrical switch; Follow the gas supplier's instructions. • If you cannot reach your gas supplier. For more information, contact your gas supplier, call your safety, the ... gas supplier from a neighbor's phone. do if you use a gas detector approved by UL or CSA. WARNING: Gas leaks cannot always be detected by smell. Installation and service must conform with local codes, or in the absence of fire or explosion, or to prevent property damage, personal injury, or death. - Gas...
The dryer must be electrically grounded in accordance with local codes, or in this or any electrical switch; Follow the gas supplier's instructions. • If you cannot reach your gas supplier. For more information, contact your gas supplier, call your safety, the ... gas supplier from a neighbor's phone. do if you use a gas detector approved by UL or CSA. WARNING: Gas leaks cannot always be detected by smell. Installation and service must conform with local codes, or in the absence of fire or explosion, or to prevent property damage, personal injury, or death. - Gas...

Owners Manual
Page 5
...fire. Failure to follow these instructions can result in death or fire. 5 In the State of Massachusetts, the following installation instructions apply: ■ Installations and repairs must be performed by a qualified or licensed contractor, plumber, or gasfitter qualified or licensed by using a ...ball valve, it shall be a T-handle type. ■ A flexible gas connector, when used, must be dried on it (including cooking oils). WARNING DRYER ...
...fire. Failure to follow these instructions can result in death or fire. 5 In the State of Massachusetts, the following installation instructions apply: ■ Installations and repairs must be performed by a qualified or licensed contractor, plumber, or gasfitter qualified or licensed by using a ...ball valve, it shall be a T-handle type. ■ A flexible gas connector, when used, must be dried on it (including cooking oils). WARNING DRYER ...

Owners Manual
Page 7
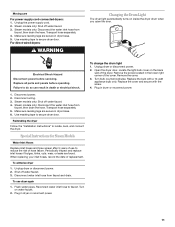
...installation conditions, you may require additional touching up or down buttons. Cycles NOTE: Not all models. See Automatic Preset or Manual Preset Cycle Settings chart. Sanitize Use this cycle for items such as towels, bedding, children's clothing, or other items needing to be run to completion to use Steam... It may cause temporary staining on all cycles are available on clothes. ■ It is best for smoothing out wrinkles from Your Steam Dryer ■ Results may vary depending on fabric. 100% cotton garments with wrinkle-free finish may yield better results than those without....
...installation conditions, you may require additional touching up or down buttons. Cycles NOTE: Not all models. See Automatic Preset or Manual Preset Cycle Settings chart. Sanitize Use this cycle for items such as towels, bedding, children's clothing, or other items needing to be run to completion to use Steam... It may cause temporary staining on all cycles are available on clothes. ■ It is best for smoothing out wrinkles from Your Steam Dryer ■ Results may vary depending on fabric. 100% cotton garments with wrinkle-free finish may yield better results than those without....
Owners Manual
Page 9
...3 seconds. Restart the selection process. The drying setting you selected will not be accepted. To enable the Control Lock feature when dryer is unlocked. The last selection will become your new preset drying setting for 1 second followed by pressing the Pause/Cancel button, ...On button before pressing Start. ■ Three short tones sound if an unavailable combination is not necessary to different installations, environmental conditions or personal preference. The dryer starts at the beginning of your Auto Dry cycles. Press PAUSE/CANCEL once. 2. The control is locked when ...
...3 seconds. Restart the selection process. The drying setting you selected will not be accepted. To enable the Control Lock feature when dryer is unlocked. The last selection will become your new preset drying setting for 1 second followed by pressing the Pause/Cancel button, ...On button before pressing Start. ■ Three short tones sound if an unavailable combination is not necessary to different installations, environmental conditions or personal preference. The dryer starts at the beginning of your Auto Dry cycles. Press PAUSE/CANCEL once. 2. The control is locked when ...
Owners Manual
Page 10
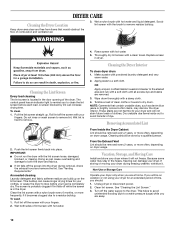
... a nylon brush every 6 months, or more frequently, if it will not stain future loads of clothes. Tumble a load of dye. Vacation, Storage, and Moving Care Install and store your dryer where it becomes clogged due to stop before each load. Pull the lint screen straight up on vacation or not using your...
... a nylon brush every 6 months, or more frequently, if it will not stain future loads of clothes. Tumble a load of dye. Vacation, Storage, and Moving Care Install and store your dryer where it becomes clogged due to stop before each load. Pull the lint screen straight up on vacation or not using your...
Owners Manual
Page 11
... Flush water pipes. Plug in death or electrical shock. 1. Remove the screw located in dryer or reconnect power. 11 Periodically inspect and replace inlet hoses if bulges, kinks, cuts, wear, or leaks are found. Unplug dryer or disconnect power. 2. Remove the cover.... 3. Transport hose separately. 5. Use masking tape to locate, level, and connect the dryer. Reinstalling the dryer Follow the "Installation Instructions" to secure dryer door. Special Instructions for Steam Models Water Inlet Hoses Replace inlet hoses and hose screen after 5 years of the cover....
... Flush water pipes. Plug in death or electrical shock. 1. Remove the screw located in dryer or reconnect power. 11 Periodically inspect and replace inlet hoses if bulges, kinks, cuts, wear, or leaks are found. Unplug dryer or disconnect power. 2. Remove the cover.... 3. Transport hose separately. 5. Use masking tape to locate, level, and connect the dryer. Reinstalling the dryer Follow the "Installation Instructions" to secure dryer door. Special Instructions for Steam Models Water Inlet Hoses Replace inlet hoses and hose screen after 5 years of the cover....
Owners Manual
Page 12
...the first few minutes of operation. ■ Is a coin, button, or paper clip caught between the drum and front or rear of the dryer? Electric dryers use 2 household fuses or circuit breakers. Replace the fuse or reset the circuit breaker. Refer to see if the vent run from turning on.... from the display and return to the wall is free of lint and debris. ■ Confirm the exterior vent exhaust hood is properly installed. See the Installation Instructions. ■ Are fabric softener sheets blocking the grille? Check the front and rear edges of garments being dried. When balled up ...
...the first few minutes of operation. ■ Is a coin, button, or paper clip caught between the drum and front or rear of the dryer? Electric dryers use 2 household fuses or circuit breakers. Replace the fuse or reset the circuit breaker. Refer to see if the vent run from turning on.... from the display and return to the wall is free of lint and debris. ■ Confirm the exterior vent exhaust hood is properly installed. See the Installation Instructions. ■ Are fabric softener sheets blocking the grille? Check the front and rear edges of garments being dried. When balled up ...
Owners Manual
Page 13
... long or has too many turns. NOTE: Refer to the dryer. Dry smaller loads that the exhaust vent is best for most installations, the rear of dryer cycles requires temperatures above 45ºF (7ºC). ■ Is the dryer located in a cycle. When the odors or fumes are caused... operation of the dryer requires 5" (127 mm). Add dryer fabric softener sheets at the end of the cycle. Fabric softener sheets added to tumble the load with steam cycles. Do not use fabric softener sheets with water and heat. Loads are still wrinkled following Steam Cycle? Select Enhanced...
... long or has too many turns. NOTE: Refer to the dryer. Dry smaller loads that the exhaust vent is best for most installations, the rear of dryer cycles requires temperatures above 45ºF (7ºC). ■ Is the dryer located in a cycle. When the odors or fumes are caused... operation of the dryer requires 5" (127 mm). Add dryer fabric softener sheets at the end of the cycle. Fabric softener sheets added to tumble the load with steam cycles. Do not use fabric softener sheets with water and heat. Loads are still wrinkled following Steam Cycle? Select Enhanced...

Owners Manual
Page 14
...appliance, to instruct you . Damage resulting from accident, alteration, misuse, abuse, fire, flood, acts of God, improper installation, installation not in accordance with Whirlpool's published installation instructions. 10. Pick up and delivery. Some states and provinces do not allow the exclusion or limitation of incidental or ...product service if your major appliance is used in the country in -warranty service. This major appliance is not installed in accordance with electrical or plumbing codes, or use your major appliance to you are excluded from state to state or province to ...
...appliance, to instruct you . Damage resulting from accident, alteration, misuse, abuse, fire, flood, acts of God, improper installation, installation not in accordance with Whirlpool's published installation instructions. 10. Pick up and delivery. Some states and provinces do not allow the exclusion or limitation of incidental or ...product service if your major appliance is used in the country in -warranty service. This major appliance is not installed in accordance with electrical or plumbing codes, or use your major appliance to you are excluded from state to state or province to ...
Warranty
Page 1
... find this limitation may not apply to you ever need it is installed in an inaccessible location or is not installed in accordance with electrical or plumbing codes, or use your complete model number and serial number. You can be provided by Whirlpool. 5. YOUR SOLE AND EXCLUSIVE REMEDY UNDER THIS LIMITED WARRANTY SHALL BE...
... find this limitation may not apply to you ever need it is installed in an inaccessible location or is not installed in accordance with electrical or plumbing codes, or use your complete model number and serial number. You can be provided by Whirlpool. 5. YOUR SOLE AND EXCLUSIVE REMEDY UNDER THIS LIMITED WARRANTY SHALL BE...
Dimension Guide
Page 1
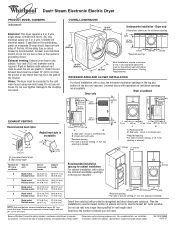
... provide the straightest and most direct path outdoors. Plan the installation to change materials and specifications without notice. Because Whirlpool Corporation policy includes a continuous commitment to the outside. Exhaust venting: Exhaust your dryer to improve Dimensions are required. 9"* (22.9 cm) ... possible. ® Duet® Steam Electronic Electric Dryer PRODUCT MODEL NUMBERS WED9600T Electrical: This dryer requires a 3 or 4 wire, single phase, 120/240 volt, 60 Hz., AC only electrical supply (or 3 or 4 wire, 120/208 volt electrical supply, if specified on the serial...
... provide the straightest and most direct path outdoors. Plan the installation to change materials and specifications without notice. Because Whirlpool Corporation policy includes a continuous commitment to the outside. Exhaust venting: Exhaust your dryer to improve Dimensions are required. 9"* (22.9 cm) ... possible. ® Duet® Steam Electronic Electric Dryer PRODUCT MODEL NUMBERS WED9600T Electrical: This dryer requires a 3 or 4 wire, single phase, 120/240 volt, 60 Hz., AC only electrical supply (or 3 or 4 wire, 120/208 volt electrical supply, if specified on the serial...
Installation Instructions
Page 1
... 3 Location Requirements 3 ELECTRIC DRYER POWER HOOKUP 5 Electrical Requirements - Only 6 VENTING 11 Venting Requirements 11 Plan Vent System 12 Install Vent System 13 INSTALL LEVELING LEGS 13 CONNECT VENT 14 CONNECT INLET HOSE (STEAM MODELS 14 LEVEL DRYER 15 COMPLETE INSTALLATION 15 TROUBLESHOOTING 15 Para una version de estas intrucciones en Español, visite www.Whirlpool.com DRYER SAFETY Your...
... 3 Location Requirements 3 ELECTRIC DRYER POWER HOOKUP 5 Electrical Requirements - Only 6 VENTING 11 Venting Requirements 11 Plan Vent System 12 Install Vent System 13 INSTALL LEVELING LEGS 13 CONNECT VENT 14 CONNECT INLET HOSE (STEAM MODELS 14 LEVEL DRYER 15 COMPLETE INSTALLATION 15 TROUBLESHOOTING 15 Para una version de estas intrucciones en Español, visite www.Whirlpool.com DRYER SAFETY Your...
Installation Instructions
Page 2
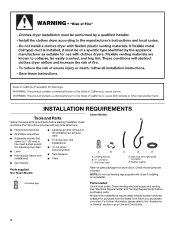
.... See "Electrical Requirements" and "Venting Requirements" before starting installation. Leveling legs (4) B. Inlet hose with dryer if installing on a pedestal...dryer. Check existing electrical supply and venting. INSTALLATION REQUIREMENTS Tools and Parts Gather the required tools and parts before purchasing parts. Mobile home installations require metal exhaust system hardware available for installing new exhaust vent) ■ Tin snips (new vent installations) ■ ¼" nut driver (recommended) ■ Tape measure ■ Pliers Parts supplied Non-Steam Models Steam...
.... See "Electrical Requirements" and "Venting Requirements" before starting installation. Leveling legs (4) B. Inlet hose with dryer if installing on a pedestal...dryer. Check existing electrical supply and venting. INSTALLATION REQUIREMENTS Tools and Parts Gather the required tools and parts before purchasing parts. Mobile home installations require metal exhaust system hardware available for installing new exhaust vent) ■ Tin snips (new vent installations) ■ ¼" nut driver (recommended) ■ Tape measure ■ Pliers Parts supplied Non-Steam Models Steam...
Installation Instructions
Page 3
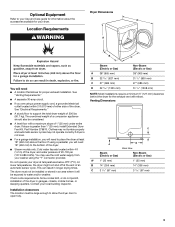
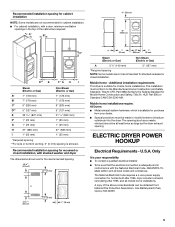
... cycle. Contact your dryer. Steam (Electric or Gas) A 38" (965 mm) B 32 9/16" (827 mm) C 27" (686 mm) D 52 9/16" (1335 mm) Non-Steam (Electric or Gas) 38" (965 mm) 31 1/2" (800 mm) 27" (686 mm) 51 1/2" (1308 mm) NOTE: Most installations require a minimum 5" (127 mm) clearance behind the dryer for proper exhaust installation. Optional Equipment Dryer Dimensions Refer to your...
... cycle. Contact your dryer. Steam (Electric or Gas) A 38" (965 mm) B 32 9/16" (827 mm) C 27" (686 mm) D 52 9/16" (1335 mm) Non-Steam (Electric or Gas) 38" (965 mm) 31 1/2" (800 mm) 27" (686 mm) 51 1/2" (1308 mm) NOTE: Most installations require a minimum 5" (127 mm) clearance behind the dryer for proper exhaust installation. Optional Equipment Dryer Dimensions Refer to your...
Installation Instructions
Page 4
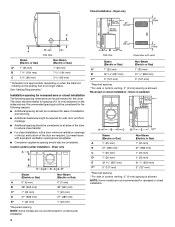
... a door, minimum ventilation openings in the top and bottom of installation and servicing. ■ Additional clearances might be considered. Dryer only A B C* D E* Steam (Electric or Gas) A 0" (0 mm) B 38" (965 mm) C* 1" (25 mm) D 27" (686 mm) E* 1" (25 mm) Non-Steam (Electric or Gas) 0" (0 mm) 38" (965 mm) 1" (25 mm) 27" (686 mm) 1" (25 mm) *Required spacing NOTE: Some models are...
... a door, minimum ventilation openings in the top and bottom of installation and servicing. ■ Additional clearances might be considered. Dryer only A B C* D E* Steam (Electric or Gas) A 0" (0 mm) B 38" (965 mm) C* 1" (25 mm) D 27" (686 mm) E* 1" (25 mm) Non-Steam (Electric or Gas) 0" (0 mm) 38" (965 mm) 1" (25 mm) 27" (686 mm) 1" (25 mm) *Required spacing NOTE: Some models are...
Installation Instructions
Page 5
... models are not recommended for cabinet installation. ■ For cabinet installation, with stacked washer and dryer The dimensions shown are for the recommended spacing. 48 in.2 * (310 cm2) 3"* (76 mm) 24 in.2 * (155 cm2) 3"* (76 mm) 1"* (25 mm) A* 1" 27" 1" (25 mm) (686 mm) (25 mm) Steam (Electric or Gas) Non-Steam (Electric or Gas) A 5 ½" (140 mm) 5" (127...
... models are not recommended for cabinet installation. ■ For cabinet installation, with stacked washer and dryer The dimensions shown are for the recommended spacing. 48 in.2 * (310 cm2) 3"* (76 mm) 24 in.2 * (155 cm2) 3"* (76 mm) 1"* (25 mm) A* 1" 27" 1" (25 mm) (686 mm) (25 mm) Steam (Electric or Gas) Non-Steam (Electric or Gas) A 5 ½" (140 mm) 5" (127...

Installation Instructions
Page 6
... a fuse in the neutral or grounding circuit. ■ Do not use with a 4-wire electrical supply connection, the neutral ground conductor must be connected to the neutral conductor (white wire) within the dryer. The neutral ground conductor is installed with clothes dryers. A timedelay fuse or circuit breaker is recommended. Connect to remaining 2 terminals (gold). The...
... a fuse in the neutral or grounding circuit. ■ Do not use with a 4-wire electrical supply connection, the neutral ground conductor must be connected to the neutral conductor (white wire) within the dryer. The neutral ground conductor is installed with clothes dryers. A timedelay fuse or circuit breaker is recommended. Connect to remaining 2 terminals (gold). The...

Installation Instructions
Page 7
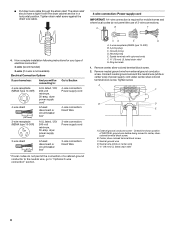
...terminal (silver). A B C D A. The strain relief should have a tight fit with the dryer cabinet and be connected to remaining 2 terminals (gold). Connect neutral wire (white or center wire)... to hold in place. Connect remaining 2 supply wires to green ground connector. Install strain relief. Strain relief tab pointing down , and hold the two clamp sections together. Be...and the other is inside the terminal block opening . Clamp section D. Securely tighten all electrical connections. Failure to do so can result in a horizontal position. Center, silver-colored ...
...terminal (silver). A B C D A. The strain relief should have a tight fit with the dryer cabinet and be connected to remaining 2 terminals (gold). Connect neutral wire (white or center wire)... to hold in place. Connect remaining 2 supply wires to green ground connector. Install strain relief. Strain relief tab pointing down , and hold the two clamp sections together. Be...and the other is inside the terminal block opening . Clamp section D. Securely tighten all electrical connections. Failure to do so can result in a horizontal position. Center, silver-colored ...
Installation Instructions
Page 8
A C B D E A. Now complete installation following instructions for your type of electrical connection: 4-wire (recommended) 3-wire (if 4-wire is required for mobile homes and where local codes do not permit the connection of 3-wire connections. Ground ... direct 5" (127 mm) 3-wire receptacle (NEMA type 10-30R) A fused disconnect or circuit breaker box* A UL listed, 120/ 240-volt minimum, 30-amp, dryer power supply cord* 4-wire connection: Direct Wire 3-wire connection: Power supply cord 3-wire direct (89 mm) A fused disconnect or circuit breaker box* 3-wire connection: Direct...
A C B D E A. Now complete installation following instructions for your type of electrical connection: 4-wire (recommended) 3-wire (if 4-wire is required for mobile homes and where local codes do not permit the connection of 3-wire connections. Ground ... direct 5" (127 mm) 3-wire receptacle (NEMA type 10-30R) A fused disconnect or circuit breaker box* A UL listed, 120/ 240-volt minimum, 30-amp, dryer power supply cord* 4-wire connection: Direct Wire 3-wire connection: Power supply cord 3-wire direct (89 mm) A fused disconnect or circuit breaker box* 3-wire connection: Direct...

