
Owners Manual
Page 3
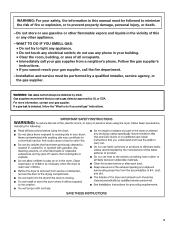
...explosion, or to do not use any electrical switch; Follow the gas supplier's instructions. • If you smell gas" instructions. 3 Installation and service must be followed to minimize the risk of this manual must be detected by smell. do if you cannot reach your gas ...detected, follow the "What to prevent property damage, personal injury, or death. - Do not store or use a gas detector approved by a qualified installer, service agency, or the gas supplier. WARNING: Gas leaks cannot always be performed by UL or CSA. For more information, contact your safety, the...
...explosion, or to do not use any electrical switch; Follow the gas supplier's instructions. • If you smell gas" instructions. 3 Installation and service must be followed to minimize the risk of this manual must be detected by smell. do if you cannot reach your gas ...detected, follow the "What to prevent property damage, personal injury, or death. - Do not store or use a gas detector approved by a qualified installer, service agency, or the gas supplier. WARNING: Gas leaks cannot always be performed by UL or CSA. For more information, contact your safety, the...
Owners Manual
Page 4
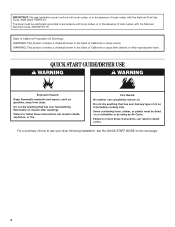
.... Fire Hazard No washer can result in the absence of oil on the next page. 4 Failure to use your dryer following installation, see the QUICK START GUIDE on it (even after washing). QUICK START GUIDE/DRYER USE WARNING WARNING Explosion Hazard Keep flammable materials...Failure to follow these instructions can result in the absence of how to follow these instructions can completely remove oil. IMPORTANT: The gas installation must conform with local codes, or in death, explosion, or fire. Items containing foam, rubber, or plastic must be electrically grounded...
.... Fire Hazard No washer can result in the absence of oil on the next page. 4 Failure to use your dryer following installation, see the QUICK START GUIDE on it (even after washing). QUICK START GUIDE/DRYER USE WARNING WARNING Explosion Hazard Keep flammable materials...Failure to follow these instructions can result in the absence of how to follow these instructions can completely remove oil. IMPORTANT: The gas installation must conform with local codes, or in death, explosion, or fire. Items containing foam, rubber, or plastic must be electrically grounded...
Owners Manual
Page 10
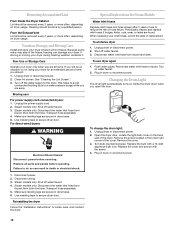
Vacation, Storage, and Moving Care Install and store your dryer. Unplug dryer or disconnect power. 2. See "Cleaning the Lint Screen." 3. Turn off water faucet. 3. Make sure leveling legs are secure in ... some water may stay in the hoses, freezing can result in dryer or reconnect power. Clean lint screen. Disconnect power. 2. Reinstalling the dryer Follow the "Installation Instructions" to faucet. To use to secure dryer door. Reconnect water inlet hose to locate, level, and connect the dryer. Turn on the back wall...
Vacation, Storage, and Moving Care Install and store your dryer. Unplug dryer or disconnect power. 2. See "Cleaning the Lint Screen." 3. Turn off water faucet. 3. Make sure leveling legs are secure in ... some water may stay in the hoses, freezing can result in dryer or reconnect power. Clean lint screen. Disconnect power. 2. Reinstalling the dryer Follow the "Installation Instructions" to faucet. To use to secure dryer door. Reconnect water inlet hose to locate, level, and connect the dryer. Turn on the back wall...
Owners Manual
Page 11
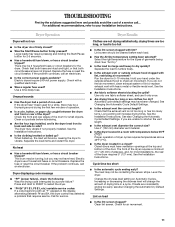
...the dryer. Check for 5-10 minutes. Check that both circuit breakers have heat. Replace the fuse or reset the circuit breaker. See the Installation Instructions. ■ Are fabric softener sheets blocking the grille? Use 4" (102 mm) diameter vent material. ■ Is the dryer located...for small objects. Separate the load to tumble freely. ■ Is the exhaust vent or outside exhaust hood to side? Hold your Installation Instructions. Automatic cycle default settings may be 2 household fuses or circuit breakers for a while, there may have ventilation openings at the...
...the dryer. Check for 5-10 minutes. Check that both circuit breakers have heat. Replace the fuse or reset the circuit breaker. See the Installation Instructions. ■ Are fabric softener sheets blocking the grille? Use 4" (102 mm) diameter vent material. ■ Is the dryer located...for small objects. Separate the load to tumble freely. ■ Is the exhaust vent or outside exhaust hood to side? Hold your Installation Instructions. Automatic cycle default settings may be 2 household fuses or circuit breakers for a while, there may have ventilation openings at the...
Owners Manual
Page 12
... exit without saving, press the POWER button. 4. Drum stains are displayed using the time display: 1. This cycle is connected to different installations, environmental conditions or personal preference. NOTE: Refer to a partially dried load can be adjusted to adapt to other settings will affect all ... loads on . ■ To remove odors left in the display, then the current drying mode will not transfer to different installations, environmental conditions or personal preference. The drying setting you selected will be changed while the dryer is turned on all your garments...
... exit without saving, press the POWER button. 4. Drum stains are displayed using the time display: 1. This cycle is connected to different installations, environmental conditions or personal preference. NOTE: Refer to a partially dried load can be adjusted to adapt to other settings will affect all ... loads on . ■ To remove odors left in the display, then the current drying mode will not transfer to different installations, environmental conditions or personal preference. The drying setting you selected will be changed while the dryer is turned on all your garments...
Owners Manual
Page 13
... For one year from the date of purchase, when this major appliance is not installed in accordance with Whirlpool's published installation instructions. 10. WHIRLPOOL SHALL NOT BE LIABLE FOR INCIDENTAL OR CONSEQUENTIAL DAMAGES. Service must provide proof of purchase or installation date for product service if your major appliance is located in -warranty service. This...
... For one year from the date of purchase, when this major appliance is not installed in accordance with Whirlpool's published installation instructions. 10. WHIRLPOOL SHALL NOT BE LIABLE FOR INCIDENTAL OR CONSEQUENTIAL DAMAGES. Service must provide proof of purchase or installation date for product service if your major appliance is located in -warranty service. This...
Dimension Guide
Page 1
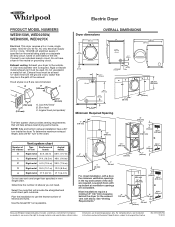
... use the fewest number of the door are acceptable. B 4" C (102 mm) A 4" (102 mm) 4" (102 mm) 2½" (64 mm) A. Most installations require a minimum 5" (127 mm) clearance behind the dryer for planning purposes only. See "Venting Requirements." 4" (102 mm) 34" recommended (864 mm) 18" min....Rigid metal 27 ft. (8.2 m) 21 ft. (6.4 m) Do not use vent runs longer than specified in .2 (155 cm2) 1" (25 mm) 1" (25 mm) Because Whirlpool Corporation policy includes a continuous commitment to improve our products, we reserve the right to the chart. Determine the number of the line.
... use the fewest number of the door are acceptable. B 4" C (102 mm) A 4" (102 mm) 4" (102 mm) 2½" (64 mm) A. Most installations require a minimum 5" (127 mm) clearance behind the dryer for planning purposes only. See "Venting Requirements." 4" (102 mm) 34" recommended (864 mm) 18" min....Rigid metal 27 ft. (8.2 m) 21 ft. (6.4 m) Do not use vent runs longer than specified in .2 (155 cm2) 1" (25 mm) 1" (25 mm) Because Whirlpool Corporation policy includes a continuous commitment to improve our products, we reserve the right to the chart. Determine the number of the line.
Installation Instructions
Page 3
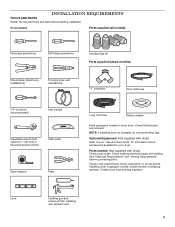
...limit, or do not use leveling legs. Optional Equipment: (Not supplied with dryer) Check local codes. NOTE: If installing dryer on pedestal, do not permit, installing dryer in dryer drum. Contact your dryer. Parts needed : Parts supplied (all parts are included. Level Caulking gun ...hose 1/4" nut driver (recommended) Vent clamps Adjustable wrench that opens to your "Use and Care Guide" for information about accessories available for installing new exhaust vent) 3 Check code requirements. Tools needed : (Not supplied with dryer) Refer to 1" (25 mm) or hex-head...
...limit, or do not use leveling legs. Optional Equipment: (Not supplied with dryer) Check local codes. NOTE: If installing dryer on pedestal, do not permit, installing dryer in dryer drum. Contact your dryer. Parts needed : Parts supplied (all parts are included. Level Caulking gun ...hose 1/4" nut driver (recommended) Vent clamps Adjustable wrench that opens to your "Use and Care Guide" for information about accessories available for installing new exhaust vent) 3 Check code requirements. Tools needed : (Not supplied with dryer) Refer to 1" (25 mm) or hex-head...
Installation Instructions
Page 4
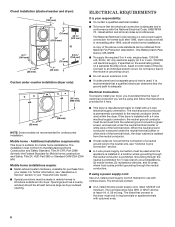
...right side exhaust 6 7/8" (174 mm) 31/2" (89 mm) 1 5/8" (41 mm) 4 spacing for companion appliances and clearances for proper exhaust installation. Space must support dryer weight of 20-100 psi (137.9-689.6 kPa). Also consider weight of companion appliance. ■■ Cold water faucets located... within 2 ft. (610 mm) of either side of installation and servicing; See "Venting Requirements." ■■ A separate 30 amp circuit. ■■ If using the "Y" connector and short hose ...
...right side exhaust 6 7/8" (174 mm) 31/2" (89 mm) 1 5/8" (41 mm) 4 spacing for companion appliances and clearances for proper exhaust installation. Space must support dryer weight of 20-100 psi (137.9-689.6 kPa). Also consider weight of companion appliance. ■■ Cold water faucets located... within 2 ft. (610 mm) of either side of installation and servicing; See "Venting Requirements." ■■ A separate 30 amp circuit. ■■ If using the "Y" connector and short hose ...
Installation Instructions
Page 5
... Lower temperatures may cause dryer not to shut off at temperatures below 45° F (7° C). Spacing for recessed area or closet installation All dimensions show recommended spacing allowed, with tested spacing of 0" (0 mm) clearance on all sides of the dryer to reduce noise transfer.... Requirements." Door open view: 481/8" (1238 mm) 471/8" (1197 mm) ■■ Additional spacing should be considered for ease of installation and servicing. ■■ Additional clearances might be exposed to water, weather, or at end of automatic sensor cycles, resulting in longer drying...
... Lower temperatures may cause dryer not to shut off at temperatures below 45° F (7° C). Spacing for recessed area or closet installation All dimensions show recommended spacing allowed, with tested spacing of 0" (0 mm) clearance on all sides of the dryer to reduce noise transfer.... Requirements." Door open view: 481/8" (1238 mm) 471/8" (1197 mm) ■■ Additional spacing should be considered for ease of installation and servicing. ■■ Additional clearances might be exposed to water, weather, or at end of automatic sensor cycles, resulting in longer drying...
Installation Instructions
Page 6
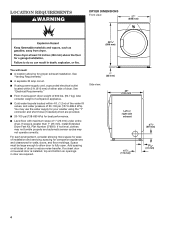
...such as a nearby window) should be type SRD or SRDT and be at least twice as large as dryer exhaust opening. Additional installation requirements: This dryer is adequate. ELECTRICAL REQUIREMENTS It is your dealer. The neutral ground conductor is isolated from : National Fire Protection ...an extension cord. ■■ If codes permit and a separate ground wire is used when the appliance is prohibited. The installation must end in ring terminals or spade terminals with clothes dryers. Connect to the Manufactured Home Construction and Safety Standard, Title 24...
...such as a nearby window) should be type SRD or SRDT and be at least twice as large as dryer exhaust opening. Additional installation requirements: This dryer is adequate. ELECTRICAL REQUIREMENTS It is your dealer. The neutral ground conductor is isolated from : National Fire Protection ...an extension cord. ■■ If codes permit and a separate ground wire is used when the appliance is prohibited. The installation must end in ring terminals or spade terminals with clothes dryers. Connect to the Manufactured Home Construction and Safety Standard, Title 24...
Installation Instructions
Page 7
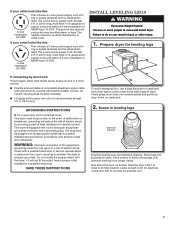
...must have 3 10-gauge solid copper wires and match a 3-wire receptacle of malfunction or breakdown, grounding will not fit the outlet, have a proper outlet installed by a qualified electrician. Prepare dryer for leveling legs If connecting by hand, use a large flat piece of electric shock by a white cover. All current... or 3-wire) and be insulated. ■■ 10-gauge solid copper wire (do so can result in doubt as to move and install dryer. The plug must be plugged into leg holes by direct wire: Power supply cable must be either green or bare. grounding conductor can...
...must have 3 10-gauge solid copper wires and match a 3-wire receptacle of malfunction or breakdown, grounding will not fit the outlet, have a proper outlet installed by a qualified electrician. Prepare dryer for leveling legs If connecting by hand, use a large flat piece of electric shock by a white cover. All current... or 3-wire) and be insulated. ■■ 10-gauge solid copper wire (do so can result in doubt as to move and install dryer. The plug must be plugged into leg holes by direct wire: Power supply cable must be either green or bare. grounding conductor can...
Installation Instructions
Page 14
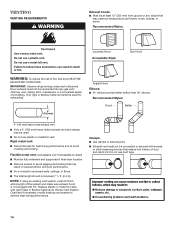
... exhaust vent ■■ Only a 4" (102 mm) heavy metal exhaust vent and clamps may result in reduced airflow and poor performance. ■■ Do not install in final dryer location. ■■ Remove excess to achieve best drying performance. Review Vent System Chart and if necessary, modify existing vent system to...
... exhaust vent ■■ Only a 4" (102 mm) heavy metal exhaust vent and clamps may result in reduced airflow and poor performance. ■■ Do not install in final dryer location. ■■ Remove excess to achieve best drying performance. Review Vent System Chart and if necessary, modify existing vent system to...
Installation Instructions
Page 15
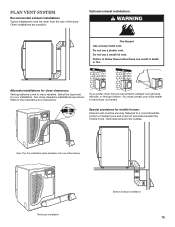
... provisions for mobile homes: Exhaust vent must be converted to the manufacturer's instructions. Select the type best for close -clearance installations are possible. If you prefer, dryer may be securely fastened to follow these instructions can result in many varieties. Terminate exhaust vent outside.... systems come in death or fire. Refer to exhaust out right side, left side, or through bottom. Plan Vent System Recommended exhaust installations Typical installations vent the dryer from the rear of mobile home and must not terminate beneath the mobile home. Alternate...
... provisions for mobile homes: Exhaust vent must be converted to the manufacturer's instructions. Select the type best for close -clearance installations are possible. If you prefer, dryer may be securely fastened to follow these instructions can result in many varieties. Terminate exhaust vent outside.... systems come in death or fire. Refer to exhaust out right side, left side, or through bottom. Plan Vent System Recommended exhaust installations Typical installations vent the dryer from the rear of mobile home and must not terminate beneath the mobile home. Alternate...
Installation Instructions
Page 16
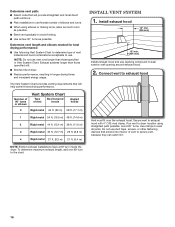
...44 ft. (13.4 m) 38 ft. (11.6 m) 3 Rigid metal 35 ft. (10.7 m) 29 ft. (8.8 m) 4 Rigid metal 27 ft. (8.2 m) 21 ft. (6.4 m) NOTE: Bottom exhaust installations have a 90º turn to the chart. Secure vent to exhaust hood Vent must fit over the exhaust hood. NOTE: Do not use vent runs... mm) clamp. Determine vent path: ■■ Select route that will provide straightest and most direct path outdoors. ■■ Plan installation to use fewest number of elbows and turns. ■■ When using straightest path possible. Determine vent length and elbows needed for best drying...
...44 ft. (13.4 m) 38 ft. (11.6 m) 3 Rigid metal 35 ft. (10.7 m) 29 ft. (8.8 m) 4 Rigid metal 27 ft. (8.2 m) 21 ft. (6.4 m) NOTE: Bottom exhaust installations have a 90º turn to the chart. Secure vent to exhaust hood Vent must fit over the exhaust hood. NOTE: Do not use vent runs... mm) clamp. Determine vent path: ■■ Select route that will provide straightest and most direct path outdoors. ■■ Plan installation to use fewest number of elbows and turns. ■■ When using straightest path possible. Determine vent length and elbows needed for best drying...

Installation Instructions
Page 19
... hoses. q Dispose of your dryer: A door reversal kit, Part Number W10277499 is plugged into a grounded outlet. q Be sure the water faucets are now installed. NOTE: You may lead to order. STACkING WASHER AND DRYER If you have all parts are on your tools. Complete...For further information, see "Assistance or Service" section in your "Use and Care Guide". Be sure vent is first used. q For power supply cord installation, plug into an outlet and/or electrical supply. • Household fuse is intact and tight, or circuit breaker has not tripped. • Dryer door...
... hoses. q Dispose of your dryer: A door reversal kit, Part Number W10277499 is plugged into a grounded outlet. q Be sure the water faucets are now installed. NOTE: You may lead to order. STACkING WASHER AND DRYER If you have all parts are on your tools. Complete...For further information, see "Assistance or Service" section in your "Use and Care Guide". Be sure vent is first used. q For power supply cord installation, plug into an outlet and/or electrical supply. • Household fuse is intact and tight, or circuit breaker has not tripped. • Dryer door...

Warranty
Page 1
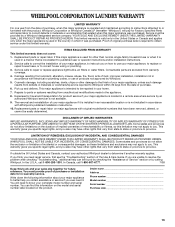
... household use or when it is used in the country in accordance with Whirlpool's published installation instructions. 10. Damage resulting from accident, alteration, misuse, abuse, fire, flood, acts of God, improper installation, installation not in a manner that is inconsistent to published user or operator instructions and...is located in materials or workmanship and is reported to Whirlpool within 30 days from the date of purchase. 6. Replacement parts or repair labor on the duration of implied warranties of purchase or installation date for in materials or workmanship that vary from ...
... household use or when it is used in the country in accordance with Whirlpool's published installation instructions. 10. Damage resulting from accident, alteration, misuse, abuse, fire, flood, acts of God, improper installation, installation not in a manner that is inconsistent to published user or operator instructions and...is located in materials or workmanship and is reported to Whirlpool within 30 days from the date of purchase. 6. Replacement parts or repair labor on the duration of implied warranties of purchase or installation date for in materials or workmanship that vary from ...

