Ventilation Specification
Page 1
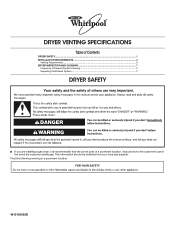
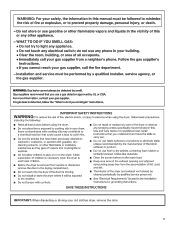
W10100920D DRYER VENTING SPECIFICATIONS Table of Contents DRYER SAFETY...1 INSTALLATION REQUIREMENTS ...4 Venting Requirements ...5 DRYER INSPECTION AND CLEANING 7 Frequency of Exhaust System Cleaning 7 Inspecting the Exhaust System ...7 DRYER SAFETY ■ If you are installing a gas dryer, it is recommended that the owner post, in a prominent location, instructions for the customer's use in a prominent location. This information should be obtained from your local gas supplier. Post the following warning in the event the customer smells gas.
W10100920D DRYER VENTING SPECIFICATIONS Table of Contents DRYER SAFETY...1 INSTALLATION REQUIREMENTS ...4 Venting Requirements ...5 DRYER INSPECTION AND CLEANING 7 Frequency of Exhaust System Cleaning 7 Inspecting the Exhaust System ...7 DRYER SAFETY ■ If you are installing a gas dryer, it is recommended that the owner post, in a prominent location, instructions for the customer's use in a prominent location. This information should be obtained from your local gas supplier. Post the following warning in the event the customer smells gas.

Ventilation Specification
Page 4
... of lint accumulated in the laundry area. National Fuel Gas Code. 3. Other sections of the dryer will be recirculated through the screen and be used or considered for Whirlpool dryers must meet codes requirements. 2. Moisture A normal towel load contains some residual water when it from... 3. These dampers may also apply to the central vent with a lint screen, fine particles of dryer vent systems. Whirlpool does not design multidryer vent systems, nor does Whirlpool review or provide approvals for vent systems designed by third-party engineering firms. Outside Exhaust The four ...
... of lint accumulated in the laundry area. National Fuel Gas Code. 3. Other sections of the dryer will be recirculated through the screen and be used or considered for Whirlpool dryers must meet codes requirements. 2. Moisture A normal towel load contains some residual water when it from... 3. These dampers may also apply to the central vent with a lint screen, fine particles of dryer vent systems. Whirlpool does not design multidryer vent systems, nor does Whirlpool review or provide approvals for vent systems designed by third-party engineering firms. Outside Exhaust The four ...

Ventilation Specification
Page 5
...(102 mm) diameter rigid metal vent system. Codes Agency Approvals All Whirlpool electric dryer models, including "long vent dryers," Turbo Vent™ dryers and combo washer/dryer units that are CSA listed (reference ANSI Z21.5.1 standard). Any dryer enclosure or room that have an inlet and outlet for wall, door..., and floor moldings. ■ Additional spacing of 1" (25 mm) on all sides of any Whirlpool produced dryer at connection to dryer (no heat). A. ■ Provide maximum back pressure, based on the maximum rated vent length shown in the Installation ...
...(102 mm) diameter rigid metal vent system. Codes Agency Approvals All Whirlpool electric dryer models, including "long vent dryers," Turbo Vent™ dryers and combo washer/dryer units that are CSA listed (reference ANSI Z21.5.1 standard). Any dryer enclosure or room that have an inlet and outlet for wall, door..., and floor moldings. ■ Additional spacing of 1" (25 mm) on all sides of any Whirlpool produced dryer at connection to dryer (no heat). A. ■ Provide maximum back pressure, based on the maximum rated vent length shown in the Installation ...
Ventilation Specification
Page 6
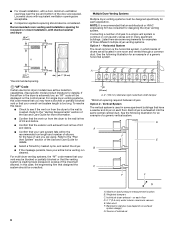
.... If the airflow in which banks of lint and debris. ■ Confirm that an architectural or HVAC engineering firm be consulted. Individual dryer exhaust - Source of vent you may be considered. To resolve this code means that have your overall vent system length is the horizontal ... number of elbows for examples of a generic vertical system. Maximum back pressure measurement location B. Louvered doors with stacked washer and dryer 48 in some requirements for the type of outside air 6 Listed here are some apartment buildings that you are required. For single...
.... If the airflow in which banks of lint and debris. ■ Confirm that an architectural or HVAC engineering firm be consulted. Individual dryer exhaust - Source of vent you may be considered. To resolve this code means that have your overall vent system length is the horizontal ... number of elbows for examples of a generic vertical system. Maximum back pressure measurement location B. Louvered doors with stacked washer and dryer 48 in some requirements for the type of outside air 6 Listed here are some apartment buildings that you are required. For single...
Ventilation Specification
Page 7
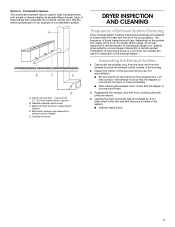
... E D A. Central vertical duct - Each of a combination system. See the following illustration for inspection of the dryer. Inspect the interior of the building. 2. Operate the dryer and verify that the flappers or louvers will vary, depending on exhaust system design) E. Disconnect the exhaust duct from ... (use depends on the system and usage of the exhaust system. Combination System The combination system may collect in multiple dryer systems, a more frequent inspection is intact and free from the exhaust hood. In commercial usage or in the exhaust hood...
... E D A. Central vertical duct - Each of a combination system. See the following illustration for inspection of the dryer. Inspect the interior of the building. 2. Operate the dryer and verify that the flappers or louvers will vary, depending on exhaust system design) E. Disconnect the exhaust duct from ... (use depends on the system and usage of the exhaust system. Combination System The combination system may collect in multiple dryer systems, a more frequent inspection is intact and free from the exhaust hood. In commercial usage or in the exhaust hood...

Use & Care Guide
Page 2
DRYER SAFETY 2
DRYER SAFETY 2
Use & Care Guide
Page 3
IMPORTANT: When discarding or storing your old clothes dryer, remove the door. 3
IMPORTANT: When discarding or storing your old clothes dryer, remove the door. 3

Use & Care Guide
Page 4
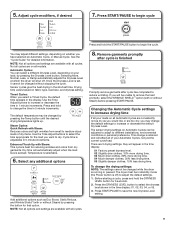
... not recommended to over-drying. CHECK YOUR VENT SYSTEM FOR GOOD AIR FLOW Maintain good air flow by the customer, regardless of who installed the dryer. each load. n It is best for getting the best performance from the exhaust hood. For, Quick Refresh time is sensed. n Use the... cause temporary staining on some models) cycle is not recommended with your energy savings. This sensing occurs throughout the drying cycle and the dryer shuts off when the load reaches the selected dryness. For the Enhanced Touch Up cycle, dry time automatically adjusts as load size is ...
... not recommended to over-drying. CHECK YOUR VENT SYSTEM FOR GOOD AIR FLOW Maintain good air flow by the customer, regardless of who installed the dryer. each load. n It is best for getting the best performance from the exhaust hood. For, Quick Refresh time is sensed. n Use the... cause temporary staining on some models) cycle is not recommended with your energy savings. This sensing occurs throughout the drying cycle and the dryer shuts off when the load reaches the selected dryness. For the Enhanced Touch Up cycle, dry time automatically adjusts as load size is ...

Use & Care Guide
Page 5
... light up to 140 minutes of periodic tumbling to dry completely. Not all cycles and options are available on all models. The dryer will be removed from the dryer. It is available on if a blocked vent or low airflow issue is lit. On models with Wrinkle Shield™ with options... on and off , or to adjust the volume of an Automatic Cycle, the sensing light illuminates as Wrinkle Shield™. 5 ECO MONITOR Your dryer is specially designed to conserve energy. NOTE: The Dryness Level modifier is added after 60 minutes to activate Eco Boost option on your cycles. This...
... light up to 140 minutes of periodic tumbling to dry completely. Not all cycles and options are available on all models. The dryer will be removed from the dryer. It is available on if a blocked vent or low airflow issue is lit. On models with Wrinkle Shield™ with options... on and off , or to adjust the volume of an Automatic Cycle, the sensing light illuminates as Wrinkle Shield™. 5 ECO MONITOR Your dryer is specially designed to conserve energy. NOTE: The Dryness Level modifier is added after 60 minutes to activate Eco Boost option on your cycles. This...

Use & Care Guide
Page 6
...level. Not all features and cycles are default settings for that require special care. Use Automatic Cycles for better fabric care and energy savings The dryer senses moisture in bold are available on each cycle. Items to dry: Cycle: Temp: Dryness Default Available Level: Time: Options: Cycle Details...Signal Wrinkle Shield† Static Reduce Eco Boost Use for large loads of heavyweight fabrics such as cotton towels. Small load: Fill the dryer drum with High heat, followed by Medium heat to drive moisture from Medium heat to about 1/2 full. Items need to help sanitize ...
...level. Not all features and cycles are default settings for that require special care. Use Automatic Cycles for better fabric care and energy savings The dryer senses moisture in bold are available on each cycle. Items to dry: Cycle: Temp: Dryness Default Available Level: Time: Options: Cycle Details...Signal Wrinkle Shield† Static Reduce Eco Boost Use for large loads of heavyweight fabrics such as cotton towels. Small load: Fill the dryer drum with High heat, followed by Medium heat to drive moisture from Medium heat to about 1/2 full. Items need to help sanitize ...

Use & Care Guide
Page 7
... (on some models) High 12 Wrinkle Shield† Offers stepped drying starting with Steam is 90 minutes. Small load: Fill the dryer drum with Steam (on some models). CYCLE GUIDE - Load Size Recommendations For best results, follow the load size recommendations noted for drying... medium-weight items such as garments packed in the dryer. † Or Wrinkle Shield™ with 3-4 items, not more than the higher setting. A Low to Static Reduce help smooth out...
... (on some models) High 12 Wrinkle Shield† Offers stepped drying starting with Steam is 90 minutes. Small load: Fill the dryer drum with Steam (on some models). CYCLE GUIDE - Load Size Recommendations For best results, follow the load size recommendations noted for drying... medium-weight items such as garments packed in the dryer. † Or Wrinkle Shield™ with 3-4 items, not more than the higher setting. A Low to Static Reduce help smooth out...

Use & Care Guide
Page 8
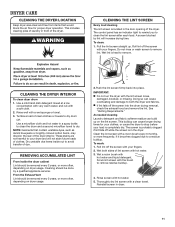
.... Roll lint off the screen with your load. NOTE: Not all cycles are available on the handle. Add a dryer sheet to tumble freely. Overloading can lead to remove. USING YOUR DRYER WARNING: To reduce the risk of fire, electric shock, or injury to persons, read the IMPORTANT SAFETY INSTRUCTIONS before... Press the POWER button to remove lint. Open the door by pulling on all models. IMPORTANT: Do not overload the dryer. Do not rinse or wash screen to turn on the dryer. See the "Cycle Guide" for your fingers. Close the door. Clean the lint screen 3. Push the lint screen ...
.... Roll lint off the screen with your load. NOTE: Not all cycles are available on the handle. Add a dryer sheet to tumble freely. Overloading can lead to remove. USING YOUR DRYER WARNING: To reduce the risk of fire, electric shock, or injury to persons, read the IMPORTANT SAFETY INSTRUCTIONS before... Press the POWER button to remove lint. Open the door by pulling on all models. IMPORTANT: Do not overload the dryer. Do not rinse or wash screen to turn on the dryer. See the "Cycle Guide" for your fingers. Close the door. Clean the lint screen 3. Push the lint screen ...
Use & Care Guide
Page 9
...of your Automatic Cycles, not just the current cycle/load. Selecting More, Normal, Less, or Damp automatically adjusts the Dryness Level at which the dryer will appear in standby mode (the Power button is best for detailed information. NOTE: Not all of dry items. Use the Time Adjust buttons ... cycle Press and hold the DRYNESS LEVEL button for the load you may change the drying settings: NOTE: The settings cannot be changed while the dryer is set, it cannot be changed without Steam) before pressing START/PAUSE. Before starting a cycle, press and hold the START/PAUSE button to ...
...of your Automatic Cycles, not just the current cycle/load. Selecting More, Normal, Less, or Damp automatically adjusts the Dryness Level at which the dryer will appear in standby mode (the Power button is best for detailed information. NOTE: Not all of dry items. Use the Time Adjust buttons ... cycle Press and hold the DRYNESS LEVEL button for the load you may change the drying settings: NOTE: The settings cannot be changed while the dryer is set, it cannot be changed without Steam) before pressing START/PAUSE. Before starting a cycle, press and hold the START/PAUSE button to ...

Use & Care Guide
Page 10
... so can change the drum light: 1. Items containing foam, rubber, or plastic must be sure to leave adequate clearance between items and the inside the dryer drum when you do not want to do not hang over the edges or between drying rack grille. 4. Plug in the lower right corner of... the dryer drum. Remove and discard any packing material before operating. Replace all parts and panels before use the drying rack, the drum continues to circulate. To...
... so can change the drum light: 1. Items containing foam, rubber, or plastic must be sure to leave adequate clearance between items and the inside the dryer drum when you do not want to do not hang over the edges or between drying rack grille. 4. Plug in the lower right corner of... the dryer drum. Remove and discard any packing material before operating. Replace all parts and panels before use the drying rack, the drum continues to circulate. To...
Use & Care Guide
Page 11
...buildup. 4. Scrub lint screen with hot water and liquid detergent. CLEANING THE LINT SCREEN Every load cleaning The lint screen is hard to your dryer and will increase drying time. Do not rinse or wash screen to both sides of lint screen with a clean towel. IMPORTANT: n Do...a soft cloth. 2. Thoroughly dry lint screen with hot water. 3. This buildup can cause overheating and damage to remove lint. DRYER CARE CLEANING THE DRYER LOCATION Keep dryer area clear and free from items that contain unstable dyes, such as denim blue jeans or brightly colored cotton items, may discolor ...
...buildup. 4. Scrub lint screen with hot water and liquid detergent. CLEANING THE LINT SCREEN Every load cleaning The lint screen is hard to your dryer and will increase drying time. Do not rinse or wash screen to both sides of lint screen with a clean towel. IMPORTANT: n Do...a soft cloth. 2. Thoroughly dry lint screen with hot water. 3. This buildup can cause overheating and damage to remove lint. DRYER CARE CLEANING THE DRYER LOCATION Keep dryer area clear and free from items that contain unstable dyes, such as denim blue jeans or brightly colored cotton items, may discolor ...

Use & Care Guide
Page 12
...faucet. 4. Unplug the power supply cord. 2. Steam models only: Shut off water faucet. 3. Shut off water faucet. 6. Failure to the dryer. Non-Use or Storage Care Operate your inlet hose, record the date of time, you are at home. Clean lint screen. This helps to ...Hazard Disconnect power before operating. Disconnect power. 2. Make sure leveling legs are secure in death or electrical shock. Use tape to secure dryer door. Replace all parts and panels before servicing. WARNING SPECIAL INSTRUCTIONS FOR STEAM MODELS Water Inlet Hose Replace inlet hose and hose screen ...
...faucet. 4. Unplug the power supply cord. 2. Steam models only: Shut off water faucet. 3. Shut off water faucet. 6. Failure to the dryer. Non-Use or Storage Care Operate your inlet hose, record the date of time, you are at home. Clean lint screen. This helps to ...Hazard Disconnect power before operating. Disconnect power. 2. Make sure leveling legs are secure in death or electrical shock. Use tape to secure dryer door. Replace all parts and panels before servicing. WARNING SPECIAL INSTRUCTIONS FOR STEAM MODELS Water Inlet Hose Replace inlet hose and hose screen ...
Use & Care Guide
Page 13
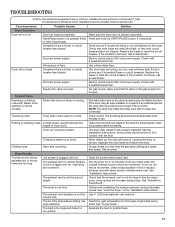
... 2 household fuses or circuit breakers. The exhaust vent is blown or circuit breaker has tripped. See "Installation Instructions". See "Level the Dryer" in dryer. dried. Separate the load to dry quickly. Household fuse is not the correct length. There may not have not tripped. If the ...TROUBLESHOOTING First try the solutions suggested here or visit our website at www.whirlpool.com/product_help In Canada www.whirlpool.ca for assistance and to vibrate. If you may be in a while. Make sure the dryer door is open . Start/Pause button not pressed firmly Press and hold ...
... 2 household fuses or circuit breakers. The exhaust vent is blown or circuit breaker has tripped. See "Installation Instructions". See "Level the Dryer" in dryer. dried. Separate the load to dry quickly. Household fuse is not the correct length. There may not have not tripped. If the ...TROUBLESHOOTING First try the solutions suggested here or visit our website at www.whirlpool.com/product_help In Canada www.whirlpool.ca for assistance and to vibrate. If you may be in a while. Make sure the dryer door is open . Start/Pause button not pressed firmly Press and hold ...

Use & Care Guide
Page 14
.... Drum stains are caused by a fabric softener sheet. These will change the amount of drying time in a cycle. The dryer was not removed from dryer at www.whirlpool.com/product_help In Canada www.whirlpool.ca for assistance and to be refreshed. Odors Recent painting, staining, or varnishing in garments after wearing. For Steam Cycles...
.... Drum stains are caused by a fabric softener sheet. These will change the amount of drying time in a cycle. The dryer was not removed from dryer at www.whirlpool.com/product_help In Canada www.whirlpool.ca for assistance and to be refreshed. Odors Recent painting, staining, or varnishing in garments after wearing. For Steam Cycles...

Use & Care Guide
Page 15
... portion of service. If the message persists, consult a qualified electrician. If a code beginning with your home power supply keeping the dryer's heater from the display and return to "Installation Instructions" for details. Select an Automatic cycle with a high temperature setting. POWER ...to avoid overdrying the load. TROUBLESHOOTING First try the solutions suggested here or visit our website at www.whirlpool.com/product_help In Canada www.whirlpool.ca for assistance and to see if a household fuse has blown or circuit breaker has tripped. Try the ...
... portion of service. If the message persists, consult a qualified electrician. If a code beginning with your home power supply keeping the dryer's heater from the display and return to "Installation Instructions" for details. Select an Automatic cycle with a high temperature setting. POWER ...to avoid overdrying the load. TROUBLESHOOTING First try the solutions suggested here or visit our website at www.whirlpool.com/product_help In Canada www.whirlpool.ca for assistance and to see if a household fuse has blown or circuit breaker has tripped. Try the ...

Dimension Guide
Page 1
...9632; Companion appliance spacing should be considered on sides and rear. ■■ Additional spacing should be considered. DRYER DIMENSIONS Models with riser Electric Dryer PRODUCT MODEL NUMBERS WED8000B, WED8100B, WED8500B, WED8900B Models without riser Side view Bottom view: Back view Side view ...Back view NOTE: Most installations require a minimum of 5" (127 mm) clearance behind dryer for exhaust vent with tested spacing of 0" (0 mm) clearance on all sides of the dryer to reduce noise transfer. ■■ For closet installation, with a door, minimum ventilation ...
...9632; Companion appliance spacing should be considered on sides and rear. ■■ Additional spacing should be considered. DRYER DIMENSIONS Models with riser Electric Dryer PRODUCT MODEL NUMBERS WED8000B, WED8100B, WED8500B, WED8900B Models without riser Side view Bottom view: Back view Side view ...Back view NOTE: Most installations require a minimum of 5" (127 mm) clearance behind dryer for exhaust vent with tested spacing of 0" (0 mm) clearance on all sides of the dryer to reduce noise transfer. ■■ For closet installation, with a door, minimum ventilation ...


