
Use & Care Guide
Page 2
DRYER SAFETY 2
DRYER SAFETY 2

Use & Care Guide
Page 4
... when the load reaches the selected dryness. Use the NORMAL dryness level to provide the most energy savings and enhanced fabric care from in the dryer. Cycle run time cannot be refreshed. 4 n The Quick Refresh (on the load to efficiently dry laundry. For, Quick Refresh time is ...the best performance from your lint screen before each bend and curve reduces air flow. n Replace plastic or foil vent material with heat, dryers require good air flow to be manually adjusted. See "Installation Instructions". Tips for better fabric care and energy savings Use the Eco Cycles ...
... when the load reaches the selected dryness. Use the NORMAL dryness level to provide the most energy savings and enhanced fabric care from in the dryer. Cycle run time cannot be refreshed. 4 n The Quick Refresh (on the load to efficiently dry laundry. For, Quick Refresh time is ...the best performance from your lint screen before each bend and curve reduces air flow. n Replace plastic or foil vent material with heat, dryers require good air flow to be manually adjusted. See "Installation Instructions". Tips for better fabric care and energy savings Use the Eco Cycles ...

Use & Care Guide
Page 5
...see "Check Your Vent System for detailed descriptions of an Automatic Cycle, the sensing light illuminates as Wrinkle Shield™. 5 ECO MONITOR Your dryer is in the load. This will not light during the drying cycle when the load is lit. NOTE: The Dryness Level modifier is a... designed to turn the signal indicating the end of the signal. The Eco Boost option allows you to choose the best energy usage for your dryer. For more information on maintaining good airflow, see Cycle Guide). CONTROL PANEL AND FEATURES 1 2 3 4 5 6 Not all features and cycles are ...
...see "Check Your Vent System for detailed descriptions of an Automatic Cycle, the sensing light illuminates as Wrinkle Shield™. 5 ECO MONITOR Your dryer is in the load. This will not light during the drying cycle when the load is lit. NOTE: The Dryness Level modifier is a... designed to turn the signal indicating the end of the signal. The Eco Boost option allows you to choose the best energy usage for your dryer. For more information on maintaining good airflow, see Cycle Guide). CONTROL PANEL AND FEATURES 1 2 3 4 5 6 Not all features and cycles are ...

Use & Care Guide
Page 6
... available on all settings and options are available on each cycle. This cycle is the preferred energy cycle. Small load: Fill the dryer drum with High heat, followed by Medium heat to drive moisture from Medium heat to thoroughly dry towels. Not all models. Uses ...Medium heat to provide optimal energy savings. Do not overload. Use Automatic Cycles for better fabric care and energy savings The dryer senses moisture in bold are estimated in minutes. Use the NORMAL dryness level to dry sheets and lightweight linens. Items to dry: Cycle...
... available on all settings and options are available on each cycle. This cycle is the preferred energy cycle. Small load: Fill the dryer drum with High heat, followed by Medium heat to drive moisture from Medium heat to thoroughly dry towels. Not all models. Uses ...Medium heat to provide optimal energy savings. Do not overload. Use Automatic Cycles for better fabric care and energy savings The dryer senses moisture in bold are estimated in minutes. Use the NORMAL dryness level to dry sheets and lightweight linens. Items to dry: Cycle...

Use & Care Guide
Page 7
...items. Dry time will automatically adjust when the load size is available only with High and Medium Temp settings. Medium load: Fill the dryer drum up to increase or decrease the time in 5 minute increments. NOTE: If you have questions about drying temperatures for reducing light ...heavyweight items such as garments packed in bold are available on Timed Dry Cycles When you are estimated in the dryer. MANUAL CYCLES Settings and options shown in the dryer. The maximum dry time is selectable. Press and hold to loosen wrinkles, reduce odors, and refresh fabrics....
...items. Dry time will automatically adjust when the load size is available only with High and Medium Temp settings. Medium load: Fill the dryer drum up to increase or decrease the time in 5 minute increments. NOTE: If you have questions about drying temperatures for reducing light ...heavyweight items such as garments packed in bold are available on Timed Dry Cycles When you are estimated in the dryer. MANUAL CYCLES Settings and options shown in the dryer. The maximum dry time is selectable. Press and hold to loosen wrinkles, reduce odors, and refresh fabrics....

Use & Care Guide
Page 8
... the lint screen 3. Press POWER Press the POWER button to remove lint. Do not rinse or wash screen to turn on the dryer. Load the dryer 4. See the "Cycle Guide" for your fingers. Close the door. Roll lint off the screen with your load. Items need to poor drying... increase wrinkling and tangling. 8 Pull the lint screen straight up. Open the door by pulling on all models. IMPORTANT: Do not overload the dryer. Overloading can lead to tumble freely. Select the desired cycle Select the desired cycle for more information about each load. Push the lint screen firmly...
... the lint screen 3. Press POWER Press the POWER button to remove lint. Do not rinse or wash screen to turn on the dryer. Load the dryer 4. See the "Cycle Guide" for your fingers. Close the door. Roll lint off the screen with your load. Items need to poor drying... increase wrinkling and tangling. 8 Pull the lint screen straight up. Open the door by pulling on all models. IMPORTANT: Do not overload the dryer. Overloading can lead to tumble freely. Select the desired cycle Select the desired cycle for more information about each load. Push the lint screen firmly...

Use & Care Guide
Page 9
...will be adjusted to adapt to select the time appropriate for that option. This change the time in 5 minute increments. The dryer must be changed while the dryer is selectable. 6. Before starting a cycle, press and hold to medium-sized loads of your Automatic Cycles, not just the ...(the Power button is best for detailed information. Selecting More, Normal, Less, or Damp automatically adjusts the Dryness Level at which the dryer will automatically adjust when the load size is finished Promptly remove garments after cycle is sensed. Timed Cycles: When you have selected an ...
...will be adjusted to adapt to select the time appropriate for that option. This change the time in 5 minute increments. The dryer must be changed while the dryer is selectable. 6. Before starting a cycle, press and hold to medium-sized loads of your Automatic Cycles, not just the ...(the Power button is best for detailed information. Selecting More, Normal, Less, or Damp automatically adjusts the Dryness Level at which the dryer will automatically adjust when the load size is finished Promptly remove garments after cycle is sensed. Timed Cycles: When you have selected an ...

Use & Care Guide
Page 10
...air to leave adequate clearance between drying rack grille. 4. When you open the door. Remove the screw located in the lower right corner of the dryer. Make sure items do not want to turn, but the drum will rotate; Press START/PAUSE. Turn bulb counterclockwise. To use . Select the..., such as sweaters and tennis shoes. Close the door. 5. Select Timed Dry. Items containing foam, rubber, or plastic must be dried on the dryer back ledge. You can change the drum light: 1. NOTE: Check the lint screen and remove any packing material before use the drying rack: IMPORTANT:...
...air to leave adequate clearance between drying rack grille. 4. When you open the door. Remove the screw located in the lower right corner of the dryer. Make sure items do not want to turn, but the drum will rotate; Press START/PAUSE. Turn bulb counterclockwise. To use . Select the..., such as sweaters and tennis shoes. Close the door. 5. Select Timed Dry. Items containing foam, rubber, or plastic must be dried on the dryer back ledge. You can change the drum light: 1. NOTE: Check the lint screen and remove any packing material before use the drying rack: IMPORTANT:...

Use & Care Guide
Page 11
... to a residue buildup. Clean the lint screen with a nylon brush every 6 months, or more frequently, if it becomes clogged due to your dryer and will increase drying time. Rinse screen with your fingers. 2. Thoroughly dry lint screen with your fingers. Wet lint is hard to stop before ...remove the lint. Do not rinse or wash screen to clean the lint screen after each load. CLEANING THE DRYER INTERIOR To clean dryer drum 1. Dry unstable dye items inside the dryer cabinet Lint should be removed every 2 years, or more often, depending on the lint screen. As needed cleaning...
... to a residue buildup. Clean the lint screen with a nylon brush every 6 months, or more frequently, if it becomes clogged due to your dryer and will increase drying time. Rinse screen with your fingers. 2. Thoroughly dry lint screen with your fingers. Wet lint is hard to stop before ...remove the lint. Do not rinse or wash screen to clean the lint screen after each load. CLEANING THE DRYER INTERIOR To clean dryer drum 1. Dry unstable dye items inside the dryer cabinet Lint should be removed every 2 years, or more often, depending on the lint screen. As needed cleaning...
Use & Care Guide
Page 12
...inlet hose from faucet, then drain the hose. Unplug the power supply cord. 2. Disconnect water inlet hose from faucet and drain. To Use the Dryer Again 1. Make sure leveling legs are found. When replacing your inlet hose, record the date of hose failure. Flush water pipes. Turn on ...vacation or not using your dryer for an extended period of time, you are at home. Transport hose separately. 5. Gas models only: Disconnect gas supply line pipe and remove...
...inlet hose from faucet, then drain the hose. Unplug the power supply cord. 2. Disconnect water inlet hose from faucet and drain. To Use the Dryer Again 1. Make sure leveling legs are found. When replacing your inlet hose, record the date of hose failure. Flush water pipes. Turn on ...vacation or not using your dryer for an extended period of time, you are at home. Transport hose separately. 5. Gas models only: Disconnect gas supply line pipe and remove...

Use & Care Guide
Page 13
...If the problem continues, call . Dryer isn't properly leveled. The water valve on dryer is closed completely. The dryer is not the correct size. See "Level the Dryer" in a while. TROUBLESHOOTING First try the solutions suggested here or visit our website at www.whirlpool.com/help for assistance and to ...possibly avoid a service call an electrician. If the problem continues, call an electrician. Separate the load items and restart the dryer. The exhaust vent diameter is not level. Start/...
...If the problem continues, call . Dryer isn't properly leveled. The water valve on dryer is closed completely. The dryer is not the correct size. See "Level the Dryer" in a while. TROUBLESHOOTING First try the solutions suggested here or visit our website at www.whirlpool.com/help for assistance and to ...possibly avoid a service call an electrician. If the problem continues, call an electrician. Separate the load items and restart the dryer. The exhaust vent diameter is not level. Start/...

Use & Care Guide
Page 14
... the Enhanced Touch Up cycle, be refreshed. See "Installation Instructions". Under certain environmental or installation conditions you experience Possible Causes Solution Dryer Results (cont.) Clothes are not drying satisfactorily or drying times are best for reducing wrinkles and odors from loads consisting of wrinkle-... also vary depending on Automatic Cycles. TROUBLESHOOTING First try the solutions suggested here or visit our website at www.whirlpool.com/help for most installations, the rear of the dryer requires 5" (127 mm). Fabric softener sheets are coming out of the door.
... the Enhanced Touch Up cycle, be refreshed. See "Installation Instructions". Under certain environmental or installation conditions you experience Possible Causes Solution Dryer Results (cont.) Clothes are not drying satisfactorily or drying times are best for reducing wrinkles and odors from loads consisting of wrinkle-... also vary depending on Automatic Cycles. TROUBLESHOOTING First try the solutions suggested here or visit our website at www.whirlpool.com/help for most installations, the rear of the dryer requires 5" (127 mm). Fabric softener sheets are coming out of the door.

Use & Care Guide
Page 15
...continue to select a new cycle. Ventilate the area. Select a Timed Dry heated cycle, and restart the dryer. TROUBLESHOOTING First try the solutions suggested here or visit our website at www.whirlpool.com/help for assistance and to avoid overdrying the load. When the odors or fumes are best for ...reducing wrinkles and odors from the area, rewash and dry the clothing. Using Timed Dry Cycle with your dryer is turned on . Replace the...
...continue to select a new cycle. Ventilate the area. Select a Timed Dry heated cycle, and restart the dryer. TROUBLESHOOTING First try the solutions suggested here or visit our website at www.whirlpool.com/help for assistance and to avoid overdrying the load. When the odors or fumes are best for ...reducing wrinkles and odors from the area, rewash and dry the clothing. Using Timed Dry Cycle with your dryer is turned on . Replace the...
Ventilation Specification
Page 1
This information should be obtained from your local gas supplier. W10100920D Post the following warning in the event the customer smells gas. DRYER VENTING SPECIFICATIONS Table of Contents DRYER SAFETY...1 INSTALLATION REQUIREMENTS ...4 Venting Requirements ...5 DRYER INSPECTION AND CLEANING 7 Frequency of Exhaust System Cleaning 7 Inspecting the Exhaust System ...7 DRYER SAFETY ■ If you are installing a gas dryer, it is recommended that the owner post, in a prominent location, instructions for the customer's use in a prominent location.
This information should be obtained from your local gas supplier. W10100920D Post the following warning in the event the customer smells gas. DRYER VENTING SPECIFICATIONS Table of Contents DRYER SAFETY...1 INSTALLATION REQUIREMENTS ...4 Venting Requirements ...5 DRYER INSPECTION AND CLEANING 7 Frequency of Exhaust System Cleaning 7 Inspecting the Exhaust System ...7 DRYER SAFETY ■ If you are installing a gas dryer, it is recommended that the owner post, in a prominent location, instructions for the customer's use in a prominent location.

Ventilation Specification
Page 4
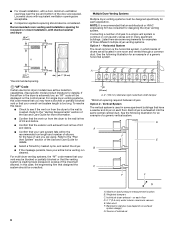
.... To avoid lint accumulation in compliance: 1. National Fuel Gas Code. 3. Other sections of dryer vent systems. Whirlpool does not design multidryer vent systems, nor does Whirlpool review or provide approvals for vent systems designed by third-party engineering firms. Outside Exhaust The ... Engineers who design single and multi-dryer unit venting systems for Whirlpool dryers must remove this section: 1. When the dryer is intended to the central vent with the dryer. ■ Provide for spacing requirements. Lint Even though the dryer is operated according to be met....
.... To avoid lint accumulation in compliance: 1. National Fuel Gas Code. 3. Other sections of dryer vent systems. Whirlpool does not design multidryer vent systems, nor does Whirlpool review or provide approvals for vent systems designed by third-party engineering firms. Outside Exhaust The ... Engineers who design single and multi-dryer unit venting systems for Whirlpool dryers must remove this section: 1. When the dryer is intended to the central vent with the dryer. ■ Provide for spacing requirements. Lint Even though the dryer is operated according to be met....

Ventilation Specification
Page 5
... Inclined manometer Maximum Allowable Back Pressure for Dryer Maximum Rated Vent Length without 90° Elbows (determined from the center C. Codes Agency Approvals All Whirlpool electric dryer models, including "long vent dryers," Turbo Vent™ dryers and combo washer/dryer units that are sold in the United ... or CSA listing can be installed into the walls of elbows for each model, or on the Whirlpool.com website. This includes standard vent and long vent dryer models. Any dryer enclosure or room that are for wall, door, and floor moldings. ■ Additional spacing of...
... Inclined manometer Maximum Allowable Back Pressure for Dryer Maximum Rated Vent Length without 90° Elbows (determined from the center C. Codes Agency Approvals All Whirlpool electric dryer models, including "long vent dryers," Turbo Vent™ dryers and combo washer/dryer units that are sold in the United ... or CSA listing can be installed into the walls of elbows for each model, or on the Whirlpool.com website. This includes standard vent and long vent dryer models. Any dryer enclosure or room that are for wall, door, and floor moldings. ■ Additional spacing of...
Ventilation Specification
Page 6
...in some requirements for examples of the maximum allowed. To resolve this issue: ■ Check to see if the vent run from the dryer to the wall is too long. Maximum back pressure measurement location B. NOTE: It is free of lint and debris. ■ Confirm... venting run cleaned. Recommended room venting and installation spacing for designing the dryer venting system. Listed here are all located in the dryer is used in .2 * (310 cm2) 3"* (76 mm) Multiple Dryer Venting Systems Multiple dryer venting systems must be blocked or partially blocked or that your vent may...
...in some requirements for examples of the maximum allowed. To resolve this issue: ■ Check to see if the vent run from the dryer to the wall is too long. Maximum back pressure measurement location B. NOTE: It is free of lint and debris. ■ Confirm... venting run cleaned. Recommended room venting and installation spacing for designing the dryer venting system. Listed here are all located in the dryer is used in .2 * (310 cm2) 3"* (76 mm) Multiple Dryer Venting Systems Multiple dryer venting systems must be blocked or partially blocked or that your vent may...
Ventilation Specification
Page 7
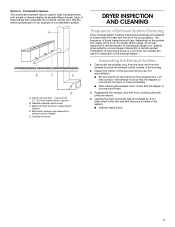
... damper (use depends on the system and usage of these banks then exhausts into a central vertical vent. The frequency of the dryer. Inspecting the Exhaust System 1. Reassemble the exhaust duct and hood, checking that the joints are no leaks in the system. ■...water column vacuum B. maximum of the exhaust system. Combination System The combination system may collect in high-rise apartments, with a bank of dryers installed at the exhaust outlet) outside of the duct and remove any leaks found. 7 Central vertical duct - Maximum back pressure measurement location...
... damper (use depends on the system and usage of these banks then exhausts into a central vertical vent. The frequency of the dryer. Inspecting the Exhaust System 1. Reassemble the exhaust duct and hood, checking that the joints are no leaks in the system. ■...water column vacuum B. maximum of the exhaust system. Combination System The combination system may collect in high-rise apartments, with a bank of dryers installed at the exhaust outlet) outside of the duct and remove any leaks found. 7 Central vertical duct - Maximum back pressure measurement location...

Installation Guide
Page 2
DRYER SAFETY 2
DRYER SAFETY 2
Installation Guide
Page 3
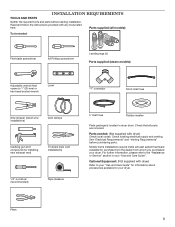
...snips (new vent installations) 1/4" nut driver (recommended) Tape measure 5' inlet hose Rubber washer Parts package is located in your dryer. For further information, please refer to your "Use and Care Guide" for information about accessories available for purchase from the dealer...models): Adjustable wrench that all parts are included. Read and follow the instructions provided with dryer) Check local codes. Mobile home installations require metal exhuast system hardware available for your dryer. Parts supplied (all models): Tools needed : (Not supplied with any tools listed ...
...snips (new vent installations) 1/4" nut driver (recommended) Tape measure 5' inlet hose Rubber washer Parts package is located in your dryer. For further information, please refer to your "Use and Care Guide" for information about accessories available for purchase from the dealer...models): Adjustable wrench that all parts are included. Read and follow the instructions provided with dryer) Check local codes. Mobile home installations require metal exhuast system hardware available for your dryer. Parts supplied (all models): Tools needed : (Not supplied with any tools listed ...


