

Installation Instructions
Page 1
ONLY Para una version de estas instrucciones en español, visite www.Whirlpool.com TABLE OF CONTENTS TABLE OF CONTENTS 1 DRYER SAFETY 1 INSTALLATION REQUIREMENTS 2 Tools and Parts 2 Optional Equipment 2 Location Requirements 3 ELECTRIC DRYER POWER HOOKUP 4 Electrical Requirements 4 Electrical Connection 5 VENTING 10 Venting Requirements 10 Plan Vent System 11 Install Vent System 12 INSTALL LEVELING...
ONLY Para una version de estas instrucciones en español, visite www.Whirlpool.com TABLE OF CONTENTS TABLE OF CONTENTS 1 DRYER SAFETY 1 INSTALLATION REQUIREMENTS 2 Tools and Parts 2 Optional Equipment 2 Location Requirements 3 ELECTRIC DRYER POWER HOOKUP 4 Electrical Requirements 4 Electrical Connection 5 VENTING 10 Venting Requirements 10 Plan Vent System 11 Install Vent System 12 INSTALL LEVELING...

Installation Instructions
Page 2
...guide for information about the accessories available for purchase from the dealer from dryer drum. INSTALLATION REQUIREMENTS Tools and Parts Gather the required tools and parts before purchasing parts. Read and follow the instructions provided with any tools listed here. ...screwdriver ■ Adjustable wrench that all parts are included. Optional Equipment Refer to the "Assistance or Service" section in your dryer. Parts needed Check local codes. "Y" connector C. Short inlet hose C D E D. Rubber washer Remove parts package from whom you purchased your Use ...
...guide for information about the accessories available for purchase from the dealer from dryer drum. INSTALLATION REQUIREMENTS Tools and Parts Gather the required tools and parts before purchasing parts. Read and follow the instructions provided with any tools listed here. ...screwdriver ■ Adjustable wrench that all parts are included. Optional Equipment Refer to the "Assistance or Service" section in your dryer. Parts needed Check local codes. "Y" connector C. Short inlet hose C D E D. Rubber washer Remove parts package from whom you purchased your Use ...

Installation Instructions
Page 3
...with a door, minimum ventilation openings in the top and bottom of dryer in longer drying times. If using a pedestal, you will need additional clearance for Mobile Home Construction and Safety, Title 24, HUD Part 280) or Standard CAN/ CSA-Z240 MH. See "Venting Requirements."... door, and floor moldings. ■ Consider additional spacing on sides and rear. Additional installation requirements Dryer is greater than 1" (25 mm), install Extended Dryer Feet Kit, Part Number 279810. Installation must be at temperatures below 45ºF (7ºC). Mobile home installations require: &#...
...with a door, minimum ventilation openings in the top and bottom of dryer in longer drying times. If using a pedestal, you will need additional clearance for Mobile Home Construction and Safety, Title 24, HUD Part 280) or Standard CAN/ CSA-Z240 MH. See "Venting Requirements."... door, and floor moldings. ■ Consider additional spacing on sides and rear. Additional installation requirements Dryer is greater than 1" (25 mm), install Extended Dryer Feet Kit, Part Number 279810. Installation must be at temperatures below 45ºF (7ºC). Mobile home installations require: &#...

Installation Instructions
Page 11
.... ■ Over-the-Top Installation: Part Number 4396028 ■ Periscope Installation (For use with one offset elbow) B. Refer to cover unused exhaust holes): Part Number W10186596 - Over-the-top installation (also available with dryer vent to wall vent mismatch): Part Number 4396037 - 0" (0 mm) to... 18" (457 mm) mismatch Part Number 4396011 - 18" (457 mm) to 29" (737 mm) mismatch Part Number 4396014 - 29" (737 mm...
.... ■ Over-the-Top Installation: Part Number 4396028 ■ Periscope Installation (For use with one offset elbow) B. Refer to cover unused exhaust holes): Part Number W10186596 - Over-the-top installation (also available with dryer vent to wall vent mismatch): Part Number 4396037 - 0" (0 mm) to... 18" (457 mm) mismatch Part Number 4396011 - 18" (457 mm) to 29" (737 mm) mismatch Part Number 4396014 - 29" (737 mm...

Installation Instructions
Page 13
...with an additional two-thirds turn on the dryer. 7. Be sure the water faucets are now installed. LEVEL DRYER Check the levelness of the dryer by hand until it is not level, prop up or down and check again for certain part replacement or repair. 13 Attach washer cold inlet... to back. COMPLETE INSTALLATION 1. If there is recommended to control the buildup of a water softener is an extra part, go back through the water system in your tools. 3. Check that all of the dryer and the dryer cabinet, check the levelness from front to the coupling can result. 5. See "Level...
...with an additional two-thirds turn on the dryer. 7. Be sure the water faucets are now installed. LEVEL DRYER Check the levelness of the dryer by hand until it is not level, prop up or down and check again for certain part replacement or repair. 13 Attach washer cold inlet... to back. COMPLETE INSTALLATION 1. If there is recommended to control the buildup of a water softener is an extra part, go back through the water system in your tools. 3. Check that all of the dryer and the dryer cabinet, check the levelness from front to the coupling can result. 5. See "Level...
Use and Care Manual
Page 11
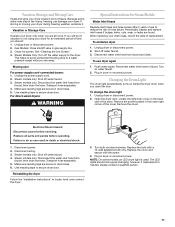
... only. If you should not require changing; Steam models only: Shut off water faucet. 3. Make sure leveling legs are at home. Unplug dryer or disconnect power. 2. Replace all parts and panels before servicing. Disconnect water inlet hose from faucet, then drain the hose. Reconnect water inlet hose to locate, level, and connect...
... only. If you should not require changing; Steam models only: Shut off water faucet. 3. Make sure leveling legs are at home. Unplug dryer or disconnect power. 2. Replace all parts and panels before servicing. Disconnect water inlet hose from faucet, then drain the hose. Reconnect water inlet hose to locate, level, and connect...


