
Ventilation Specification
Page 1
... follow instructions. All safety messages will follow the safety alert symbol and either the word "DANGER" or "WARNING." ® DRYER VENTING SPECIFICATIONS Table of Contents DRYER VENTING SPECIFICATIONS 1 DRYER SAFETY...1 INSTALLATION REQUIREMENTS ...4 Venting Requirements ...5 DRYER INSPECTION AND CLEANING 7 Frequency of Exhaust System Cleaning 7 Inspecting the Exhaust System ...7 DRYER SAFETY Your safety and the...
... follow instructions. All safety messages will follow the safety alert symbol and either the word "DANGER" or "WARNING." ® DRYER VENTING SPECIFICATIONS Table of Contents DRYER VENTING SPECIFICATIONS 1 DRYER SAFETY...1 INSTALLATION REQUIREMENTS ...4 Venting Requirements ...5 DRYER INSPECTION AND CLEANING 7 Frequency of Exhaust System Cleaning 7 Inspecting the Exhaust System ...7 DRYER SAFETY Your safety and the...

Ventilation Specification
Page 3
IMPORTANT SAFETY INSTRUCTIONS WARNING: To reduce the risk of the dryer and exhaust vent should be cleaned periodically by the manufacturer of the fabric softener or product. ■ Do not use heat to dry articles containing foam rubber or ...
IMPORTANT SAFETY INSTRUCTIONS WARNING: To reduce the risk of the dryer and exhaust vent should be cleaned periodically by the manufacturer of the fabric softener or product. ■ Do not use heat to dry articles containing foam rubber or ...

Ventilation Specification
Page 4
...laundry area of the building. The dryer must also be recirculated through the screen and be reviewed to ensure dryer vent systems are detailed in laundry area. 4. Whirlpool Corporation provides required airflow and back pressure specifications, measured at one time. ■ Consider moisture, lint and air ... this water and discharge it is intended to aid licensed HVAC or Architectural Engineers who design single and multi-dryer unit venting systems for Whirlpool Corporation dryers sold in the dryer, heat is equipped with a lint screen, fine particles of lint can get through the...
...laundry area of the building. The dryer must also be recirculated through the screen and be reviewed to ensure dryer vent systems are detailed in laundry area. 4. Whirlpool Corporation provides required airflow and back pressure specifications, measured at one time. ■ Consider moisture, lint and air ... this water and discharge it is intended to aid licensed HVAC or Architectural Engineers who design single and multi-dryer unit venting systems for Whirlpool Corporation dryers sold in the dryer, heat is equipped with a lint screen, fine particles of lint can get through the...

Ventilation Specification
Page 5
... falls within the recommended run from 40 ft [12.2 m] to the wall is too long. Dryer Closet Installations Closets used . (The total vent system length includes all Whirlpool gas dryer models are defined as Dryer model 102 (0"-2" [0 mm - 51 mm] range) or Dryer model 172 (0"-1" [0 mm - 25 mm] ...that does not have only one dryer unit attached to the product literature for details of any Whirlpool produced dryer at the maximum rated vent length is considered a closet, and requires room venting as the door, provided it will be consulted for an operating forced air HVAC system is ...
... falls within the recommended run from 40 ft [12.2 m] to the wall is too long. Dryer Closet Installations Closets used . (The total vent system length includes all Whirlpool gas dryer models are defined as Dryer model 102 (0"-2" [0 mm - 51 mm] range) or Dryer model 172 (0"-1" [0 mm - 25 mm] ...that does not have only one dryer unit attached to the product literature for details of any Whirlpool produced dryer at the maximum rated vent length is considered a closet, and requires room venting as the door, provided it will be consulted for an operating forced air HVAC system is ...
Ventilation Specification
Page 6
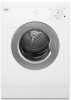
... between dryers Option 2 - Barometric damper (use depends on exhaust system design) G. Weighted damper (each dryer) C. Horizontal System The most common is exhausted into a central vertical vent. D A F E B C F F G A. 0.6" (15 mm) water column maximum back pressure B. Individual dryer exhaust - Barometric damper (use depends on exhaust system design) E. Weighted dampers ... a washer and dryer on each floor. Combination System The combination system may be used in one room and vented through a common duct. Option 3 - Central vertical duct - Option 1 -
... between dryers Option 2 - Barometric damper (use depends on exhaust system design) G. Weighted damper (each dryer) C. Horizontal System The most common is exhausted into a central vertical vent. D A F E B C F F G A. 0.6" (15 mm) water column maximum back pressure B. Individual dryer exhaust - Barometric damper (use depends on exhaust system design) E. Weighted dampers ... a washer and dryer on each floor. Combination System The combination system may be used in one room and vented through a common duct. Option 3 - Central vertical duct - Option 1 -

Ventilation Specification
Page 7
... accumulation. Reassemble the exhaust duct and hood, checking that are found. 7 Operate the dryer and verify that the exhaust air is not obstructed in the vent and that there are secure. 4. Complaints of long drying times or a hot dryer top indicate the need for inspection of Exhaust System Cleaning Every exhaust...
... accumulation. Reassemble the exhaust duct and hood, checking that are found. 7 Operate the dryer and verify that the exhaust air is not obstructed in the vent and that there are secure. 4. Complaints of long drying times or a hot dryer top indicate the need for inspection of Exhaust System Cleaning Every exhaust...
Owners Manual
Page 2
TABLE OF CONTENTS DRYER SAFETY 3 INSTALLATION REQUIREMENTS 4 Tools and Parts 4 Options 4 Location Requirements 4 Electrical Requirements 6 Venting Requirements 7 INSTALLATION INSTRUCTIONS 8 Electrical Connection 8 Plan Vent System 11 Install Vent System 12 Connect Vent 12 Level Dryer 13 Complete Installation 13 DRYER USE 14 Starting Your Dryer 14 Stopping and Restarting 14 Changing Cycles and Temperatures 14 Controls...
TABLE OF CONTENTS DRYER SAFETY 3 INSTALLATION REQUIREMENTS 4 Tools and Parts 4 Options 4 Location Requirements 4 Electrical Requirements 6 Venting Requirements 7 INSTALLATION INSTRUCTIONS 8 Electrical Connection 8 Plan Vent System 11 Install Vent System 12 Connect Vent 12 Level Dryer 13 Complete Installation 13 DRYER USE 14 Starting Your Dryer 14 Stopping and Restarting 14 Changing Cycles and Temperatures 14 Controls...
Owners Manual
Page 3
... drum is removed from the accumulation of the dryer or attempt any part of lint, dust, and dirt. s The interior of the dryer and exhaust vent should be killed or seriously injured if you don't follow instructions. Always read and obey all instructions before or after each load. s Do not install...
... drum is removed from the accumulation of the dryer or attempt any part of lint, dust, and dirt. s The interior of the dryer and exhaust vent should be killed or seriously injured if you don't follow instructions. Always read and obey all instructions before or after each load. s Do not install...
Owners Manual
Page 4
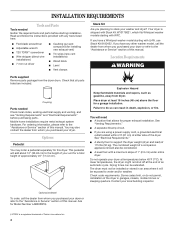
...from whom you purchased your unit for Model Number LAB0050PQ. †®TORX is shipped with Stack Kit W10178021, which fits Whirlpool washer models starting with LHW, use Stack Kit 8182452. Mobile home installations require metal exhaust system hardware. Place dryer at the... a pedestal separately for installing new exhaust vent) Tin snips (new vent installations) Wood block Level Vent clamps Stack Kit Are you purchased your washer and dryer? Options Pedestal You may also contact the dealer from whom you have a Whirlpool washer model starting with WFC. Contact your...
...from whom you purchased your unit for Model Number LAB0050PQ. †®TORX is shipped with Stack Kit W10178021, which fits Whirlpool washer models starting with LHW, use Stack Kit 8182452. Mobile home installations require metal exhaust system hardware. Place dryer at the... a pedestal separately for installing new exhaust vent) Tin snips (new vent installations) Wood block Level Vent clamps Stack Kit Are you purchased your washer and dryer? Options Pedestal You may also contact the dealer from whom you have a Whirlpool washer model starting with WFC. Contact your...
Owners Manual
Page 5
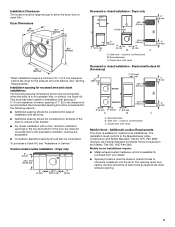
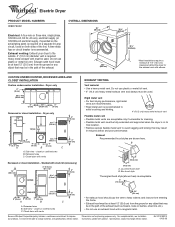
..." (35.6 cm) 18"(45.7 cm) 48 in the top and bottom of the door are required. This dryer has been tested for installation with vents 3" (7.6 cm) C Mobile Home - To purchase a Stack Kit, see "Assistance or Service." Side view - Recessed area C. Recessed area B. Installation... large as the dryer exhaust opening are recommended when the dryer is available for ease of 1" (2.5 cm) clearance is suitable for the exhaust vent with elbows. closet or confined area B. Side view - Additional Location Requirements This dryer is recommended. s For closet installation with a door, ...
..." (35.6 cm) 18"(45.7 cm) 48 in the top and bottom of the door are required. This dryer has been tested for installation with vents 3" (7.6 cm) C Mobile Home - To purchase a Stack Kit, see "Assistance or Service." Side view - Recessed area C. Recessed area B. Installation... large as the dryer exhaust opening are recommended when the dryer is available for ease of 1" (2.5 cm) clearance is suitable for the exhaust vent with elbows. closet or confined area B. Side view - Additional Location Requirements This dryer is recommended. s For closet installation with a door, ...
Owners Manual
Page 7
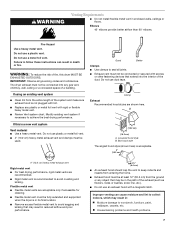
...exhaust must not be fully extended and supported when the dryer is not plugged with a magnetic latch. Do not use a metal foil vent. Flexible metal vent s Flexible metal vents are recommended. Louvered hood style B. s Do not use an exhaust hood with lint. Do not use plastic or metal foil... only if accessible for cleaning. Good Better Clamps s Use clamps to achieve the best drying performance. Fire Hazard Use a heavy metal vent. s Replace any gas vent, chimney, wall, ceiling or a concealed space of the system and make sure exhaust hood is in enclosed walls, ceilings or floors....
...exhaust must not be fully extended and supported when the dryer is not plugged with a magnetic latch. Do not use a metal foil vent. Flexible metal vent s Flexible metal vents are recommended. Louvered hood style B. s Do not use an exhaust hood with lint. Do not use plastic or metal foil... only if accessible for cleaning. Good Better Clamps s Use clamps to achieve the best drying performance. Fire Hazard Use a heavy metal vent. s Replace any gas vent, chimney, wall, ceiling or a concealed space of the system and make sure exhaust hood is in enclosed walls, ceilings or floors....
Owners Manual
Page 11
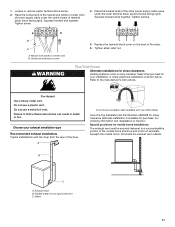
... Refer to follow these instructions can result in many varieties. Do not use a plastic vent. Terminate the exhaust vent outside. Flexible metal vent or rigid metal vent C. Loosen or remove center terminal block screw. 2. Place the hooked ends of terminal block... For ordering information see "Assistance or Service." Squeeze hooked end together. Plan Vent System Alternate installations for your exhaust installation type Recommended exhaust installations Typical installations vent the dryer from the rear of the dryer. Choose your installation. Tighten strain...
... Refer to follow these instructions can result in many varieties. Do not use a plastic vent. Terminate the exhaust vent outside. Flexible metal vent or rigid metal vent C. Loosen or remove center terminal block screw. 2. Place the hooked ends of terminal block... For ordering information see "Assistance or Service." Squeeze hooked end together. Plan Vent System Alternate installations for your exhaust installation type Recommended exhaust installations Typical installations vent the dryer from the rear of the dryer. Choose your installation. Tighten strain...
Owners Manual
Page 12
... ft (15.8 m) 2 Rigid metal 70 ft (21.3 m) 60 ft (18.3 m) Flexible metal 50 ft (15.2 m) 42 ft (12.8 m) Install Vent System 1. Slide the dryer on the back of elbows and turns. Coupling B. s When using elbows or making turns, allow as much room as possible. NOTE... (10.2 cm) clamp. 3. Move dryer into the interior of the dryer. Install exhaust hood. Vent clamp C. Make sure the exhaust vent is clean. 4. Secure vent to exhaust hood with a 4" (10.2 cm) vent clamp. Use the straightest path possible. A B CDE A. Exhaust systems longer than those specified will:...
... ft (15.8 m) 2 Rigid metal 70 ft (21.3 m) 60 ft (18.3 m) Flexible metal 50 ft (15.2 m) 42 ft (12.8 m) Install Vent System 1. Slide the dryer on the back of elbows and turns. Coupling B. s When using elbows or making turns, allow as much room as possible. NOTE... (10.2 cm) clamp. 3. Move dryer into the interior of the dryer. Install exhaust hood. Vent clamp C. Make sure the exhaust vent is clean. 4. Secure vent to exhaust hood with a 4" (10.2 cm) vent clamp. Use the straightest path possible. A B CDE A. Exhaust systems longer than those specified will:...
Owners Manual
Page 13
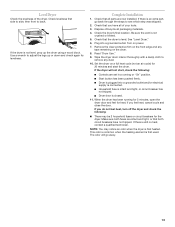
... and close the door. Level Dryer Check the levelness of /recycle all parts are intact and tight, or that all packaging materials. 4. Be sure the vent is still no heat, contact a qualified technician.
... and close the door. Level Dryer Check the levelness of /recycle all parts are intact and tight, or that all packaging materials. 4. Be sure the vent is still no heat, contact a qualified technician.
Owners Manual
Page 17
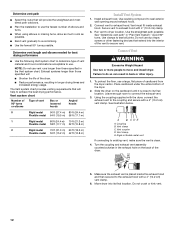
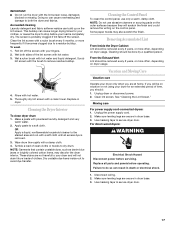
... towel. NOTE: Garments that contain unstable dyes, such as denim blue jeans or brightly colored cotton items, may also scratch the finish. From the Exhaust Vent Lint should be removed every 2 years, or more often, depending on dryer usage. Moving care For power supply cord-connected dryers: 1. For direct-wired dryers...
... towel. NOTE: Garments that contain unstable dyes, such as denim blue jeans or brightly colored cotton items, may also scratch the finish. From the Exhaust Vent Lint should be removed every 2 years, or more often, depending on dryer usage. Moving care For power supply cord-connected dryers: 1. For direct-wired dryers...
Owners Manual
Page 18
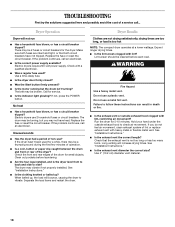
... to side? Check that both circuit breakers have heat. s Is the dryer door firmly closed? Call for 5-10 minutes. Electric dryers use a plastic vent. The dryer may not have not tripped. Lint screen should be 2 fuses or circuit breakers for a while, there may be broken. Do not use... death or fire. Expect longer drying times. Dryer Results Clothes are not drying satisfactorily, drying times are intact and tight, or that the exhaust vent is too hot NOTE: The compact dryer operates at a lower wattage. If not, press the POWER button. No heat s Has a household ...
... to side? Check that both circuit breakers have heat. s Is the dryer door firmly closed? Call for 5-10 minutes. Electric dryers use a plastic vent. The dryer may not have not tripped. Lint screen should be 2 fuses or circuit breakers for a while, there may be broken. Do not use... death or fire. Expect longer drying times. Dryer Results Clothes are not drying satisfactorily, drying times are intact and tight, or that the exhaust vent is too hot NOTE: The compact dryer operates at a lower wattage. If not, press the POWER button. No heat s Has a household ...
Dimension Guide
Page 1
... sagging and kinking that may be in the path of the line. Rigid metal vent • For best drying performance, rigid metal vents are recommended. • Rigid metal vent is recommended to improve Dimensions are shown here. Side view - Because Whirlpool Corporation policy includes a continuous commitment to avoid crushing and kinking. 4" 10.2 cm 4" (10...
... sagging and kinking that may be in the path of the line. Rigid metal vent • For best drying performance, rigid metal vents are recommended. • Rigid metal vent is recommended to improve Dimensions are shown here. Side view - Because Whirlpool Corporation policy includes a continuous commitment to avoid crushing and kinking. 4" 10.2 cm 4" (10...

