Use and Care Guide
Page 6
... worn or clothes that matches the type of tumbling with Timed Cycles. Follow package instructions. ■ To reduce wrinkling, remove the load from dry items, such as sports shirts, casual business clothes, permanent press, and synthetics DELICATE Lingerie, blouses, or washable knit fabrics Extra-Low Steam Cycles (on your load. See the following Automatic Preset Cycle Settings chart. Cool Down tumbles the load without . The length of wrinkle-free cotton...
... worn or clothes that matches the type of tumbling with Timed Cycles. Follow package instructions. ■ To reduce wrinkling, remove the load from dry items, such as sports shirts, casual business clothes, permanent press, and synthetics DELICATE Lingerie, blouses, or washable knit fabrics Extra-Low Steam Cycles (on your load. See the following Automatic Preset Cycle Settings chart. Cool Down tumbles the load without . The length of wrinkle-free cotton...
Use and Care Guide
Page 9
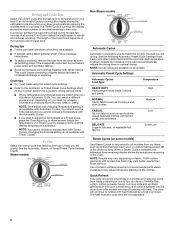
... dry items such as needed to press PAUSE/CANCEL twice, the program clears and your Auto Dry cycles. If your model does not have a drying rack, you happen to complete drying. NOTE: The drying rack must select a time by the current drying setting. 3. Do not use the drying rack 1. A A. Place drying rack inside dryer drum, positioning the back wire on top of your dryer shuts down on a clothesline or by using the Air Only temperature setting. 7. Dryer back panel...
... dry items such as needed to press PAUSE/CANCEL twice, the program clears and your Auto Dry cycles. If your model does not have a drying rack, you happen to complete drying. NOTE: The drying rack must select a time by the current drying setting. 3. Do not use the drying rack 1. A A. Place drying rack inside dryer drum, positioning the back wire on top of your dryer shuts down on a clothesline or by using the Air Only temperature setting. 7. Dryer back panel...
Use and Care Guide
Page 10
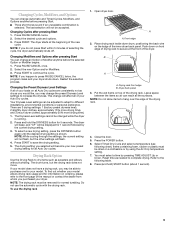
... screen with a clean towel. Wet a nylon brush with hot water. 5. Rinse screen with hot water and liquid detergent. Cleaning the Dryer Interior 1. From the Exhaust Vent Lint should be removed every 2 years, or more often, depending on dryer usage. Doing so can increase drying time. NOTE: Garments that would obstruct the flow of combustion and ventilation air. Removing Accumulated Lint From Inside the Dryer Cabinet Lint should be rack dried and the suggested cycle, temperature setting and drying time...
... screen with a clean towel. Wet a nylon brush with hot water. 5. Rinse screen with hot water and liquid detergent. Cleaning the Dryer Interior 1. From the Exhaust Vent Lint should be removed every 2 years, or more often, depending on dryer usage. Doing so can increase drying time. NOTE: Garments that would obstruct the flow of combustion and ventilation air. Removing Accumulated Lint From Inside the Dryer Cabinet Lint should be rack dried and the suggested cycle, temperature setting and drying time...
Use and Care Guide
Page 11
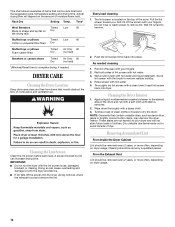
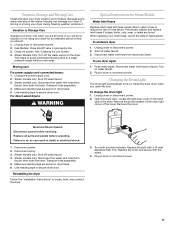
...Steam models only: Shut off water faucet. 3. Plug in gas supply line. 3. Plug in the lower right corner of time, you are found. Steam Models Only: Turn off water faucet. 4. To winterize dryer 1. Unplug dryer or disconnect power. 2. Remove the screw located in dryer or reconnect power. 11 Reconnect water inlet hose to the dryer. Remove the cover. Transport hose separately. 5. Vacation, Storage, and Moving Care Install and store your dryer where it . Open the dryer door. Unplug dryer or disconnect power. 2. Shut off water faucet. 3. Replace the cover...
...Steam models only: Shut off water faucet. 3. Plug in gas supply line. 3. Plug in the lower right corner of time, you are found. Steam Models Only: Turn off water faucet. 4. To winterize dryer 1. Unplug dryer or disconnect power. 2. Remove the screw located in dryer or reconnect power. 11 Reconnect water inlet hose to the dryer. Remove the cover. Transport hose separately. 5. Vacation, Storage, and Moving Care Install and store your dryer where it . Open the dryer door. Unplug dryer or disconnect power. 2. Shut off water faucet. 3. Replace the cover...
Use and Care Guide
Page 12
... recommended run when this diagnostic code is the dryer level front to back and side to "Electrical Connection" in the Installation Instructions for the type of lint and debris. If the problem continues, call an electrician. ■ Is the valve open on the gas supply line on . Check the front and rear edges of lint and debris. When balled up ? Electric dryers use two household fuses or breakers. Replace the fuse or reset the circuit breaker. The dryer...
... recommended run when this diagnostic code is the dryer level front to back and side to "Electrical Connection" in the Installation Instructions for the type of lint and debris. If the problem continues, call an electrician. ■ Is the valve open on the gas supply line on . Check the front and rear edges of lint and debris. When balled up ? Electric dryers use two household fuses or breakers. Replace the fuse or reset the circuit breaker. The dryer...
Use and Care Guide
Page 13
... clothes coming out of lint or replace exhaust vent with damp or wet spots? Run the dryer for the types of garments being dried. Check that the exhaust vent is too hot ■ Is the lint screen clogged with lint? Select the right temperature for 5-10 minutes. The load may expereince underdrying. Clean lint screen. WARNING Fire Hazard Use a heavy metal vent. If you may not be cleaned before each load. See the Installation Instructions. ■ Has the Air Only...
... clothes coming out of lint or replace exhaust vent with damp or wet spots? Run the dryer for the types of garments being dried. Check that the exhaust vent is too hot ■ Is the lint screen clogged with lint? Select the right temperature for 5-10 minutes. The load may expereince underdrying. Clean lint screen. WARNING Fire Hazard Use a heavy metal vent. If you may not be cleaned before each load. See the Installation Instructions. ■ Has the Air Only...
Use and Care Guide
Page 14
... and dryer's water inlet valve. Check that water inlet hose is turned on. Fabric softener sheets added to help smooth out wrinkles from the area, rewash and dry the clothing. For Steam Dryers select Enhanced Touch Up Cycle to garment care label instructions. Results may have an odor. When the odors or fumes are caused by dyes in garments after the first cycle. ■ Is water connected to the dryer.
... and dryer's water inlet valve. Check that water inlet hose is turned on. Fabric softener sheets added to help smooth out wrinkles from the area, rewash and dry the clothing. For Steam Dryers select Enhanced Touch Up Cycle to garment care label instructions. Results may have an odor. When the odors or fumes are caused by dyes in garments after the first cycle. ■ Is water connected to the dryer.
Use and Care Guide
Page 15
... Phone number Model number Serial number Purchase date 15 Replacement parts or repair labor if this major appliance is used for other rights that is inconsistent to be provided by Whirlpool. 5. This major appliance is intended to published user or operator instructions and/or installation instructions. 2. LIMITATION OF REMEDIES; If you think you also may have other damage to the finish of the Use & Care Guide. ITEMS EXCLUDED FROM WARRANTY...
... Phone number Model number Serial number Purchase date 15 Replacement parts or repair labor if this major appliance is used for other rights that is inconsistent to be provided by Whirlpool. 5. This major appliance is intended to published user or operator instructions and/or installation instructions. 2. LIMITATION OF REMEDIES; If you think you also may have other damage to the finish of the Use & Care Guide. ITEMS EXCLUDED FROM WARRANTY...
Installation Instructions
Page 1
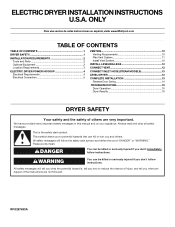
...ONLY Para una version de estas instrucciones en español, visite www.Whirlpool.com TABLE OF CONTENTS TABLE OF CONTENTS 1 DRYER SAFETY 1 INSTALLATION REQUIREMENTS 2 Tools and Parts 2 Optional Equipment 2 Location Requirements 3 ELECTRIC DRYER POWER HOOKUP 4 Electrical Requirements 4 Electrical Connection 5 VENTING 10 Venting Requirements 10 Plan Vent System 11 Install Vent System 12 INSTALL LEVELING LEGS 12 CONNECT VENT 12 CONNECT INLET HOSE (STEAM MODELS 13 LEVEL DRYER 13 COMPLETE INSTALLATION 13 Reverse Door Swing 14 TROUBLESHOOTING 15 Dryer Operation 15 Dryer...
...ONLY Para una version de estas instrucciones en español, visite www.Whirlpool.com TABLE OF CONTENTS TABLE OF CONTENTS 1 DRYER SAFETY 1 INSTALLATION REQUIREMENTS 2 Tools and Parts 2 Optional Equipment 2 Location Requirements 3 ELECTRIC DRYER POWER HOOKUP 4 Electrical Requirements 4 Electrical Connection 5 VENTING 10 Venting Requirements 10 Plan Vent System 11 Install Vent System 12 INSTALL LEVELING LEGS 12 CONNECT VENT 12 CONNECT INLET HOSE (STEAM MODELS 13 LEVEL DRYER 13 COMPLETE INSTALLATION 13 Reverse Door Swing 14 TROUBLESHOOTING 15 Dryer Operation 15 Dryer...
Installation Instructions
Page 2
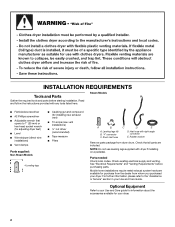
... Tools and Parts Gather the required tools and parts before purchasing parts. Check existing electrical supply and venting. "Y" connector C. Short inlet hose C D E D. Inlet hose with dryer if installing on a pedestal. Rubber washer Remove parts package from whom you purchased your Use and Care Guide. Parts needed Check local codes. Mobile home installations require metal exhaust system hardware available for purchase from the dealer from dryer drum. Leveling legs (4) B. NOTE: Do not use leveling legs supplied with right-angle connector E. Check that opens to...
... Tools and Parts Gather the required tools and parts before purchasing parts. Check existing electrical supply and venting. "Y" connector C. Short inlet hose C D E D. Inlet hose with dryer if installing on a pedestal. Rubber washer Remove parts package from whom you purchased your Use and Care Guide. Parts needed Check local codes. Mobile home installations require metal exhaust system hardware available for purchase from the dealer from dryer drum. Leveling legs (4) B. NOTE: Do not use leveling legs supplied with right-angle connector E. Check that opens to...
Installation Instructions
Page 3
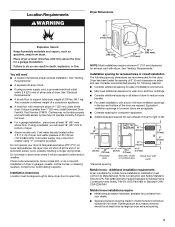
... automatic sensor cycle, possibly resulting in garages, closets, mobile homes, or sleeping quarters. Mobile home installations require: ■ Metal exhaust system hardware, available for purchase from washer using "Y" connector provided. Additional installation requirements Dryer is greater than 1" (25 mm), install Extended Dryer Feet Kit, Part Number 279810. Cold water supply may come from your dealer. ■ Special provisions must be large enough to allow dryer door to introduce outside air into dryer. Openings...
... automatic sensor cycle, possibly resulting in garages, closets, mobile homes, or sleeping quarters. Mobile home installations require: ■ Metal exhaust system hardware, available for purchase from washer using "Y" connector provided. Additional installation requirements Dryer is greater than 1" (25 mm), install Extended Dryer Feet Kit, Part Number 279810. Cold water supply may come from your dealer. ■ Special provisions must be large enough to allow dryer door to introduce outside air into dryer. Openings...
Installation Instructions
Page 4
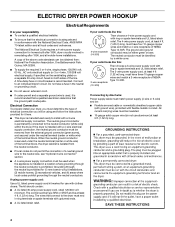
... 4 ft (1.22 m) long, must be removed from the neutral conductor. ■ If local codes do not use with ring or spade terminals and UL listed strain relief. If your outlet looks like this : 3-wire receptacle (10-30R) Then choose a 3-wire power supply cord with clothes dryers. ELECTRIC DRYER POWER HOOKUP Electrical Requirements It is your responsibility ■ To contact a qualified electrical installer. ■ To be sure that the electrical connection is adequate and in a location...
... 4 ft (1.22 m) long, must be removed from the neutral conductor. ■ If local codes do not use with ring or spade terminals and UL listed strain relief. If your outlet looks like this : 3-wire receptacle (10-30R) Then choose a 3-wire power supply cord with clothes dryers. ELECTRIC DRYER POWER HOOKUP Electrical Requirements It is your responsibility ■ To contact a qualified electrical installer. ■ To be sure that the electrical connection is adequate and in a location...
Installation Instructions
Page 6
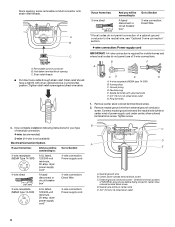
...: Power supply cord 4-wire direct 5" (127 mm) A fused disconnect or circuit breaker box* 4-wire connection: Direct Wire 3-wire receptacle (NEMA type 10-30R) A UL listed, 120/240-volt minimum, 30-amp, dryer power supply cord* 3-wire connection: Power supply cord B C D A E A. block opening C. Removable conduit connector B. Remove center, silver-colored terminal block screw. 2. Neutral ground wire. Now complete installation following instructions for your type of electrical connection: 4-wire (recommended) 3-wire (if 4-wire is required for mobile homes and where local codes do...
...: Power supply cord 4-wire direct 5" (127 mm) A fused disconnect or circuit breaker box* 4-wire connection: Direct Wire 3-wire receptacle (NEMA type 10-30R) A UL listed, 120/240-volt minimum, 30-amp, dryer power supply cord* 3-wire connection: Power supply cord B C D A E A. block opening C. Removable conduit connector B. Remove center, silver-colored terminal block screw. 2. Neutral ground wire. Now complete installation following instructions for your type of electrical connection: 4-wire (recommended) 3-wire (if 4-wire is required for mobile homes and where local codes do...
Installation Instructions
Page 8
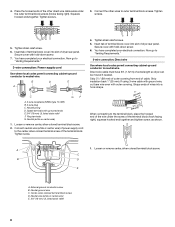
... A. 3-wire receptacle (NEMA type 10-30R) B. 3-wire plug C. Neutral (white or center wire) 1. Place the hooked ends of dryer rear panel. Connect the other direct wire cable wires under the screw of the terminal block. Secure cover with hold -down screw. 6. Now go to "Venting Requirements." 3-wire connection: Direct wire Use where local codes permit connecting cabinet-ground conductor to the terminal block, place the hooked end of the wire under the outer terminal block screws (hooks facing right). Insert tab of terminal block cover into a hook...
... A. 3-wire receptacle (NEMA type 10-30R) B. 3-wire plug C. Neutral (white or center wire) 1. Place the hooked ends of dryer rear panel. Connect the other direct wire cable wires under the screw of the terminal block. Secure cover with hold -down screw. 6. Now go to "Venting Requirements." 3-wire connection: Direct wire Use where local codes permit connecting cabinet-ground conductor to the terminal block, place the hooked end of the wire under the outer terminal block screws (hooks facing right). Insert tab of terminal block cover into a hook...
Installation Instructions
Page 10
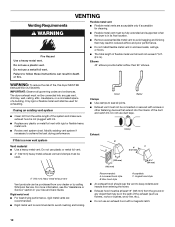
... metal vent. ■ Review vent system chart. Modify existing vent system if necessary to follow these instructions can be connected or secured with a magnetic latch. 10 Do not use an exhaust hood with screws or other fastening devices that may result in reduced airflow and poor performance. ■ Do not install flexible metal vent in your dealer or by calling Whirlpool Service...
... metal vent. ■ Review vent system chart. Modify existing vent system if necessary to follow these instructions can be connected or secured with a magnetic latch. 10 Do not use an exhaust hood with screws or other fastening devices that may result in reduced airflow and poor performance. ■ Do not install flexible metal vent in your dealer or by calling Whirlpool Service...
Installation Instructions
Page 11
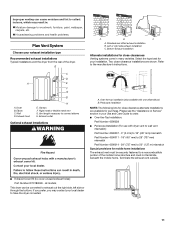
... and Care Guide to order. ■ Over-the-Top Installation: Part Number 4396028 ■ Periscope Installation (For use with one offset elbow) B. Terminate the exhaust vent outside. ■ Exhaust Cover Kit (to the manufacturer's instructions. Exhaust outlet Optional exhaust installations A B C A. Dryer B. Refer to cover unused exhaust holes): Part Number W10186596 - Periscope installation NOTE: The following kits for purchase. If you prefer, you may result in many varieties. B C D A E F G B A. Wall D. Exhaust hood H E. Vent length necessary to connect...
... and Care Guide to order. ■ Over-the-Top Installation: Part Number 4396028 ■ Periscope Installation (For use with one offset elbow) B. Terminate the exhaust vent outside. ■ Exhaust Cover Kit (to the manufacturer's instructions. Exhaust outlet Optional exhaust installations A B C A. Dryer B. Refer to cover unused exhaust holes): Part Number W10186596 - Periscope installation NOTE: The following kits for purchase. If you prefer, you may result in many varieties. B C D A E F G B A. Wall D. Exhaust hood H E. Vent length necessary to connect...

Installation Instructions
Page 12
... floor, use old hoses. 1. The dryer vent must be attached directly to cold water faucet, go to the cold water faucet. Install exhaust hood. Attach short hose to use duct tape, screws or other injury. 1. CONNECT INLET HOSE (STEAM MODELS) The dryer must fit inside the dryer. Determine vent length and elbows needed for best drying performance ■ Use the following vent system chart to determine type of vent material and hood combinations acceptable to use vent runs longer...
... floor, use old hoses. 1. The dryer vent must be attached directly to cold water faucet, go to the cold water faucet. Install exhaust hood. Attach short hose to use duct tape, screws or other injury. 1. CONNECT INLET HOSE (STEAM MODELS) The dryer must fit inside the dryer. Determine vent length and elbows needed for best drying performance ■ Use the following vent system chart to determine type of vent material and hood combinations acceptable to use vent runs longer...
Installation Instructions
Page 13
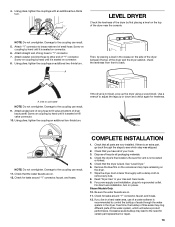
... to the need for leaks around "Y" connector, faucet, and hoses. 12. Check the dryer's final location. Read "Dryer Use" in the crease on power. Be sure the water faucets are now installed. NOTE: Do not overtighten. Attach straight end of small hose. A A. Check for certain part replacement or repair. 13 Wipe the dryer drum interior thoroughly with an additional two-thirds turn on the side of the dryer between the...
... to the need for leaks around "Y" connector, faucet, and hoses. 12. Check the dryer's final location. Read "Dryer Use" in the crease on power. Be sure the water faucets are now installed. NOTE: Do not overtighten. Attach straight end of small hose. A A. Check for certain part replacement or repair. 13 Wipe the dryer drum interior thoroughly with an additional two-thirds turn on the side of the dryer between the...
Installation Instructions
Page 14
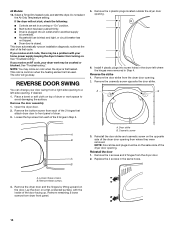
... dryer automatically runs an installation diagnostic routine at the start of the dryer door opening , if desired. 1. This odor is common when the heating element is closed. REVERSE DOOR SWING You can change your home power supply keeping the dryer's heater from the dryer door. Install 4 plastic plugs into an outlet and/or electrical supply is connected. ■ Household fuse is intact and tight, or circuit breaker has not tripped. ■ Dryer door is first used. B. Remove these screws. Reverse...
... dryer automatically runs an installation diagnostic routine at the start of the dryer door opening , if desired. 1. This odor is common when the heating element is closed. REVERSE DOOR SWING You can change your home power supply keeping the dryer's heater from the dryer door. Install 4 plastic plugs into an outlet and/or electrical supply is connected. ■ Household fuse is intact and tight, or circuit breaker has not tripped. ■ Dryer door is first used. B. Remove these screws. Reverse...
Installation Instructions
Page 16
... : Check to run cleaned. ■ "E" Variable (E1, E2, E3) service codes: Call for details. ■ Select a Timed Dry heated cycle, and restart the dryer. Try the following : Clean lint screen. ■ Check to see if a household fuse has blown or circuit breaker has tripped. Electric dryers use a plastic vent. Lint screen should be cleaned before each load. WARNING outside exhaust hood clogged with heavy metal or flexible metal vent. See the Installation Instructions. ■ Are fabric softener sheets blocking the grille? Use...
... : Check to run cleaned. ■ "E" Variable (E1, E2, E3) service codes: Call for details. ■ Select a Timed Dry heated cycle, and restart the dryer. Try the following : Clean lint screen. ■ Check to see if a household fuse has blown or circuit breaker has tripped. Electric dryers use a plastic vent. Lint screen should be cleaned before each load. WARNING outside exhaust hood clogged with heavy metal or flexible metal vent. See the Installation Instructions. ■ Are fabric softener sheets blocking the grille? Use...


