

User Instructions
Page 2
... door or lid. dry-cleaning solvents, other flammable, or explosive substances to persons when using the washer, follow instructions. s Do not repair or replace any part of fire, electric shock, or injury to the wash water. This is moving. Always read and obey all instructions before using the washer. All safety...
... door or lid. dry-cleaning solvents, other flammable, or explosive substances to persons when using the washer, follow instructions. s Do not repair or replace any part of fire, electric shock, or injury to the wash water. This is moving. Always read and obey all instructions before using the washer. All safety...

User Instructions
Page 3
... the rinse cycle. If desired, add powdered or liquid color safe bleach. 2. Bleach is immediately fed into washer and is diluted automatically during the wash part of it touches. Do not guess. Do not use an extension cord. To avoid spilling, use less of the cycle. 3. (OPTIONAL) Add liquid chlorine bleach...
... the rinse cycle. If desired, add powdered or liquid color safe bleach. 2. Bleach is immediately fed into washer and is diluted automatically during the wash part of it touches. Do not guess. Do not use an extension cord. To avoid spilling, use less of the cycle. 3. (OPTIONAL) Add liquid chlorine bleach...
User Instructions
Page 6
... the water level seem too low, or does the washer appear to handle 17 gal. (64 L) of the agitator is normal. This is the upper part of a service call an electrician. s Is the water inlet hose kinked? Some cycles feature periods of drain hose. Reset the rear leveling legs (if needed...
... the water level seem too low, or does the washer appear to handle 17 gal. (64 L) of the agitator is normal. This is the upper part of a service call an electrician. s Is the water inlet hose kinked? Some cycles feature periods of drain hose. Reset the rear leveling legs (if needed...

User Instructions
Page 8
... correct the installation of this warranty does not apply. Service calls to contact Whirlpool, please see the "Troubleshooting" section of products not approved by Whirlpool. 5. Those consumable parts are made to correct defects in the home. 8. SOME STATES AND PROVINCES DO...Outside the 50 United States and Canada, this document. 8 Expenses for travel and transportation for Factory Specified Parts and repair labor to the appliance. 9. WHIRLPOOL SHALL NOT BE LIABLE FOR INCIDENTAL OR CONSEQUENTIAL DAMAGES. Damage resulting from warranty coverage. 3. DISCLAIMER OF IMPLIED...
... correct the installation of this warranty does not apply. Service calls to contact Whirlpool, please see the "Troubleshooting" section of products not approved by Whirlpool. 5. Those consumable parts are made to correct defects in the home. 8. SOME STATES AND PROVINCES DO...Outside the 50 United States and Canada, this document. 8 Expenses for travel and transportation for Factory Specified Parts and repair labor to the appliance. 9. WHIRLPOOL SHALL NOT BE LIABLE FOR INCIDENTAL OR CONSEQUENTIAL DAMAGES. Damage resulting from warranty coverage. 3. DISCLAIMER OF IMPLIED...

Installation Instructions
Page 1
...;N DE LA LAVADORA INSTRUCTIONS POUR L'INSTALLATION DE LA LAVEUSE Table of Contents / Índice / Table des matières WASHER SAFETY 1 INSTALLATION REQUIREMENTS 2 Tools and Parts 2 Location Requirements 3 Drain System 3 Electrical Requirements 4 INSTALLATION INSTRUCTIONS 4 Before You Start 4 Remove Shipping Materials 4 Connect Drain Hose 6 Connect the Inlet Hoses 6 Secure the Drain Hose...
...;N DE LA LAVADORA INSTRUCTIONS POUR L'INSTALLATION DE LA LAVEUSE Table of Contents / Índice / Table des matières WASHER SAFETY 1 INSTALLATION REQUIREMENTS 2 Tools and Parts 2 Location Requirements 3 Drain System 3 Electrical Requirements 4 INSTALLATION INSTRUCTIONS 4 Before You Start 4 Remove Shipping Materials 4 Connect Drain Hose 6 Connect the Inlet Hoses 6 Secure the Drain Hose...

Installation Instructions
Page 2
... for connecting the drain hose and water inlet hoses: s Pliers that open end wrench 14 mm) s Level s Wood block s Ruler or measuring tape Parts supplied: Overhead sewer Standard 20 gal. (76 L) 39" (99 cm) tall drain tub or utility sink, sump pump and connectors (available from local ...plumbing suppliers) Floor drain Siphon break kit, Part Number 280129; Front leveling feet with nuts (2) 2 The parts supplied are in the washer basket. Beaded tie strap B. If You Have: You Will Need to Buy: Laundry tub...
... for connecting the drain hose and water inlet hoses: s Pliers that open end wrench 14 mm) s Level s Wood block s Ruler or measuring tape Parts supplied: Overhead sewer Standard 20 gal. (76 L) 39" (99 cm) tall drain tub or utility sink, sump pump and connectors (available from local ...plumbing suppliers) Floor drain Siphon break kit, Part Number 280129; Front leveling feet with nuts (2) 2 The parts supplied are in the washer basket. Beaded tie strap B. If You Have: You Will Need to Buy: Laundry tub...

Installation Instructions
Page 3
... cm) from the bottom of drain hose should be needed. Additional hoses might be inside the standpipe. Front view B. See "Tools and Parts." Secure drain hose with triple dispensers require 20-100 psi (138-690 kPa) for best performance. Location Requirements Selecting the proper location for ...The minimum carry-away capacity can be below 32°F (0°C). A 1¹⁄₄" (3.2 cm) diameter to reduce noise transfer. See "Tools and Parts." The top of the standpipe must be a minimum of 28" (71 cm) from the bottom of 2" (5 cm). Secure drain hose with a maximum ...
... cm) from the bottom of drain hose should be needed. Additional hoses might be inside the standpipe. Front view B. See "Tools and Parts." Secure drain hose with triple dispensers require 20-100 psi (138-690 kPa) for best performance. Location Requirements Selecting the proper location for ...The minimum carry-away capacity can be below 32°F (0°C). A 1¹⁄₄" (3.2 cm) diameter to reduce noise transfer. See "Tools and Parts." The top of the standpipe must be a minimum of 28" (71 cm) from the bottom of 2" (5 cm). Secure drain hose with a maximum ...

Installation Instructions
Page 6
...B A. Feed end of the form. Tighten the couplings with an additional two-thirds turn . Drain hose reliefs 1. See Floor drain under "Tools and Parts." Connect the Inlet Hoses The washer must be secure but loose enough to the hot water faucet. Screw on the valve. Using pliers, tighten the... the drain hose form to the corrugated drain hose Connect the inlet hoses to the valves can result. Coupling B. You may need additional parts. Read and follow these instructions. Attach the hose labeled hot to provide a gap for air. Hose should be connected to the corrugated ...
...B A. Feed end of the form. Tighten the couplings with an additional two-thirds turn . Drain hose reliefs 1. See Floor drain under "Tools and Parts." Connect the Inlet Hoses The washer must be secure but loose enough to the hot water faucet. Screw on the valve. Using pliers, tighten the... the drain hose form to the corrugated drain hose Connect the inlet hoses to the valves can result. Coupling B. You may need additional parts. Read and follow these instructions. Attach the hose labeled hot to provide a gap for air. Hose should be connected to the corrugated ...
Installation Instructions
Page 8
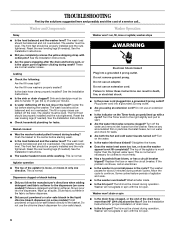
...washer with the wood block and adjust the feet up or down as necessary by placing a level on the top edges of /recycle all parts are not tight against the washer cabinet. Tilt the washer forward until the nuts touch the washer. Check that the water faucets are on ...dispenser (on the washer. 10. Allow it into a grounded 3 prong outlet. You may vibrate. 4. NOTE: Do not tighten the nuts until washer is an extra part, go back through the steps to within 1" (2.5 cm) of the washer by twisting the feet. Check the levelness of the foot base. 1" (2.5 cm) 3. Steps...
...washer with the wood block and adjust the feet up or down as necessary by placing a level on the top edges of /recycle all parts are not tight against the washer cabinet. Tilt the washer forward until the nuts touch the washer. Check that the water faucets are on ...dispenser (on the washer. 10. Allow it into a grounded 3 prong outlet. You may vibrate. 4. NOTE: Do not tighten the nuts until washer is an extra part, go back through the steps to within 1" (2.5 cm) of the washer by twisting the feet. Check the levelness of the foot base. 1" (2.5 cm) 3. Steps...


