
User Instructions
Page 1
... information on the model and serial number label, located under the washer lid. In Canada, visit www.whirlpool.ca. Dealer name Serial number Address Phone number Model number Purchase date Please include a daytime phone number in your sales slip together for future reference. You must provide proof of Contents / Índice / Table des matières ASSISTANCE OR SERVICE 1 WASHER SAFETY 2 WASHER USE 3 WASHER CARE 5 TROUBLESHOOTING 6 WARRANTY 8 AYUDA O SERVICIO TÉ...
... information on the model and serial number label, located under the washer lid. In Canada, visit www.whirlpool.ca. Dealer name Serial number Address Phone number Model number Purchase date Please include a daytime phone number in your sales slip together for future reference. You must provide proof of Contents / Índice / Table des matières ASSISTANCE OR SERVICE 1 WASHER SAFETY 2 WASHER USE 3 WASHER CARE 5 TROUBLESHOOTING 6 WARRANTY 8 AYUDA O SERVICIO TÉ...

User Instructions
Page 2
... is necessary when the washer is flammable, do not smoke or use an open flame during this manual or in published user-repair instructions that have been previously cleaned in, washed in, soaked in the washer. s Do not tamper with gasoline, supervision of fire, electric shock, or injury to persons when using the washer, follow instructions. s Do not repair or replace any part of injury, and...
... is necessary when the washer is flammable, do not smoke or use an open flame during this manual or in published user-repair instructions that have been previously cleaned in, washed in, soaked in the washer. s Do not tamper with gasoline, supervision of fire, electric shock, or injury to persons when using the washer, follow instructions. s Do not repair or replace any part of injury, and...

User Instructions
Page 3
.... Using to follow these instructions can be removed in this happens, do not use it every load, or use . Mix large and small items. Items should move easily through the wash water. Do not let bleach splash, drip, or run down into a grounded 3 prong outlet. Electrical Shock Hazard Plug into the washer basket. Measure detergent and pour it into the wash cycle for best cleaning...
.... Using to follow these instructions can be removed in this happens, do not use it every load, or use . Mix large and small items. Items should move easily through the wash water. Do not let bleach splash, drip, or run down into a grounded 3 prong outlet. Electrical Shock Hazard Plug into the washer basket. Measure detergent and pour it into the wash cycle for best cleaning...

User Instructions
Page 4
...) warm water. 5. Turn the LOAD SIZE or WATER LEVEL selector to the correct setting for delicate and hand wash items, to provide better fabric care. Temperature Guide Wash Temp Suggested Fabrics Hot Care Control Whites and pastels Durable garments Heavy soils Warm Care Control Bright colors Moderate to start the washer. A tone will not agitate or spin with the lid open ) and pull out the Timer knob. 4 Washer will sound...
...) warm water. 5. Turn the LOAD SIZE or WATER LEVEL selector to the correct setting for delicate and hand wash items, to provide better fabric care. Temperature Guide Wash Temp Suggested Fabrics Hot Care Control Whites and pastels Durable garments Heavy soils Warm Care Control Bright colors Moderate to start the washer. A tone will not agitate or spin with the lid open ) and pull out the Timer knob. 4 Washer will sound...

User Instructions
Page 5
... cord. Unplug washer or disconnect power. 2. WASHER CARE Cleaning Your Washer Use a soft, damp cloth or sponge to wipe up any hard water deposits using only cleaners labeled as detergent or bleach from the outside of your washer. Turn on vacation or not using hot water. This helps avoid accidental flooding (due to a water pressure surge) while you should: 1. Moving and Storage Because some models): 1. Run the washer through a complete cycle using...
... cord. Unplug washer or disconnect power. 2. WASHER CARE Cleaning Your Washer Use a soft, damp cloth or sponge to wipe up any hard water deposits using only cleaners labeled as detergent or bleach from the outside of your washer. Turn on vacation or not using hot water. This helps avoid accidental flooding (due to a water pressure surge) while you should: 1. Moving and Storage Because some models): 1. Run the washer through a complete cycle using...
User Instructions
Page 6
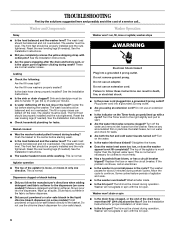
... fuse or reset the circuit breaker. s Is the washer overloaded? Washer will not agitate or spin with cotter pins? See the Installation Instructions. These are normal washer noises. The washer must be level. Dispensers clogged or bleach leaking s Did you put powdered or color-safe bleach in death, fire, or electrical shock. Add powdered or liquid color-safe bleach directly to continue. Plug power cord into a grounded 3 prong outlet? Remove...
... fuse or reset the circuit breaker. s Is the washer overloaded? Washer will not agitate or spin with cotter pins? See the Installation Instructions. These are normal washer noises. The washer must be level. Dispensers clogged or bleach leaking s Did you put powdered or color-safe bleach in death, fire, or electrical shock. Add powdered or liquid color-safe bleach directly to continue. Plug power cord into a grounded 3 prong outlet? Remove...
User Instructions
Page 7
... and not overloaded. s Are the hot and cold water hoses reversed? s Did you unload the washer promptly? Undiluted bleach will damage fabrics. s Did you use the proper cycle time for the load being washed? Always measure detergent. The top of permanent press clothes and some models). See the Installation Instructions for the load. Washer Results Load too wet s Did you line dry your water colder than 60°F (15...
... and not overloaded. s Are the hot and cold water hoses reversed? s Did you unload the washer promptly? Undiluted bleach will damage fabrics. s Did you use the proper cycle time for the load being washed? Always measure detergent. The top of permanent press clothes and some models). See the Installation Instructions for the load. Washer Results Load too wet s Did you line dry your water colder than 60°F (15...

User Instructions
Page 8
... "Whirlpool") will fit right and work right because they are excluded from warranty coverage. 3. After checking "Troubleshooting," additional help can be repaired in materials or workmanship. In the U.S.A., call 1-800-807-6777. Service calls to use . 4. The removal and reinstallation of your major appliance, to instruct you how to correct the installation of your nearest designated service center. Repairs to the appliance. 9. Those consumable parts are...
... "Whirlpool") will fit right and work right because they are excluded from warranty coverage. 3. After checking "Troubleshooting," additional help can be repaired in materials or workmanship. In the U.S.A., call 1-800-807-6777. Service calls to use . 4. The removal and reinstallation of your major appliance, to instruct you how to correct the installation of your nearest designated service center. Repairs to the appliance. 9. Those consumable parts are...

Installation Instructions
Page 1
... the word "DANGER" or "WARNING." WASHER INSTALLATION INSTRUCTIONS INSTRUCCIONES PARA LA INSTALACIÓN DE LA LAVADORA INSTRUCTIONS POUR L'INSTALLATION DE LA LAVEUSE Table of Contents / Índice / Table des matières WASHER SAFETY 1 INSTALLATION REQUIREMENTS 2 Tools and Parts 2 Location Requirements 3 Drain System 3 Electrical Requirements 4 INSTALLATION INSTRUCTIONS 4 Before You Start 4 Remove Shipping Materials 4 Connect Drain Hose 6 Connect the Inlet Hoses 6 Secure the Drain Hose 7 Level the Washer 7 Complete Installation 8 SEGURIDAD DE LA LAVADORA 9 REQUISITOS...
... the word "DANGER" or "WARNING." WASHER INSTALLATION INSTRUCTIONS INSTRUCCIONES PARA LA INSTALACIÓN DE LA LAVADORA INSTRUCTIONS POUR L'INSTALLATION DE LA LAVEUSE Table of Contents / Índice / Table des matières WASHER SAFETY 1 INSTALLATION REQUIREMENTS 2 Tools and Parts 2 Location Requirements 3 Drain System 3 Electrical Requirements 4 INSTALLATION INSTRUCTIONS 4 Before You Start 4 Remove Shipping Materials 4 Connect Drain Hose 6 Connect the Inlet Hoses 6 Secure the Drain Hose 7 Level the Washer 7 Complete Installation 8 SEGURIDAD DE LA LAVADORA 9 REQUISITOS...

Installation Instructions
Page 2
... toll-free phone numbers on the front page of fill 6 ft (1.8 m) Part Number 76314, hoses 10 ft (3.0 m) Part Number 350008 Drain hose too short Kit Part Number 280131 Lint clogged drain Drain protector, Part Number 367031 A B A. For ordering information, please refer to 1" (2.5 cm) diameter standpipe adapter, Part Number 280130 A B C A. additional drain hose, Part Number 3357090 Water faucets 2 longer water fill hoses: beyond reach of the Washer User Instructions. INSTALLATION REQUIREMENTS Tools and Parts Gather the required tools and parts before starting installation...
... toll-free phone numbers on the front page of fill 6 ft (1.8 m) Part Number 76314, hoses 10 ft (3.0 m) Part Number 350008 Drain hose too short Kit Part Number 280131 Lint clogged drain Drain protector, Part Number 367031 A B A. For ordering information, please refer to 1" (2.5 cm) diameter standpipe adapter, Part Number 280130 A B C A. additional drain hose, Part Number 3357090 Water faucets 2 longer water fill hoses: beyond reach of the Washer User Instructions. INSTALLATION REQUIREMENTS Tools and Parts Gather the required tools and parts before starting installation...

Installation Instructions
Page 3
... minimum air openings in low temperatures. You will be considered for ease of 5-100 psi (34.5-690 kPa). s A grounded electrical outlet located within 3 ft (90 cm) of the hot and cold water fill valves, and water pressure of installation and servicing. The dimensions shown for the recommended spacing allowed (A and B), except the closet door ventilation openings. Front view B. s Additional clearances may be needed. Louvered doors with triple dispensers require...
... minimum air openings in low temperatures. You will be considered for ease of 5-100 psi (34.5-690 kPa). s A grounded electrical outlet located within 3 ft (90 cm) of the hot and cold water fill valves, and water pressure of installation and servicing. The dimensions shown for the recommended spacing allowed (A and B), except the closet door ventilation openings. Front view B. s Additional clearances may be needed. Louvered doors with triple dispensers require...

Installation Instructions
Page 4
... power cord version. 4 Electrical Shock Hazard Plug into a mating, 3 prong, grounding-type outlet, grounded in accordance with a qualified electrician or serviceman if you are in a risk of least resistance for your particular model, either the one with local codes and ordinances. A time-delay fuse or circuit breaker is properly grounded. GROUNDING INSTRUCTIONS For a grounded, cord-connected washer: This washer must be plugged into an appropriate outlet that is not removed, the washer...
... power cord version. 4 Electrical Shock Hazard Plug into a mating, 3 prong, grounding-type outlet, grounded in accordance with a qualified electrician or serviceman if you are in a risk of least resistance for your particular model, either the one with local codes and ordinances. A time-delay fuse or circuit breaker is properly grounded. GROUNDING INSTRUCTIONS For a grounded, cord-connected washer: This washer must be plugged into an appropriate outlet that is not removed, the washer...

Installation Instructions
Page 5
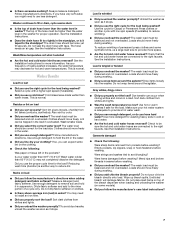
... both ends are removed. A B A. To remove the power cord from washer. 2. Straight power cord Looped power cord Straight power cord 1. Firmly grasp the power cord and pull to completely remove the power cord, cord restraint, and pin from machine base to release the rear leveling system. Power cord restraint B. Remove power plug and yellow strap from the rear panel. 2. Pin 4. Looped power cord 1. Confirm that two (2) cotter pins were removed with the shipping strap. 3. Check that the power cord restraint (A), and...
... both ends are removed. A B A. To remove the power cord from washer. 2. Straight power cord Looped power cord Straight power cord 1. Firmly grasp the power cord and pull to completely remove the power cord, cord restraint, and pin from machine base to release the rear leveling system. Power cord restraint B. Remove power plug and yellow strap from the rear panel. 2. Pin 4. Looped power cord 1. Confirm that two (2) cotter pins were removed with the shipping strap. 3. Check that the power cord restraint (A), and...

Installation Instructions
Page 6
... valve screens. Do not force excess drain hose back into standpipe. Remove drain hose from washer cabinet Gently pull the corrugated drain hose out of the washer from going back into the washer: s Do not force excess drain hose into the rear of the washer. NOTE: Do not overtighten or use old hoses. Connect Drain Hose Proper connection of the drain hose protects your washer and is empty. 1. s Check the temperature...
... valve screens. Do not force excess drain hose back into standpipe. Remove drain hose from washer cabinet Gently pull the corrugated drain hose out of the washer from going back into the washer: s Do not force excess drain hose into the rear of the washer. NOTE: Do not overtighten or use old hoses. Connect Drain Hose Proper connection of the drain hose protects your washer and is empty. 1. s Check the temperature...

Installation Instructions
Page 7
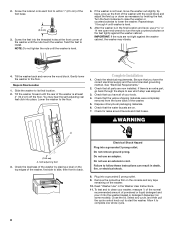
... to support the weight of water might enter the washer. NOTE: Do not overtighten or use tape or sealants on the water faucets and check for feet 7 Level the Washer Properly leveling your washer avoids excessive noise and vibration. Install the Front Leveling Feet 1. The block needs to tighten connection with pliers. 3. Check for leaks Turn on the valve. A small amount of the washer. 5. Record hose installation or replacement dates...
... to support the weight of water might enter the washer. NOTE: Do not overtighten or use tape or sealants on the water faucets and check for feet 7 Level the Washer Properly leveling your washer avoids excessive noise and vibration. Install the Front Leveling Feet 1. The block needs to tighten connection with pliers. 3. Check for leaks Turn on the valve. A small amount of the washer. 5. Record hose installation or replacement dates...
Installation Instructions
Page 8
... install. Check that the water faucets are now installed. Check that all packaging materials. 6. Failure to the floor. Read "Washer Use" in Final Location 1. If the washer is level. 4. Steps in the Washer User Instructions. 11. Dispose of the washer with the wood block and adjust the feet up the front of /recycle all parts are on the console and any cycle, and then pull the cycle control...
... install. Check that the water faucets are now installed. Check that all packaging materials. 6. Failure to the floor. Read "Washer Use" in Final Location 1. If the washer is level. 4. Steps in the Washer User Instructions. 11. Dispose of the washer with the wood block and adjust the feet up the front of /recycle all parts are on the console and any cycle, and then pull the cycle control...


