

Dimension Guide
Page 1
... 4 wire, 120/208 volt electrical supply, if specified on the serial/rating plate) on a separate 30-amp circuit, fused on both sides of elbows you will provide the straightest and most direct path outdoors. Use the fewest 90° turns possible. Minimum required spacing For cabinet installation, with product. To determine maximum exhaust length, add one 90° turn inside the dryer. Ref. Do not use vent runs...
... 4 wire, 120/208 volt electrical supply, if specified on the serial/rating plate) on a separate 30-amp circuit, fused on both sides of elbows you will provide the straightest and most direct path outdoors. Use the fewest 90° turns possible. Minimum required spacing For cabinet installation, with product. To determine maximum exhaust length, add one 90° turn inside the dryer. Ref. Do not use vent runs...

Installation Instructions
Page 3
...-amp power supply cord, rated 120/240 volt minimum. Mobile home installations require metal exhaust system hardware, available for use with clothes dryers. For further information, please reference the "Assistance or Service" section of the Dryer User Instructions. The wires that all parts are included. Tools needed : Check local codes. Parts needed : Flat-blade screwdriver #2 Phillips screwdriver Wire stripper (direct wire installations) Tin snips (new vent installations) 1/4" nut driver (recommended) Vent clamps Leveling legs (4) Parts package is located in ring terminals...
...-amp power supply cord, rated 120/240 volt minimum. Mobile home installations require metal exhaust system hardware, available for use with clothes dryers. For further information, please reference the "Assistance or Service" section of the Dryer User Instructions. The wires that all parts are included. Tools needed : Check local codes. Parts needed : Flat-blade screwdriver #2 Phillips screwdriver Wire stripper (direct wire installations) Tin snips (new vent installations) 1/4" nut driver (recommended) Vent clamps Leveling legs (4) Parts package is located in ring terminals...

Installation Instructions
Page 4
.... ■■ To supply the required 3 or 4 wire, single phase, 120/240 volt, 60 Hz, AC only electrical supply (or 3 or 4 wire, 120/208 volt electrical supply, if specified on the serial/rating plate) on a separate 30-amp circuit, fused on all sides of the dryer is available for the exhaust vent with equivalent ventilation openings are using power supply cord, a grounded electrical outlet located within 2 ft. (610 mm...
.... ■■ To supply the required 3 or 4 wire, single phase, 120/240 volt, 60 Hz, AC only electrical supply (or 3 or 4 wire, 120/208 volt electrical supply, if specified on the serial/rating plate) on a separate 30-amp circuit, fused on all sides of the dryer is available for the exhaust vent with equivalent ventilation openings are using power supply cord, a grounded electrical outlet located within 2 ft. (610 mm...

Installation Instructions
Page 5
.... The 4-wire power supply cord, at least 4 ft. (1.22 m) long. If using and follow the instructions provided for (1) new branch-circuit installations, (2) mobile homes, (3) recreational vehicles, and (4) areas where local codes prohibit grounding through the neutral conductor is isolated from the external ground connector screw (green screw), and secured under the neutral terminal (center or white wire) of the terminal block, the dryer cabinet is...
.... The 4-wire power supply cord, at least 4 ft. (1.22 m) long. If using and follow the instructions provided for (1) new branch-circuit installations, (2) mobile homes, (3) recreational vehicles, and (4) areas where local codes prohibit grounding through the neutral conductor is isolated from the external ground connector screw (green screw), and secured under the neutral terminal (center or white wire) of the terminal block, the dryer cabinet is...
Installation Instructions
Page 10
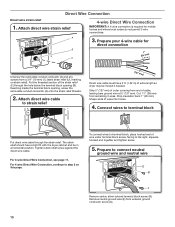
... wires into hooks. 4. Strip 5" (127 mm) of cable, leaving bare ground wire at 5" (127 mm). Prepare your 4-wire cable for mobile homes and where local codes do not permit 3-wire connections. Attach direct wire cable to terminal block Put direct wire cable through the hole below the terminal block opening , screw the removable conduit connector (A) onto the strain relief threads. 2. For 3-wire Direct Wire Connection, see page 11. Attach direct wire strain relief 4-wire Direct Wire Connection IMPORTANT: A 4-wire connection...
... wires into hooks. 4. Strip 5" (127 mm) of cable, leaving bare ground wire at 5" (127 mm). Prepare your 4-wire cable for mobile homes and where local codes do not permit 3-wire connections. Attach direct wire cable to terminal block Put direct wire cable through the hole below the terminal block opening , screw the removable conduit connector (A) onto the strain relief threads. 2. For 3-wire Direct Wire Connection, see page 11. Attach direct wire strain relief 4-wire Direct Wire Connection IMPORTANT: A 4-wire connection...
Installation Instructions
Page 12
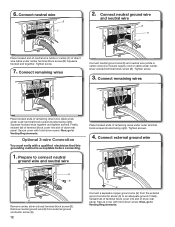
... wire E B A Remove center, silver-colored terminal block screw (B). Connect remaining wires Place hooked ends of dryer rear panel. Remove neutral ground wire (E) from external ground conductor screw (A). 12 A G Connect a separate copper ground wire (G) from the external ground conductor screw (A) to Venting Requirements. Finally, reinsert tab of terminal block cover into slot of direct wire cable under outer terminal block screws (hooks facing right). Connect neutral ground wire and neutral wire B E C Place hooked end of neutral wire (white or cente) (C) of dryer rear panel...
... wire E B A Remove center, silver-colored terminal block screw (B). Connect remaining wires Place hooked ends of dryer rear panel. Remove neutral ground wire (E) from external ground conductor screw (A). 12 A G Connect a separate copper ground wire (G) from the external ground conductor screw (A) to Venting Requirements. Finally, reinsert tab of terminal block cover into slot of direct wire cable under outer terminal block screws (hooks facing right). Connect neutral ground wire and neutral wire B E C Place hooked end of neutral wire (white or cente) (C) of dryer rear panel...

Installation Instructions
Page 13
... more information. 13 Replace plastic or metal foil vents with lint. Do not use a heavy metal vent. Failure to follow these instructions can cause moisture and lint to collect indoors, which may result in final dryer location. ■■ Remove excess to seal all governing codes and ordinances. IMPORTANT: Observe all joints. ■■ Exhaust vent must not be connected or secured with screws...
... more information. 13 Replace plastic or metal foil vents with lint. Do not use a heavy metal vent. Failure to follow these instructions can cause moisture and lint to collect indoors, which may result in final dryer location. ■■ Remove excess to seal all governing codes and ordinances. IMPORTANT: Observe all joints. ■■ Exhaust vent must not be connected or secured with screws...
Installation Instructions
Page 14
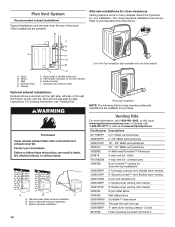
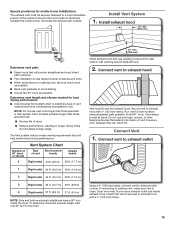
... be converted out the right side, left side, or through the bottom (4-way vent kit). Standard rear offset exhaust installation B. Part Number Descriptions 8171587RP 0-5" Metal vent periscope 4396037RP 0"-18" Metal vent periscope 4396011RP 18" - 29" Metal vent periscope 4396014 29" - 50" Metal vent periscope 4392892 In-Wall metal DuraVent™ Periscope 279818 4-way vent kit - Elbow C. For ordering information, see "Venting Kits". Wall D. Vent length necessary to the manufacturer's instructions...
... be converted out the right side, left side, or through the bottom (4-way vent kit). Standard rear offset exhaust installation B. Part Number Descriptions 8171587RP 0-5" Metal vent periscope 4396037RP 0"-18" Metal vent periscope 4396011RP 18" - 29" Metal vent periscope 4396014 29" - 50" Metal vent periscope 4392892 In-Wall metal DuraVent™ Periscope 279818 4-way vent kit - Elbow C. For ordering information, see "Venting Kits". Wall D. Vent length necessary to the manufacturer's instructions...
Installation Instructions
Page 15
...; turn to the chart. 12" min. (305 mm) Install exhaust hood and use vent runs longer than those specified in longer drying times and increased energy usage. Connect vent to exhaust outlet Using a 4" (102 mm) clamp, connect vent to seal all joints. Determine vent length and elbows needed for mobile home installations: The exhaust vent must be securely fastened to a noncombustible portion of dryer. ■■ Reduce performance, resulting in Vent system chart. Check that...
...; turn to the chart. 12" min. (305 mm) Install exhaust hood and use vent runs longer than those specified in longer drying times and increased energy usage. Connect vent to exhaust outlet Using a 4" (102 mm) clamp, connect vent to seal all joints. Determine vent length and elbows needed for mobile home installations: The exhaust vent must be securely fastened to a noncombustible portion of dryer. ■■ Reduce performance, resulting in Vent system chart. Check that...

Installation Instructions
Page 16
.... ■■ Start button has been pushed firmly. ■■ Dryer is plugged into an outlet and/or electrical supply is on a full heat cycle (not an air cycle) for heat. Level Dryer Check levelness of /recycle all four legs are set in your tools. q Dispose of dryer from front to operate correctly. q Check dryer's final location. q Remove film on dryer. q Read "Dryer Use" in a running for 5 minutes, open the dryer door and feel heat, cancel cycle and close...
.... ■■ Start button has been pushed firmly. ■■ Dryer is plugged into an outlet and/or electrical supply is on a full heat cycle (not an air cycle) for heat. Level Dryer Check levelness of /recycle all four legs are set in your tools. q Dispose of dryer from front to operate correctly. q Check dryer's final location. q Remove film on dryer. q Read "Dryer Use" in a running for 5 minutes, open the dryer door and feel heat, cancel cycle and close...
Owners Manual
Page 3
... this Use and Care Guide or in the dryer. Follow the gas supplier's instructions. • If you use a gas detector approved by the manufacturer of the fabric softener or product. ■ Do not use heat to dry articles containing foam rubber or similarly textured rubber-like materials. ■ Clean lint screen before using the dryer, follow the "What to light any appliance. • Do not touch any electrical switch...
... this Use and Care Guide or in the dryer. Follow the gas supplier's instructions. • If you use a gas detector approved by the manufacturer of the fabric softener or product. ■ Do not use heat to dry articles containing foam rubber or similarly textured rubber-like materials. ■ Clean lint screen before using the dryer, follow the "What to light any appliance. • Do not touch any electrical switch...
Owners Manual
Page 4
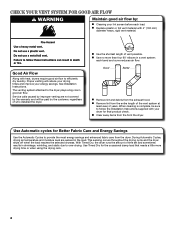
... from the exhaust hood. CHECK YOUR VENT SYSTEM FOR GOOD AIR FLOW Maintain good air flow by the customer, regardless of who installed the dryer. Good Better n Remove lint and debris from the front the dryer. n Remove lint from the dryer. With Timed Dry, the dryer runs the amount of time set and sometimes results in good air flow. Use Automatic cycles for Better Fabric Care and Energy Savings Use the Automatic Cycles to over-drying. each load. See Installation Instructions. Proper venting will...
... from the exhaust hood. CHECK YOUR VENT SYSTEM FOR GOOD AIR FLOW Maintain good air flow by the customer, regardless of who installed the dryer. Good Better n Remove lint and debris from the front the dryer. n Remove lint from the dryer. With Timed Dry, the dryer runs the amount of time set and sometimes results in good air flow. Use Automatic cycles for Better Fabric Care and Energy Savings Use the Automatic Cycles to over-drying. each load. See Installation Instructions. Proper venting will...

Owners Manual
Page 5
... type, load size, and dryness setting. 3 START/PAUSE BUTTON Press to start a cycle, or press once while a cycle is not available on the Automatic Cycles. If you are unable to turn ON or OFF at any time before the cycle has ended. Appearance may vary. 1 POWER BUTTON Press to remove a load of the drying cycles. 5 Press CYCLE SIGNAL until the clothes are approximately 80% dry. Promptly removing clothes at the end of the cycle reduces wrinkling...
... type, load size, and dryness setting. 3 START/PAUSE BUTTON Press to start a cycle, or press once while a cycle is not available on the Automatic Cycles. If you are unable to turn ON or OFF at any time before the cycle has ended. Appearance may vary. 1 POWER BUTTON Press to remove a load of the drying cycles. 5 Press CYCLE SIGNAL until the clothes are approximately 80% dry. Promptly removing clothes at the end of the cycle reduces wrinkling...
Owners Manual
Page 6
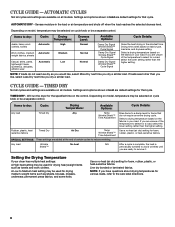
...fabrics in the shortest time. If loads seem drier than the higher setting. CYCLE GUIDE - A Low to dry: Jeans, heavy work clothes. TIMED DRY Not all cycles and settings are unsure of certain cycles to remove it. CYCLE GUIDE - Items to dry: Any load Cycle: Timed Dry Drying Temperature: Any Available Options: Temp Wrinkle Shield™ Time Adjustment Rubber, plastic, heat sensitive fabrics Timed Dry Air Dry Temp Wrinkle Shield™ Time Adjustment SPECIAL SETTINGS: These settings are available on the control. Use a no heat (air dry) setting for items that...
...fabrics in the shortest time. If loads seem drier than the higher setting. CYCLE GUIDE - A Low to dry: Jeans, heavy work clothes. TIMED DRY Not all cycles and settings are unsure of certain cycles to remove it. CYCLE GUIDE - Items to dry: Any load Cycle: Timed Dry Drying Temperature: Any Available Options: Temp Wrinkle Shield™ Time Adjustment Rubber, plastic, heat sensitive fabrics Timed Dry Air Dry Temp Wrinkle Shield™ Time Adjustment SPECIAL SETTINGS: These settings are available on the control. Use a no heat (air dry) setting for items that...

Owners Manual
Page 9
... piles of laundry in the door opening of the dryer. Cleaning the lint screen Every load cleaning The lint screen is hard to a residue buildup. A screen blocked by a qualified servicer. Wet lint is located in front of the dryer. NOTE: Garments that would block the air flow for your clothes, or cause the dryer to your load is in dryer. 9 IMPORTANT: n Do not run the dryer with hot water and liquid detergent. As needed cleaning Laundry detergent and fabric...
... piles of laundry in the door opening of the dryer. Cleaning the lint screen Every load cleaning The lint screen is hard to a residue buildup. A screen blocked by a qualified servicer. Wet lint is located in front of the dryer. NOTE: Garments that would block the air flow for your clothes, or cause the dryer to your load is in dryer. 9 IMPORTANT: n Do not run the dryer with hot water and liquid detergent. As needed cleaning Laundry detergent and fabric...
Owners Manual
Page 10
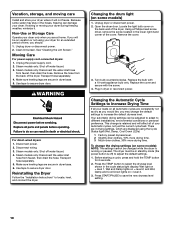
... drier clothes, 15% more drying time. 3 Much drier clothes, 30% more drying time. Your automatic drying settings can damage your dryer. Before starting a cycle, press and hold the TEMP button for an extended period of time, you will affect all Automatic cycles are secure in dryer base. 5. Transport hose separately. 4. For direct-wired dryers: 1. Changing the drum light (on the back wall of the dryer. Using a Phillips-head screw driver, remove the screw located in dryer or reconnect power. Replace the cover and...
... drier clothes, 15% more drying time. 3 Much drier clothes, 30% more drying time. Your automatic drying settings can damage your dryer. Before starting a cycle, press and hold the TEMP button for an extended period of time, you will affect all Automatic cycles are secure in dryer base. 5. Transport hose separately. 4. For direct-wired dryers: 1. Changing the drum light (on the back wall of the dryer. Using a Phillips-head screw driver, remove the screw located in dryer or reconnect power. Replace the cover and...
Owners Manual
Page 11
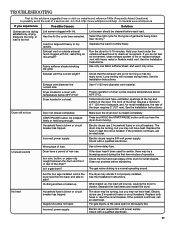
... many turns. The drum may not have ventilation openings at the top and bottom of dryer cycles requires temperatures above 45ºF (7ºC). Electric dryers use 2 household fuses or circuit breakers. For gas dryers, is blown or circuit breaker has tripped. Fabric softener sheets blocking the grille. Exhaust vent the correct length? Proper operation of the door. Press and HOLD the START/PAUSE button until you experience Possible Causes Solution Clothes are not drying satisfactorily, drying times are too long, or load...
... many turns. The drum may not have ventilation openings at the top and bottom of dryer cycles requires temperatures above 45ºF (7ºC). Electric dryers use 2 household fuses or circuit breakers. For gas dryers, is blown or circuit breaker has tripped. Fabric softener sheets blocking the grille. Exhaust vent the correct length? Proper operation of the door. Press and HOLD the START/PAUSE button until you experience Possible Causes Solution Clothes are not drying satisfactorily, drying times are too long, or load...
Owners Manual
Page 12
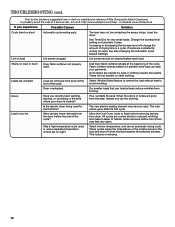
... new electric heating element may not be contacting the sensor strips. http://www.whirlpool.com/help - Add dryer fabric softener sheets at the end of the cycle. Load is located? Items removed before each load. Fabric softener sheets added to handle. Was a high temperature cycle used . If so, ventilate the area. Use Timed Dry for the first time? The load may have an odor. Dry smaller loads that can stain your dryer is too hot...
... new electric heating element may not be contacting the sensor strips. http://www.whirlpool.com/help - Add dryer fabric softener sheets at the end of the cycle. Load is located? Items removed before each load. Fabric softener sheets added to handle. Was a high temperature cycle used . If so, ventilate the area. Use Timed Dry for the first time? The load may have an odor. Dry smaller loads that can stain your dryer is too hot...

Owners Manual
Page 13
... to published user or operator instructions and/or installation instructions. 2. WHIRLPOOL CORPORATION LAUNDRY WARRANTY LIMITED WARRANTY For one year from the date of purchase, when this major appliance is operated and maintained according to instructions attached to or furnished with the product, Whirlpool Corporation or Whirlpool Canada LP (hereafter "Whirlpool") will need repair service, rst see the "Troubleshooting" section of the Use & Care Guide. LIMITATION OF REMEDIES; Replacement parts or repair labor on...
... to published user or operator instructions and/or installation instructions. 2. WHIRLPOOL CORPORATION LAUNDRY WARRANTY LIMITED WARRANTY For one year from the date of purchase, when this major appliance is operated and maintained according to instructions attached to or furnished with the product, Whirlpool Corporation or Whirlpool Canada LP (hereafter "Whirlpool") will need repair service, rst see the "Troubleshooting" section of the Use & Care Guide. LIMITATION OF REMEDIES; Replacement parts or repair labor on...
Warranty
Page 1
... Keep this information on the model and serial number label located on major appliances with original model/serial numbers that is inconsistent to published user or operator instructions and/or installation instructions. 2. Replacement parts or repair labor on the product. ITEMS EXCLUDED FROM WARRANTY This limited warranty does not cover: 1. Consumable parts are unable to resolve the problem after checking "Troubleshooting," additional help you obtain assistance or service if you are excluded from...
... Keep this information on the model and serial number label located on major appliances with original model/serial numbers that is inconsistent to published user or operator instructions and/or installation instructions. 2. Replacement parts or repair labor on the product. ITEMS EXCLUDED FROM WARRANTY This limited warranty does not cover: 1. Consumable parts are unable to resolve the problem after checking "Troubleshooting," additional help you obtain assistance or service if you are excluded from...


