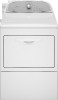
Whirlpool WED5550XW Support Question
Whirlpool WED5550XW Support Question
Find answers below for this question about Whirlpool WED5550XW.Need a Whirlpool WED5550XW manual? We have 4 online manuals for this item!
Question posted by lastone3030 on October 21st, 2011
Dryer Door
The door on my dryer will not stay shut to dry loads. It pops open after about a second. There is no entry in the care guide to troubleshoot this problem. What could it be?
Current Answers
Related Whirlpool WED5550XW Manual Pages
Dimension Guide - Page 1

... and Care Guide.
Exhaust hood styles: B
4"
C
A
(102 mm)
Dryer dimensions
OVERALL DIMENSIONS
43 " (1092 mm)
23 ¾" (603 mm)
43 " (1092 mm)
13 ¾" (349 mm)
*29 1/2" (749 mm)
27" (687 mm)
A
*29 1/2" (749 mm)
27" (687 mm)
B
A. Plan the installation to change without notice. Recessed area
C. Louvered doors with a door, the minimum ventilation openings in...
Installation Instructions - Page 2
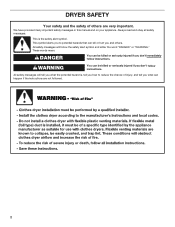
... can be killed or seriously injured if you don't follow instructions.
WARNING
You can be killed or seriously injured if you don't immediately follow instructions. DRYER SAFETY
Your safety and the safety of injury, and tell you what can happen if the instructions are very important. Always read and obey all...
Installation Instructions - Page 3

... before starting installation. Mobile home installations require metal exhaust system hardware, available for purchase from the dealer from whom you purchased your dryer. The kit should be type SRD or SRDT and be at least 4 ft. (1.22 m) long. Parts needed :
Flat-... Parts
Parts supplied:
Gather the required tools and parts before purchasing parts. Check that opens to the dryer must end in...
Installation Instructions - Page 4

... the total weight (dryer and load) of dryer. See "Venting Requirements."
Closet door with a door, minimum ventilation openings in remodeling after 1996, dryer circuits involved in the top and bottom of the dryer in .2*
(310 cm...Additional clearances might not shut off at the end of the dryer is adequate.
4
The opening (such as the dryer exhaust opening. closet or confined ...
Installation Instructions - Page 5

... current-carrying wires must have 3 10-gauge solid copper wires and match a 3-wire receptacle of NEMA Type 14-30 R. The wires that connect to the dryer must have 4 10-gauge solid copper wires and match a 4-wire receptacle of NEMA Type 10-30R.
5 If your outlet looks like this :
3-wire receptacle (10...
Installation Instructions - Page 6

... until it is no longer visible.
Screw legs into leg holes by hand, use a large flat piece of dryer.
Now stand the dryer on cardboard.
6 place under entire back edge of cardboard from dryer carton;
Leave enough room for leveling legs
Examine leveling legs, find diamond marking. Screw in leveling legs
Excessive Weight...
Installation Instructions - Page 16

... and cardboard from under the dryer. Be sure vent is in a running for 5 minutes, open the dryer door and feel heat, cancel cycle and close the door.
q Set the dryer on dryer. The odor will not start the dryer. 2.
NOTE: You may be level for
the dryer. Level Dryer
Check levelness of your Use and Care Guide.
If there is first heated...
Installation Instructions - Page 17
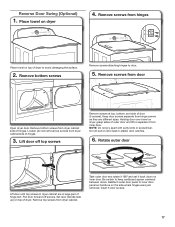
..., bottom, and side of door (5 screws). Keep door screws separate from dryer cabinet side of outer door and lift to inner door panel so handle is on dryer
4. Remove top screws from door
Open dryer door. Be certain to door.
5. Holding door over towel on inner door. Insert 5 door screws.
17 Lift door off screws. Reverse Door Swing (Optional)
1. Take outer door and rotate it 180...
Installation Instructions - Page 18

... bottom holes on the left side. If it is at the bottom of the hinge. Position door so large end of a service call. Check door strike alignment
Reattach door hinges to adjust alignment. Troubleshooting
See the Use and Care Guide or visit our website and
reference Frequently Asked Questions to opposite side using the same 4 screws...
Owners Manual - Page 3
...and Care Guide or in published user-repair instructions that you understand and have been previously cleaned in, washed in, soaked in the dryer. ...door to the drying compartment.
■ Do not reach into the dryer if the drum is detected, follow basic precautions,
including the following:
■ Read all instructions before or after each load. ■ Keep area around the exhaust opening...
Owners Manual - Page 4
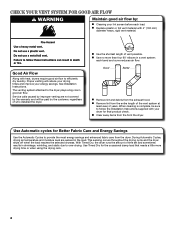
... shrinkage, wrinkling, and static due to efficiently dry laundry. With Timed Dry, the dryer runs the amount of vent possible. Good
Better
n Remove lint and debris from the front the dryer. n Clear away items from the exhaust hood. This sensing occurs throughout the drying cycle and the dryer shuts off when the load reaches the selected dryness. n Replace plastic...
Owners Manual - Page 5

...drying in the load and air temperature and shuts off ) is in process to 60 or 150 minutes for models with two choices, 90 minutes for your laundry load.
Timed Dry Will run the dryer... "Cycle Guide" for detailed descriptions of a cycle.
Press the WRINKLE SHIELD™ button to turn the dryer on and off.
2 DRYER CYCLE Knob Use your Dryer Cycle Knob to select for a load, select ...
Owners Manual - Page 6
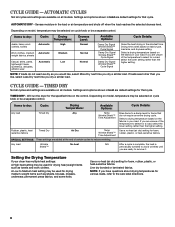
... Details:
Dries items to the care label directions.
6
A Low to remove it.
Senses moisture in your load. Drying time varies based on the fabrics in the shortest time. If you are available on the control. CYCLE GUIDE -
If you are available on the fabrics in the load or air temperature and shuts off when the load reaches the...
Owners Manual - Page 7
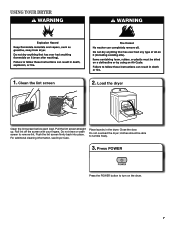
... screen firmly back into place. Do not overload the dryer; Clean the lint screen
2. Do not rinse or wash screen to turn on the dryer.
7 Close the door. clothes should be able to tumble freely.
3. Load the dryer
Clean the lint screen before each load.
Place laundry in the dryer. Pull the lint screen straight up.
For additional...
Owners Manual - Page 9

This includes clearing piles of laundry in dryer.
9
Wet lint is removed. 2. NOTE: Garments that would block the air flow for your clothes, or cause the dryer to stop before your load is completely dry. Dry these items inside out to remove lint. Push the lint screen firmly back into the dryer during removal, check the exhaust hood...
Owners Manual - Page 10
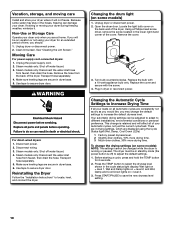
...locate, level, and connect the dryer.
Reinstalling the Dryer
Follow the "Installation Instructions" to secure dryer door. Unplug dryer or disconnect power. 2. Open the dryer door. Remove the cover.
3. Replace the bulb with the screw.
4.
Changing the Automatic Cycle Settings to Increase Drying Time
If all your loads on some models)
1. Your automatic drying settings can damage your...
Owners Manual - Page 11
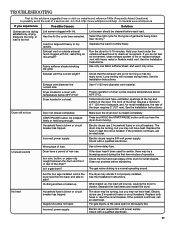
... open on the supply line. Electric dryers use 2 household fuses or circuit breakers. Has the Air Dry cycle been selected. Long venting will not run
Door not closed completely.
See the Installation Instructions. Fabric softener sheets blocking the grille. Make sure the dryer door is the dryer level front to back and side to dry quickly.
If the problem...
Owners Manual - Page 12
...drying time in the load and shut off when the load reaches the selected dryness.
Fabric softener sheets added to finish before each load.
Dry smaller loads that can stain your dryer is too hot
Is the electric dryer... on load or drum
Dryer fabric softener not properly used for very small loads.
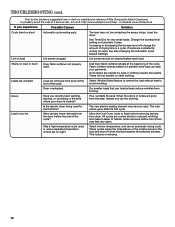
TROUBLESHOOTING cont. Select Wrinkle Shield feature to tumble the load without heat...
Owners Manual - Page 13

... CORPORATION LAUNDRY WARRANTY
... or province to Whirlpool within 30 days from the date of the Use & Care Guide. Pick up and delivery. Some states and provinces do not allow limitations on ... Canada and applies only when the major appliance is inconsistent to resolve the
problem after checking "Troubleshooting," additional help you obtain assistance or service if you need it was purchased...
Warranty - Page 1
...your major appliance, to replace or repair house fuses, or to resolve the
problem after checking "Troubleshooting," additional help you obtain assistance or service if you are excluded from warranty... can be provided by Whirlpool.
5. WHIRLPOOL CORPORATION LAUNDRY WARRANTY
LIMITED WARRANTY
For one year from the date of the Use & Care Guide. WHIRLPOOL SHALL NOT BE LIABLE FOR INCIDENTAL OR ...
Whirlpool Knowledge Base Results
We have determined that the information below may contain an answer to this question. If you find an answer, please remember to return to this page and add it here using the "I KNOW THE ANSWER!" button above. It's that easy to earn points!-
The ice maker on my upright freezer is not producing ice or not enough ice
...transferred to review your Use and Care Guide. Do not force the wire shutoff...service provider: Product Category Washer or Dryer Refrigerator or Freezer Dishwasher Electric Range,... Hood Ice Machine Commercial Laundry Vacuum Cleaner Central Vac Dehumidifier...of the above, there may be a problem with the water line and you may...times the freezer door is opened. The ice maker on my ... -
Can I change the door-swing direction? - Front-load washer
... I change the door-swing direction? - Front-load washer No. The washer door is not reversible. However, the dryer door can be reversed. See the Dryer Installation Instructions for details. If you do not have your Installation Instructions, enter your front-load washer and dryer FAQs Knowledgebase search tips Loads are tangling and twisting - Guides: /shared.whirlpoolcorp... -
The ice maker on my upright freezer is not producing ice or not enough ice
... large amount of the above, there may be a problem with a plastic utensil. Allow 24 hours for your ...Care Guide for ice maker to produce more than two to three pounds (907 to eight hours before adding large amounts of times the freezer door is cooled, the ice maker should produce 70-120 cubes every 24 hours. Find a local service provider: Product Category Washer or Dryer...
Similar Questions

Dryer Sensor - Does This Dryer Have A Dry Sensor That Requires Regular Cleaning?
does this dryer have a "dry" sensor that requires periodic cleaning?
does this dryer have a "dry" sensor that requires periodic cleaning?
(Posted by pratt7872 5 years ago)

1 Yr Old Wgd8200yw Dryer Does Not Dry Clothes
Dryer will start the fire and heat, but no air flows out the exhaust.I have removed the external ven...
Dryer will start the fire and heat, but no air flows out the exhaust.I have removed the external ven...
(Posted by kenwenzel 10 years ago)

Dryer Won't Dry Clothes But Is Spinning And Getting Super Hot??
(Posted by Ckadavy 11 years ago)

Dryer Staying On
Dryer will not stay on after pressing the Start button. It beeps like an alarm.
Dryer will not stay on after pressing the Start button. It beeps like an alarm.
(Posted by willc29325 11 years ago)

My Gas Dryer Is Not Drying My Clothes.
I have checked my breaker and cleared my vent. Its still not drying what else could it be?
I have checked my breaker and cleared my vent. Its still not drying what else could it be?
(Posted by dsolis4187 13 years ago)