Owners Manual
Page 8
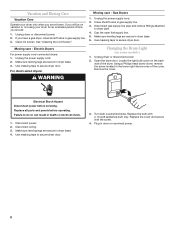
.... 6. Make sure leveling legs are at home. Electric Dryers For power supply cord-connected dryers: 1. For direct-wired dryers: Changing the Drum Light (on the back wall of the cover. Unplug dryer or disconnect power. 2. Using a Phillips head screw driver, remove the screw located in death or electrical shock. 1. WARNING Electrical Shock Hazard Disconnect power before operating. Disconnect wiring. 3. Replace the...
.... 6. Make sure leveling legs are at home. Electric Dryers For power supply cord-connected dryers: 1. For direct-wired dryers: Changing the Drum Light (on the back wall of the cover. Unplug dryer or disconnect power. 2. Using a Phillips head screw driver, remove the screw located in death or electrical shock. 1. WARNING Electrical Shock Hazard Disconnect power before operating. Disconnect wiring. 3. Replace the...
Installation Instructions
Page 2
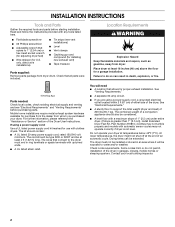
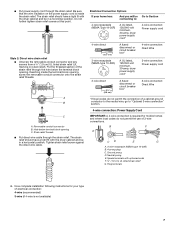
... were included. 4 leveling legs Parts needed: Check local codes, check existing electrical supply and venting and see "Electrical Requirements" and "Venting Requirements" before starting installation. Contact your dryer. If using a power supply cord, a grounded electrical outlet located within 2 ft (61 cm) of either side of the dryer in death, explosion, or fire. Location Requirements WARNING Explosion Hazard Keep...
... were included. 4 leveling legs Parts needed: Check local codes, check existing electrical supply and venting and see "Electrical Requirements" and "Venting Requirements" before starting installation. Contact your dryer. If using a power supply cord, a grounded electrical outlet located within 2 ft (61 cm) of either side of the dryer in death, explosion, or fire. Location Requirements WARNING Explosion Hazard Keep...
Installation Instructions
Page 4
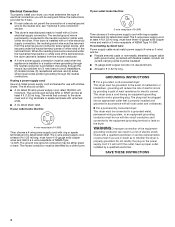
... connected to the dryer must end in a risk of electric shock. Grounding through the neutral is prohibited for electric current. The kit should be type SRD or SRDT and be : ■ Flexible armored cable or nonmetallic sheathed copper cable (with ground wire), protected with clothes dryers. The 4-wire power supply cord, at least 4 ft (1.22 m) long. If...
... connected to the dryer must end in a risk of electric shock. Grounding through the neutral is prohibited for electric current. The kit should be type SRD or SRDT and be : ■ Flexible armored cable or nonmetallic sheathed copper cable (with ground wire), protected with clothes dryers. The 4-wire power supply cord, at least 4 ft (1.22 m) long. If...
Installation Instructions
Page 5
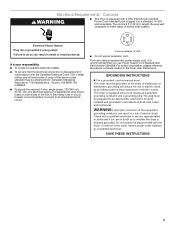
...; For a grounded, cord-connected dryer: This dryer must be sure that you are using a replacement power supply cord, it will reduce the risk of electric shock. WARNING: Improper connection of the line. SAVE THESE INSTRUCTIONS 5 grounding conductor can result in conformance with a cord having an equipmentgrounding conductor and a grounding plug. Check with a CSA International Certified Power Cord intended to...
...; For a grounded, cord-connected dryer: This dryer must be sure that you are using a replacement power supply cord, it will reduce the risk of electric shock. WARNING: Improper connection of the line. SAVE THESE INSTRUCTIONS 5 grounding conductor can result in conformance with a cord having an equipmentgrounding conductor and a grounding plug. Check with a CSA International Certified Power Cord intended to...

Installation Instructions
Page 6
...). Strain relief tab pointing up and the other is pointing down screw and terminal block cover. Only Power Supply Cord Direct Wire WARNING WARNING Fire Hazard Use a new UL listed 30 amp power supply cord. Disconnect power before making electrical connections. Terminal block cover B. Tighten strain relief screws just enough to green ground connector. Ground wire...
...). Strain relief tab pointing up and the other is pointing down screw and terminal block cover. Only Power Supply Cord Direct Wire WARNING WARNING Fire Hazard Use a new UL listed 30 amp power supply cord. Disconnect power before making electrical connections. Terminal block cover B. Tighten strain relief screws just enough to green ground connector. Ground wire...
Installation Instructions
Page 7
... your type of electrical connection: 4-wire (recommended) 3-wire (if 4-wire is not available) 7 Now complete installation following instructions for your home has: And you will be connecting to: Go to Section 4-wire receptacle (NEMA Type 14-30R) A UL listed, 120/240-volt minimum, 30-amp, dryer power supply cord* 4-wire connection: Power supply cord 4-wire direct...
... your type of electrical connection: 4-wire (recommended) 3-wire (if 4-wire is not available) 7 Now complete installation following instructions for your home has: And you will be connecting to: Go to Section 4-wire receptacle (NEMA Type 14-30R) A UL listed, 120/240-volt minimum, 30-amp, dryer power supply cord* 4-wire connection: Power supply cord 4-wire direct...

Installation Instructions
Page 8
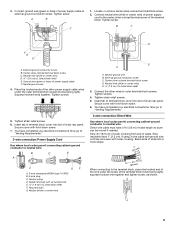
..., silvercolored terminal block screw. Secure cover with hold-down screw. 7. You have 5 ft (1.52 m) of power supply cord to outer terminal block screws. B. Neutral ground wire 8 Remove neutral ground wire from ...go to the terminal block, place the hooked end of the wire under the screw of dryer rear panel. Tighten screw. Cut 1¹⁄₂" (3.8 cm) from external ground ...(1.9 cm) UL listed strain relief E. Direct wire cable must have completed your electrical connections. Center silver-colored terminal block screw C. Tighten screw. Remove neutral ground wire...
..., silvercolored terminal block screw. Secure cover with hold-down screw. 7. You have 5 ft (1.52 m) of power supply cord to outer terminal block screws. B. Neutral ground wire 8 Remove neutral ground wire from ...go to the terminal block, place the hooked end of the wire under the screw of dryer rear panel. Tighten screw. Cut 1¹⁄₂" (3.8 cm) from external ground ...(1.9 cm) UL listed strain relief E. Direct wire cable must have completed your electrical connections. Center silver-colored terminal block screw C. Tighten screw. Remove neutral ground wire...
Installation Instructions
Page 9
...dryer rear panel. A B C 1. B C D F E D A. Secure cover with hold -down screw. 6. Spade terminals with outer covering. External ground conductor screw C. Connect the other power supply cable wires under the screw of power supply cord...power supply cable F. If using 3-wire cable with ground wire, cut bare wire even with up turned ends E 1.9 cm) UL listed strain relief F. Ground wire (green or bare) of cable. Direct wire cable must have completed your electrical... into slot of extra length so dryer can be moved if needed. You have 5 ft (1.52 m) of dryer rear panel.
...dryer rear panel. A B C 1. B C D F E D A. Secure cover with hold -down screw. 6. Spade terminals with outer covering. External ground conductor screw C. Connect the other power supply cable wires under the screw of power supply cord...power supply cable F. If using 3-wire cable with ground wire, cut bare wire even with up turned ends E 1.9 cm) UL listed strain relief F. Ground wire (green or bare) of cable. Direct wire cable must have completed your electrical... into slot of extra length so dryer can be moved if needed. You have 5 ft (1.52 m) of dryer rear panel.

Installation Instructions
Page 10
...tab of terminal block cover into slot of dryer rear panel. Place the hooked end of the neutral wire (white or center wire) of power supply cable under center, silver-colored terminal block screw. Tighten screws. 4. You have completed your electrical connections. Neutral wire (white or center wire)...Requirements." Neutral ground wire E B. Center silver-colored terminal block screw D. Insert tab of terminal block cover into slot of power supply cord/cable under the center screw of the other wires to an adequate ground. 10 External ground conductor screw B. Neutral ground wire...
...tab of terminal block cover into slot of dryer rear panel. Place the hooked end of the neutral wire (white or center wire) of power supply cable under center, silver-colored terminal block screw. Tighten screws. 4. You have completed your electrical connections. Neutral wire (white or center wire)...Requirements." Neutral ground wire E B. Center silver-colored terminal block screw D. Insert tab of terminal block cover into slot of power supply cord/cable under the center screw of the other wires to an adequate ground. 10 External ground conductor screw B. Neutral ground wire...

Installation Instructions
Page 15
...vent is still no heat, contact a qualified technician. When the dryer has been running or "On" position. ■ Start button has been pushed firmly. ■ Dryer is plugged into an outlet and/or electrical supply is closed. 11. If there is not crushed or kinked...: 9. In the U.S.A. ■ For power supply cord installation, plug into a grounded 4 prong outlet. Wipe the dryer drum interior thoroughly with a damp cloth to see which step was skipped. 10. Complete Installation 1. Dispose of your tools. Read "Dryer Use" in the Dryer User Instructions. ■ Controls are now ...
...vent is still no heat, contact a qualified technician. When the dryer has been running or "On" position. ■ Start button has been pushed firmly. ■ Dryer is plugged into an outlet and/or electrical supply is closed. 11. If there is not crushed or kinked...: 9. In the U.S.A. ■ For power supply cord installation, plug into a grounded 4 prong outlet. Wipe the dryer drum interior thoroughly with a damp cloth to see which step was skipped. 10. Complete Installation 1. Dispose of your tools. Read "Dryer Use" in the Dryer User Instructions. ■ Controls are now ...


