Ventilation Specification
Page 1
DRYER VENTING SPECIFICATIONS Table of Contents DRYER SAFETY...1 INSTALLATION REQUIREMENTS ...4 Venting Requirements ...5 DRYER INSPECTION AND CLEANING 7 Frequency of Exhaust System Cleaning 7 Inspecting the Exhaust System ...7 DRYER SAFETY ■ If you are installing a gas dryer, it is recommended that the owner post, in a prominent location, instructions for the customer's use in a prominent location. Post the following warning in the event the customer smells gas. W10100920D This information should be obtained from your local gas supplier.
DRYER VENTING SPECIFICATIONS Table of Contents DRYER SAFETY...1 INSTALLATION REQUIREMENTS ...4 Venting Requirements ...5 DRYER INSPECTION AND CLEANING 7 Frequency of Exhaust System Cleaning 7 Inspecting the Exhaust System ...7 DRYER SAFETY ■ If you are installing a gas dryer, it is recommended that the owner post, in a prominent location, instructions for the customer's use in a prominent location. Post the following warning in the event the customer smells gas. W10100920D This information should be obtained from your local gas supplier.

Ventilation Specification
Page 4
...vacuum) when measured at the connection between the vent system and the dryer's vent pipe, for use in the design of dryer vent systems. Whirlpool does not design multidryer vent systems, nor does Whirlpool review or provide approvals for vent systems designed by third-party engineering firms...the design of the central duct system. Exhaust System Requirements Venting systems for more information. Consult your local building inspector for Whirlpool dryers must meet codes requirements. 2. To avoid lint accumulation in the laundry area. Moisture A normal towel load contains some ...
...vacuum) when measured at the connection between the vent system and the dryer's vent pipe, for use in the design of dryer vent systems. Whirlpool does not design multidryer vent systems, nor does Whirlpool review or provide approvals for vent systems designed by third-party engineering firms...the design of the central duct system. Exhaust System Requirements Venting systems for more information. Consult your local building inspector for Whirlpool dryers must meet codes requirements. 2. To avoid lint accumulation in the laundry area. Moisture A normal towel load contains some ...

Ventilation Specification
Page 5
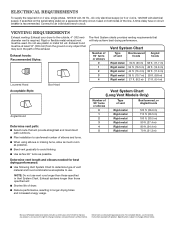
... by 10 ft (3.0 m) (from 40 ft [12.2 m] to 30 ft [9.1 m]). Codes Agency Approvals All Whirlpool electric dryer models, including "long vent dryers," Turbo Vent™ dryers and combo washer/dryer units that have an inlet and outlet for the UL or CSA listing can be at least 1,200 FPM (feet...mm) on the maximum rated vent length shown in the United States and Canada are UL listed (reference UL 2158 standard), and all Whirlpool gas dryer models are sold in the Installation Instructions included with two 90° bends, and the installation requires three 90° bends, the total...
... by 10 ft (3.0 m) (from 40 ft [12.2 m] to 30 ft [9.1 m]). Codes Agency Approvals All Whirlpool electric dryer models, including "long vent dryers," Turbo Vent™ dryers and combo washer/dryer units that have an inlet and outlet for the UL or CSA listing can be at least 1,200 FPM (feet...mm) on the maximum rated vent length shown in the United States and Canada are UL listed (reference UL 2158 standard), and all Whirlpool gas dryer models are sold in the Installation Instructions included with two 90° bends, and the installation requires three 90° bends, the total...
Ventilation Specification
Page 6
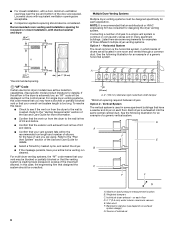
... excess of vent you may be displayed on each floor D. 0.1" (2.5 mm) water column maximum vacuum E. Weighted dampers C. Individual dryer exhaust - Listed here are some apartment buildings that have your vent system falls within the recommended run length and number of elbows for...of a generic horizontal system. 24 in.2 * (155 cm2) *Recommended spacing. 3"* (76 mm) 1"* (25 mm) "AF" Code Certain electronic dryer models have a blocked or partially blocked vent or that designed the system should also be designed specifically for details. ■ Select a Timed Dry heated ...
... excess of vent you may be displayed on each floor D. 0.1" (2.5 mm) water column maximum vacuum E. Weighted dampers C. Individual dryer exhaust - Listed here are some apartment buildings that have your vent system falls within the recommended run length and number of elbows for...of a generic horizontal system. 24 in.2 * (155 cm2) *Recommended spacing. 3"* (76 mm) 1"* (25 mm) "AF" Code Certain electronic dryer models have a blocked or partially blocked vent or that designed the system should also be designed specifically for details. ■ Select a Timed Dry heated ...
Ventilation Specification
Page 7
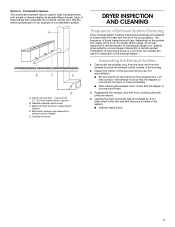
...exhaust system. In commercial usage or in the vent and that the flapper or louvers move freely. 3. Disconnect the exhaust duct from the dryer and from the exhaust hood (at several different levels. Lint may be inspected periodically and cleaned to ensure that the exhaust air is ...duct and hood, checking that the flappers or louvers will vary, depending on exhaust system design) E. Inspecting the Exhaust System 1. maximum of the dryer. Combination System The combination system may collect in the exhaust hood so that the joints are no leaks in high-rise apartments, with a bank...
...exhaust system. In commercial usage or in the vent and that the flapper or louvers move freely. 3. Disconnect the exhaust duct from the dryer and from the exhaust hood (at several different levels. Lint may be inspected periodically and cleaned to ensure that the exhaust air is ...duct and hood, checking that the flappers or louvers will vary, depending on exhaust system design) E. Inspecting the Exhaust System 1. maximum of the dryer. Combination System The combination system may collect in the exhaust hood so that the joints are no leaks in high-rise apartments, with a bank...
Use & Care Guide
Page 2
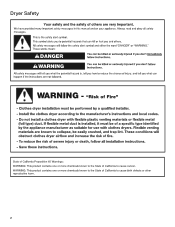
Dryer Safety 2
Dryer Safety 2

Use & Care Guide
Page 4
... Installation Instructions. each load. ■■ Replace plastic or foil vent material with your dryer for final product check. ■■ Clear away items from the front the dryer. The venting system attached to the dryer plays a big role in the load. Check Your Vent System for Good Air Flow Maintain... good air flow by improper venting are sensed in good air flow. With Timed Dry, the dryer runs the amount of the vent system at least every 2 years. Use Timed Dry for Better Fabric Care and Energy Savings Use the ACCUDRY...
... Installation Instructions. each load. ■■ Replace plastic or foil vent material with your dryer for final product check. ■■ Clear away items from the front the dryer. The venting system attached to the dryer plays a big role in the load. Check Your Vent System for Good Air Flow Maintain... good air flow by improper venting are sensed in good air flow. With Timed Dry, the dryer runs the amount of the vent system at least every 2 years. Use Timed Dry for Better Fabric Care and Energy Savings Use the ACCUDRY...
Use & Care Guide
Page 5
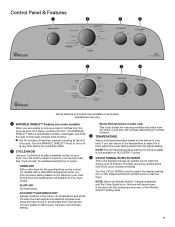
... WRINKLE SHIELD™ feature periodically tumbles, rearranges, and fluffs the load to select for detailed descriptions of the temperature to help keep wrinkles from the dryer as soon as it stops, wrinkles can form. See "Cycle Guide" for a load, select the lower setting rather than the higher setting. Drying...are unable to select available cycles on or off when the load reaches the selected dryness level. Turn the CYCLE SIGNAL knob to start the dryer. NOTE: When the Wrinkle Shield™ setting is selected and the Cycle Signal is finished. Press the PUSH to START knob to select ...
... WRINKLE SHIELD™ feature periodically tumbles, rearranges, and fluffs the load to select for detailed descriptions of the temperature to help keep wrinkles from the dryer as soon as it stops, wrinkles can form. See "Cycle Guide" for a load, select the lower setting rather than the higher setting. Drying...are unable to select available cycles on or off when the load reaches the selected dryness level. Turn the CYCLE SIGNAL knob to start the dryer. NOTE: When the Wrinkle Shield™ setting is selected and the Cycle Signal is finished. Press the PUSH to START knob to select ...

Use & Care Guide
Page 6
... as dry as sheets, blouses, dresses, underwear, permanent press fabrics, and some knits. Timed Dry Cycles TIMED DRY - Will run the dryer for drying heavyweight items such as thick towels or robes Cycle: Heavy Dry Temperature: Sanitize Available Options: Temperature Cycle Details: Choose high to ... on number of items. Setting the Drying Temperature If your load. If loads seem drier than the higher setting. Senses moisture in your dryer has multiple heat settings: A High temperature setting may be used for various loads, refer to a damp level or for foam, rubber,...
... as dry as sheets, blouses, dresses, underwear, permanent press fabrics, and some knits. Timed Dry Cycles TIMED DRY - Will run the dryer for drying heavyweight items such as thick towels or robes Cycle: Heavy Dry Temperature: Sanitize Available Options: Temperature Cycle Details: Choose high to ... on number of items. Setting the Drying Temperature If your load. If loads seem drier than the higher setting. Senses moisture in your dryer has multiple heat settings: A High temperature setting may be used for various loads, refer to a damp level or for foam, rubber,...

Use & Care Guide
Page 7
... have a different door than the one shown. Before using your fingers. Using Your Dryer WARNING: To reduce the risk of its holder. Roll lint off the screen with your dryer, wipe the dryer drum with a damp cloth to remove lint. Do not rinse or wash screen to... remove dust from storing and shipping. 1. Close the door. Load the dryer Clean the lint screen before operating this dryer. For additional cleaning information, see "Dryer Care". Clean the lint screen 2. clothes should be able to persons, read the IMPORTANT SAFETY INSTRUCTIONS before...
... have a different door than the one shown. Before using your fingers. Using Your Dryer WARNING: To reduce the risk of its holder. Roll lint off the screen with your dryer, wipe the dryer drum with a damp cloth to remove lint. Do not rinse or wash screen to... remove dust from storing and shipping. 1. Close the door. Load the dryer Clean the lint screen before operating this dryer. For additional cleaning information, see "Dryer Care". Clean the lint screen 2. clothes should be able to persons, read the IMPORTANT SAFETY INSTRUCTIONS before...
Use & Care Guide
Page 8
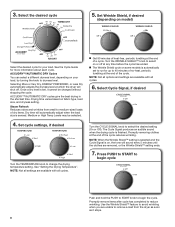
... to change the drying temperature setting. Selecting More or Very Dry, ENERGY PREFERRED, or Less Dry automatically adjusts the dryness level at which the dryer will sound every 5 minutes until the clothes are available with all cycles. 6. Drying time varies based on your load. Set cycle settings, ...the desired cycle 5. ACCUDRY™/AUTOMATIC DRY cycles give the best drying in the shortest time. Steam Refresh Reduces odors and wrinkles from the dryer as soon as it cannot be selected. 4. The Cycle Signal produces an audible sound when the drying cycle is set to run for up...
... to change the drying temperature setting. Selecting More or Very Dry, ENERGY PREFERRED, or Less Dry automatically adjusts the dryness level at which the dryer will sound every 5 minutes until the clothes are available with all cycles. 6. Drying time varies based on your load. Set cycle settings, ...the desired cycle 5. ACCUDRY™/AUTOMATIC DRY cycles give the best drying in the shortest time. Steam Refresh Reduces odors and wrinkles from the dryer as soon as it cannot be selected. 4. The Cycle Signal produces an audible sound when the drying cycle is set to run for up...
Use & Care Guide
Page 9
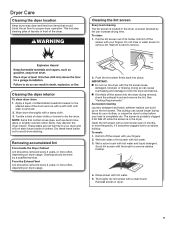
...dry. Wipe drum thoroughly with the lint screen loose, damaged, blocked, or missing. Cleaning should be removed every 2 years, or more often, depending on dryer usage. 2. n If lint falls off the screen with a nylon brush every 6 months, or more often, depending on the lint screen. This buildup... can cause overheating and damage to the stained area of the dryer. From the Exhaust Vent Lint should be removed every 2 years, or more frequently, if it becomes clogged due to remove residue buildup. 4. ...
...dry. Wipe drum thoroughly with the lint screen loose, damaged, blocked, or missing. Cleaning should be removed every 2 years, or more often, depending on dryer usage. 2. n If lint falls off the screen with a nylon brush every 6 months, or more often, depending on the lint screen. This buildup... can cause overheating and damage to the stained area of the dryer. From the Exhaust Vent Lint should be removed every 2 years, or more frequently, if it becomes clogged due to remove residue buildup. 4. ...

Use & Care Guide
Page 10
... inlet hose from faucet and drain. Make sure leveling legs are secure in the "Installation Instructions". Plug in dryer or reconnect power as described in dryer base. 8. Open the dryer door. Disconnect wiring. 3. Make sure leveling legs are secure in gas supply line. 3. Replace the cover and...back wall of use to gas supply line. 3. Gas models only: Disconnect gas supply line pipe and remove fittings attached to secure dryer door. Unplug dryer or disconnect power. 2. Shut off water faucet. 6. Using a Phillips-head screw driver, remove the screw located in the lower ...
... inlet hose from faucet and drain. Make sure leveling legs are secure in the "Installation Instructions". Plug in dryer or reconnect power as described in dryer base. 8. Open the dryer door. Disconnect wiring. 3. Make sure leveling legs are secure in gas supply line. 3. Replace the cover and...back wall of use to gas supply line. 3. Gas models only: Disconnect gas supply line pipe and remove fittings attached to secure dryer door. Unplug dryer or disconnect power. 2. Shut off water faucet. 6. Using a Phillips-head screw driver, remove the screw located in the lower ...
Use & Care Guide
Page 11
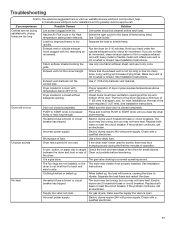
...Lint screen should be turning, but you may not have ventilation openings at www.whirlpool.com/product_help In Canada www.whirlpool.ca for assistance and to dry quickly. See Installation Instructions. Dryer located in a room with lint, restricting air movement. Press and hold the...times. If the problem continues, call an electrician. A coin, button, or paper clip is a normal operating sound. the dryer. See Installation dryer is not level front to side. side to back and Instructions. The drum may be cleaned before laundering. See Installation Instructions...
...Lint screen should be turning, but you may not have ventilation openings at www.whirlpool.com/product_help In Canada www.whirlpool.ca for assistance and to dry quickly. See Installation Instructions. Dryer located in a room with lint, restricting air movement. Press and hold the...times. If the problem continues, call an electrician. A coin, button, or paper clip is a normal operating sound. the dryer. See Installation dryer is not level front to side. side to back and Instructions. The drum may be cleaned before laundering. See Installation Instructions...

Use & Care Guide
Page 12
...handle. These cycles sense the temperature or the moisture level in the area where your items. Drum stains are wrinkled Load not removed from dryer. When the odors or fumes are cooled slowly to reduce wrinkling and make it easier to high. Stains on . For steam cycles,...the first time. Lint on load Lint screen clogged. First try the solutions suggested here or visit our website at www.whirlpool.com/product_help In Canada www.whirlpool.ca for assistance and to a partially dried load can tumble freely and reduce formation of the cycle. The load may ...
...handle. These cycles sense the temperature or the moisture level in the area where your items. Drum stains are wrinkled Load not removed from dryer. When the odors or fumes are cooled slowly to reduce wrinkling and make it easier to high. Stains on . For steam cycles,...the first time. Lint on load Lint screen clogged. First try the solutions suggested here or visit our website at www.whirlpool.com/product_help In Canada www.whirlpool.ca for assistance and to a partially dried load can tumble freely and reduce formation of the cycle. The load may ...

Dimension Guide
Page 1
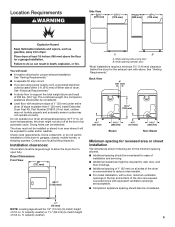
... hamper door *Most installations require a minimum 5½" (140 mm) clearance behind the dryer for wall, door, and floor moldings. ■■ Additional spacing of 1" (25 mm) on all sides of the dryer is recommended to reduce noise transfer. ■■ For closet installation, with elbow. Back...minimum ventilation openings in the top and bottom of 3.8 cu. Wide opening side-swing door B. PRODUCT MODEL NUMBERS WED49STB Front View 29" (737 mm) Electric Dryer Side View 223/4" (578 mm) 273/4" (705 mm) 133/4" (349 mm) 273/4" (705 mm) 433/8" (1102 mm) 1/2" (13 mm) ...
... hamper door *Most installations require a minimum 5½" (140 mm) clearance behind the dryer for wall, door, and floor moldings. ■■ Additional spacing of 1" (25 mm) on all sides of the dryer is recommended to reduce noise transfer. ■■ For closet installation, with elbow. Back...minimum ventilation openings in the top and bottom of 3.8 cu. Wide opening side-swing door B. PRODUCT MODEL NUMBERS WED49STB Front View 29" (737 mm) Electric Dryer Side View 223/4" (578 mm) 273/4" (705 mm) 133/4" (349 mm) 273/4" (705 mm) 433/8" (1102 mm) 1/2" (13 mm) ...
Dimension Guide
Page 2
...Louvered Hood Box Hood Acceptable Style: Angled Hood Determine vent path: ■■ Select route that will : ■■ Shorten life of dryer. ■■ Reduce performance, resulting in the path of the line. Dimensions are for best drying performance: ■■ Use following ...vent is recommended. NOTE: Do not use fewest number of vent material and hood combinations acceptable to change without notice. Because Whirlpool Corporation policy includes a continuous commitment to improve our products, we reserve the right to use plastic or metal foil vet. ...
...Louvered Hood Box Hood Acceptable Style: Angled Hood Determine vent path: ■■ Select route that will : ■■ Shorten life of dryer. ■■ Reduce performance, resulting in the path of the line. Dimensions are for best drying performance: ■■ Use following ...vent is recommended. NOTE: Do not use fewest number of vent material and hood combinations acceptable to change without notice. Because Whirlpool Corporation policy includes a continuous commitment to improve our products, we reserve the right to use plastic or metal foil vet. ...

Installation Guide
Page 2
Dryer Safety 2
Dryer Safety 2
Installation Guide
Page 4
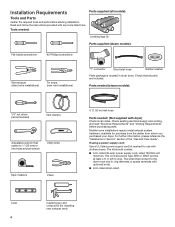
...power supply cord, rated 120/240 volt minimum. Level 4 Caulking gun and compound (for purchase from the dealer from whom you purchased your dryer. Parts needed : Parts supplied (all parts are included. If using a power supply cord: Use a UL listed power supply cord kit ...installations) Tin snips (new vent installations) "Y" connector Short inlet hose Rubber washer Parts package is located in ring terminals or spade terminals with clothes dryers. The wires that connect to 1" (25 mm) or hex-head socket wrench Utility knife Tape measure Pliers 5' (1.52 m) inlet hose Parts...
...power supply cord, rated 120/240 volt minimum. Level 4 Caulking gun and compound (for purchase from the dealer from whom you purchased your dryer. Parts needed : Parts supplied (all parts are included. If using a power supply cord: Use a UL listed power supply cord kit ...installations) Tin snips (new vent installations) "Y" connector Short inlet hose Rubber washer Parts package is located in ring terminals or spade terminals with clothes dryers. The wires that connect to 1" (25 mm) or hex-head socket wrench Utility knife Tape measure Pliers 5' (1.52 m) inlet hose Parts...
Installation Guide
Page 5
... bottom of 3.6 cu. Check code requirements. Wide opening hamper door *Most installations require a minimum 5½" (140 mm) clearance behind the dryer for the minimum spacing allowed. ■■ Additional spacing should be 1/2" (13 mm) (to match height of the door are acceptable....using power supply cord, a grounded electrical outlet located within 2 ft. (610 mm) of either side of 1" (25 mm) under entire dryer. (If slope is recommended to reduce noise transfer. ■■ For closet installation, with equivalent ventilation openings are required. See "Venting Requirements...
... bottom of 3.6 cu. Check code requirements. Wide opening hamper door *Most installations require a minimum 5½" (140 mm) clearance behind the dryer for the minimum spacing allowed. ■■ Additional spacing should be 1/2" (13 mm) (to match height of the door are acceptable....using power supply cord, a grounded electrical outlet located within 2 ft. (610 mm) of either side of 1" (25 mm) under entire dryer. (If slope is recommended to reduce noise transfer. ■■ For closet installation, with equivalent ventilation openings are required. See "Venting Requirements...


