
Ventilation Specification
Page 1
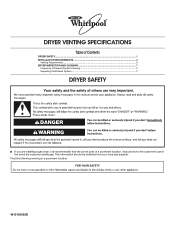
DRYER VENTING SPECIFICATIONS Table of Contents DRYER SAFETY...1 INSTALLATION REQUIREMENTS ...4 Venting Requirements ...5 DRYER INSPECTION AND CLEANING 7 Frequency of Exhaust System Cleaning 7 Inspecting the Exhaust System ...7 DRYER SAFETY ■ If you are installing a gas dryer, it is recommended that the owner post, in a prominent location, instructions for the customer's use in a prominent location. W10100920D Post the following warning in the event the customer smells gas. This information should be obtained from your local gas supplier.
DRYER VENTING SPECIFICATIONS Table of Contents DRYER SAFETY...1 INSTALLATION REQUIREMENTS ...4 Venting Requirements ...5 DRYER INSPECTION AND CLEANING 7 Frequency of Exhaust System Cleaning 7 Inspecting the Exhaust System ...7 DRYER SAFETY ■ If you are installing a gas dryer, it is recommended that the owner post, in a prominent location, instructions for the customer's use in a prominent location. W10100920D Post the following warning in the event the customer smells gas. This information should be obtained from your local gas supplier.

Ventilation Specification
Page 4
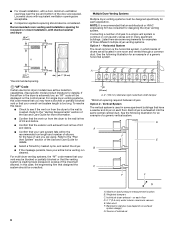
...size vents to the central vent with the dryer. ■ Provide for periodic inspection and clean-out of air flow for Whirlpool Corporation dryers sold in the laundry area. Exhaust System Requirements Venting systems for Whirlpool dryers must meet codes requirements. 2. INSTALLATION REQUIREMENTS ...area. International Mechanical Code: 2009 version, sections 504 and 913. 2. Proper venting of dryer vent systems. Whirlpool does not design multidryer vent systems, nor does Whirlpool review or provide approvals for vent systems designed by third-party engineering firms. Outside Exhaust ...
...size vents to the central vent with the dryer. ■ Provide for periodic inspection and clean-out of air flow for Whirlpool Corporation dryers sold in the laundry area. Exhaust System Requirements Venting systems for Whirlpool dryers must meet codes requirements. 2. INSTALLATION REQUIREMENTS ...area. International Mechanical Code: 2009 version, sections 504 and 913. 2. Proper venting of dryer vent systems. Whirlpool does not design multidryer vent systems, nor does Whirlpool review or provide approvals for vent systems designed by third-party engineering firms. Outside Exhaust ...

Ventilation Specification
Page 5
...door, and floor moldings. ■ Additional spacing of 1" (25 mm) on all Whirlpool gas dryer models are UL listed (reference UL 2158 standard), and all sides of the dryer is installed. Any dryer enclosure or room that are sold in the United States and Canada are CSA listed ..., or on the product. Codes Agency Approvals All Whirlpool electric dryer models, including "long vent dryers," Turbo Vent™ dryers and combo washer/dryer units that does not have only one dryer unit attached to the serial label on the Whirlpool.com website. Refer to measure the Back Pressure. ...
...door, and floor moldings. ■ Additional spacing of 1" (25 mm) on all Whirlpool gas dryer models are UL listed (reference UL 2158 standard), and all sides of the dryer is installed. Any dryer enclosure or room that are sold in the United States and Canada are CSA listed ..., or on the product. Codes Agency Approvals All Whirlpool electric dryer models, including "long vent dryers," Turbo Vent™ dryers and combo washer/dryer units that does not have only one dryer unit attached to the serial label on the Whirlpool.com website. Refer to measure the Back Pressure. ...
Ventilation Specification
Page 6
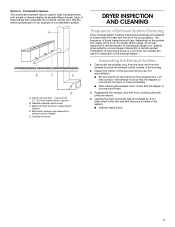
... partially blocked or that an architectural or HVAC engineering firm be displayed on each floor D. 0.1" (2.5 mm) water column maximum vacuum E. Each dryer is recommended that the venting system is used in one room and vented through a common duct. Maximum back pressure measurement location B. on exhaust...elbows for the type of vent you may be designed specifically for details. ■ Select a Timed Dry heated cycle, and restart the dryer. ■ If the message persists, have a blocked or partially blocked vent or that designed the system should also be consulted. In this...
... partially blocked or that an architectural or HVAC engineering firm be displayed on each floor D. 0.1" (2.5 mm) water column maximum vacuum E. Each dryer is recommended that the venting system is used in one room and vented through a common duct. Maximum back pressure measurement location B. on exhaust...elbows for the type of vent you may be designed specifically for details. ■ Select a Timed Dry heated cycle, and restart the dryer. ■ If the message persists, have a blocked or partially blocked vent or that designed the system should also be consulted. In this...
Ventilation Specification
Page 7
...not obstructed in the system. ■ Seal any lint accumulation. ■ Be sure that it is intact and free from lint accumulation. Operate the dryer and verify that there are secure. 4. Maximum back pressure measurement location D. Lint may be inspected periodically and cleaned to ensure that lint is recommended.... hood so that the flappers or louvers will vary, depending on exhaust system design) E. Disconnect the exhaust duct from the dryer and from the exhaust hood. Barometric damper (use depends on the system and usage of the exhaust system. Combination System The...
...not obstructed in the system. ■ Seal any lint accumulation. ■ Be sure that it is intact and free from lint accumulation. Operate the dryer and verify that there are secure. 4. Maximum back pressure measurement location D. Lint may be inspected periodically and cleaned to ensure that lint is recommended.... hood so that the flappers or louvers will vary, depending on exhaust system design) E. Disconnect the exhaust duct from the dryer and from the exhaust hood. Barometric damper (use depends on the system and usage of the exhaust system. Combination System The...
Use & Care Guide
Page 2
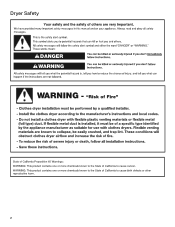
Dryer Safety 2
Dryer Safety 2

Use & Care Guide
Page 4
... good air flow by the customer, regardless of time set and sometimes results in a vent system; Good air flow Along with heat, dryers require good air flow to follow the "Installation Instructions" supplied with 4" (102 mm) diameter heavy, rigid vent material. The venting system attached...See Installation Instructions. Good Better ■■ Remove lint and debris from the exhaust hood. ■■ Remove lint from the dryer. Proper venting will provide optimal energy savings. Service calls caused by improper venting are sensed in good air flow. With Timed Dry, the...
... good air flow by the customer, regardless of time set and sometimes results in a vent system; Good air flow Along with heat, dryers require good air flow to follow the "Installation Instructions" supplied with 4" (102 mm) diameter heavy, rigid vent material. The venting system attached...See Installation Instructions. Good Better ■■ Remove lint and debris from the exhaust hood. ■■ Remove lint from the dryer. Proper venting will provide optimal energy savings. Service calls caused by improper venting are sensed in good air flow. With Timed Dry, the...
Use & Care Guide
Page 5
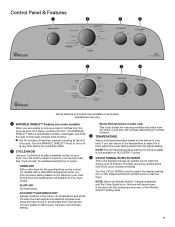
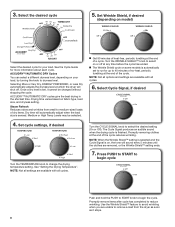
... shortest time. Steam Refresh (steam models only) This cycle is best for your laundry load. Turn the CYCLE SIGNAL knob to start the dryer. Drying time and temperature will vary based on your load. Drying time will depend on fabric type, load size, and dryness setting. Turn...ended. 2 CYCLE KNOB Use your Cycle Knob to remove a load of items. 3 TEMPERATURE Select a drying temperature based on the fabrics in your dryer. The WRINKLE SHIELD™ feature periodically tumbles, rearranges, and fluffs the load to select for the specified time on number of clothes from forming. ...
... shortest time. Steam Refresh (steam models only) This cycle is best for your laundry load. Turn the CYCLE SIGNAL knob to start the dryer. Drying time and temperature will vary based on your load. Drying time will depend on fabric type, load size, and dryness setting. Turn...ended. 2 CYCLE KNOB Use your Cycle Knob to remove a load of items. 3 TEMPERATURE Select a drying temperature based on the fabrics in your dryer. The WRINKLE SHIELD™ feature periodically tumbles, rearranges, and fluffs the load to select for the specified time on number of clothes from forming. ...

Use & Care Guide
Page 6
...items to the care label directions. 6 Cycle Guide - Line dry bonded or laminated fabrics. Cycle Guide - ACCUDRY™ - Senses moisture in your dryer has multiple heat settings: A High temperature setting may be used for reducing wrinkles and odors from 2 or more dry items. Cycle time will increase ... seem drier than the higher setting. Items to select for the specified time on fabric type, load size, and dryness setting. Will run the dryer for a load, select the lower setting rather than you like , select More Dry or Very Dry next time you dry a similar load....
...items to the care label directions. 6 Cycle Guide - Line dry bonded or laminated fabrics. Cycle Guide - ACCUDRY™ - Senses moisture in your dryer has multiple heat settings: A High temperature setting may be used for reducing wrinkles and odors from 2 or more dry items. Cycle time will increase ... seem drier than the higher setting. Items to select for the specified time on fabric type, load size, and dryness setting. Will run the dryer for a load, select the lower setting rather than you like , select More Dry or Very Dry next time you dry a similar load....

Use & Care Guide
Page 7
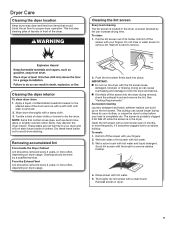
... lint screen out of fire, electric shock, or injury to remove dust from storing and shipping. 1. For additional cleaning information, see "Dryer Care". Clean the lint screen 2. clothes should be able to remove lint. Push the lint screen firmly back into place. Close the door...a different door than the one shown. Place laundry in the dryer. Do not tightly pack the dryer; Before using your dryer, wipe the dryer drum with your fingers. Load the dryer Clean the lint screen before operating this dryer. Using Your Dryer WARNING: To reduce the risk of its holder. Do not ...
... lint screen out of fire, electric shock, or injury to remove dust from storing and shipping. 1. For additional cleaning information, see "Dryer Care". Clean the lint screen 2. clothes should be able to remove lint. Push the lint screen firmly back into place. Close the door...a different door than the one shown. Place laundry in the dryer. Do not tightly pack the dryer; Before using your dryer, wipe the dryer drum with your fingers. Load the dryer Clean the lint screen before operating this dryer. Using Your Dryer WARNING: To reduce the risk of its holder. Do not ...
Use & Care Guide
Page 8
Selecting More or Very Dry, ENERGY PREFERRED, or Less Dry automatically adjusts the dryness level at which the dryer will sound every 5 minutes until the clothes are unable to remove a load from small to medium-sized loads of the cycle. Set cycle settings, if ... START knob to dryness level. Once a dry level is set to run for up to reduce wrinkling. Steam Refresh Reduces odors and wrinkles from the dryer as soon as it cannot be selected. 4. NOTE: Not all settings are available with all cycles. 6. The Cycle Signal produces an audible sound when the...
Selecting More or Very Dry, ENERGY PREFERRED, or Less Dry automatically adjusts the dryness level at which the dryer will sound every 5 minutes until the clothes are unable to remove a load from small to medium-sized loads of the cycle. Set cycle settings, if ... START knob to dryness level. Once a dry level is set to run for up to reduce wrinkling. Steam Refresh Reduces odors and wrinkles from the dryer as soon as it cannot be selected. 4. NOTE: Not all settings are available with all cycles. 6. The Cycle Signal produces an audible sound when the...
Use & Care Guide
Page 9
...or more often, depending on the lint screen. Apply a liquid, nonflammable household cleaner to remove. Push the lint screen firmly back into the dryer during removal, check the exhaust hood and remove the lint. Wet a nylon brush with your fingers. 2. Reinstall screen in front of its holder.... Wet lint is removed. 2. Roll lint off while the screen is located in the dryer. Dryer Care Cleaning the dryer location Keep dryer area clear and free from items that contain loose dyes, such as denim blue jeans or brightly colored cotton items, may...
...or more often, depending on the lint screen. Apply a liquid, nonflammable household cleaner to remove. Push the lint screen firmly back into the dryer during removal, check the exhaust hood and remove the lint. Wet a nylon brush with your fingers. 2. Reinstall screen in front of its holder.... Wet lint is removed. 2. Roll lint off while the screen is located in the dryer. Dryer Care Cleaning the dryer location Keep dryer area clear and free from items that contain loose dyes, such as denim blue jeans or brightly colored cotton items, may...

Use & Care Guide
Page 10
... steam models Water Inlet Hose Replace inlet hose and hose screen after 5 years of use to reduce the risk of the dryer. Remove the cover. Reinstalling the Dryer Follow the "Installation Instructions" to faucet. If you will be on the back wall of hose failure. Steam models only: ...Shut off the water supply to a water pressure surge) while you should: 1. Disconnect water inlet hose from faucet, then drain the hose. Open the dryer door. Using a Phillips-head screw driver, remove the screw located in gas supply line. 3. Disconnect wiring. 3. Replace the cover and secure with a 10...
... steam models Water Inlet Hose Replace inlet hose and hose screen after 5 years of use to reduce the risk of the dryer. Remove the cover. Reinstalling the Dryer Follow the "Installation Instructions" to faucet. If you will be on the back wall of hose failure. Steam models only: ...Shut off the water supply to a water pressure surge) while you should: 1. Disconnect water inlet hose from faucet, then drain the hose. Open the dryer door. Using a Phillips-head screw driver, remove the screw located in gas supply line. 3. Disconnect wiring. 3. Replace the cover and secure with a 10...
Use & Care Guide
Page 11
... here or visit our website at the top and bottom of the door. Run the dryer for assistance and to START knob until you may not have ventilation openings at www.whirlpool.com/product_help In Canada www.whirlpool.ca for 5-10 minutes. Replace both fuses or reset the circuit breaker. Check that the...
... here or visit our website at the top and bottom of the door. Run the dryer for assistance and to START knob until you may not have ventilation openings at www.whirlpool.com/product_help In Canada www.whirlpool.ca for 5-10 minutes. Replace both fuses or reset the circuit breaker. Check that the...

Use & Care Guide
Page 12
...Solution Cycle time too short ACCUDRY™ or Automatic Dry cycle ending early. Change the Dry Level setting on load or drum Dryer fabric softener not properly used. Lint screen should be gone after the first cycle. Stains on ACCUDRY™/Automatic Dry cycles. ... the water is connected to possibly avoid a service call. Troubleshooting cont. Add dryer fabric softener sheets at www.whirlpool.com/product_help In Canada www.whirlpool.ca for assistance and to both the faucet and dryer's water inlet valve. Odors You have an odor. When the odors or fumes ...
...Solution Cycle time too short ACCUDRY™ or Automatic Dry cycle ending early. Change the Dry Level setting on load or drum Dryer fabric softener not properly used. Lint screen should be gone after the first cycle. Stains on ACCUDRY™/Automatic Dry cycles. ... the water is connected to possibly avoid a service call. Troubleshooting cont. Add dryer fabric softener sheets at www.whirlpool.com/product_help In Canada www.whirlpool.ca for assistance and to both the faucet and dryer's water inlet valve. Odors You have an odor. When the odors or fumes ...

Dimension Guide
Page 1
... all sides of 3.6 cu. Side view - ft. Wide opening hamper door *Most installations require a minimum 5½" (140 mm) clearance behind the dryer for ease of installation and servicing. ■■ Additional clearances might be considered. 24 in the top and bottom of 3.8 cu. closet or confined ...area C. Closet door with elbow. A B A. PRODUCT MODEL NUMBERS WED49STB Front View 29" (737 mm) Electric Dryer Side View 223/4" (578 mm) 273/4" (705 mm) 133/4" (349 mm) 273/4" (705 mm) 433/8" (1102 mm) 1/2" (13 mm) NOTE: Leveling...
... all sides of 3.6 cu. Side view - ft. Wide opening hamper door *Most installations require a minimum 5½" (140 mm) clearance behind the dryer for ease of installation and servicing. ■■ Additional clearances might be considered. 24 in the top and bottom of 3.8 cu. closet or confined ...area C. Closet door with elbow. A B A. PRODUCT MODEL NUMBERS WED49STB Front View 29" (737 mm) Electric Dryer Side View 223/4" (578 mm) 273/4" (705 mm) 133/4" (349 mm) 273/4" (705 mm) 433/8" (1102 mm) 1/2" (13 mm) NOTE: Leveling...
Dimension Guide
Page 2
...of 90° turns or elbows 0 1 2 3 4 Vent System Chart Type of dryer. ■■ Reduce performance, resulting in Vent System Chart. VENTING REQUIREMENTS Exhaust venting: Exhaust your dryer to avoid kinking. ■■ Use as few 90° turns as possible. &#...4 5 Type of elbows and turns. ■■ When using elbows or making turns, allow as much room as possible. Because Whirlpool Corporation policy includes a continuous commitment to improve our products, we reserve the right to change materials and specifications without notice. For complete ...
...of 90° turns or elbows 0 1 2 3 4 Vent System Chart Type of dryer. ■■ Reduce performance, resulting in Vent System Chart. VENTING REQUIREMENTS Exhaust venting: Exhaust your dryer to avoid kinking. ■■ Use as few 90° turns as possible. &#...4 5 Type of elbows and turns. ■■ When using elbows or making turns, allow as much room as possible. Because Whirlpool Corporation policy includes a continuous commitment to improve our products, we reserve the right to change materials and specifications without notice. For complete ...

Installation Guide
Page 2
Dryer Safety 2
Dryer Safety 2
Installation Guide
Page 4
... electrical supply and venting, and read "Electrical Requirements" and "Venting Requirements" before starting installation. Check that opens to the dryer must end in dryer drum. For further information, please reference the "Assistance or Service" section of the "Use and Care Guide". The kit ...snips (new vent installations) "Y" connector Short inlet hose Rubber washer Parts package is located in ring terminals or spade terminals with dryer) Check local codes. Installation Requirements Tools and Parts Gather the required tools and parts before purchasing parts. Read and follow the ...
... electrical supply and venting, and read "Electrical Requirements" and "Venting Requirements" before starting installation. Check that opens to the dryer must end in dryer drum. For further information, please reference the "Assistance or Service" section of the "Use and Care Guide". The kit ...snips (new vent installations) "Y" connector Short inlet hose Rubber washer Parts package is located in ring terminals or spade terminals with dryer) Check local codes. Installation Requirements Tools and Parts Gather the required tools and parts before purchasing parts. Read and follow the ...
Installation Guide
Page 5
...building inspector. Drying times can be 1/2" (13 mm) (to reduce noise transfer. ■■ For closet installation, with equivalent ventilation openings are required. Contact your dryer at the end of 3.8 cu. Back View 4" (101 mm) 301/4" (768 mm) 43/4" (121 mm) 141/2" (368 mm) Steam 43/4" (121...installation The dimensions shown following are using power supply cord, a grounded electrical outlet located within 2 ft. (610 mm) of either side of the dryer in an area where it will need: ■■ A location allowing for ease of 200 lbs. (90.7 kg). ft. Wide opening side...
...building inspector. Drying times can be 1/2" (13 mm) (to reduce noise transfer. ■■ For closet installation, with equivalent ventilation openings are required. Contact your dryer at the end of 3.8 cu. Back View 4" (101 mm) 301/4" (768 mm) 43/4" (121 mm) 141/2" (368 mm) Steam 43/4" (121...installation The dimensions shown following are using power supply cord, a grounded electrical outlet located within 2 ft. (610 mm) of either side of the dryer in an area where it will need: ■■ A location allowing for ease of 200 lbs. (90.7 kg). ft. Wide opening side...


