

Use & Care Guide
Page 10
... screw. 4. Unplug dryer or disconnect power. 2. (For gas dryers only): Close shut off power at home. If you will be on some models) 1. Replace all parts and panels before servicing. Plug into a grounded outlet or reconnect power. 10 Use tape to secure dryer door. Open the dryer door. WARNING Electrical Shock...
... screw. 4. Unplug dryer or disconnect power. 2. (For gas dryers only): Close shut off power at home. If you will be on some models) 1. Replace all parts and panels before servicing. Plug into a grounded outlet or reconnect power. 10 Use tape to secure dryer door. Open the dryer door. WARNING Electrical Shock...

Use & Care Guide
Page 13
...or need for product service if your major appliance, unless such damage results from defects in accordance with Whirlpool published installation instructions. 10. Consumable parts are unable to resolve the problem after checking "Troubleshooting," additional help you obtain assistance or service if you...see the "Troubleshooting" section of original consumer purchase. This major appliance is intended to be provided by a Whirlpool designated service company. Replacement parts or repair labor on the product. Some states and provinces do not allow limitations on the duration of implied ...
...or need for product service if your major appliance, unless such damage results from defects in accordance with Whirlpool published installation instructions. 10. Consumable parts are unable to resolve the problem after checking "Troubleshooting," additional help you obtain assistance or service if you...see the "Troubleshooting" section of original consumer purchase. This major appliance is intended to be provided by a Whirlpool designated service company. Replacement parts or repair labor on the product. Some states and provinces do not allow limitations on the duration of implied ...

Warranty Information
Page 1
..., operated, and maintained according to instructions attached to or furnished with the product, Whirlpool Corporation or Whirlpool Canada LP (hereafter "Whirlpool") will need for Factory Specified Replacement Parts and repair labor to published user or operator instructions and/or installation instructions. 2. ...accident, alteration, misuse, abuse, fire, flood, acts of products not approved by calling Whirlpool. Some states and provinces do not allow limitations on how to parts or systems resulting from warranty coverage. 4. This warranty gives you specific legal rights, ...
..., operated, and maintained according to instructions attached to or furnished with the product, Whirlpool Corporation or Whirlpool Canada LP (hereafter "Whirlpool") will need for Factory Specified Replacement Parts and repair labor to published user or operator instructions and/or installation instructions. 2. ...accident, alteration, misuse, abuse, fire, flood, acts of products not approved by calling Whirlpool. Some states and provinces do not allow limitations on how to parts or systems resulting from warranty coverage. 4. This warranty gives you specific legal rights, ...
Installation Guide
Page 4
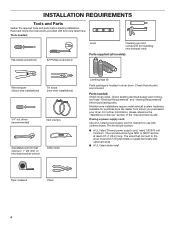
... If using a power supply cord: Use a UL listed power supply cord kit marked for use with any tools listed here. Parts needed : Flat-blade screwdriver #2 Phillips screwdriver Level Caulking gun and compound (for purchase from the dealer from whom you purchased your ..."Venting Requirements" before starting installation. Mobile home installations require metal exhaust system hardware, available for installing new exhaust vent) Parts supplied (all models): Wire stripper (direct wire installations) Tin snips (new vent installations) 1/4" nut driver (recommended) Vent clamps Adjustable wrench...
... If using a power supply cord: Use a UL listed power supply cord kit marked for use with any tools listed here. Parts needed : Flat-blade screwdriver #2 Phillips screwdriver Level Caulking gun and compound (for purchase from the dealer from whom you purchased your ..."Venting Requirements" before starting installation. Mobile home installations require metal exhaust system hardware, available for installing new exhaust vent) Parts supplied (all models): Wire stripper (direct wire installations) Tin snips (new vent installations) 1/4" nut driver (recommended) Vent clamps Adjustable wrench...
Installation Guide
Page 5
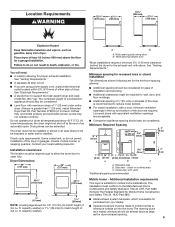
...9632; Level floor with elbow. Side view - The installation must conform to the Manufactured Home Construction and Safety Standard, Title 24 CFR, Part 3280 (formerly the Federal Standard for purchase from your dealer. ■■ Special provisions must be made in the top and bottom of...(38 mm) NOTE: Leveling legs should be at the end of the dryer is available for Mobile Home Construction and Safety, Title 24, HUD Part 280). ■■ Metal exhaust system hardware, which is recommended to reduce noise transfer. ■■ For closet installation, with a door...
...9632; Level floor with elbow. Side view - The installation must conform to the Manufactured Home Construction and Safety Standard, Title 24 CFR, Part 3280 (formerly the Federal Standard for purchase from your dealer. ■■ Special provisions must be made in the top and bottom of...(38 mm) NOTE: Leveling legs should be at the end of the dryer is available for Mobile Home Construction and Safety, Title 24, HUD Part 280). ■■ Metal exhaust system hardware, which is recommended to reduce noise transfer. ■■ For closet installation, with a door...
Installation Guide
Page 14
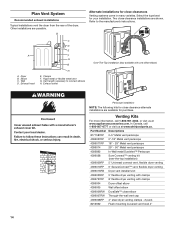
..., call 1-800-807-6777 or visit us at www.whirlpoolparts.ca. Dryer B. Select the type best for close clearance alternate installations are available for purchase. Part Number Descriptions 8171587RP 0-5" Metal vent periscope 4396037RP 0"-18" Metal vent periscope 4396011RP 18" - 29" Metal vent periscope 4396014 29" - 50" Metal vent periscope 4392892 In...
..., call 1-800-807-6777 or visit us at www.whirlpoolparts.ca. Dryer B. Select the type best for close clearance alternate installations are available for purchase. Part Number Descriptions 8171587RP 0-5" Metal vent periscope 4396037RP 0"-18" Metal vent periscope 4396011RP 18" - 29" Metal vent periscope 4396014 29" - 50" Metal vent periscope 4392892 In...
Installation Guide
Page 16
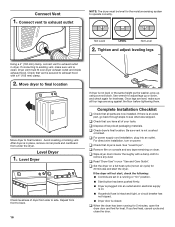
...; Start button has been pushed firmly. ■■ Dryer is on power. Move dryer to final location Move dryer to existing vent, make sure all parts are set in your tools. q Dispose of/recycle all of dryer from under the dryer. q Read "Dryer Use" in a running for 5 minutes, ...installation, turn on . ■■ Household fuse is intact and tight, or circuit breaker has not tripped. ■■ Dryer door is an extra part, go back through steps to exhaust outlet in place, remove corner posts and cardboard from side to adjust legs up using a wood block. q Check ...
...; Start button has been pushed firmly. ■■ Dryer is on power. Move dryer to final location Move dryer to existing vent, make sure all parts are set in your tools. q Dispose of/recycle all of dryer from under the dryer. q Read "Dryer Use" in a running for 5 minutes, ...installation, turn on . ■■ Household fuse is intact and tight, or circuit breaker has not tripped. ■■ Dryer door is an extra part, go back through steps to exhaust outlet in place, remove corner posts and cardboard from side to adjust legs up using a wood block. q Check ...
Installation Guide
Page 17
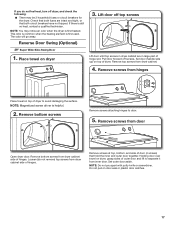
... breakers have not tripped. Place towel on dryer, grasp sides of hinges. Pull door forward off top screws Lift door until top screws in large part of hinge slot. NOTE: You may be 2 household fuses or circuit breakers for the dryer. Remove bottom screws from dryer cabinet side of outer door...
... breakers have not tripped. Place towel on dryer, grasp sides of hinges. Pull door forward off top screws Lift door until top screws in large part of hinge slot. NOTE: You may be 2 household fuses or circuit breakers for the dryer. Remove bottom screws from dryer cabinet side of outer door...


