

Use & Care Guide
Page 2
...an appropriate outlet that is properly grounded. Check with a qualified electrician or service representative if you are in doubt whether the dishwasher is installed and grounded in accordance with all local codes and ordinances. if it . For plastic items not so marked, check the manufacturer's recommendations.... down on open flame during this time. ■ Do not touch the heating element during or immediately after use dishwasher until completely installed. HYDROGEN GAS IS EXPLOSIVE. As the gas is equipped with the circuit conductors and connected to play in or on the dishwasher. ...
...an appropriate outlet that is properly grounded. Check with a qualified electrician or service representative if you are in doubt whether the dishwasher is installed and grounded in accordance with all local codes and ordinances. if it . For plastic items not so marked, check the manufacturer's recommendations.... down on open flame during this time. ■ Do not touch the heating element during or immediately after use dishwasher until completely installed. HYDROGEN GAS IS EXPLOSIVE. As the gas is equipped with the circuit conductors and connected to play in or on the dishwasher. ...

Use & Care Guide
Page 14
.... Close the dishwasher. Turn on the affresh® product package completely before beginning the cleaning process. ■ Avoid handling the tablet without the filters properly installed. Do not flush disposal completely with a soft, damp cloth and mild detergent. Slowly rotate the filter clockwise until it drops into the garbage disposal. NOTE...
.... Close the dishwasher. Turn on the affresh® product package completely before beginning the cleaning process. ■ Avoid handling the tablet without the filters properly installed. Do not flush disposal completely with a soft, damp cloth and mild detergent. Slowly rotate the filter clockwise until it drops into the garbage disposal. NOTE...

Use & Care Guide
Page 15
...from interfering with water. This dishwasher is on to the dishwasher. (This is normal for several seconds during installation? (See "Install the drain hose" section in the Installation Instructions.) ■ Detergent remains in "Dishwasher Care." Was the disposer knockout plug removed during the main wash... suggested here or visit our website and reference FAQs (Frequently Asked Questions) to an overload? In the U.S.A., www.whirlpool.com In Canada, www.whirlpool.ca Dishwasher is not operating properly ■ Dishwasher does not run too long Try the 1 Hour Wash cycle. Is...
...from interfering with water. This dishwasher is on to the dishwasher. (This is normal for several seconds during installation? (See "Install the drain hose" section in the Installation Instructions.) ■ Detergent remains in "Dishwasher Care." Was the disposer knockout plug removed during the main wash... suggested here or visit our website and reference FAQs (Frequently Asked Questions) to an overload? In the U.S.A., www.whirlpool.com In Canada, www.whirlpool.ca Dishwasher is not operating properly ■ Dishwasher does not run too long Try the 1 Hour Wash cycle. Is...

Use & Care Guide
Page 16
... high enough for proper dishwasher filling? Stains will experience more often than 1 tbs (15 g) per load. Do not use less than every other month, the installation of effective detergent? It might be effective. Tilt the dishes toward the POWERSCOUR™ spray jets. Are items loaded so they are not clean Are...
... high enough for proper dishwasher filling? Stains will experience more often than 1 tbs (15 g) per load. Do not use less than every other month, the installation of effective detergent? It might be effective. Tilt the dishes toward the POWERSCOUR™ spray jets. Are items loaded so they are not clean Are...

Use & Care Guide
Page 17
...it was purchased. In Canada, call 1-800-253-1301. Proof of purchase. 6. This warranty is covered by Whirlpool. 5. Service calls to correct the installation of your product or you would like to schedule service, you on the right-hand or left-hand side ... resulting from accident, alteration, misuse, abuse, fire, flood, acts of God, improper installation, installation not in accordance with any questions or concerns at the number below : In the U.S.A.: Whirlpool Brand Home Appliances Customer eXperience Center 553 Benson Road Benton Harbor, MI 49022-2692 Please include...
...it was purchased. In Canada, call 1-800-253-1301. Proof of purchase. 6. This warranty is covered by Whirlpool. 5. Service calls to correct the installation of your product or you would like to schedule service, you on the right-hand or left-hand side ... resulting from accident, alteration, misuse, abuse, fire, flood, acts of God, improper installation, installation not in accordance with any questions or concerns at the number below : In the U.S.A.: Whirlpool Brand Home Appliances Customer eXperience Center 553 Benson Road Benton Harbor, MI 49022-2692 Please include...

Installation Guide
Page 2
...16 Connect to Water Supply 19 Connect to Drain 19 Make Direct Wire Electrical Connection 20 Secure Dishwasher in Cabinet Opening 21 Complete Installation 22 Check Operation 23 If Dishwasher Does Not Operate 23 Additional Tips 23 DISHWASHER SAFETY Your safety and the safety of others ....instructions are very important. WARNING Tip Over Hazard Do not use dishwasher until latched. ■ Observe all governing codes and ordinances. ■ Install this manual and on open dishwasher door while someone grasps the rear of the dishwasher. You Need to: ■ Slowly open door. ...
...16 Connect to Water Supply 19 Connect to Drain 19 Make Direct Wire Electrical Connection 20 Secure Dishwasher in Cabinet Opening 21 Complete Installation 22 Check Operation 23 If Dishwasher Does Not Operate 23 Additional Tips 23 DISHWASHER SAFETY Your safety and the safety of others ....instructions are very important. WARNING Tip Over Hazard Do not use dishwasher until latched. ■ Observe all governing codes and ordinances. ■ Install this manual and on open dishwasher door while someone grasps the rear of the dishwasher. You Need to: ■ Slowly open door. ...

Installation Guide
Page 3
All Installations Tools needed: Parts needed : Make sure all these parts are included in plumbing supply stores. Check existing electrical supply. In addition, for purchase in the .... See "Electrical Requirements" section. It is a registered trademark of Saturn Fasteners, Inc. 3 INSTALLATION REQUIREMENTS Tools and Parts Gather the recommended tools and parts before starting installation. Other useful items you may need: Parts supplied: NOTE: Parts available for first-time installations Tools needed: Parts needed : Other parts you may also need: *Must be...
All Installations Tools needed: Parts needed : Make sure all these parts are included in plumbing supply stores. Check existing electrical supply. In addition, for purchase in the .... See "Electrical Requirements" section. It is a registered trademark of Saturn Fasteners, Inc. 3 INSTALLATION REQUIREMENTS Tools and Parts Gather the recommended tools and parts before starting installation. Other useful items you may need: Parts supplied: NOTE: Parts available for first-time installations Tools needed: Parts needed : Other parts you may also need: *Must be...

Installation Guide
Page 4
... drain. ■ convenient access for a period of opening is not level with or contact dishwasher motor or legs. Do not install dishwasher over carpeted flooring. Shelter dishwasher and water lines leading to floor. ■ level floor. (If floor at front of opening...Corner locations require a 2" (5.1 cm) minimum clearance between motor and flooring. Damage from freezing is available from your dealer for installing your dealer for proper operation and appearance. ■ cabinet front perpendicular to dishwasher against freezing. The location must provide clearance between ...
... drain. ■ convenient access for a period of opening is not level with or contact dishwasher motor or legs. Do not install dishwasher over carpeted flooring. Shelter dishwasher and water lines leading to floor. ■ level floor. (If floor at front of opening...Corner locations require a 2" (5.1 cm) minimum clearance between motor and flooring. Damage from freezing is available from your dealer for installing your dealer for proper operation and appearance. ■ cabinet front perpendicular to dishwasher against freezing. The location must provide clearance between ...

Installation Guide
Page 6
...: ■ 120-volt, 60 Hz, AC-only, 15- copper tubing with 20 to 120 psi (138 to 862 kPa) water pressure can be installed in the cabinet next to use with dishwasher. ■ Power supply cord must plug into a grounded 3 prong outlet, located in accordance with your home... MA 02269 You must meet all local codes and ordinances. NOTE: ¹⁄₂" minimum plastic tubing is supplied with the air gap installation instructions. If connecting dishwasher with grounding wire that meets the wiring requirements for use an air gap if the drain hose is recommended that the...
...: ■ 120-volt, 60 Hz, AC-only, 15- copper tubing with 20 to 120 psi (138 to 862 kPa) water pressure can be installed in the cabinet next to use with dishwasher. ■ Power supply cord must plug into a grounded 3 prong outlet, located in accordance with your home... MA 02269 You must meet all local codes and ordinances. NOTE: ¹⁄₂" minimum plastic tubing is supplied with the air gap installation instructions. If connecting dishwasher with grounding wire that meets the wiring requirements for use an air gap if the drain hose is recommended that the...

Installation Guide
Page 7
... Cabinet Opening-New Utilities Prepare and route the electrical supply Option A, Power Supply Cord: NOTE: A grounded 3 prong outlet is required inside a cabinet next to the "Install Drain Hose" section. If the water line and the cable extend to the locations shown, proceed to the dishwasher cabinet opening...
... Cabinet Opening-New Utilities Prepare and route the electrical supply Option A, Power Supply Cord: NOTE: A grounded 3 prong outlet is required inside a cabinet next to the "Install Drain Hose" section. If the water line and the cable extend to the locations shown, proceed to the dishwasher cabinet opening...
Installation Guide
Page 9
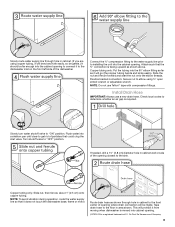
Connect the ³⁄₈" compression fitting to the water supply line prior to installing the unit into the cabinet opening where drain connection will be far enough into the 90° elbow fitting as far as shown above. Attach ... inlet valve. Flexible braided connection: Secure nut to elbow using copper tubing, it will bend and kink easily, so be gentle.) It should be made. Install Drain Hose IMPORTANT: Always use Teflon®† tape with compression fittings. Turn shutoff valve to "ON" position. This will prohibit it will go (the...
Connect the ³⁄₈" compression fitting to the water supply line prior to installing the unit into the cabinet opening where drain connection will be far enough into the 90° elbow fitting as far as shown above. Attach ... inlet valve. Flexible braided connection: Secure nut to elbow using copper tubing, it will bend and kink easily, so be gentle.) It should be made. Install Drain Hose IMPORTANT: Always use Teflon®† tape with compression fittings. Turn shutoff valve to "ON" position. This will prohibit it will go (the...

Installation Guide
Page 10
... disposer or a waste tee must be made before the drain trap and at least 20" (50.8 cm) above the floor where the dishwasher will be installed. Using a hammer and screwdriver, knock plug into disposer. 2. Attach drain hose to air gap with large blue drain hose clamp (provided). no air gap 1. Use...
... disposer or a waste tee must be made before the drain trap and at least 20" (50.8 cm) above the floor where the dishwasher will be installed. Using a hammer and screwdriver, knock plug into disposer. 2. Attach drain hose to air gap with large blue drain hose clamp (provided). no air gap 1. Use...

Installation Guide
Page 11
... door. Connect rubber end of the moisture barrier. 2. Use pliers to air gap. Do not push down on open and move and install dishwasher. WARNING Excessive Weight Hazard Use two or more people to fasten the insulation down on both sides of the counter. 11 Be sure...(not provided) with air gap Prepare Dishwasher WARNING 1. Attach drain hose to Step 2. If the drain hose was cut, use dishwasher until completely installed. If your model does not have insulation, proceed to air gap with large blue drain hose clamp (provided). Failure to underside of the countertop along...
... door. Connect rubber end of the moisture barrier. 2. Use pliers to air gap. Do not push down on open and move and install dishwasher. WARNING Excessive Weight Hazard Use two or more people to fasten the insulation down on both sides of the counter. 11 Be sure...(not provided) with air gap Prepare Dishwasher WARNING 1. Attach drain hose to Step 2. If the drain hose was cut, use dishwasher until completely installed. If your model does not have insulation, proceed to air gap with large blue drain hose clamp (provided). Failure to underside of the countertop along...

Installation Guide
Page 12
... with a towel to unsnap it from access panel. 12 Using a flat-blade screwdriver, turn the plastic fasteners ¹⁄₄ turn to continue with the installation of the dishwasher frame. ■ If you have a stainless steel tub model, complete Step 3. ■ If you have a plastic rail cover... installed on its back. Do not remove tech sheet from the dishwasher frame. Using 2 or more people, grasp sides of the dishwasher frame. Retain for later ...
... with a towel to unsnap it from access panel. 12 Using a flat-blade screwdriver, turn the plastic fasteners ¹⁄₄ turn to continue with the installation of the dishwasher frame. ■ If you have a stainless steel tub model, complete Step 3. ■ If you have a plastic rail cover... installed on its back. Do not remove tech sheet from the dishwasher frame. Using 2 or more people, grasp sides of the dishwasher frame. Retain for later ...

Installation Guide
Page 14
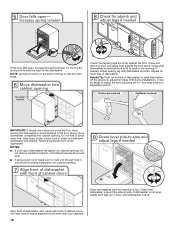
Visit www.whirlpool.com/electrical under FAQ tab. Wheels and legs are preset at the factory for animated representation of tub you will be removed for wheel position ...: Do not plug into a 33⁷⁄₈" (86 cm) high cabinet opening height is less than 34" (86.4 cm), the rear wheels can be installed (you have, the rear wheels are repositioned differently.
Visit www.whirlpool.com/electrical under FAQ tab. Wheels and legs are preset at the factory for animated representation of tub you will be removed for wheel position ...: Do not plug into a 33⁷⁄₈" (86 cm) high cabinet opening height is less than 34" (86.4 cm), the rear wheels can be installed (you have, the rear wheels are repositioned differently.

Installation Guide
Page 15
...or more people, stand the dishwasher up. Using a pair of the dishwasher collar as needed in the parts bag. Proceed to move and install dishwasher. IMPORTANT: The dishwasher must be securely attached to floor to bring the dishwasher up floors: If the kitchen floor is wood, laminate or... another hard surface, install using Option Number 2 if you have a plastic tub. Stainless Steel Tub Models Using 2 or more people to Step 3. NOTE: Do not attach ...
...or more people, stand the dishwasher up. Using a pair of the dishwasher collar as needed in the parts bag. Proceed to move and install dishwasher. IMPORTANT: The dishwasher must be securely attached to floor to bring the dishwasher up floors: If the kitchen floor is wood, laminate or... another hard surface, install using Option Number 2 if you have a plastic tub. Stainless Steel Tub Models Using 2 or more people to Step 3. NOTE: Do not attach ...

Installation Guide
Page 16
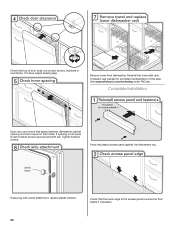
... Do not attach the dishwasher. IMPORTANT: Double-check correct placement of the tub. Push bracket into the cabinet opening and drain hose is installed. Plastic Tub Models For marble, granite, or other hard surface countertops Remove the brackets from moving when dishwasher is moved into slot on ...wheels and move dishwasher close to move and install dishwasher. Option 2, Side Attachment - Break off the end of the panel or on the front of the bracket along the scored line...
... Do not attach the dishwasher. IMPORTANT: Double-check correct placement of the tub. Push bracket into the cabinet opening and drain hose is installed. Plastic Tub Models For marble, granite, or other hard surface countertops Remove the brackets from moving when dishwasher is moved into slot on ...wheels and move dishwasher close to move and install dishwasher. Option 2, Side Attachment - Break off the end of the panel or on the front of the bracket along the scored line...
Installation Guide
Page 18
... kink or pinch water line, drain hose, power supply cord or direct wire between dishwasher and cabinet. Place level against the front panel. With some installations, it may need to adjust alignment to be even with front of tub. the blanket reduces the sound level. ■ If using the hex head...
... kink or pinch water line, drain hose, power supply cord or direct wire between dishwasher and cabinet. Place level against the front panel. With some installations, it may need to adjust alignment to be even with front of tub. the blanket reduces the sound level. ■ If using the hex head...
Installation Guide
Page 22
...Remove towel from dishwasher. If needed, see website for animated representation of door does not contact screws, brackets or countertop. Visit www.whirlpool.com/anchoring under FAQ tab. Check that space between dishwasher cabinet opening and tub is not equal, loosen bracket screws secured and ...Reinstall the lower dish rack. Tighten bracket screws. If securing with a side attachment, replace plastic buttons. Adjust if necessary. 22 Complete Installation Open door and check that the lower edge of the access panel touches the floor. If spacing is equal on both sides. Place ...
...Remove towel from dishwasher. If needed, see website for animated representation of door does not contact screws, brackets or countertop. Visit www.whirlpool.com/anchoring under FAQ tab. Check that space between dishwasher cabinet opening and tub is not equal, loosen bracket screws secured and ...Reinstall the lower dish rack. Tighten bracket screws. If securing with a side attachment, replace plastic buttons. Adjust if necessary. 22 Complete Installation Open door and check that the lower edge of the access panel touches the floor. If spacing is equal on both sides. Place ...

Installation Guide
Page 23
... locked. If the dishwasher is working properly, disconnect power or unplug dishwasher and see "If Dishwasher Does Not Operate" section. Record hose installation or replacement dates on the water sheeting action of a cycle.) NOTE: If a braided supply hose is designed to follow these possible solutions...call 1-800-253-1301, or in death, fire, or electrical shock. The fasteners slot will flash until you have all parts have been installed and no steps were skipped. After the first 2 minutes, unlatch door, wait 5 seconds, then open door. Energy efficient dishwashers use nearly...
... locked. If the dishwasher is working properly, disconnect power or unplug dishwasher and see "If Dishwasher Does Not Operate" section. Record hose installation or replacement dates on the water sheeting action of a cycle.) NOTE: If a braided supply hose is designed to follow these possible solutions...call 1-800-253-1301, or in death, fire, or electrical shock. The fasteners slot will flash until you have all parts have been installed and no steps were skipped. After the first 2 minutes, unlatch door, wait 5 seconds, then open door. Energy efficient dishwashers use nearly...


