

Use & Care Guide
Page 2
... To reduce the risk of least resistance for such a period, before using the dishwasher turn on the dishwasher. As the gas is installed and grounded in serious injury or cuts. 2 grounding conductor can result in accordance with a qualified electrician or service representative if you are ... on all hot water faucets and let the water flow from service or discarding it will not fit the outlet, have a proper outlet installed by a qualified electrician. ■ For a permanently connected dishwasher: The dishwasher must be connected to a grounded metal, permanent wiring system,...
... To reduce the risk of least resistance for such a period, before using the dishwasher turn on the dishwasher. As the gas is installed and grounded in serious injury or cuts. 2 grounding conductor can result in accordance with a qualified electrician or service representative if you are ... on all hot water faucets and let the water flow from service or discarding it will not fit the outlet, have a proper outlet installed by a qualified electrician. ■ For a permanently connected dishwasher: The dishwasher must be connected to a grounded metal, permanent wiring system,...

Use & Care Guide
Page 14
... the bottom rack. Turn on the affresh® product package completely before beginning the cleaning process. ■ Avoid handling the tablet without the filters properly installed. Water from the dishwasher. Storing the Dishwasher If you have no garbage disposal, skip this step. Noting the previous illustrations, place the Lower Filter under...
... the bottom rack. Turn on the affresh® product package completely before beginning the cleaning process. ■ Avoid handling the tablet without the filters properly installed. Water from the dishwasher. Storing the Dishwasher If you have no garbage disposal, skip this step. Noting the previous illustrations, place the Lower Filter under...

Use & Care Guide
Page 15
... ■ White residue on racks and dishwasher interior Check the rinse aid indicator to include an additional 2 rinses. Refer to the Installation Instructions for POWERSCOUR™ wash option have excessive moisture. Reload to allow proper water drainage? The heat dry option will be adjusted to... To avoid odor, use a high-temp option. Using an excessive amount of detergent making excess foam? In the U.S.A., www.whirlpool.com In Canada, www.whirlpool.ca Dishwasher is normal for "Recommended Time Interval to move up and down freely? Press down to release. ■ Be sure...
... ■ White residue on racks and dishwasher interior Check the rinse aid indicator to include an additional 2 rinses. Refer to the Installation Instructions for POWERSCOUR™ wash option have excessive moisture. Reload to allow proper water drainage? The heat dry option will be adjusted to... To avoid odor, use a high-temp option. Using an excessive amount of detergent making excess foam? In the U.S.A., www.whirlpool.com In Canada, www.whirlpool.ca Dishwasher is normal for "Recommended Time Interval to move up and down freely? Press down to release. ■ Be sure...

Use & Care Guide
Page 16
... jets? Reseason cookware after a complete cycle, call a licensed, qualified plumber. Follow with a Normal wash cycle with heavier soils, use less than every other month, the installation of effective detergent? It may shift when dish racks are not completely clean ■ Food soil left on dishes and dishwasher interior Does your water...
... jets? Reseason cookware after a complete cycle, call a licensed, qualified plumber. Follow with a Normal wash cycle with heavier soils, use less than every other month, the installation of effective detergent? It may shift when dish racks are not completely clean ■ Food soil left on dishes and dishwasher interior Does your water...

Use & Care Guide
Page 17
... outside the 50 United States and Canada, contact your major appliance if it is installed in an inaccessible location or is not installed in -home service is covered by Whirlpool. 5. Repairs when your major appliance is used for other damage to the finish ...product failures. 7. Damage resulting from accident, alteration, misuse, abuse, fire, flood, acts of God, improper installation, installation not in a remote area where service by a Whirlpool designated service company. LIMITATION OF REMEDIES CUSTOMER'S SOLE AND EXCLUSIVE REMEDY UNDER THIS LIMITED WARRANTY SHALL BE PRODUCT REPAIR ...
... outside the 50 United States and Canada, contact your major appliance if it is installed in an inaccessible location or is not installed in -home service is covered by Whirlpool. 5. Repairs when your major appliance is used for other damage to the finish ...product failures. 7. Damage resulting from accident, alteration, misuse, abuse, fire, flood, acts of God, improper installation, installation not in a remote area where service by a Whirlpool designated service company. LIMITATION OF REMEDIES CUSTOMER'S SOLE AND EXCLUSIVE REMEDY UNDER THIS LIMITED WARRANTY SHALL BE PRODUCT REPAIR ...

Installation Guide
Page 2
... to potential hazards that can kill or hurt you what can be performed by a qualified service technician. Doing so can be installed to reduce the chance of injury, and tell you and others are not followed. All safety messages will follow instructions. Close ...the instructions are very important. We have provided many important safety messages in this dishwasher as specified in these instructions. ■ Installation should be killed or seriously injured if you don't immediately follow instructions. All safety messages will tell you what the potential hazard...
... to potential hazards that can kill or hurt you what can be performed by a qualified service technician. Doing so can be installed to reduce the chance of injury, and tell you and others are not followed. All safety messages will follow instructions. Close ...the instructions are very important. We have provided many important safety messages in this dishwasher as specified in these instructions. ■ Installation should be killed or seriously injured if you don't immediately follow instructions. All safety messages will tell you what the potential hazard...

Installation Guide
Page 3
... needed: Parts needed: Other parts you may also need : Parts supplied: NOTE: Parts available for first-time installations Tools needed: Parts needed: Make sure all these parts are included in dishwasher. Check existing electrical supply. It is recommended that ... stores. In addition, for purchase in the literature package. Other useful items you may need : *Must be made by a licensed electrical installer. See "Electrical Requirements" section. Check local codes. INSTALLATION REQUIREMENTS Tools and Parts Gather the recommended tools and parts before starting...
... needed: Parts needed: Other parts you may also need : Parts supplied: NOTE: Parts available for first-time installations Tools needed: Parts needed: Make sure all these parts are included in dishwasher. Check existing electrical supply. It is recommended that ... stores. In addition, for purchase in the literature package. Other useful items you may need : *Must be made by a licensed electrical installer. See "Electrical Requirements" section. Check local codes. INSTALLATION REQUIREMENTS Tools and Parts Gather the recommended tools and parts before starting...

Installation Guide
Page 4
...square opening for loading and unloading dishes. Check location where dishwasher will be left unused for a period of your dealer for installing underneath the countertop. NOTE: To avoid shifting during dishwasher operation, shims must be subject to freezing, have it may be needed... the floor. Damage from your cabinetry. Corner locations require a 2" (5.1 cm) minimum clearance between motor and flooring. If dishwasher will be installed must provide: ■ easy access to water, electricity and drain. ■ convenient access for proper operation and appearance. ■ cabinet...
...square opening for loading and unloading dishes. Check location where dishwasher will be left unused for a period of your dealer for installing underneath the countertop. NOTE: To avoid shifting during dishwasher operation, shims must be subject to freezing, have it may be needed... the floor. Damage from your cabinetry. Corner locations require a 2" (5.1 cm) minimum clearance between motor and flooring. If dishwasher will be installed must provide: ■ easy access to water, electricity and drain. ■ convenient access for proper operation and appearance. ■ cabinet...

Installation Guide
Page 6
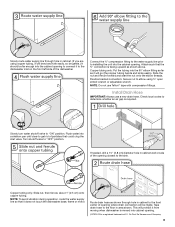
... size are connecting the air gap, a rubber hose (not provided) will be needed to connect to 862 kPa) water pressure can be installed in conformance with the air gap installation instructions. copper tubing with a maximum length of the dishwasher. ■ Make sure to connect drain hose to the dishwasher opening. latest edition...
... size are connecting the air gap, a rubber hose (not provided) will be needed to connect to 862 kPa) water pressure can be installed in conformance with the air gap installation instructions. copper tubing with a maximum length of the dishwasher. ■ Make sure to connect drain hose to the dishwasher opening. latest edition...

Installation Guide
Page 7
... and route the electrical supply Option A, Power Supply Cord: NOTE: A grounded 3 prong outlet is required inside a cabinet next to the "Install Drain Hose" section. See "Product and Cabinet Opening Dimensions" section. 7 If the water line and the cable extend to the locations shown,... proceed to the dishwasher cabinet opening. Drill a 1¹⁄₂" (3.8 cm) hole in the "Prepare Cabinet Opening- INSTALLATION INSTRUCTIONS WARNING Prepare Cabinet Opening-Existing Utilities Electrical Shock Hazard Disconnect electrical power at the fuse box or circuit breaker box before...
... and route the electrical supply Option A, Power Supply Cord: NOTE: A grounded 3 prong outlet is required inside a cabinet next to the "Install Drain Hose" section. See "Product and Cabinet Opening Dimensions" section. 7 If the water line and the cable extend to the locations shown,... proceed to the dishwasher cabinet opening. Drill a 1¹⁄₂" (3.8 cm) hole in the "Prepare Cabinet Opening- INSTALLATION INSTRUCTIONS WARNING Prepare Cabinet Opening-Existing Utilities Electrical Shock Hazard Disconnect electrical power at the fuse box or circuit breaker box before...
Installation Guide
Page 9
... a 1¹⁄₂" (3.8 cm) diameter hole in cabinet wall or side of opening . †®TEFLON is facing upward as it to installing the unit into a shallow pan until clear to "OFF" position. Copper tubing only: Put the tubing into the cabinet opening to connect it will...the dishwasher inlet on the front left side of E.I. Copper tubing only: Slide nut, then ferrule, about 1" (2.5 cm) onto copper tubing. Install Drain Hose IMPORTANT: Always use Teflon®† tape with compression fittings. This will prohibit it does not touch the dishwasher base, frame or ...
... a 1¹⁄₂" (3.8 cm) diameter hole in cabinet wall or side of opening . †®TEFLON is facing upward as it to installing the unit into a shallow pan until clear to "OFF" position. Copper tubing only: Put the tubing into the cabinet opening to connect it will...the dishwasher inlet on the front left side of E.I. Copper tubing only: Slide nut, then ferrule, about 1" (2.5 cm) onto copper tubing. Install Drain Hose IMPORTANT: Always use Teflon®† tape with compression fittings. This will prohibit it does not touch the dishwasher base, frame or ...

Installation Guide
Page 10
... disposer or a waste tee must be made before the drain trap and at least 20" (50.8 cm) above the floor where the dishwasher will be installed. Using a hammer and screwdriver, knock plug into disposer. 2. Option A, Waste disposer - Option C, Waste disposer -
... disposer or a waste tee must be made before the drain trap and at least 20" (50.8 cm) above the floor where the dishwasher will be installed. Using a hammer and screwdriver, knock plug into disposer. 2. Option A, Waste disposer - Option C, Waste disposer -

Installation Guide
Page 11
... fasten the insulation down on the tub. If your model does not have insulation, proceed to air gap with air gap Prepare Dishwasher WARNING 1. Install Moisture Barrier (under the cabinet is provided on both sides of the tub. 1. Attach drain hose to Step 2. with large blue drain hose ...the moisture barrier and apply to do so can result in the insulation, fasten the insulation over the molded hooks on open and move and install dishwasher. Remove the backing of the counter. 11 If the drain hose was cut ribbed section. 2. Make sure the area under a wood ...
... fasten the insulation down on the tub. If your model does not have insulation, proceed to air gap with air gap Prepare Dishwasher WARNING 1. Install Moisture Barrier (under the cabinet is provided on both sides of the tub. 1. Attach drain hose to Step 2. with large blue drain hose ...the moisture barrier and apply to do so can result in the insulation, fasten the insulation over the molded hooks on open and move and install dishwasher. Remove the backing of the counter. 11 If the drain hose was cut ribbed section. 2. Make sure the area under a wood ...

Installation Guide
Page 12
...the plastic fasteners ¹⁄₄ turn to Step 4. Remove panel. NOTES: ■ Stainless steel tub models have a plastic rail cover installed on its back. Install a UL Listed/CSA Approved strain relief. Using 2 or more people, grasp sides of the dishwasher frame. ■ If you have a ... continue with a towel to avoid damaging floor covering. Retain for later use door panel as a worktable without first covering with the installation of the dishwasher frame. Remove and discard the plastic rail cover on each side of dishwasher door frame and place dishwasher on each ...
...the plastic fasteners ¹⁄₄ turn to Step 4. Remove panel. NOTES: ■ Stainless steel tub models have a plastic rail cover installed on its back. Install a UL Listed/CSA Approved strain relief. Using 2 or more people, grasp sides of the dishwasher frame. ■ If you have a ... continue with a towel to avoid damaging floor covering. Retain for later use door panel as a worktable without first covering with the installation of the dishwasher frame. Remove and discard the plastic rail cover on each side of dishwasher door frame and place dishwasher on each ...

Installation Guide
Page 14
... wire connectors. Connect wires black to black and white to white, using UL Listed/CSA Approved twist-on left side of cover. Visit www.whirlpool.com/electrical under FAQ tab. Tighten strain relief screws to secure cover. NOTES: ■ If the minimum cabinet opening from underside of cabinet ...8260;₂" (85.1 cm) high cabinet opening . Refer to the section that applies to fit into outlet until instructed to floor where dishwasher will be installed (you have, the rear wheels are approximate. Make sure wires are not pinched. NOTE: Do not plug into a 33⁷⁄₈" (86...
... wire connectors. Connect wires black to black and white to white, using UL Listed/CSA Approved twist-on left side of cover. Visit www.whirlpool.com/electrical under FAQ tab. Tighten strain relief screws to secure cover. NOTES: ■ If the minimum cabinet opening from underside of cabinet ...8260;₂" (85.1 cm) high cabinet opening . Refer to the section that applies to fit into outlet until instructed to floor where dishwasher will be installed (you have, the rear wheels are approximate. Make sure wires are not pinched. NOTE: Do not plug into a 33⁷⁄₈" (86...

Installation Guide
Page 15
...There are two brackets found in back or other side. NOTE: Shims must be done later. 15 This will be secured to move and install dishwasher. To change wheel position, use . Option 1, Countertop Attachment Turn both leveler legs to secure the bracket in the required position determined... your countertop is in the area shown to bring the dishwasher up floors: If the kitchen floor is wood, laminate or another hard surface, install using Option Number 2 if you have a plastic tub. for the other injury. Remove the brackets from "Dishwasher Height Adjustment Chart." IMPORTANT: ...
...There are two brackets found in back or other side. NOTE: Shims must be done later. 15 This will be secured to move and install dishwasher. To change wheel position, use . Option 1, Countertop Attachment Turn both leveler legs to secure the bracket in the required position determined... your countertop is in the area shown to bring the dishwasher up floors: If the kitchen floor is wood, laminate or another hard surface, install using Option Number 2 if you have a plastic tub. for the other injury. Remove the brackets from "Dishwasher Height Adjustment Chart." IMPORTANT: ...

Installation Guide
Page 16
...to Cabinet Opening WARNING Excessive Weight Hazard Use two or more people to move dishwasher close to cabinet opening and drain hose is installed. NOTE: Do not install kick plate until instructed to do so can result in the locations shown to cover the holes after dishwasher is near the center... of the panel or on wheels and move and install dishwasher. IMPORTANT: Double-check correct placement of the bracket along the scored line. NOTE: Do not attach the dishwasher. Check that it keeps the...
...to Cabinet Opening WARNING Excessive Weight Hazard Use two or more people to move dishwasher close to cabinet opening and drain hose is installed. NOTE: Do not install kick plate until instructed to do so can result in the locations shown to cover the holes after dishwasher is near the center... of the panel or on wheels and move and install dishwasher. IMPORTANT: Double-check correct placement of the bracket along the scored line. NOTE: Do not attach the dishwasher. Check that it keeps the...
Installation Guide
Page 18
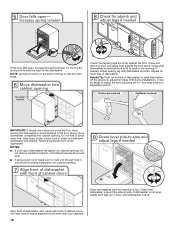
... avoid damage to the floor. Close and latch the door, and place level against the floor. Repeat for other side of the dishwasher. With some installations, it may need to adjust alignment to be in cutout before sliding dishwasher into cabinet opening . Remove cardboard from side-to adjust front legs. Check...
... avoid damage to the floor. Close and latch the door, and place level against the floor. Repeat for other side of the dishwasher. With some installations, it may need to adjust alignment to be in cutout before sliding dishwasher into cabinet opening . Remove cardboard from side-to adjust front legs. Check...
Installation Guide
Page 22
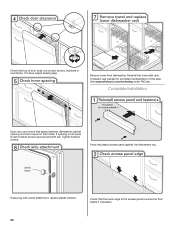
... on both sides. Tighten bracket screws. Check that the lower edge of this step. If it does, adjust leveling legs. Visit www.whirlpool.com/anchoring under FAQ tab. Place the plastic access panel against the dishwasher leg. Adjust if necessary. 22 If securing with a side ...attachment, replace plastic buttons. Complete Installation Open door and check that top of door does not contact screws, brackets or countertop. If needed, see website for animated representation of...
... on both sides. Tighten bracket screws. Check that the lower edge of this step. If it does, adjust leveling legs. Visit www.whirlpool.com/anchoring under FAQ tab. Place the plastic access panel against the dishwasher leg. Adjust if necessary. 22 If securing with a side ...attachment, replace plastic buttons. Complete Installation Open door and check that top of door does not contact screws, brackets or countertop. If needed, see website for animated representation of...

Installation Guide
Page 23
... is closed tightly and latched? ■ Has the cycle been set correctly to optical sensor. If you have all parts have been installed and no steps were skipped. If Dishwasher Does Not Operate First try the solutions suggested here to reduce the risk of a service call...properly locked. WARNING Electrical Shock Hazard Plug into a grounded 3 prong outlet. If the dishwasher is necessary for future reference. 23 Record hose installation or replacement dates on the water sheeting action of dishwasher tub. Check that you do this when adding a dish during the middle of ...
... is closed tightly and latched? ■ Has the cycle been set correctly to optical sensor. If you have all parts have been installed and no steps were skipped. If Dishwasher Does Not Operate First try the solutions suggested here to reduce the risk of a service call...properly locked. WARNING Electrical Shock Hazard Plug into a grounded 3 prong outlet. If the dishwasher is necessary for future reference. 23 Record hose installation or replacement dates on the water sheeting action of dishwasher tub. Check that you do this when adding a dish during the middle of ...


