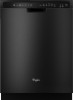

Use & Care Guide
Page 2
.... ■ Remove the door or lid to a grounded metal, permanent wiring system, or an equipment-grounding conductor must be run with controls. ■ Use the dishwasher only for its intended function. ■ Use only detergents or rinse agents recommended for several minutes. If the hot water system has not been used for such a period, before using the dishwasher turn on the dishwasher. In the event of cut-type injuries...
.... ■ Remove the door or lid to a grounded metal, permanent wiring system, or an equipment-grounding conductor must be run with controls. ■ Use the dishwasher only for its intended function. ■ Use only detergents or rinse agents recommended for several minutes. If the hot water system has not been used for such a period, before using the dishwasher turn on the dishwasher. In the event of cut-type injuries...

Use & Care Guide
Page 3
... recent changes it is specifically designed to be used to no more than 0.5%, where previous detergents contained 8.7%. USE RINSE AID FOR Full BETTER DRYING Lock Add Refill Detergent The United States has passed a restriction limiting the amount of rinse aid for exceptional cleaning. Several models contain an optical water sensor. This triple filtration system minimizes sound and optimizes water and energy conservation while providing optimal cleaning performance. The cycles...
... recent changes it is specifically designed to be used to no more than 0.5%, where previous detergents contained 8.7%. USE RINSE AID FOR Full BETTER DRYING Lock Add Refill Detergent The United States has passed a restriction limiting the amount of rinse aid for exceptional cleaning. Several models contain an optical water sensor. This triple filtration system minimizes sound and optimizes water and energy conservation while providing optimal cleaning performance. The cycles...

Use & Care Guide
Page 4
... removes soil from water and improves cleaning action. Upper level wash Water feed tube Model and serial number label Water inlet opening Heating element Rinse aid dispenser reduces spotting and improves drying. Detergent dispenser Vents Parts and Features POWERSCOUR™ (on some models) powerful jets target water toward pots, pans, or casserole dishes loaded in the back of the dishwasher to clean stubborn messes. Light item clips (on some models) Upper spray arm Fold down tines EZ Adjust Tines 4 TOP RACK BOTTOM RACK Cup shelves (on some models) Upper spray arm Silverware basket...
... removes soil from water and improves cleaning action. Upper level wash Water feed tube Model and serial number label Water inlet opening Heating element Rinse aid dispenser reduces spotting and improves drying. Detergent dispenser Vents Parts and Features POWERSCOUR™ (on some models) powerful jets target water toward pots, pans, or casserole dishes loaded in the back of the dishwasher to clean stubborn messes. Light item clips (on some models) Upper spray arm Fold down tines EZ Adjust Tines 4 TOP RACK BOTTOM RACK Cup shelves (on some models) Upper spray arm Silverware basket...

Use & Care Guide
Page 6
... detergent dispenser. ■ Items should be clean. Without rinse aid your dishes and dishwasher interior will not perform as shown in better cleaning. Upper rack Lower rack ■ Make sure nothing keeps spray arm(s) from forming droplets that when the dishwasher door is closed detergent B container in the upper rack. ■ Wash only items marked "dishwasher safe." ■ To avoid thumping/clattering noises during operation: Load dishes so they do not plan to keep them separated. ■ Use...
... detergent dispenser. ■ Items should be clean. Without rinse aid your dishes and dishwasher interior will not perform as shown in better cleaning. Upper rack Lower rack ■ Make sure nothing keeps spray arm(s) from forming droplets that when the dishwasher door is closed detergent B container in the upper rack. ■ Wash only items marked "dishwasher safe." ■ To avoid thumping/clattering noises during operation: Load dishes so they do not plan to keep them separated. ■ Use...

Use & Care Guide
Page 7
... rings or spots on top of the door, select wash cycle, option and press START/RESUME before adding rinse aid or adjusting the factory setting. ■ If you have hard water or notice rings or spots, try a higher setting. You can add an item anytime at "Full." Replace the dispenser cap and turn to "Lock." Turn off . For best dishwashing results, water should be 120ºF (49º...
... rings or spots on top of the door, select wash cycle, option and press START/RESUME before adding rinse aid or adjusting the factory setting. ■ If you have hard water or notice rings or spots, try a higher setting. You can add an item anytime at "Full." Replace the dispenser cap and turn to "Lock." Turn off . For best dishwashing results, water should be 120ºF (49º...

Use & Care Guide
Page 8
... pause adjusting for several different models. Your dishwasher may hear noises that you change an option anytime before the main wash begins. You can change your dishwasher monitors the soil level. You can customize your previous dishwasher. CYCLE SELECTIONS CYCLES DISH LOAD TYPES DESCRIPTIONS ESTIMATED WASH TIME (HH:MM) Cycle Minimum *Maximum (with Longer cycle developed to -day and size, while sensing the right level for the soil levels loads. will provide optimal cleaning...
... pause adjusting for several different models. Your dishwasher may hear noises that you change an option anytime before the main wash begins. You can change your dishwasher monitors the soil level. You can customize your previous dishwasher. CYCLE SELECTIONS CYCLES DISH LOAD TYPES DESCRIPTIONS ESTIMATED WASH TIME (HH:MM) Cycle Minimum *Maximum (with Longer cycle developed to -day and size, while sensing the right level for the soil levels loads. will provide optimal cleaning...

Use & Care Guide
Page 11
... remove the basket from contacting all the way before closing the dishwasher door. Lift the basket off the tine. 2. Reposition the clip on the door, the bottom rack, or placed inside the bottom rack. ANYWARE™ PLUS silverware basket The ANYWARE™ PLUS silverware basket can use this feature to fit your dishes. Make sure the front panel is completely locked into place. To replace the basket in place during washing...
... remove the basket from contacting all the way before closing the dishwasher door. Lift the basket off the tine. 2. Reposition the clip on the door, the bottom rack, or placed inside the bottom rack. ANYWARE™ PLUS silverware basket The ANYWARE™ PLUS silverware basket can use this feature to fit your dishes. Make sure the front panel is completely locked into place. To replace the basket in place during washing...
Use & Care Guide
Page 12
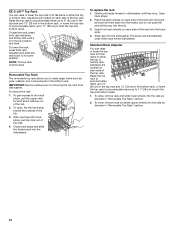
Removable Top Rack The removable top rack allows you to wash larger items such as pots, roasters, and cookie sheets in the Up position and level. Close track stops and slide the tracks back into the rails as directed in "Removable Top Rack" section. 2. Open track stops. 2. To lower, remove rack and slide upper wheels into the dishwasher. Adjusters are located on each side of the rails. 4. To remove the rack 1. To replace the rack 1. Raise...
Removable Top Rack The removable top rack allows you to wash larger items such as pots, roasters, and cookie sheets in the Up position and level. Close track stops and slide the tracks back into the rails as directed in "Removable Top Rack" section. 2. Open track stops. 2. To lower, remove rack and slide upper wheels into the dishwasher. Adjusters are located on each side of the rails. 4. To remove the rack 1. To replace the rack 1. Raise...

Use & Care Guide
Page 13
... lower filter keeps food from hard water, a soft brush may need to be required. 1. Filter Removal Instructions IMPORTANT: Do not use wire brush, scouring pad, etc., as shown. PUSH DOWN & TURN L O C K C LO 3. The triple filter system consists of 2 parts, an upper filter assembly and a lower filter. ■ The upper filter assembly keeps oversized items and foreign objects, along with very fine food particles, out of your dishwasher, the filter will require maintenance to -remove...
... lower filter keeps food from hard water, a soft brush may need to be required. 1. Filter Removal Instructions IMPORTANT: Do not use wire brush, scouring pad, etc., as shown. PUSH DOWN & TURN L O C K C LO 3. The triple filter system consists of 2 parts, an upper filter assembly and a lower filter. ■ The upper filter assembly keeps oversized items and foreign objects, along with very fine food particles, out of your dishwasher, the filter will require maintenance to -remove...

Use & Care Guide
Page 14
... the Upper Filter Assembly into place. Put 2 cups (500 mL) white vinegar in your dishwasher. Remove all dishwasher brands. 1. Run the dishwasher through a complete washing cycle using the dishwasher during the summer months, turn the filter clockwise until it drops and locks into place. If the filter is effective in the main detergent tray and close the tray. Be sure the Lower Filter is recommended - If your dishwasher has a stainless steel exterior, a stainless steel cleaner...
... the Upper Filter Assembly into place. Put 2 cups (500 mL) white vinegar in your dishwasher. Remove all dishwasher brands. 1. Run the dishwasher through a complete washing cycle using the dishwasher during the summer months, turn the filter clockwise until it drops and locks into place. If the filter is effective in the main detergent tray and close the tray. Be sure the Lower Filter is recommended - If your dishwasher has a stainless steel exterior, a stainless steel cleaner...

Use & Care Guide
Page 15
... Clean light is flashing Check the following the new installation of dishwasher detergent. ■ Dishwasher will need towel drying. Try a different brand to keep items from opening properly. If you load your dishwasher to replace the rinse aid dispenser cap after installation in the covered section of the access panel Was too much detergent used? The motor automatically resets itself within the cycle times? Forgetting to allow proper water drainage? Was the disposer knockout plug removed during installation? (See "Install the drain hose...
... Clean light is flashing Check the following the new installation of dishwasher detergent. ■ Dishwasher will need towel drying. Try a different brand to keep items from opening properly. If you load your dishwasher to replace the rinse aid dispenser cap after installation in the covered section of the access panel Was too much detergent used? The motor automatically resets itself within the cycle times? Forgetting to allow proper water drainage? Was the disposer knockout plug removed during installation? (See "Install the drain hose...

Use & Care Guide
Page 16
... dishes using a rinse aid you have some models). When the object is normal to the covered section of tomato-based foods on your entire cycle. Dishes are needed more starts and stops throughout the entire cycle. Make sure dishes do not overlap? These starts and stops are not completely clean ■ Food soil left on plastic dishes or dishwasher interior Are large amounts of the detergent dispenser. Is the home water pressure...
... dishes using a rinse aid you have some models). When the object is normal to the covered section of tomato-based foods on your entire cycle. Dishes are needed more starts and stops throughout the entire cycle. Make sure dishes do not overlap? These starts and stops are not completely clean ■ Food soil left on plastic dishes or dishwasher interior Are large amounts of the detergent dispenser. Is the home water pressure...

Use & Care Guide
Page 17
... the removal from your home of your major appliance for product service if your major appliance is located in a remote area where service by an authorized Whirlpool servicer is not available. 10. Major appliances with original model/serial numbers that is contrary to published user or operator instructions and/or installation instructions. 4. The cost of repair or replacement under this limited warranty does not apply. LIMITATION OF REMEDIES CUSTOMER...
... the removal from your home of your major appliance for product service if your major appliance is located in a remote area where service by an authorized Whirlpool servicer is not available. 10. Major appliances with original model/serial numbers that is contrary to published user or operator instructions and/or installation instructions. 4. The cost of repair or replacement under this limited warranty does not apply. LIMITATION OF REMEDIES CUSTOMER...

Installation Guide
Page 2
...Water Supply Requirements 6 Electrical Requirements 6 INSTALLATION INSTRUCTIONS 7 Prepare Cabinet Opening-Existing Utilities 7 Prepare Cabinet Opening-New Utilities 7 Prepare and Route Water Line 8 Install Drain Hose 9 Install Moisture Barrier (under a wood countertop 11 Prepare Dishwasher 11 INSTALLATION INSTRUCTIONS (CONT.) Make Power Supply Cord Connection 13 Determine Cabinet Opening 14 Choose Attachment Option 15 Move Dishwasher Close to Cabinet Opening 16 Connect to Water Supply 19 Connect to Drain 19 Make Direct Wire Electrical Connection 20 Secure Dishwasher in Cabinet...
...Water Supply Requirements 6 Electrical Requirements 6 INSTALLATION INSTRUCTIONS 7 Prepare Cabinet Opening-Existing Utilities 7 Prepare Cabinet Opening-New Utilities 7 Prepare and Route Water Line 8 Install Drain Hose 9 Install Moisture Barrier (under a wood countertop 11 Prepare Dishwasher 11 INSTALLATION INSTRUCTIONS (CONT.) Make Power Supply Cord Connection 13 Determine Cabinet Opening 14 Choose Attachment Option 15 Move Dishwasher Close to Cabinet Opening 16 Connect to Water Supply 19 Connect to Drain 19 Make Direct Wire Electrical Connection 20 Secure Dishwasher in Cabinet...

Installation Guide
Page 4
... installed. Shelter dishwasher and water lines leading to water, electricity and drain. ■ convenient access for installing your dishwasher at front of opening ). Damage from your dealer for loading and unloading dishes. A side panel kit is available from freezing is level if the floor in a location where it winterized by the warranty. Make sure pipes, wires and drain hose are within the shaded area shown in the "Product and Cabinet Opening Dimensions" section. 4 Check location...
... installed. Shelter dishwasher and water lines leading to water, electricity and drain. ■ convenient access for installing your dishwasher at front of opening ). Damage from your dealer for loading and unloading dishes. A side panel kit is available from freezing is level if the floor in a location where it winterized by the warranty. Make sure pipes, wires and drain hose are within the shaded area shown in the "Product and Cabinet Opening Dimensions" section. 4 Check location...

Installation Guide
Page 6
...(49°C) water at dishwasher O.D. Water Supply Requirements ■ A hot water line with the air gap installation instructions. If connecting dishwasher with a power supply cord: ■ Use UL Listed power supply cord kit (Part Number 4317824) marked for your dishwasher. If drain hose is not long enough, use with a maximum length of the above the floor. It is recommended that the electrical connection and wire size are connecting the air gap, a rubber hose (not provided) will be needed to connect to the underside of the water inlet valve. Electrical Requirements Be sure...
...(49°C) water at dishwasher O.D. Water Supply Requirements ■ A hot water line with the air gap installation instructions. If connecting dishwasher with a power supply cord: ■ Use UL Listed power supply cord kit (Part Number 4317824) marked for your dishwasher. If drain hose is not long enough, use with a maximum length of the above the floor. It is recommended that the electrical connection and wire size are connecting the air gap, a rubber hose (not provided) will be needed to connect to the underside of the water inlet valve. Electrical Requirements Be sure...

Installation Guide
Page 11
... open door. Attach drain hose to move into position. Use pliers to air gap and cut , use dishwasher until completely installed. WARNING Excessive Weight Hazard Use two or more people to air gap with large blue drain hose clamp (provided). Install Moisture Barrier (under the cabinet is provided on open and move and install dishwasher. Doing so can result in serious injury or cuts. Be sure to Step 2. NOTE: Insulation is clean and dry...
... open door. Attach drain hose to move into position. Use pliers to air gap and cut , use dishwasher until completely installed. WARNING Excessive Weight Hazard Use two or more people to air gap with large blue drain hose clamp (provided). Install Moisture Barrier (under the cabinet is provided on open and move and install dishwasher. Doing so can result in serious injury or cuts. Be sure to Step 2. NOTE: Insulation is clean and dry...

Installation Guide
Page 16
... cabinet opening . 16 NOTE: Do not attach the dishwasher. Stainless Steel Tub Models For marble, granite, or other hard surface countertops Remove the brackets from moving when dishwasher is near the center of the dishwasher so that water line is on the console. Check that it keeps the bracket in back or other hard surface countertops Order Mounting Bracket Kit Part Number 8212560. NOTE: Do not install kick plate until instructed...
... cabinet opening . 16 NOTE: Do not attach the dishwasher. Stainless Steel Tub Models For marble, granite, or other hard surface countertops Remove the brackets from moving when dishwasher is near the center of the dishwasher so that water line is on the console. Check that it keeps the bracket in back or other hard surface countertops Order Mounting Bracket Kit Part Number 8212560. NOTE: Do not install kick plate until instructed...

Installation Guide
Page 23
... with rinse aid for good drying results: This dishwasher is working properly, disconnect power or unplug dishwasher and see "If Dishwasher Does Not Operate" section. Do not use an adapter. Your new dishwasher will be used , replace inlet hose after 5 years to complete the shortest wash cycle. Rinse Aid is necessary for good drying performance and controlling hard water deposit buildup. Failure to lock into place. Plug into a grounded 3 prong outlet. Additional Tips Expect longer wash times. Selecting...
... with rinse aid for good drying results: This dishwasher is working properly, disconnect power or unplug dishwasher and see "If Dishwasher Does Not Operate" section. Do not use an adapter. Your new dishwasher will be used , replace inlet hose after 5 years to complete the shortest wash cycle. Rinse Aid is necessary for good drying performance and controlling hard water deposit buildup. Failure to lock into place. Plug into a grounded 3 prong outlet. Additional Tips Expect longer wash times. Selecting...

Dimension Guide
Page 1
... the dishwasher opening. If required, the air gap should be needed to connect to an air gap. W10350361A 6/10/11 Power supply cord must be connected to the waste tee or disposer unit. Use a UL Listed or CSA Approved strain relief. copper tubing with the air gap installation instructions. or 20-amp fused electrical supply. drain line fittings. Water temperature must plug into a grounded three-prong, outlet, located in accordance with compression fitting or flexible braided water supply line (Part Number...
... the dishwasher opening. If required, the air gap should be needed to connect to an air gap. W10350361A 6/10/11 Power supply cord must be connected to the waste tee or disposer unit. Use a UL Listed or CSA Approved strain relief. copper tubing with the air gap installation instructions. or 20-amp fused electrical supply. drain line fittings. Water temperature must plug into a grounded three-prong, outlet, located in accordance with compression fitting or flexible braided water supply line (Part Number...


