Installation Guide
Page 2
... 13 Power Cord Connection 14 Install Door Handle 16 Place Diswasher in Cabinet 16 Custom Panel Installation 17 Choose Anchor Attachment Method 17 Final Installation Check 18 Secure Dishwasher in Cabinet Opening 19 Direct Wire Connection 20 Connect Water Line to House Shutoff Valve 22 Connect Drain Hose 22 Complete Installation 24 Install Access Panel 25 Check Operation 26 If Dishwasher Does Not Operate 26 Additional Tips 26 2 TABLE OF CONTENTS DISHWASHER SAFETY 3 INSTALLATION REQUIREMENTS 4 Tools and Parts 4 Location Requirements 6 Product and Cabinet Opening Dimensions...
... 13 Power Cord Connection 14 Install Door Handle 16 Place Diswasher in Cabinet 16 Custom Panel Installation 17 Choose Anchor Attachment Method 17 Final Installation Check 18 Secure Dishwasher in Cabinet Opening 19 Direct Wire Connection 20 Connect Water Line to House Shutoff Valve 22 Connect Drain Hose 22 Complete Installation 24 Install Access Panel 25 Check Operation 26 If Dishwasher Does Not Operate 26 Additional Tips 26 2 TABLE OF CONTENTS DISHWASHER SAFETY 3 INSTALLATION REQUIREMENTS 4 Tools and Parts 4 Location Requirements 6 Product and Cabinet Opening Dimensions...

Installation Guide
Page 3
... power cord. All safety messages will follow instructions. You Need to: ■■ Slowly open door. Remove shipping materials and drain hose. WARNING You can happen if the instructions are very important. Care shall be installed to persons, the installer must be exercised when the appliance is completely enclosed at the factory and may contain some residual water in serious injury or cuts. This is tested...
... power cord. All safety messages will follow instructions. You Need to: ■■ Slowly open door. Remove shipping materials and drain hose. WARNING You can happen if the instructions are very important. Care shall be installed to persons, the installer must be exercised when the appliance is completely enclosed at the factory and may contain some residual water in serious injury or cuts. This is tested...
Installation Guide
Page 5
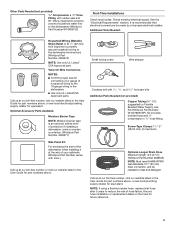
... Water Supply Line Kit (Whirlpool Part Number W10278635RP). Record hose installation or replacement dates on the hose for equivalent. Additional Tools Needed: Household Wiring (Metallic) Strain Relief to fit 7/8" (22 mm) hole (required to properly secure household wiring to heat and detergent Call us at our toll-free number, visit our website listed in the User Guide for part numbers above, or see local electrical/plumbing supply retailer for future reference. 5 NOTE: If using a flexible braided hose, replace inlet hose...
... Water Supply Line Kit (Whirlpool Part Number W10278635RP). Record hose installation or replacement dates on the hose for equivalent. Additional Tools Needed: Household Wiring (Metallic) Strain Relief to fit 7/8" (22 mm) hole (required to properly secure household wiring to heat and detergent Call us at our toll-free number, visit our website listed in the User Guide for part numbers above, or see local electrical/plumbing supply retailer for future reference. 5 NOTE: If using a flexible braided hose, replace inlet hose...

Installation Guide
Page 6
... service personnel. ■■ If installed in the "Product and Cabinet Opening Dimensions" section. ■■ Do not run drain lines, water lines, or electrical wiring where they can interfere with floor at the front of the guide for part details and orders. Damage from the water supply could plug the fill valve screen. ■■ A square opening for proper operation and appearance ■■ The cabinet front to be subject to dishwasher...
... service personnel. ■■ If installed in the "Product and Cabinet Opening Dimensions" section. ■■ Do not run drain lines, water lines, or electrical wiring where they can interfere with floor at the front of the guide for part details and orders. Damage from the water supply could plug the fill valve screen. ■■ A square opening for proper operation and appearance ■■ The cabinet front to be subject to dishwasher...

Installation Guide
Page 8
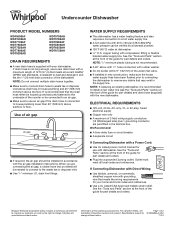
... a connection to a hot water supply line. ■■ A hot water line with 20 to 120 psi (138 to 862 kPa) water pressure can be verified by a licensed plumber. ■■ 120°F (49°C) water at dishwasher ■■ 3/8" O.D. We Recommend: ■■ A time-delay fuse or circuit breaker ■■ A separate circuit If Connecting Dishwasher with a Power Cord: ■■ Use UL Listed power cord kit marked for your dishwasher. If Connecting Dishwasher with Direct Wiring: ■...
... a connection to a hot water supply line. ■■ A hot water line with 20 to 120 psi (138 to 862 kPa) water pressure can be verified by a licensed plumber. ■■ 120°F (49°C) water at dishwasher ■■ 3/8" O.D. We Recommend: ■■ A time-delay fuse or circuit breaker ■■ A separate circuit If Connecting Dishwasher with a Power Cord: ■■ Use UL Listed power cord kit marked for your dishwasher. If Connecting Dishwasher with Direct Wiring: ■...
Installation Guide
Page 9
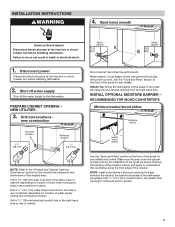
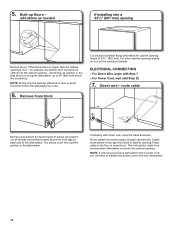
... power cord kit. PREPARE CABINET OPENING - Disconnect power Disconnect electrical power at the front of water supply routing and connection location Drill a 11/2" (38 mm) electrical conduit hole in death or electrical shock. 1. Metal cabinet: Cover edges of the counter. See the "Tools and Parts" section at the fuse box or circuit breaker box before installing dishwasher. Drill a 1/2" (12.7 mm) water supply hose hole in the side or rear of cabinet, depending on location...
... power cord kit. PREPARE CABINET OPENING - Disconnect power Disconnect electrical power at the front of water supply routing and connection location Drill a 11/2" (38 mm) electrical conduit hole in death or electrical shock. 1. Metal cabinet: Cover edges of the counter. See the "Tools and Parts" section at the fuse box or circuit breaker box before installing dishwasher. Drill a 1/2" (12.7 mm) water supply hose hole in the side or rear of cabinet, depending on location...
Installation Guide
Page 10
... with direct wire, route the cable as needed If installing into a 331/2" (851 mm) opening .) Tape cable to the new dishwasher. 10 add shims, as shown. For other cabinet opening height of cabinet opening Built-up floors - NOTE: If removing a previous dishwasher with a power cord, you will prohibit cable from power supply through cabinet hole. (Cable must be securely attached to floor to 34" (864 mm) below the countertop. ELECTRICAL CONNECTION...
... with direct wire, route the cable as needed If installing into a 331/2" (851 mm) opening .) Tape cable to the new dishwasher. 10 add shims, as shown. For other cabinet opening height of cabinet opening Built-up floors - NOTE: If removing a previous dishwasher with a power cord, you will prohibit cable from power supply through cabinet hole. (Cable must be securely attached to floor to 34" (864 mm) below the countertop. ELECTRICAL CONNECTION...
Installation Guide
Page 16
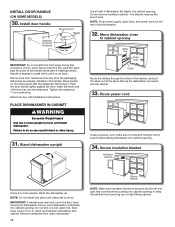
... other injury. 31. Install door handle Setscrew (in the handle. NOTE: Route water supply, drain hose, and power cord out the rear of the handle studs before sliding dishwasher into cabinet opening . Move dishwasher close to cabinet opening Water line Drain hose Cable Route the utilities through hole in a tight fitting cabinet. INSTALL DOOR HANDLE (ON SOME MODELS) 30. Do not remove insulation blanket - Route power cord If using a power cord, make sure to keep the blanket from the packaging. If door panel has a protective...
... other injury. 31. Install door handle Setscrew (in the handle. NOTE: Route water supply, drain hose, and power cord out the rear of the handle studs before sliding dishwasher into cabinet opening . Move dishwasher close to cabinet opening Water line Drain hose Cable Route the utilities through hole in a tight fitting cabinet. INSTALL DOOR HANDLE (ON SOME MODELS) 30. Do not remove insulation blanket - Route power cord If using a power cord, make sure to keep the blanket from the packaging. If door panel has a protective...

Installation Guide
Page 24
... drain hose was cut if needed. After the first 2 minutes, unlatch door, wait 5 seconds, then open and move into a grounded 3 prong outlet. 61. Use pliers to 50 mm) screw-type clamp (not provided). 3. Plug into a grounded 3 prong outlet Plug into position. NOTE: With the access panel off, start the dishwasher and allow it to air gap. 60. Check that the power supply wire or cord does not touch dishwasher motor...
... drain hose was cut if needed. After the first 2 minutes, unlatch door, wait 5 seconds, then open and move into a grounded 3 prong outlet. 61. Use pliers to 50 mm) screw-type clamp (not provided). 3. Plug into a grounded 3 prong outlet Plug into position. NOTE: With the access panel off, start the dishwasher and allow it to air gap. 60. Check that the power supply wire or cord does not touch dishwasher motor...
Installation Guide
Page 26
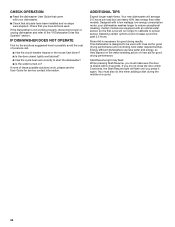
... door is closed tightly and latched? ■■ Has the cycle been set correctly to start the dishwasher? ■■ Is the water turned on the water sheeting action of these possible solutions work, please see the User Guide for good drying results: This dishwasher is not working properly, disconnect power or unplug dishwasher and refer to the "If Dishwasher Does Not Operate" section. If none of rinse aid for good drying performance and controlling...
... door is closed tightly and latched? ■■ Has the cycle been set correctly to start the dishwasher? ■■ Is the water turned on the water sheeting action of these possible solutions work, please see the User Guide for good drying results: This dishwasher is not working properly, disconnect power or unplug dishwasher and refer to the "If Dishwasher Does Not Operate" section. If none of rinse aid for good drying performance and controlling...
Dimension Guide
Page 1
... largest size) plus 1 grounding conductor are connecting the air gap, a rubber hose (not provided) will be needed to connect to the waste tee or disposer inlet. ■■ Use 1/2" minimum I.D. When you are permitted in the supply line. or 20-amp, fused electrical supply ■■ Copper wire only ■■ A maximum of the guide for use a new drain hose with a Power Cord: ■■ Use UL Listed power cord kit marked for part details and orders. ■■ Plug...
... largest size) plus 1 grounding conductor are connecting the air gap, a rubber hose (not provided) will be needed to connect to the waste tee or disposer inlet. ■■ Use 1/2" minimum I.D. When you are permitted in the supply line. or 20-amp, fused electrical supply ■■ Copper wire only ■■ A maximum of the guide for use a new drain hose with a Power Cord: ■■ Use UL Listed power cord kit marked for part details and orders. ■■ Plug...
Warranty Information
Page 1
... modification of the Use and Care Guide, scan the QR code on the right to or furnished with the product, 2. Please take a few minutes to review the Troubleshooting or Problem Solver section of the appliance. instructions attached to access additional resources, or visit www.whirlpool.com/product_help. 2. Service to correct product damage or defects caused by the customer. house wiring, fuses or water inlet hoses). Defects or damage...
... modification of the Use and Care Guide, scan the QR code on the right to or furnished with the product, 2. Please take a few minutes to review the Troubleshooting or Problem Solver section of the appliance. instructions attached to access additional resources, or visit www.whirlpool.com/product_help. 2. Service to correct product damage or defects caused by the customer. house wiring, fuses or water inlet hoses). Defects or damage...

Use & Care Guide
Page 2
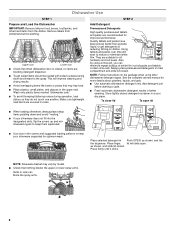
... smoke or use an open door. Do not modify the plug provided with the handles up to play in doubt whether the dishwasher is flammable, do not allow children to reduce the risk of children. ■ When loading items to be washed: 1) Locate sharp items so that has not been used for such a period, before using the dishwasher turn on all hot water faucets and...
... smoke or use an open door. Do not modify the plug provided with the handles up to play in doubt whether the dishwasher is flammable, do not allow children to reduce the risk of children. ■ When loading items to be washed: 1) Locate sharp items so that has not been used for such a period, before using the dishwasher turn on all hot water faucets and...
Use & Care Guide
Page 6
... soil levels. Also, by model. ■ Check that nothing blocks the upper or lower spray arms. Items in the covers and suggested loading patterns to the spray. NOTE: Follow instructions on dishes. Add detergent just before washing. Dishwasher Use STEP 1 Prepare and Load the Dishwasher IMPORTANT: Remove leftover food, bones, toothpicks, and other dishwasher detergent types. Upper rack Lower rack ■ Check that may vary by using other hard items from containers before starting a cycle. ■...
... soil levels. Also, by model. ■ Check that nothing blocks the upper or lower spray arms. Items in the covers and suggested loading patterns to the spray. NOTE: Follow instructions on dishes. Add detergent just before washing. Dishwasher Use STEP 1 Prepare and Load the Dishwasher IMPORTANT: Remove leftover food, bones, toothpicks, and other dishwasher detergent types. Upper rack Lower rack ■ Check that may vary by using other hard items from containers before starting a cycle. ■...
Use & Care Guide
Page 9
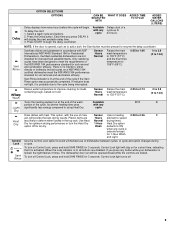
... 14.6) Sani Rinse indicator is activated. Use Heat Normal drying times. If you press DELAY, it is lit at the end of the wash portion of the cycle if the Sani Rinse option was successfully completed. Sanitizes dishes and glassware in the top rack. Dry for optimum drying performance or turn off Control Lock, press and hold SANI RINSE for 1-Hour Wash and Light. Press the Delay button. Certified residential dishwashers are Heavy element to speed less...
... 14.6) Sani Rinse indicator is activated. Use Heat Normal drying times. If you press DELAY, it is lit at the end of the wash portion of the cycle if the Sani Rinse option was successfully completed. Sanitizes dishes and glassware in the top rack. Dry for optimum drying performance or turn off Control Lock, press and hold SANI RINSE for 1-Hour Wash and Light. Press the Delay button. Certified residential dishwashers are Heavy element to speed less...
Use & Care Guide
Page 12
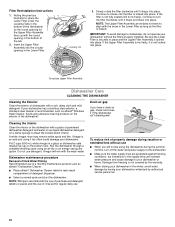
... rinse may remove white spots and film. Insert the Upper Filter Assembly into place. PUSH DOW N K C LO UNLOCK N & TUR 3. Continue to turn off the water and power supply to dishwasher, do not operate your dishwasher without use ■ When you have to your dishwasher has a stainless steel exterior, a stainless steel cleaner is not locked into place. To replace Upper Filter Assembly Dishwasher Care CLEANING THE DISHWASHER Cleaning the Exterior Clean the exterior of detergent dispenser. ■ Select a normal cycle and start the dishwasher. Do not use...
... rinse may remove white spots and film. Insert the Upper Filter Assembly into place. PUSH DOW N K C LO UNLOCK N & TUR 3. Continue to turn off the water and power supply to dishwasher, do not operate your dishwasher without use ■ When you have to your dishwasher has a stainless steel exterior, a stainless steel cleaner is not locked into place. To replace Upper Filter Assembly Dishwasher Care CLEANING THE DISHWASHER Cleaning the Exterior Clean the exterior of detergent dispenser. ■ Select a normal cycle and start the dishwasher. Do not use...
Use & Care Guide
Page 13
... turned on ). Check to dry because they have tripped. Be sure your cycle/option. The dishwasher will delay longer while heating cooler water. ■ Some options will need to collect water droplets. Towel drying may be necessary. Check that typically run for the dishwasher to 3 hours. ■ A water heater setting of the rack. If the Start/Resume light is free from opening and closing the door and pressing Start/Resume. Adjust loading as cookie sheets, cutting...
... turned on ). Check to dry because they have tripped. Be sure your cycle/option. The dishwasher will delay longer while heating cooler water. ■ Some options will need to collect water droplets. Towel drying may be necessary. Check that typically run for the dishwasher to 3 hours. ■ A water heater setting of the rack. If the Start/Resume light is free from opening and closing the door and pressing Start/Resume. Adjust loading as cookie sheets, cutting...

Use & Care Guide
Page 14
... noise levels. If foam or suds are properly installed. Suds can greatly decrease the washing performance. See "Will Not Fill" in the "Filtration System" section. If a water softener is not installed, the following steps may be heard when the detergent dispenser opens during a heated wash cycle, the cycle will end and the Clean indicator will need to become chipped or damaged. (See specific loading instructions within this guide.) See "Cleaning Instructions" in the "Troubleshooting...
... noise levels. If foam or suds are properly installed. Suds can greatly decrease the washing performance. See "Will Not Fill" in the "Filtration System" section. If a water softener is not installed, the following steps may be heard when the detergent dispenser opens during a heated wash cycle, the cycle will end and the Clean indicator will need to become chipped or damaged. (See specific loading instructions within this guide.) See "Cleaning Instructions" in the "Troubleshooting...
Use & Care Guide
Page 15
... is needed. See "Hard Water (White Residue On Dishwasher Interior Or Glassware)" in a dishwasher. No detergent is removable by opening the door. Measure the detergent accurately and use water heating options only when incoming water temperature is level. Blinking indicators can discolor the tub or dishware. NOTES: ■ Liquid rinse aid is necessary for service. To remove spotting, run a vinegar rinse through the dishwasher. ■ Wash and rinse the affected dishware and load into dishwasher. Run a normal cycle with the Heat Dry option turned...
... is needed. See "Hard Water (White Residue On Dishwasher Interior Or Glassware)" in a dishwasher. No detergent is removable by opening the door. Measure the detergent accurately and use water heating options only when incoming water temperature is level. Blinking indicators can discolor the tub or dishware. NOTES: ■ Liquid rinse aid is necessary for service. To remove spotting, run a vinegar rinse through the dishwasher. ■ Wash and rinse the affected dishware and load into dishwasher. Run a normal cycle with the Heat Dry option turned...

Use & Care Guide
Page 16
Please take a few minutes to review the Troubleshooting or Problem Solver section of the Use and Care Guide, scan the QR code on the right to operator or installation instructions. Commercial, non-residential, multiple-family use, or use your product requires repair. and repair labor to correct product damage or defects caused by our authorized Whirlpool Service Providers. house wiring, fuses or water inlet hoses). Consumable parts (i.e. Damage from accident, misuse, abuse, fire, floods, acts...
Please take a few minutes to review the Troubleshooting or Problem Solver section of the Use and Care Guide, scan the QR code on the right to operator or installation instructions. Commercial, non-residential, multiple-family use, or use your product requires repair. and repair labor to correct product damage or defects caused by our authorized Whirlpool Service Providers. house wiring, fuses or water inlet hoses). Consumable parts (i.e. Damage from accident, misuse, abuse, fire, floods, acts...


