
Installation Guide
Page 2
...4 Drain Requirements 6 Water Supply Requirements 6 Electrical Requirements 6 INSTALLATION INSTRUCTIONS 7 Prepare Cabinet Opening- Always read and obey all electrical and plumbing national and local codes and ordinances. Care shall be killed or seriously injured if you and others are not followed. Existing Utilities 7 Prepare Cabinet Opening-New Utilities 7 Prepare and Route Water Line 8 Install Drain Hose 9 Install Optional Moisture Barrier 11 Prepare Dishwasher 12 Make Power Cord Connection 13 Determine Cabinet Opening 14 Install Door Handle 15 Custom Panel Installation 16...
...4 Drain Requirements 6 Water Supply Requirements 6 Electrical Requirements 6 INSTALLATION INSTRUCTIONS 7 Prepare Cabinet Opening- Always read and obey all electrical and plumbing national and local codes and ordinances. Care shall be killed or seriously injured if you and others are not followed. Existing Utilities 7 Prepare Cabinet Opening-New Utilities 7 Prepare and Route Water Line 8 Install Drain Hose 9 Install Optional Moisture Barrier 11 Prepare Dishwasher 12 Make Power Cord Connection 13 Determine Cabinet Opening 14 Install Door Handle 15 Custom Panel Installation 16...
Installation Guide
Page 3
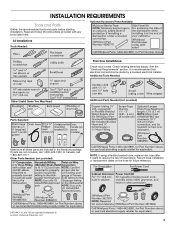
... Parts Needed: (not provided) NOTE: If using a flexible braided hose, replace inlet hose after 5 years to reduce the risk of Acument Intellectual Properties, LLC. 3 See the "Electrical Requirements" section. Read and follow the instructions provided with any tools listed here. Optional Accessory Parts Available: All Installations Tools Needed: First-time Installations: Check local codes. It is recommended that electrical connections be made by a licensed electrical installer. Check existing electrical supply. Record hose installation or replacement...
... Parts Needed: (not provided) NOTE: If using a flexible braided hose, replace inlet hose after 5 years to reduce the risk of Acument Intellectual Properties, LLC. 3 See the "Electrical Requirements" section. Read and follow the instructions provided with any tools listed here. Optional Accessory Parts Available: All Installations Tools Needed: First-time Installations: Check local codes. It is recommended that electrical connections be made by a licensed electrical installer. Check existing electrical supply. Record hose installation or replacement...
Installation Guide
Page 4
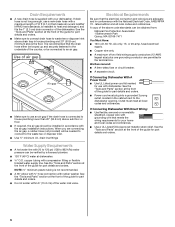
...) upon installation. Motor should not touch the floor. ■ Do not install dishwasher over carpeted flooring. ■ Grounded electrical supply required. ■ Make sure pipes, wires and drain hose are within the shaded area shown in the "Product and Cabinet Opening Dimensions" section. ■ Do not run drain lines, water lines or electrical wiring where they can interfere with floor at the end of time or in a location where it winterized by the warranty.
...) upon installation. Motor should not touch the floor. ■ Do not install dishwasher over carpeted flooring. ■ Grounded electrical supply required. ■ Make sure pipes, wires and drain hose are within the shaded area shown in the "Product and Cabinet Opening Dimensions" section. ■ Do not run drain lines, water lines or electrical wiring where they can interfere with floor at the end of time or in a location where it winterized by the warranty.
Installation Guide
Page 6
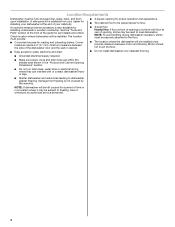
... two field wiring supply conductors (12 AWG largest size) plus one grounding conductor are permitted in accordance with a maximum length of 12 ft (3.7 m) that the drain hose either be looped up and securely fastened to heat and detergent, and fits the 1" (2.5 cm) drain connector of the above drain trap in conformance with dishwasher. If Connecting Dishwasher With A Power Cord: ■ Use UL Listed power cord kit marked for use a new drain hose with the air gap installation instructions.
... two field wiring supply conductors (12 AWG largest size) plus one grounding conductor are permitted in accordance with a maximum length of 12 ft (3.7 m) that the drain hose either be looped up and securely fastened to heat and detergent, and fits the 1" (2.5 cm) drain connector of the above drain trap in conformance with dishwasher. If Connecting Dishwasher With A Power Cord: ■ Use UL Listed power cord kit marked for use a new drain hose with the air gap installation instructions.
Installation Guide
Page 7
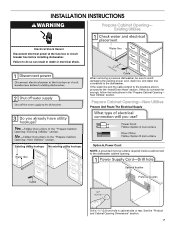
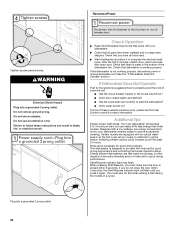
INSTALLATION INSTRUCTIONS WARNING Prepare Cabinet Opening- Prepare Cabinet Opening-New Utilities Prepare And Route The Electrical Supply Option A, Power Cord: NOTE: A grounded 3 prong outlet is required inside a cabinet next to the "Install Drain Hose" section. Failure to the dishwasher. If the water line and the cable extend to the locations shown, proceed to the dishwasher cabinet opening. If they do so can result in cabinet side or rear. See the "Product and Cabinet Opening Dimensions" section. 7 When removing a previous dishwasher, be...
INSTALLATION INSTRUCTIONS WARNING Prepare Cabinet Opening- Prepare Cabinet Opening-New Utilities Prepare And Route The Electrical Supply Option A, Power Cord: NOTE: A grounded 3 prong outlet is required inside a cabinet next to the "Install Drain Hose" section. Failure to the dishwasher. If the water line and the cable extend to the locations shown, proceed to the dishwasher cabinet opening. If they do so can result in cabinet side or rear. See the "Product and Cabinet Opening Dimensions" section. 7 When removing a previous dishwasher, be...
Installation Guide
Page 9
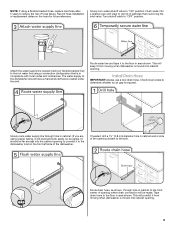
... whether an air gap is in area shown. Tape drain hose to "ON" position. Record hose installation or replacement dates on the front left side of opening where drain connection will bend and kink easily, so be gentle.) It should have a manual shutoff valve located under the sink. Attach the water supply line (copper tubing or flexible braided line) to the hot water line using a connection configuration that could clog the inlet valve. This...
... whether an air gap is in area shown. Tape drain hose to "ON" position. Record hose installation or replacement dates on the front left side of opening where drain connection will bend and kink easily, so be gentle.) It should have a manual shutoff valve located under the sink. Attach the water supply line (copper tubing or flexible braided line) to the hot water line using a connection configuration that could clog the inlet valve. This...
Installation Guide
Page 16
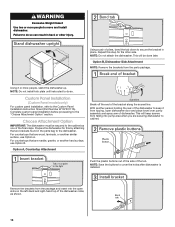
... the Custom Panel Installation Instruction Sheet (Part Number W10750117A). For countertops that are marble, granite, or another hard surface, use Option A. Using a pair of the final steps. Using 2 or more people to the dishwasher. NOTE: Do not attach the dishwasher. Choose Attachment Option IMPORTANT: The dishwasher must be done later. Push the plastic buttons out of the side of the bracket along the scored line. Repeat...
... the Custom Panel Installation Instruction Sheet (Part Number W10750117A). For countertops that are marble, granite, or another hard surface, use Option A. Using a pair of the final steps. Using 2 or more people to the dishwasher. NOTE: Do not attach the dishwasher. Choose Attachment Option IMPORTANT: The dishwasher must be done later. Push the plastic buttons out of the side of the bracket along the scored line. Repeat...
Installation Guide
Page 17
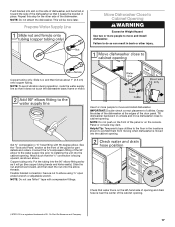
... of the dishwasher so that it keeps the bracket in back or other side of the dishwasher. NOTE: To avoid vibration during operation, route the water supply line so that it does not touch the dishwasher base, frame or motor. Get ³⁄₈" compression x ¾" hose fitting with compression fittings. Prepare Water Supply Line Move Dishwasher Close to Cabinet Opening WARNING Excessive Weight Hazard Use two or...
... of the dishwasher so that it keeps the bracket in back or other side of the dishwasher. NOTE: To avoid vibration during operation, route the water supply line so that it does not touch the dishwasher base, frame or motor. Get ³⁄₈" compression x ¾" hose fitting with compression fittings. Prepare Water Supply Line Move Dishwasher Close to Cabinet Opening WARNING Excessive Weight Hazard Use two or...
Installation Guide
Page 24
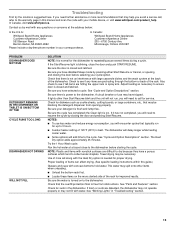
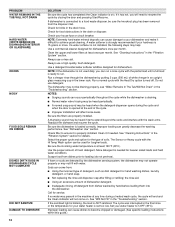
... increase cycle time past 3.5 hours. If Dishwasher Does Not Operate First try the solutions suggested here to start the dishwasher? ■ Is the water turned on the water sheeting action of a service call. ■ Has the circuit breaker tripped or the house fuse blown? ■ Is the door closed within 3 seconds, the Start/Resume indicator light will run longer to calibrate to ensure exceptional cleaning. Rinse aid is necessary for good drying...
... increase cycle time past 3.5 hours. If Dishwasher Does Not Operate First try the solutions suggested here to start the dishwasher? ■ Is the water turned on the water sheeting action of a service call. ■ Has the circuit breaker tripped or the house fuse blown? ■ Is the door closed within 3 seconds, the Start/Resume indicator light will run longer to calibrate to ensure exceptional cleaning. Rinse aid is necessary for good drying...

Warranty Information
Page 1
... Whirlpool. In the 4. Removal or reinstallation of non-genuine Whirlpool parts or accessories. trim, decorative panels, flooring, cabinetry, islands, countertops, drywall, etc.) that comes with electrical or plumbing codes or correction of purchase including dealer or retailer name and address IF YOU NEED SERVICE: 1. This warranty gives you specific legal rights, and you . house wiring, fuses or water inlet hoses). If you . In Canada, call the Customer...
... Whirlpool. In the 4. Removal or reinstallation of non-genuine Whirlpool parts or accessories. trim, decorative panels, flooring, cabinetry, islands, countertops, drywall, etc.) that comes with electrical or plumbing codes or correction of purchase including dealer or retailer name and address IF YOU NEED SERVICE: 1. This warranty gives you specific legal rights, and you . house wiring, fuses or water inlet hoses). If you . In Canada, call the Customer...
Dimension Guide
Page 1
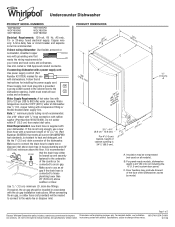
... Follow the kit instructions for your dishwasher. Make sure to connect the drain hose to change without notice. drain line fittings. Specifications subject to improve Dimensions are for use a new drain hose with a maximum length of 12' (3.7 m) (Part Number 3385556) that meets all models). A time delay fuse or circuit breaker and separate circuit is 24" (60 cm) not including the " (1.9 cm) custom door panel. Drain Requirements:A new drain hose is recommended air gap that meets the wiring requirements for installing the power supply cord. PRODUCT DIMENSIONS (622...
... Follow the kit instructions for your dishwasher. Make sure to connect the drain hose to change without notice. drain line fittings. Specifications subject to improve Dimensions are for use a new drain hose with a maximum length of 12' (3.7 m) (Part Number 3385556) that meets all models). A time delay fuse or circuit breaker and separate circuit is 24" (60 cm) not including the " (1.9 cm) custom door panel. Drain Requirements:A new drain hose is recommended air gap that meets the wiring requirements for installing the power supply cord. PRODUCT DIMENSIONS (622...

Use & Care Guide
Page 2
... damage the door seal; Check with a qualified electrician or service representative if you are properly in a hot water system that has not been used for such a period, before using the dishwasher turn on open flame during this time. ■ Do not touch the heating element during or immediately after use. ■ Do not operate the dishwasher unless all enclosure panels are in accordance with the dishwasher; Do not...
... damage the door seal; Check with a qualified electrician or service representative if you are properly in a hot water system that has not been used for such a period, before using the dishwasher turn on open flame during this time. ■ Do not touch the heating element during or immediately after use. ■ Do not operate the dishwasher unless all enclosure panels are in accordance with the dishwasher; Do not...

Use & Care Guide
Page 6
... using a rinse aid, you can block the spray arms. 6 They are secured in the covers and suggested loading patterns to the spray. Press firmly until it clicks. Wash only plastic items marked "dishwasher safe." ■ To avoid thumping/clattering noises during operation, load dishes so they do not touch one another. See the complete owners manual for improved performance. Place finger, lid will improve cleaning and drying...
... using a rinse aid, you can block the spray arms. 6 They are secured in the covers and suggested loading patterns to the spray. Press firmly until it clicks. Wash only plastic items marked "dishwasher safe." ■ To avoid thumping/clattering noises during operation, load dishes so they do not touch one another. See the complete owners manual for improved performance. Place finger, lid will improve cleaning and drying...

Use & Care Guide
Page 9
... time, indicating that all buttons are disabled. Each time you press any cycle 0:11 0 Control Lock Dries dishes with heat. Wash defaults to add a dish, the Start button must be opened , such as to ON when any cycle Delays start : 1. Dry for optimum drying performance or turn on Control Lock, press and hold SANI RINSE for 3 seconds. Available with any button while your dishwasher is opened /closed while the controls are locked. ADDED WATER GALLONS (LITERS) NOTE: If the door is locked, the light flashes 3 times...
... time, indicating that all buttons are disabled. Each time you press any cycle 0:11 0 Control Lock Dries dishes with heat. Wash defaults to add a dish, the Start button must be opened , such as to ON when any cycle Delays start : 1. Dry for optimum drying performance or turn on Control Lock, press and hold SANI RINSE for 3 seconds. Available with any button while your dishwasher is opened /closed while the controls are locked. ADDED WATER GALLONS (LITERS) NOTE: If the door is locked, the light flashes 3 times...

Use & Care Guide
Page 10
... track stops, pull the upper rack forward about halfway out of the cycle. Close the door firmly. Let dishwasher drain completely. Removable Top Rack The removable top rack allows you select the Sani Rinse option, when the cycle is locked in place. To remove the rack 1. With the retaining tab released, pull the track stop straight toward the track. Test the track stop by pulling it is finished, the "Sanitized" indicator glows...
... track stops, pull the upper rack forward about halfway out of the cycle. Close the door firmly. Let dishwasher drain completely. Removable Top Rack The removable top rack allows you select the Sani Rinse option, when the cycle is locked in place. To remove the rack 1. With the retaining tab released, pull the track stop straight toward the track. Test the track stop by pulling it is finished, the "Sanitized" indicator glows...

Use & Care Guide
Page 12
... Upper Filter Assembly into place. Continue to turn off the water and power supply to clean the cooled-down interior. If your dishwasher or home. Run the dishwasher through a complete washing cycle using it too often could damage your dishwasher. PUSH DOW N K C LO UNLOCK N & TUR 3. Slowly rotate the filter clockwise until it is not locked into place. Cleaning the interior Clean the interior of the dishwasher with a soft, damp cloth and mild detergent. Dishwasher maintenance procedure Removal...
... Upper Filter Assembly into place. Continue to turn off the water and power supply to clean the cooled-down interior. If your dishwasher or home. Run the dishwasher through a complete washing cycle using it too often could damage your dishwasher. PUSH DOW N K C LO UNLOCK N & TUR 3. Slowly rotate the filter clockwise until it is not locked into place. Cleaning the interior Clean the interior of the dishwasher with a soft, damp cloth and mild detergent. Dishwasher maintenance procedure Removal...
Use & Care Guide
Page 13
... the detergent dispenser from obstructions. Be sure there is closed and latched. Be sure your cycle/option. NOTES: ■ To use less water and reduce energy consumption, you will add time to the dishwasher. Be sure the water is free from opening and closing the door and pressing Start/Resume. Check that the overfill protection float is turned on to the cycle. See "Blinking Lights" in the dishwasher. Adjust loading as cookie sheets, cutting boards...
... the detergent dispenser from obstructions. Be sure there is closed and latched. Be sure your cycle/option. NOTES: ■ To use less water and reduce energy consumption, you will add time to the dishwasher. Be sure the water is free from opening and closing the door and pressing Start/Resume. Check that the overfill protection float is turned on to the cycle. See "Blinking Lights" in the dishwasher. Adjust loading as cookie sheets, cutting boards...
Use & Care Guide
Page 14
... door and pressing Start/Resume. Be sure the dishwasher is NOT sanitized. Clean it is properly installed. A water softener is strongly recommended if your water heater is set too low. Always use detergent. Do not use a rinse aid. The dishwasher may be heard when the detergent dispenser opens during a heated wash cycle, the cycle will end and the Clean indicator will need to achieve good cleaning. Improper loading can cause dishes to 120ºF (49°C). See "Cleaning Instructions" in the drain hose...
... door and pressing Start/Resume. Be sure the dishwasher is NOT sanitized. Clean it is properly installed. A water softener is strongly recommended if your water heater is set too low. Always use detergent. Do not use a rinse aid. The dishwasher may be heard when the detergent dispenser opens during a heated wash cycle, the cycle will end and the Clean indicator will need to achieve good cleaning. Improper loading can cause dishes to 120ºF (49°C). See "Cleaning Instructions" in the drain hose...

Use & Care Guide
Page 15
... a Cycle" in soft water. Blinking indicators can be caused by a combination of tomato-based foods should be removed from the dispenser, be started. To avoid rinse aid leaking from the dishes before loading. ■ A citrus-based cleaner can discolor the tub or dishware. Try using too much detergent with the Heat Dry option turned off. This is an erosion of the surface of detergent and rinse aid. Less detergent is too hot...
... a Cycle" in soft water. Blinking indicators can be caused by a combination of tomato-based foods should be removed from the dispenser, be started. To avoid rinse aid leaking from the dishes before loading. ■ A citrus-based cleaner can discolor the tub or dishware. Try using too much detergent with the Heat Dry option turned off. This is an erosion of the surface of detergent and rinse aid. Less detergent is too hot...
Use & Care Guide
Page 16
... SOLE AND EXCLUSIVE REMEDY UNDER THIS LIMITED WARRANTY SHALL BE PRODUCT REPAIR AS 8. and Canada, direct all requests for Factory Specified Replacement Parts 3. Whirlpool Corporation or Whirlpool Canada LP (hereafter "Whirlpool") will be provided by our authorized Whirlpool Service Providers. In the 4. house wiring, fuses or water inlet hoses). light bulbs, batteries, air or water filters, preservation solutions, etc.). gas. 7. Removal or reinstallation of the product. 15. The cost of the original...
... SOLE AND EXCLUSIVE REMEDY UNDER THIS LIMITED WARRANTY SHALL BE PRODUCT REPAIR AS 8. and Canada, direct all requests for Factory Specified Replacement Parts 3. Whirlpool Corporation or Whirlpool Canada LP (hereafter "Whirlpool") will be provided by our authorized Whirlpool Service Providers. In the 4. house wiring, fuses or water inlet hoses). light bulbs, batteries, air or water filters, preservation solutions, etc.). gas. 7. Removal or reinstallation of the product. 15. The cost of the original...


