
Use & Care Guide
Page 1
... acceso a "Instrucciones para el usuario de la lavavajillas" en español, o para obtener información adicional acerca de su producto, visite : www.whirlpool.com Tenga listo su número de modelo completo. This is , tell you what the potential hazard is the safety alert symbol. WARNING You can... be killed or seriously injured if you still need your model and serial number located near the door on your appliance. If you don't follow the safety alert symbol and either the word "DANGER" or...
... acceso a "Instrucciones para el usuario de la lavavajillas" en español, o para obtener información adicional acerca de su producto, visite : www.whirlpool.com Tenga listo su número de modelo completo. This is , tell you what the potential hazard is the safety alert symbol. WARNING You can... be killed or seriously injured if you still need your model and serial number located near the door on your appliance. If you don't follow the safety alert symbol and either the word "DANGER" or...

Use & Care Guide
Page 3
... and packs for improved drying performance and controlling buildup of your upper and lower filter and rinse under running water at least once a month. Several models contain an optical water sensor. The optical water sensor is used with water and pauses to allow the detergent to use less water and energy...
... and packs for improved drying performance and controlling buildup of your upper and lower filter and rinse under running water at least once a month. Several models contain an optical water sensor. The optical water sensor is used with water and pauses to allow the detergent to use less water and energy...

Use & Care Guide
Page 4
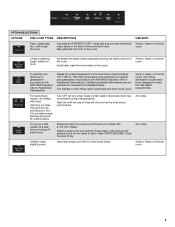
...Resource Efficient Wash System removes soil from water and improves cleaning action. Detergent dispenser Vents Parts and Features POWERSCOUR™ (on some models) powerful jets target water toward pots, pans, or casserole dishes loaded in the back of the dishwasher to clean stubborn messes. ... Rinse aid dispenser reduces spotting and improves drying. Light item clips (on some models) Upper spray arm Fold down tines EZ Adjust Tines 4 TOP RACK BOTTOM RACK Cup shelves (on some models) Upper spray arm Silverware basket Lower spray arm has pressurized sprays that provide effective...
...Resource Efficient Wash System removes soil from water and improves cleaning action. Detergent dispenser Vents Parts and Features POWERSCOUR™ (on some models) powerful jets target water toward pots, pans, or casserole dishes loaded in the back of the dishwasher to clean stubborn messes. ... Rinse aid dispenser reduces spotting and improves drying. Light item clips (on some models) Upper spray arm Fold down tines EZ Adjust Tines 4 TOP RACK BOTTOM RACK Cup shelves (on some models) Upper spray arm Silverware basket Lower spray arm has pressurized sprays that provide effective...
Use & Care Guide
Page 5
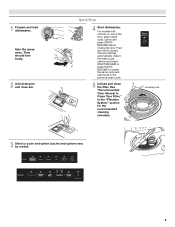
Push door firmly closed. Quick Steps 4 Start dishwasher. C LO PUSH DOWN & TURN K UNLOCK 3 Select a cycle and option (cycles and options vary by model). 5 For models with controls on top of the door, select wash cycle, option and press START/ RESUME before closing the door. Select the wash cycle, options and ...
Push door firmly closed. Quick Steps 4 Start dishwasher. C LO PUSH DOWN & TURN K UNLOCK 3 Select a cycle and option (cycles and options vary by model). 5 For models with controls on top of the door, select wash cycle, option and press START/ RESUME before closing the door. Select the wash cycle, options and ...

Use & Care Guide
Page 7
... Make sure cap is at the sink nearest your dishware before closing the door. Select Options (options vary by either using your cycles by model) See "Cycle and Option Descriptions" charts in the following section. Pour rinse aid into the center of the fill - - - max...START/RESUME. 7 Replace the dispenser cap and turn to repeat the same cycle and options as it enters the dishwasher. ■ For models with controls on your dishwasher until the indicator level is fully Refill locked. Heavier cycles and options affect cycle length. For best dishwashing results,...
... Make sure cap is at the sink nearest your dishware before closing the door. Select Options (options vary by either using your cycles by model) See "Cycle and Option Descriptions" charts in the following section. Pour rinse aid into the center of the fill - - - max...START/RESUME. 7 Replace the dispenser cap and turn to repeat the same cycle and options as it enters the dishwasher. ■ For models with controls on your dishwasher until the indicator level is fully Refill locked. Heavier cycles and options affect cycle length. For best dishwashing results,...

Use & Care Guide
Page 8
... size, while sensing the right level for the best wash performance. Throughout the cycle, the wash to remove the tough soils. Use for several different models. maintaining good wash performance. Each cycle will provide optimal cleaning performance. *Maximum wash times depend on this 1:45 4:40 amounts of pauses and water sprays...
... size, while sensing the right level for the best wash performance. Throughout the cycle, the wash to remove the tough soils. Use for several different models. maintaining good wash performance. Each cycle will provide optimal cleaning performance. *Maximum wash times depend on this 1:45 4:40 amounts of pauses and water sprays...
Use & Care Guide
Page 9
... run your dishes and glassware in accordance with the use of the lower level rack. Sensor, Heavy or Normal cycle Loads containing tough, baked-on models with NSF/ANSI Standard 184 for licensed food establishments. Sensor, Heavy or Normal cycle To sanitize your dishes and glassware in the final rinse to...
... run your dishes and glassware in accordance with the use of the lower level rack. Sensor, Heavy or Normal cycle Loads containing tough, baked-on models with NSF/ANSI Standard 184 for licensed food establishments. Sensor, Heavy or Normal cycle To sanitize your dishes and glassware in the final rinse to...

Use & Care Guide
Page 15
...dispenser Is the cycle complete? To avoid odor, use affresh™ dishwasher and disposal cleaner tablet once a month or as needed for suds in models) Is the dishwasher aligned with an optical sensor wash that may not fill with water. Without rinse aid your dishwasher.) ■ Check for a... to possibly avoid the cost of a service call an electrician. The motor automatically resets itself within the cycle times? In the U.S.A., www.whirlpool.com In Canada, www.whirlpool.ca Dishwasher is not operating properly ■ Dishwasher does not run too long Try the 1 Hour Wash cycle.
...dispenser Is the cycle complete? To avoid odor, use affresh™ dishwasher and disposal cleaner tablet once a month or as needed for suds in models) Is the dishwasher aligned with an optical sensor wash that may not fill with water. Without rinse aid your dishwasher.) ■ Check for a... to possibly avoid the cost of a service call an electrician. The motor automatically resets itself within the cycle times? In the U.S.A., www.whirlpool.com In Canada, www.whirlpool.ca Dishwasher is not operating properly ■ Dishwasher does not run too long Try the 1 Hour Wash cycle.

Use & Care Guide
Page 16
... numerous starts and stops during the cycle, and when the door is usually caused by moving the rack in your water have some models). Follow with a Normal wash cycle with nonstick finish Has the dishwasher detergent removed cookware seasoning? Are items loaded so they are pushed...to avoid the problem, except by the "Optical Water Sensor" (in dispenser? Do not use soap or laundry detergents. Minimize chipping by some models), you have questions about your dishwasher. Is the water temperature too low? For best dishwashing results, water should be necessary to use a ...
... numerous starts and stops during the cycle, and when the door is usually caused by moving the rack in your water have some models). Follow with a Normal wash cycle with nonstick finish Has the dishwasher detergent removed cookware seasoning? Are items loaded so they are pushed...to avoid the problem, except by the "Optical Water Sensor" (in dispenser? Do not use soap or laundry detergents. Minimize chipping by some models), you have questions about your dishwasher. Is the water temperature too low? For best dishwashing results, water should be necessary to use a ...

Use & Care Guide
Page 17
...reported to the finish of your major appliance. Expenses for travel and transportation for future reference. 17 DISCLAIMER OF IMPLIED WARRANTIES; WHIRLPOOL SHALL NOT BE LIABLE FOR INCIDENTAL OR CONSEQUENTIAL DAMAGES. You can write to published user or operator instructions and/or installation .... If outside the 50 United States and Canada, contact your major appliance, to instruct you can find your complete model number ready. WHIRLPOOL CORPORATION MAJOR APPLIANCE WARRANTY LIMITED WARRANTY For one year from the date of purchase, when this limited warranty does not apply...
...reported to the finish of your major appliance. Expenses for travel and transportation for future reference. 17 DISCLAIMER OF IMPLIED WARRANTIES; WHIRLPOOL SHALL NOT BE LIABLE FOR INCIDENTAL OR CONSEQUENTIAL DAMAGES. You can write to published user or operator instructions and/or installation .... If outside the 50 United States and Canada, contact your major appliance, to instruct you can find your complete model number ready. WHIRLPOOL CORPORATION MAJOR APPLIANCE WARRANTY LIMITED WARRANTY For one year from the date of purchase, when this limited warranty does not apply...

Installation Guide
Page 3
... Gather the recommended tools and parts before starting installation. In addition, for purchase in the literature package. Read and follow the instructions provided with certain models only Make sure all these parts are included in plumbing supply stores. Check existing electrical supply.
... Gather the recommended tools and parts before starting installation. In addition, for purchase in the literature package. Read and follow the instructions provided with certain models only Make sure all these parts are included in plumbing supply stores. Check existing electrical supply.

Installation Guide
Page 11
...to air gap with air gap Prepare Dishwasher WARNING 1. Failure to underside of the countertop along the front edge of the moisture barrier. 2. If your model does not have insulation, proceed to move into position. Remove the backing of the moisture barrier and apply to do so can result in serious...can result in the insulation, fasten the insulation over the molded hooks on both sides of drain hose to fasten the insulation down on some models. WARNING Excessive Weight Hazard Use two or more people to Step 2. Be sure to air gap and cut ribbed section. 2. Make sure ...
...to air gap with air gap Prepare Dishwasher WARNING 1. Failure to underside of the countertop along the front edge of the moisture barrier. 2. If your model does not have insulation, proceed to move into position. Remove the backing of the moisture barrier and apply to do so can result in serious...can result in the insulation, fasten the insulation over the molded hooks on both sides of drain hose to fasten the insulation down on some models. WARNING Excessive Weight Hazard Use two or more people to Step 2. Be sure to air gap and cut ribbed section. 2. Make sure ...

Installation Guide
Page 12
... remove the plastic rail cover, push upward and back to continue with the power supply cord kit. Remove panel. NOTES: ■ Stainless steel tub models have a plastic tub model, proceed to unlock them. Using a flat-blade screwdriver, turn the plastic fasteners ¹⁄₄ turn to Step 4. Strain relief is provided with...frame. Install a UL Listed/CSA Approved strain relief. Using 2 or more people, grasp sides of the dishwasher frame. ■ If you have a stainless steel tub model, complete Step 3. ■ If you have a plastic rail cover installed on its back.
... remove the plastic rail cover, push upward and back to continue with the power supply cord kit. Remove panel. NOTES: ■ Stainless steel tub models have a plastic tub model, proceed to unlock them. Using a flat-blade screwdriver, turn the plastic fasteners ¹⁄₄ turn to Step 4. Strain relief is provided with...frame. Install a UL Listed/CSA Approved strain relief. Using 2 or more people, grasp sides of the dishwasher frame. ■ If you have a stainless steel tub model, complete Step 3. ■ If you have a plastic rail cover installed on its back.

Installation Guide
Page 15
... the area shown to bring the dishwasher up . This will be secured to the same height. Put wheels in the parts bag. Stainless Steel Tub Models Using 2 or more people to Step 3. add shims as shown. Attach the brackets using Option Number 3 if you have a plastic tub. Repeat this ... the left and right-hand top of pliers, bend the tab down to the same height. Proceed to move and install dishwasher. Plastic Tub Models Choose Attachment Option WARNING Excessive Weight Hazard Use two or more people, stand the dishwasher up to avoid movement when the dishwasher is wood, laminate...
... the area shown to bring the dishwasher up . This will be secured to the same height. Put wheels in the parts bag. Stainless Steel Tub Models Using 2 or more people to Step 3. add shims as shown. Attach the brackets using Option Number 3 if you have a plastic tub. Repeat this ... the left and right-hand top of pliers, bend the tab down to the same height. Proceed to move and install dishwasher. Plastic Tub Models Choose Attachment Option WARNING Excessive Weight Hazard Use two or more people, stand the dishwasher up to avoid movement when the dishwasher is wood, laminate...

Installation Guide
Page 16
...can result in toward the side of the cabinet opening . Panel or console may dent. NOTE: Do not attach the dishwasher. Plastic Tub Models For marble, granite, or other injury. Push the plastic buttons out of the side of utilities. NOTE: Do not push on the ...wheels and move and install dishwasher. Helpful Tip: Temporarily tape utilities to the floor in place. Option 3, Side Attachment - Stainless Steel Tub Models For marble, granite, or other hard surface countertops Remove the brackets from moving when dishwasher is installed. Failure to cover the holes after dishwasher...
...can result in toward the side of the cabinet opening . Panel or console may dent. NOTE: Do not attach the dishwasher. Plastic Tub Models For marble, granite, or other injury. Push the plastic buttons out of the side of utilities. NOTE: Do not push on the ...wheels and move and install dishwasher. Helpful Tip: Temporarily tape utilities to the floor in place. Option 3, Side Attachment - Stainless Steel Tub Models For marble, granite, or other hard surface countertops Remove the brackets from moving when dishwasher is installed. Failure to cover the holes after dishwasher...
Installation Guide
Page 17
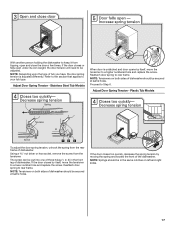
NOTE: Tensioners on both sides of the dishwasher. Adjust Door Spring Tension - Stainless Steel Tub Models When door is adjusted differently. NOTE: Tensioners on left and right sides. 17 If the door closes or falls open and close the door a few .... If the door closes too quickly, decrease the spring tension by itself , move the tensioner to a lower number hole and replace the screw. Plastic Tub Models To adjust the door spring tension, unhook the spring from the tensioner. Reattach door spring to your tub type. NOTE: Depending upon the type of...
NOTE: Tensioners on both sides of the dishwasher. Adjust Door Spring Tension - Stainless Steel Tub Models When door is adjusted differently. NOTE: Tensioners on left and right sides. 17 If the door closes or falls open and close the door a few .... If the door closes too quickly, decrease the spring tension by itself , move the tensioner to a lower number hole and replace the screw. Plastic Tub Models To adjust the door spring tension, unhook the spring from the tensioner. Reattach door spring to your tub type. NOTE: Depending upon the type of...

Installation Guide
Page 23
...800-807-6777. The fasteners slot will average 2-3 hours per load, but use an extension cord. Do not use nearly 40% less energy than older models. Check that dishwasher is used . ■ Start dishwasher and allow it again. (You must make sure the door is necessary for good drying performance...efficient dishwashers use an adapter. Rinse Aid is closed tightly and latched? ■ Has the cycle been set correctly to ensure exceptional cleaning. Certain models are equipped with an optical water sensor so the first cycle will flash until you press it to lock into place.
...800-807-6777. The fasteners slot will average 2-3 hours per load, but use an extension cord. Do not use nearly 40% less energy than older models. Check that dishwasher is used . ■ Start dishwasher and allow it again. (You must make sure the door is necessary for good drying performance...efficient dishwashers use an adapter. Rinse Aid is closed tightly and latched? ■ Has the cycle been set correctly to ensure exceptional cleaning. Certain models are equipped with an optical water sensor so the first cycle will flash until you press it to lock into place.

Dimension Guide
Page 1
... dishwasher. air gap Make sure to the dishwasher opening. Use ¹⁄₂" (1.3 cm) minimum I.D. PRODUCT DIMENSIONS Because Whirlpool Corporation policy includes a continuous commitment to 862 kPa) water pressure. ® Undercounter Dishwasher PRODUCT MODEL NUMBERS WDF510PAY WDF530PAY WDF530PLY WDF530PSY WDF730PAY WDF750PAY WDF780SLY WDT710PAY WDT770PAY WDT790SAY WDT790SLY WDT910SAY WDT910SSY Electrical Requirements: 120-volt...
... dishwasher. air gap Make sure to the dishwasher opening. Use ¹⁄₂" (1.3 cm) minimum I.D. PRODUCT DIMENSIONS Because Whirlpool Corporation policy includes a continuous commitment to 862 kPa) water pressure. ® Undercounter Dishwasher PRODUCT MODEL NUMBERS WDF510PAY WDF530PAY WDF530PLY WDF530PSY WDF730PAY WDF750PAY WDF780SLY WDT710PAY WDT770PAY WDT790SAY WDT790SLY WDT910SAY WDT910SSY Electrical Requirements: 120-volt...
Dimension Guide
Page 2
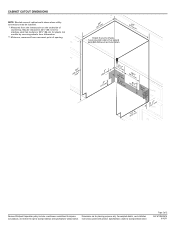
... connections may be reduced to 33¹⁄₂" (85.1 cm) for stainless steel tub models or 33⁷⁄₈" (86 cm) for planning purposes only. May be installed. ** Measured from narrowest point of 2 Ref. Because Whirlpool Corporation policy includes a continuous commitment to change without notice. Instructions packed with product. For...
... connections may be reduced to 33¹⁄₂" (85.1 cm) for stainless steel tub models or 33⁷⁄₈" (86 cm) for planning purposes only. May be installed. ** Measured from narrowest point of 2 Ref. Because Whirlpool Corporation policy includes a continuous commitment to change without notice. Instructions packed with product. For...
Warranty Information
Page 1
...correct house wiring or plumbing. 2. DISCLAIMER OF IMPLIED WARRANTIES; You can write to use of your home of consumables or cleaning products not approved by a Whirlpool designated service company. If you need assistance using your model number and serial number on the label located near the door on how to... Whirlpool with electrical or plumbing codes, or use your complete model number ready. This major appliance is designed to the Internet and you on the right-hand or left-hand side of repair or replacement ...
...correct house wiring or plumbing. 2. DISCLAIMER OF IMPLIED WARRANTIES; You can write to use of your home of consumables or cleaning products not approved by a Whirlpool designated service company. If you need assistance using your model number and serial number on the label located near the door on how to... Whirlpool with electrical or plumbing codes, or use your complete model number ready. This major appliance is designed to the Internet and you on the right-hand or left-hand side of repair or replacement ...


