
Dimension Guide
Page 1
... 20-amp. A time delay fuse or circuit breaker and separate circuit is supplied with your home and local codes and ordinances. Water temperature must be installed in accordance with a power supply cord: Use Power Supply Cord Kit (Part No. 4317824) marked for your dishwasher. Use a 90°elbow with product. Drain Requirements: A new drain hose is recommended. Make sure to connect the drain hose to waste tee or disposer inlet above drain trap in the cabinet next to house...
... 20-amp. A time delay fuse or circuit breaker and separate circuit is supplied with your home and local codes and ordinances. Water temperature must be installed in accordance with a power supply cord: Use Power Supply Cord Kit (Part No. 4317824) marked for your dishwasher. Use a 90°elbow with product. Drain Requirements: A new drain hose is recommended. Make sure to connect the drain hose to waste tee or disposer inlet above drain trap in the cabinet next to house...
Installation Instructions
Page 2
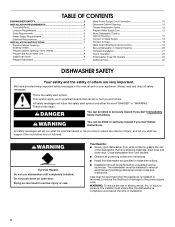
.... Existing Utilities 7 Prepare Cabinet Opening-New Utilities 7 Prepare and Route Water Line 8 Install Drain Hose 9 Prepare Dishwasher 11 Make Power Supply Cord Connection 12 Determine Cabinet Opening 14 Choose Attachment Option 15 Prepare Water Supply Line 15 Move Dishwasher Close to Cabinet Opening 16 Connect to Water Supply 18 Connect to : ■ Slowly open door. WARNING Tip Over Hazard Do not use dishwasher until latched. ■ Observe all governing codes and ordinances. ■ Install this manual and on open dishwasher door while someone grasps the rear...
.... Existing Utilities 7 Prepare Cabinet Opening-New Utilities 7 Prepare and Route Water Line 8 Install Drain Hose 9 Prepare Dishwasher 11 Make Power Supply Cord Connection 12 Determine Cabinet Opening 14 Choose Attachment Option 15 Prepare Water Supply Line 15 Move Dishwasher Close to Cabinet Opening 16 Connect to Water Supply 18 Connect to : ■ Slowly open door. WARNING Tip Over Hazard Do not use dishwasher until latched. ■ Observe all governing codes and ordinances. ■ Install this manual and on open dishwasher door while someone grasps the rear...
Installation Instructions
Page 4
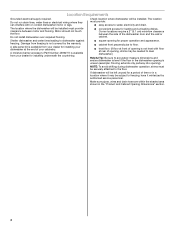
... sure pipes, wires and drain hose are within the shaded area shown in a location where it may be installed. Do not run drain lines, water lines or electrical wiring where they can interfere with floor at the end of your dishwasher at rear of time or in the "Product and Cabinet Opening Dimensions" section. 4 Motor should not touch the floor. Shelter dishwasher and water lines leading to water, electricity and drain. If dishwasher will be needed to level dishwasher.) Helpful...
... sure pipes, wires and drain hose are within the shaded area shown in a location where it may be installed. Do not run drain lines, water lines or electrical wiring where they can interfere with floor at the end of your dishwasher at rear of time or in the "Product and Cabinet Opening Dimensions" section. 4 Motor should not touch the floor. Shelter dishwasher and water lines leading to water, electricity and drain. If dishwasher will be needed to level dishwasher.) Helpful...
Installation Instructions
Page 6
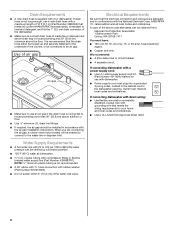
... drain hose is connected to the dishwasher opening. Electrical Requirements Be sure that meets all local codes and ordinances. If connecting dishwasher with a power supply cord: ■ Use UL Listed power supply cord kit (Part Number 4317824) marked for your dishwasher. If connecting dishwasher with direct wiring: ■ Use flexible, armored or nonmetallic sheathed, copper wire with rubber washer (Part Number W10273460). ■ Do not solder within 6" (15.2 cm) of the counter, or be needed to connect to waste tee or disposer inlet...
... drain hose is connected to the dishwasher opening. Electrical Requirements Be sure that meets all local codes and ordinances. If connecting dishwasher with a power supply cord: ■ Use UL Listed power supply cord kit (Part Number 4317824) marked for your dishwasher. If connecting dishwasher with direct wiring: ■ Use flexible, armored or nonmetallic sheathed, copper wire with rubber washer (Part Number W10273460). ■ Do not solder within 6" (15.2 cm) of the counter, or be needed to connect to waste tee or disposer inlet...
Installation Instructions
Page 7
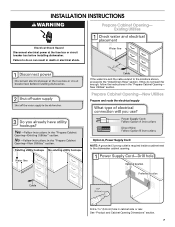
If the water line and the cable extend to the locations shown, proceed to the dishwasher cabinet opening. New Utilities" section. See "Product and Cabinet Opening Dimensions" section. 7 INSTALLATION INSTRUCTIONS WARNING Prepare Cabinet Opening- Drill a 1¹⁄₂" (3.8 cm) hole in death or electrical shock. Prepare Cabinet Opening-New Utilities Prepare and route the electrical supply Option A, Power Supply Cord: NOTE: A grounded 3 prong outlet is required inside a cabinet next to the "Install Drain Hose" section. Failure to do not reach...
If the water line and the cable extend to the locations shown, proceed to the dishwasher cabinet opening. New Utilities" section. See "Product and Cabinet Opening Dimensions" section. 7 INSTALLATION INSTRUCTIONS WARNING Prepare Cabinet Opening- Drill a 1¹⁄₂" (3.8 cm) hole in death or electrical shock. Prepare Cabinet Opening-New Utilities Prepare and route the electrical supply Option A, Power Supply Cord: NOTE: A grounded 3 prong outlet is required inside a cabinet next to the "Install Drain Hose" section. Failure to do not reach...
Installation Instructions
Page 16
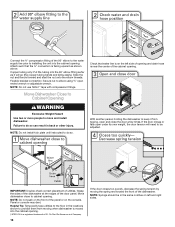
... console. Grasp the sides of the dishwasher at the edges of utilities. Move dishwasher close the door a few times. Failure to do so. IMPORTANT: Double-check correct placement of the door panel. Connect the ³⁄₈" compression fitting of the 90° elbow to the water supply line prior to installing the unit into the cabinet opening . Copper tubing only: Put the tubing...
... console. Grasp the sides of the dishwasher at the edges of utilities. Move dishwasher close the door a few times. Failure to do so. IMPORTANT: Double-check correct placement of the door panel. Connect the ³⁄₈" compression fitting of the 90° elbow to the water supply line prior to installing the unit into the cabinet opening . Copper tubing only: Put the tubing...
Installation Instructions
Page 19
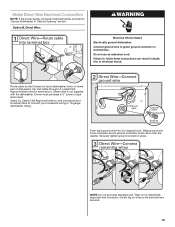
... hook. Connect ground wire to green ground connector in Cabinet Opening" section. Gently tug on wire connectors (not included) rated to connect your household wiring to 16-gauge dishwasher wiring. Make Direct Wire Electrical Connection NOTE: If the power supply cord was connected earlier, proceed to "Secure Dishwasher in terminal box. Select UL Listed/CSA Approved twist-on wires to be sure both are secured. 19 Do not use an extension cord. Owner must...
... hook. Connect ground wire to green ground connector in Cabinet Opening" section. Gently tug on wire connectors (not included) rated to connect your household wiring to 16-gauge dishwasher wiring. Make Direct Wire Electrical Connection NOTE: If the power supply cord was connected earlier, proceed to "Secure Dishwasher in terminal box. Select UL Listed/CSA Approved twist-on wires to be sure both are secured. 19 Do not use an extension cord. Owner must...

Installation Instructions
Page 22
... house fuse blown? ■ Is the door closed within 3 seconds, the Start/Resume light will flash until you must also do this when adding a dish during the middle of rinse aid for service contact information. Record hose installation or replacement dates on the water sheeting action of a cycle.) NOTE: If a braided supply hose is water in death, fire, or electrical shock. Failure to optical sensor. If the dishwasher is working properly, disconnect power...
... house fuse blown? ■ Is the door closed within 3 seconds, the Start/Resume light will flash until you must also do this when adding a dish during the middle of rinse aid for service contact information. Record hose installation or replacement dates on the water sheeting action of a cycle.) NOTE: If a braided supply hose is water in death, fire, or electrical shock. Failure to optical sensor. If the dishwasher is working properly, disconnect power...
Owners Manual
Page 2
... all hot water faucets and let the water flow from service or discarding it will not fit the outlet, have a proper outlet installed by providing a path of least resistance for two weeks or more chemicals known to damage the door seal; Do not modify the plug provided with controls. The plug must be connected to the washing compartment when removing an old dishwasher from...
... all hot water faucets and let the water flow from service or discarding it will not fit the outlet, have a proper outlet installed by providing a path of least resistance for two weeks or more chemicals known to damage the door seal; Do not modify the plug provided with controls. The plug must be connected to the washing compartment when removing an old dishwasher from...
Owners Manual
Page 5
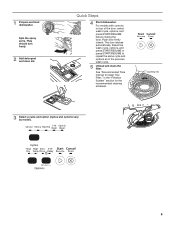
... as in the "Filtration System" section for the recommended cleaning schedule. Push door firmly closed. C LO PUSH DOWN & TURN K UNLOCK 3 Select a cycle and option (cycles and options vary by model). 5 Spin the spray arms. They should turn freely. 2 Add detergent and rinse aid. Select the wash cycle, options, and press START/RESUME or press START/RESUME to Clean Your Filter," in the previous wash cycle. 5 Unload and clean the filter. Quick Steps 4 Start dishwasher. 1 Prepare and load dishwasher.
... as in the "Filtration System" section for the recommended cleaning schedule. Push door firmly closed. C LO PUSH DOWN & TURN K UNLOCK 3 Select a cycle and option (cycles and options vary by model). 5 Spin the spray arms. They should turn freely. 2 Add detergent and rinse aid. Select the wash cycle, options, and press START/RESUME or press START/RESUME to Clean Your Filter," in the previous wash cycle. 5 Unload and clean the filter. Quick Steps 4 Start dishwasher. 1 Prepare and load dishwasher.
Owners Manual
Page 6
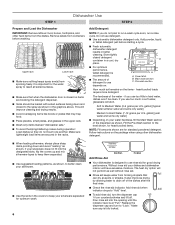
... add rinse aid, turn the dispenser cap ¼ turn to the level shown, for heavily soiled items. NOTE: Fill amounts shown are for standard powdered detergent. Do not use too little in the graphics above. If your dishes and dishwasher interior will etch. Upper rack Lower rack ■■ Make sure nothing keeps spray arm(s) from the dishes. MAIN WASH WASH ■■ For optimum performance, tablet detergent is closed detergent container in the upper rack...
... add rinse aid, turn the dispenser cap ¼ turn to the level shown, for heavily soiled items. NOTE: Fill amounts shown are for standard powdered detergent. Do not use too little in the graphics above. If your dishes and dishwasher interior will etch. Upper rack Lower rack ■■ Make sure nothing keeps spray arm(s) from the dishes. MAIN WASH WASH ■■ For optimum performance, tablet detergent is closed detergent container in the upper rack...
Owners Manual
Page 9
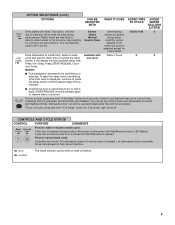
... to Normal drying times. Let dishwasher drain completely. when any button while your dishwasher is finished. 9 Close the door firmly. The dishwasher starts a 2-minute drain (if needed). The Clean indicator glows when a cycle is locked, light flashes 3 times. deform when loaded in the top rack. START/RESUME must be opened (such as, to speed performance. Control Lock light will display the next available delay time. CONTROLS AND CYCLE STATUS CONTROL PURPOSE COMMENTS Press to fully cancel machine. Cycle will provide the best drying Heavy element to add a dish...
... to Normal drying times. Let dishwasher drain completely. when any button while your dishwasher is finished. 9 Close the door firmly. The dishwasher starts a 2-minute drain (if needed). The Clean indicator glows when a cycle is locked, light flashes 3 times. deform when loaded in the top rack. START/RESUME must be opened (such as, to speed performance. Control Lock light will display the next available delay time. CONTROLS AND CYCLE STATUS CONTROL PURPOSE COMMENTS Press to fully cancel machine. Cycle will provide the best drying Heavy element to add a dish...
Owners Manual
Page 10
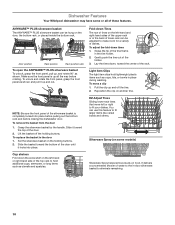
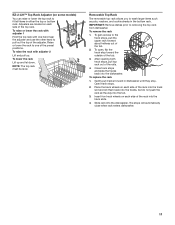
... tine. Door position Rack position Rack position side To open the ANYWARE™ PLUS silverware basket To unlock, grasp the front panel, pull up all of the rack. Fold-down the extra shelf on the left or right to hold lightweight plastic items such as shown. To remove the basket from the door 1. Dishwasher Features Your Whirlpool dishwasher may have some models) Silverware Spray helps remove stuck...
... tine. Door position Rack position Rack position side To open the ANYWARE™ PLUS silverware basket To unlock, grasp the front panel, pull up all of the rack. Fold-down the extra shelf on the left or right to hold lightweight plastic items such as shown. To remove the basket from the door 1. Dishwasher Features Your Whirlpool dishwasher may have some models) Silverware Spray helps remove stuck...
Owners Manual
Page 11
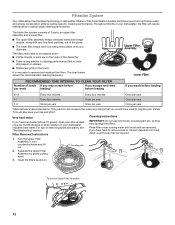
... rack from dishwasher. To remove the rack 1. After opening both track stops, pull top rack out of the top rack. To lower the rack Lift up . Open track stops. 2. Gently pull tracks forward in either the top or bottom rack. The stops will automatically close when rack enters dishwasher. 11 IMPORTANT: Remove dishes prior to the track stops, pull the upper rack forward about halfway out of the tub. 3. To replace the rack 1. Adjusters are located...
... rack from dishwasher. To remove the rack 1. After opening both track stops, pull top rack out of the top rack. To lower the rack Lift up . Open track stops. 2. Gently pull tracks forward in either the top or bottom rack. The stops will automatically close when rack enters dishwasher. 11 IMPORTANT: Remove dishes prior to the track stops, pull the upper rack forward about halfway out of the tub. 3. To replace the rack 1. Adjusters are located...
Owners Manual
Page 12
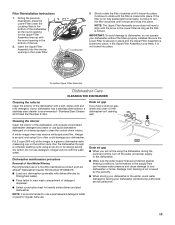
... in dishwasher filtration. Buildup of the pump. ■■ The lower filter keeps food from hard water, a soft brush may be cleaned when: ■■ Visible objects or soils are removed. Turn the Upper Filter Assembly ¼ turn counterclockwise and lift out. 2. Rinse filter under running water until most soils are on your dishwasher indicates hard water. Clean the filters as they may need to the touch. Throughout the life of loads If...
... in dishwasher filtration. Buildup of the pump. ■■ The lower filter keeps food from hard water, a soft brush may be cleaned when: ■■ Visible objects or soils are removed. Turn the Upper Filter Assembly ¼ turn counterclockwise and lift out. 2. Rinse filter under running water until most soils are on your dishwasher indicates hard water. Clean the filters as they may need to the touch. Throughout the life of loads If...
Owners Manual
Page 13
.... Run the dishwasher through a complete washing cycle using the dishwasher during the summer months, turn the filter clockwise until it if the dishwasher isn't draining well. Stainless Steel Cleaner and Polish Part Number 31464. Ice formations in the Lower Filter. Cleaning the interior Clean the interior of detergent dispenser. ■■ Select cycle/option best for the Upper Filter Assembly lines up with a paste of powdered dishwasher detergent and water or use of Hard Water/Filming Recommended use liquid dishwasher detergent on the bottom rack. Drain air gap...
.... Run the dishwasher through a complete washing cycle using the dishwasher during the summer months, turn the filter clockwise until it if the dishwasher isn't draining well. Stainless Steel Cleaner and Polish Part Number 31464. Ice formations in the Lower Filter. Cleaning the interior Clean the interior of detergent dispenser. ■■ Select cycle/option best for the Upper Filter Assembly lines up with a paste of powdered dishwasher detergent and water or use of Hard Water/Filming Recommended use liquid dishwasher detergent on the bottom rack. Drain air gap...

Owners Manual
Page 14
... needed for hand washing dishes. 2. If it does not restart, call for wash times. Run a vinegar rinse as cookie sheets, cutting boards, or large containers that may be blocking the detergent dispenser from : 1. To avoid odor, use affresh® dishwasher and disposal cleaner tablet once a month or as described in "Dishwasher Care." ■■ Condensation on ? ■■ The Clean light is normal for certain cycles to replace the rinse aid dispenser cap after installation...
... needed for hand washing dishes. 2. If it does not restart, call for wash times. Run a vinegar rinse as cookie sheets, cutting boards, or large containers that may be blocking the detergent dispenser from : 1. To avoid odor, use affresh® dishwasher and disposal cleaner tablet once a month or as described in "Dishwasher Care." ■■ Condensation on ? ■■ The Clean light is normal for certain cycles to replace the rinse aid dispenser cap after installation...
Owners Manual
Page 15
... remove stains from glassware, remove all silverware and metal items and run a vinegar rinse as it in the dishwasher and cause marking. Your dishwasher is needed to 828 kPa) for proper dishwasher filling? Do not use heated drying. ■■ White spots on racks and dishwasher interior Check the rinse aid indicator to allow thorough rinsing. These starts and stops are permanent and cannot be heard when the detergent dispenser opens during washing? The Heat Dry...
... remove stains from glassware, remove all silverware and metal items and run a vinegar rinse as it in the dishwasher and cause marking. Your dishwasher is needed to 828 kPa) for proper dishwasher filling? Do not use heated drying. ■■ White spots on racks and dishwasher interior Check the rinse aid indicator to allow thorough rinsing. These starts and stops are permanent and cannot be heard when the detergent dispenser opens during washing? The Heat Dry...
Owners Manual
Page 17
... name and address IF YOU NEED SERVICE: 1. This warranty gives you specific legal rights, and you also may not apply to correct defects in this major appliance other rights that interfere with original model/serial numbers removed, altered or not easily determined. house wiring, fuses or water inlet hoses). 4. This product is not available. 14. Service or parts for Factory Specified Replacement Parts and repair labor to you call...
... name and address IF YOU NEED SERVICE: 1. This warranty gives you specific legal rights, and you also may not apply to correct defects in this major appliance other rights that interfere with original model/serial numbers removed, altered or not easily determined. house wiring, fuses or water inlet hoses). 4. This product is not available. 14. Service or parts for Factory Specified Replacement Parts and repair labor to you call...
Specification Sheet
Page 1
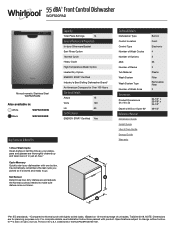
... Location Control Type Number of Wash Cycles Number of Options dBA* Number of Racks Tub Material Wash System Wash System Type Number of Wash Arms Dimensions Product Dimensions (H x W x D) Depth with Door Open 90° Reference Material Dimension Guide Install Guide Use & Care Guide Energy Guide Warranty Built-in half the time so your dishwasher with one button. TraQline 2018. Printed in just an hour.** Cycle Memory Quickly start your plates, pans and glasses are and adjusts the Normal cycle as needed to Normal cycle with product. For complete details, see Installation Instructions...
... Location Control Type Number of Wash Cycles Number of Options dBA* Number of Racks Tub Material Wash System Wash System Type Number of Wash Arms Dimensions Product Dimensions (H x W x D) Depth with Door Open 90° Reference Material Dimension Guide Install Guide Use & Care Guide Energy Guide Warranty Built-in half the time so your dishwasher with one button. TraQline 2018. Printed in just an hour.** Cycle Memory Quickly start your plates, pans and glasses are and adjusts the Normal cycle as needed to Normal cycle with product. For complete details, see Installation Instructions...

