Whirlpool UDT555SAHP Support and Manuals
Get Help and Manuals for this Whirlpool item
View All Support Options Below
Free Whirlpool UDT555SAHP manuals!
Problems with Whirlpool UDT555SAHP?
Ask a Question
Free Whirlpool UDT555SAHP manuals!
Problems with Whirlpool UDT555SAHP?
Ask a Question
Whirlpool UDT555SAHP Videos

Whirlpool UDT555SAHP Lave-vaisselle
Duration: :51
Total Views: 25
Duration: :51
Total Views: 25
Whirlpool UDT555SAHP Built-In Undercounter Dishwasher
Duration: :53
Total Views: 74
Duration: :53
Total Views: 74
Popular Whirlpool UDT555SAHP Manual Pages
Installation Instructions - Page 2

...Parts 4 18" Product and Cabinet Opening Dimensions 6 24" Product and Cabinet Opening Dimensions 7 Location Requirements 8 Drain Requirements 8 Water Supply Requirements 8 Electrical Requirements 8
INSTALLATION INSTRUCTIONS 9 Prepare Cabinet Opening-New Utilities 9 Moisture Barrier-Recommended for Wood Countertops........9 Direct Wire Routing 10 Prepare Dishwasher 10
Remove Access Panel...
Installation Instructions - Page 3
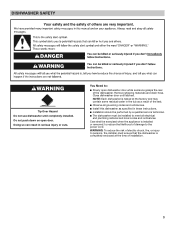
... rear of damage to meet all electrical and plumbing national and local codes and ordinances.
Doing so can result in these instructions.
■■ Installation should be performed by a qualified service technician.
■■ The dishwasher must be installed to the power cord. NOTE: Each dishwasher is tested at the time of the test.
■■ Observe...
Installation Instructions - Page 4
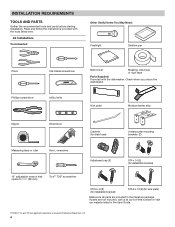
... unbox the dishwasher. If parts are not included, call us at our toll-free number or visit our website listed in the User Guide.
†®...(2) (for installation bracket)
ST3.9 x 13 (2) (for kick plate)
Make sure all parts are registred trademarks of Acument Intellectual Properties, LLC.
4 Read and follow the instructions provided with the dishwasher.
All Installations
Tools Needed:...
Installation Instructions - Page 5
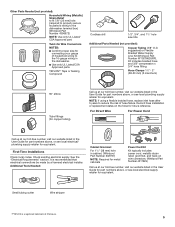
.... Record hose installation or replacement dates on wire connectors. (Whirlpool Part Number 4317824)
Call us at our toll-free number, visit our website listed in the User Guide for part numbers above , or see local electrical supply retailer for copper tubing)
Call us at our toll-free number, visit our website listed in the dishwasher.
■■...
Installation Instructions - Page 6
...
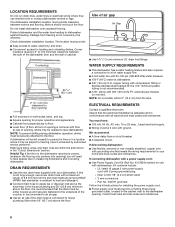
NOTE: Route the water supply line and power cable through the channels provided under the dishwasher (circled above).
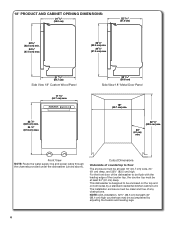
NOTE: ADA installation, 321/2" (82.5 cm) beneath 34" (86.4 cm) high countertops may be ....5 cm) min.
341/2" (87.5 cm) max
21 9/16" (54.7 cm)
Side View 18" Custom Wood Panel
17 5/8" (44.7 cm) max
32 1/2" (82.5 cm) min.
34 1/2" (87.5 cm) max
22 5/16" (56.6 cm)
Side View...
Installation Instructions - Page 7
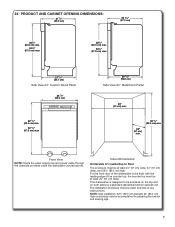
... (56.6 cm)
Side View 24" Metal Door Panel
24" (61 cm) min.
24" (61 cm)
min.
32 1/2" (82.5 cm) min.
For the front door of the dishwasher to be flush with the leading edge of the ...unit. NOTE: ADA installation, 321/2" (82.5 cm) beneath 34" (86.4 cm) high countertops may be at least 24" (61 cm) deep.
Cutout Dimensions
Underside of any obstructions.
This dishwasher is designed to ...
Installation Instructions - Page 8
... Cord Kit (Part No. 4317824) marked for installing the power supply cord. ■■ Power supply cord must meet all current AHAM/ IAPMO test standards, is connected to the floor.
copper tubing with grounding wire that meets all local codes and ordinances.
8 NOTE: Do not solder within the area shown in leveling dishwasher.
clearance...
Installation Instructions - Page 10
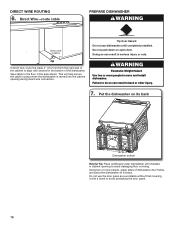
... cabinet opening during direct wire connection. Do not push down on its back
Dishwasher bottom Helpful Tip: Place cardboard under dishwasher until completely installed. Using two or more people to avoid scratching the door panel.
10 Direct Wire-route cable
PREPARE DISHWASHER
WARNING
Direct wire location 4"
If direct wire, route the cable 4" (10.2 cm) from...
Installation Instructions - Page 11
... opening
Tighten elbow until snug, and be installed. Turn leg counter clockwise to raise the dishwasher or clockwise to dishwasher.
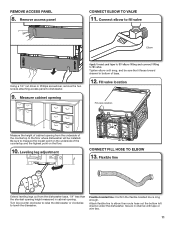
9. Remove access panel
CONNECT ELBOW TO VALVE
11. Fill valve location
Fill valve location
Measure the height of cabinet opening . Flexible line
Extend leveling legs out from the dishwasher base, 1/4" less than the shortest opening...
Installation Instructions - Page 14
... pushed into slots
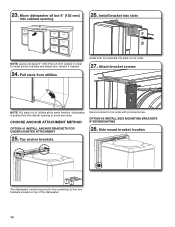
NOTE: Leave unit about 6" (152 mm) out from utilities
Install both top brackets into cabinet opening to install anchor brackets and adjust door tension if needed.
24.
Top anchor brackets
The dishwasher must be secured to tub collar with provided screw. Side mount bracket location
25. 23. CHOOSE ANCHOR ATTACHMENT...
Installation Instructions - Page 15
...tub collar.
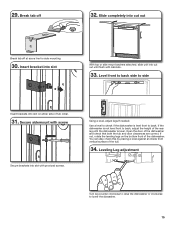
31. Using a level, adjust legs If needed. Use a level to check if the dishwasher is not level front to side
Insert brackets into cut out
Break tab off
32. You can also ...check this by placing a level against an inside front vertical surface of the dishwasher and check that both the tub and door clearances are correct.
Open the door of the tub...
Installation Instructions - Page 16
... of door.
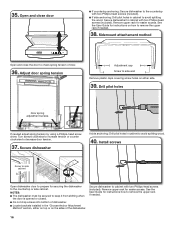
36. See the User Guide for instructions how to the countertop or side cabinet. Secure dishwasher to decrease door tension.
37. Drill pilot holes
-
- Remove upper rack for securing the dishwasher to remove the upper rack if needed adjust spring tension by using a Phillips-head screw driver. Adjust door spring tension
AdAjudstjmuesntmcaep nt...
Installation Instructions - Page 17
...
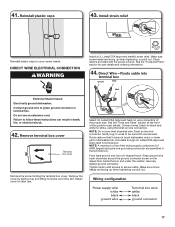
WARNING
Install a UL Listed/CSA Approved metallic strain relief. Twist on wire connectors. Form bare ground wire into terminal box
ground
white
black
Electrical Shock Hazard Electrically ground dishwasher.
Select UL Listed/CSA Approved twist-on wire connectors of the guide for part details and ordering information.
44. Connect ground wire to follow these instructions...
Installation Instructions - Page 18
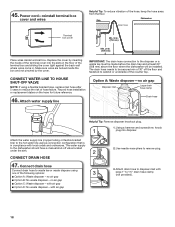
... drain trap and at least 20" (508 mm) above the floor where the dishwasher will be secured min of the counter top. Power cord-reinstall terminal box cover and... connection to disposer inlet with local codes and ordinances. Record hose installation or replacement dates on the hose for future reference.
46. The water supply
to the dishwasher should have a manual shut-off the floor and fastened ...
Installation Instructions - Page 20
... wattage, low energy consumption motor, your dishwasher.
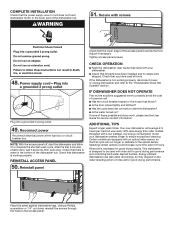
■■ Check that all tools. Check that you have been installed and no steps were skipped. COMPLETE INSTALLATION
Check that the power supply wire or cord does not touch dishwasher motor or the lower part of these possible solutions work, please see the User Guide for service contact information.
Whirlpool UDT555SAHP Reviews
We have not received any reviews for Whirlpool yet.