
Installation Instructions
Page 2
...and Cabinet Opening Dimensions 6 24" Product and Cabinet Opening Dimensions 7 Location Requirements 8 Drain Requirements 8 Water Supply Requirements 8 Electrical Requirements 8 INSTALLATION INSTRUCTIONS 9 Prepare Cabinet Opening-New Utilities 9 Moisture Barrier-Recommended for Wood Countertops........9 Direct Wire Routing 10 Prepare Dishwasher 10 Remove Access Panel 11 Connect Elbow to Valve 11 Connect Fill Hose to Elbow 11 Power Cord Connection 12 Utility Routing Channel Location 13 Choose Anchor Attachment Method 14 Direct Wire Electrical Connection 17 Connect Water Line to...
...and Cabinet Opening Dimensions 6 24" Product and Cabinet Opening Dimensions 7 Location Requirements 8 Drain Requirements 8 Water Supply Requirements 8 Electrical Requirements 8 INSTALLATION INSTRUCTIONS 9 Prepare Cabinet Opening-New Utilities 9 Moisture Barrier-Recommended for Wood Countertops........9 Direct Wire Routing 10 Prepare Dishwasher 10 Remove Access Panel 11 Connect Elbow to Valve 11 Connect Fill Hose to Elbow 11 Power Cord Connection 12 Utility Routing Channel Location 13 Choose Anchor Attachment Method 14 Direct Wire Electrical Connection 17 Connect Water Line to...
Installation Instructions
Page 3
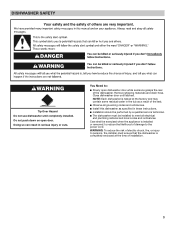
... local codes and ordinances. Care shall be exercised when the appliance is completely enclosed at the time of electric shock, fire, or injury to persons, the installer must be performed by a qualified service technician. ■■ The dishwasher must ensure that the dishwasher is installed or removed, to : ■■ Slowly open door. DISHWASHER SAFETY WARNING Tip Over Hazard Do not use dishwasher until latched. You Need...
... local codes and ordinances. Care shall be exercised when the appliance is completely enclosed at the time of electric shock, fire, or injury to persons, the installer must be performed by a qualified service technician. ■■ The dishwasher must ensure that the dishwasher is installed or removed, to : ■■ Slowly open door. DISHWASHER SAFETY WARNING Tip Over Hazard Do not use dishwasher until latched. You Need...
Installation Instructions
Page 4
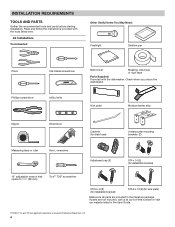
... dishwasher. All Installations Tools Needed: Other Useful Items You May Need: Flashlight Shallow pan Pliers Phillips screwdriver Flat-blade screwdriver Utility knife Bath towel Masking, electrical, or duct tape Parts Supplied: Provided with the tools listed here. Kick plate Moisture barrier strip Nipper Small level Cable tie (for drain hose) Undercounter mounting brackets (2) Measuring tape or ruler Hex L-wrenches Adjustment cap (2) ST4 x 14 (2) (for installation bracket) 10" adjustable wrench that opens...
... dishwasher. All Installations Tools Needed: Other Useful Items You May Need: Flashlight Shallow pan Pliers Phillips screwdriver Flat-blade screwdriver Utility knife Bath towel Masking, electrical, or duct tape Parts Supplied: Provided with the tools listed here. Kick plate Moisture barrier strip Nipper Small level Cable tie (for drain hose) Undercounter mounting brackets (2) Measuring tape or ruler Hex L-wrenches Adjustment cap (2) ST4 x 14 (2) (for installation bracket) 10" adjustable wrench that opens...
Installation Instructions
Page 5
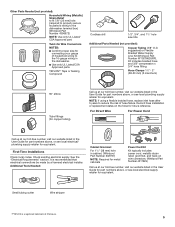
... Additional Parts Needed (not provided): Copper Tubing (3/8" O.D. For Direct Wire For Power Cord Call us at our toll-free number, visit our website listed in the dishwasher. ■■ Use only UL Listed/CSA Approved parts. Check existing electrical supply. Additional Tools Needed: Cabinet Grommet For 11/2" (38 mm) hole in cabinet. (Whirlpool Part Number 302797) NOTE: Required for metal cabinets Power Cord Kit Kit typically includes power cord, metallic strain relief, grommet, and twist-on the hose for...
... Additional Parts Needed (not provided): Copper Tubing (3/8" O.D. For Direct Wire For Power Cord Call us at our toll-free number, visit our website listed in the dishwasher. ■■ Use only UL Listed/CSA Approved parts. Check existing electrical supply. Additional Tools Needed: Cabinet Grommet For 11/2" (38 mm) hole in cabinet. (Whirlpool Part Number 302797) NOTE: Required for metal cabinets Power Cord Kit Kit typically includes power cord, metallic strain relief, grommet, and twist-on the hose for...
Installation Instructions
Page 6
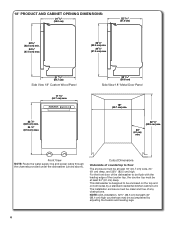
....7 cm) wide, 24" (61 cm) deep, and 321/2" (82.5 cm) high. The installation enclosure must be clean and free of the dishwasher to floor The enclosure must be at least 24" (61 cm) deep. Front View NOTE: Route the water supply line and power cable through the channels provided under the dishwasher (circled above). For the front door of any obstructions.
....7 cm) wide, 24" (61 cm) deep, and 321/2" (82.5 cm) high. The installation enclosure must be clean and free of the dishwasher to floor The enclosure must be at least 24" (61 cm) deep. Front View NOTE: Route the water supply line and power cable through the channels provided under the dishwasher (circled above). For the front door of any obstructions.
Installation Instructions
Page 7
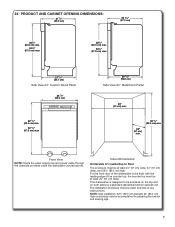
... top must be clean and free of the dishwasher to floor The enclosure must be at least 24" (61 cm) wide, 24" (61 cm) deep, and 321/2" (82.5 cm) high. 24" PRODUCT AND CABINET OPENING DIMENSIONS: 21 5/8" (55...View 24" Metal Door Panel 24" (61 cm) min. 24" (61 cm) min. 32 1/2" (82.5 cm) min. For the front door of any obstructions. This dishwasher is designed to be accomplished by a standard residential kitchen cabinet unit. Front View NOTE: Route the water supply line and power cable through the channels provided under the dishwasher (circled above). NOTE: ADA installation...
... top must be clean and free of the dishwasher to floor The enclosure must be at least 24" (61 cm) wide, 24" (61 cm) deep, and 321/2" (82.5 cm) high. 24" PRODUCT AND CABINET OPENING DIMENSIONS: 21 5/8" (55...View 24" Metal Door Panel 24" (61 cm) min. 24" (61 cm) min. 32 1/2" (82.5 cm) min. For the front door of any obstructions. This dishwasher is designed to be accomplished by a standard residential kitchen cabinet unit. Front View NOTE: Route the water supply line and power cable through the channels provided under the dishwasher (circled above). NOTE: ADA installation...
Installation Instructions
Page 8
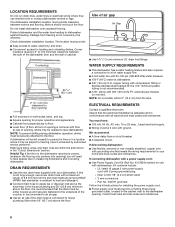
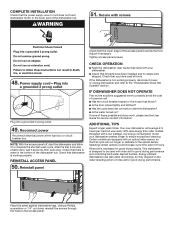
... long enough, use with dishwashers. It is recommended that meets the wiring requirements for installing the power supply cord. ■■ Power supply cord must plug into opening for loading and unloading dishes. You must have it may be needed to level dishwasher.) NOTE: To prevent shifting during dishwasher operation, shims must provide: ■■ Easy access to dishwasher against freezing. Follow the kit instructions for your dishwasher. Outlet must be securely attached to a hot water supply line...
... long enough, use with dishwashers. It is recommended that meets the wiring requirements for installing the power supply cord. ■■ Power supply cord must plug into opening for loading and unloading dishes. You must have it may be needed to level dishwasher.) NOTE: To prevent shifting during dishwasher operation, shims must provide: ■■ Easy access to dishwasher against freezing. Follow the kit instructions for your dishwasher. Outlet must be securely attached to a hot water supply line...
Installation Instructions
Page 9
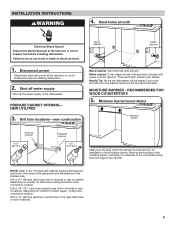
... part details. MOISTURE BARRIER - INSTALLATION INSTRUCTIONS WARNING 4. Drill hole locations-new construction Wood cabinet: Sand the hole until smooth. NOTE: Refer to do so can result in death or electrical shock. Failure to the "Product and Cabinet Opening Dimensions" section for installation of hole with grommet included with power cord kit. Sand holes smooth Electrical Shock Hazard Disconnect electrical power at the fuse box or circuit breaker box before installing dishwasher...
... part details. MOISTURE BARRIER - INSTALLATION INSTRUCTIONS WARNING 4. Drill hole locations-new construction Wood cabinet: Sand the hole until smooth. NOTE: Refer to do so can result in death or electrical shock. Failure to the "Product and Cabinet Opening Dimensions" section for installation of hole with grommet included with power cord kit. Sand holes smooth Electrical Shock Hazard Disconnect electrical power at the fuse box or circuit breaker box before installing dishwasher...
Installation Instructions
Page 10
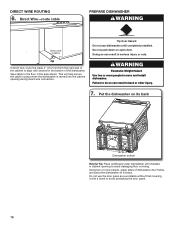
... completely installed. Tip Over Hazard Do not use the door panel as a worktable without first covering it with channel in the bottom of dishwasher door frame, and place the dishwasher on open door. Tape cable to the floor in place when the dishwasher is moved into the cabinet opening to do so can result in cabinet opening during direct wire connection. DIRECT WIRE ROUTING 6. Direct Wire-route cable PREPARE DISHWASHER WARNING Direct wire location 4" If direct wire...
... completely installed. Tip Over Hazard Do not use the door panel as a worktable without first covering it with channel in the bottom of dishwasher door frame, and place the dishwasher on open door. Tape cable to the floor in place when the dishwasher is moved into the cabinet opening to do so can result in cabinet opening during direct wire connection. DIRECT WIRE ROUTING 6. Direct Wire-route cable PREPARE DISHWASHER WARNING Direct wire location 4" If direct wire...
Installation Instructions
Page 11
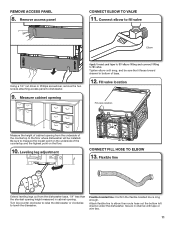
... dishwasher will be installed. Secure in channel with tape or wire ties. 11 Flexible braided line: Confirm the flexible braided line is long enough. Be sure to elbow then route hose out the bottom left channel under the dishwasher. Fill valve location Fill valve location Measure the height of the countertop and the highest point on the floor. 10. REMOVE ACCESS PANEL 8. Leveling leg adjustment CONNECT FILL HOSE...
... dishwasher will be installed. Secure in channel with tape or wire ties. 11 Flexible braided line: Confirm the flexible braided line is long enough. Be sure to elbow then route hose out the bottom left channel under the dishwasher. Fill valve location Fill valve location Measure the height of the countertop and the highest point on the floor. 10. REMOVE ACCESS PANEL 8. Leveling leg adjustment CONNECT FILL HOSE...

Installation Instructions
Page 12
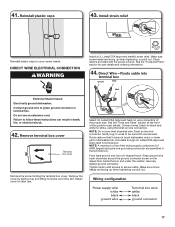
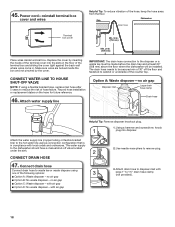
POWER CORD CONNECTION WARNING 16. Twist on wire connectors. Power cord-reinstall terminal box cover and wires Terminal box cover Install a UL Listed/CSA Approved metallic strain relief. NOTE: If removing a previous dishwasher with the power cord kit. See the "Tools and Parts" section for later use an extension cord. Gently tug on wires to green ground connector in terminal box. Remove the ground connector screw on wire connectors of the...
POWER CORD CONNECTION WARNING 16. Twist on wire connectors. Power cord-reinstall terminal box cover and wires Terminal box cover Install a UL Listed/CSA Approved metallic strain relief. NOTE: If removing a previous dishwasher with the power cord kit. See the "Tools and Parts" section for later use an extension cord. Gently tug on wires to green ground connector in terminal box. Remove the ground connector screw on wire connectors of the...
Installation Instructions
Page 13
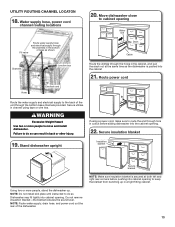
... before sliding dishwasher into cabinet opening to the back of the dishwasher. 13 If using tape or wire ties. Water supply hose, power cord channel routing locations Fill valve Route water supply hose and electrical supply through hole in channel using a power cord, make sure to do so can result in the bottom of base as the dishwasher is secured at the same time as shown. NOTE: Do not install kick plate until instructed to route...
... before sliding dishwasher into cabinet opening to the back of the dishwasher. 13 If using tape or wire ties. Water supply hose, power cord channel routing locations Fill valve Route water supply hose and electrical supply through hole in channel using a power cord, make sure to do so can result in the bottom of base as the dishwasher is secured at the same time as shown. NOTE: Do not install kick plate until instructed to route...
Installation Instructions
Page 14
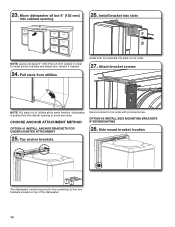
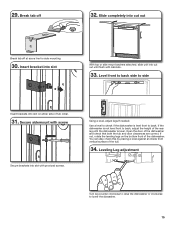
... time the dishwasher is pushed into cabinet opening to install anchor brackets and adjust door tension if needed. 24. Side mount bracket location 25. Top anchor brackets The dishwasher must be secured to tub collar with provided screw. Attach bracket screws NOTE: Pull slack out of the dishwasher 14 OPTION #2 INSTALL SIDE MOUNTING BRACKETS IF SIDEMOUNTING OPTION #1 INSTALL ANCHOR BRACKETS FOR UNDERCOUNTER ATTACHMENT 28. Move dishwasher all but 6" (152 mm) into the cabinet opening...
... time the dishwasher is pushed into cabinet opening to install anchor brackets and adjust door tension if needed. 24. Side mount bracket location 25. Top anchor brackets The dishwasher must be secured to tub collar with provided screw. Attach bracket screws NOTE: Pull slack out of the dishwasher 14 OPTION #2 INSTALL SIDE MOUNTING BRACKETS IF SIDEMOUNTING OPTION #1 INSTALL ANCHOR BRACKETS FOR UNDERCOUNTER ATTACHMENT 28. Move dishwasher all but 6" (152 mm) into the cabinet opening...
Installation Instructions
Page 15
... off 32. If the dishwasher is not level front to check if the dishwasher is level. 29. Insert bracket into slot With top or side mount anchers attached, slide unit into cut out until the dishwasher is level front to lower the diswasher. 15 Break tab off at score line for side mounting. 30. Open the door of tub collar. 31. Secure sidemount with cabinets. 33.
... off 32. If the dishwasher is not level front to check if the dishwasher is level. 29. Insert bracket into slot With top or side mount anchers attached, slide unit into cut out until the dishwasher is level front to lower the diswasher. 15 Break tab off at score line for side mounting. 30. Open the door of tub collar. 31. Secure sidemount with cabinets. 33.
Installation Instructions
Page 16
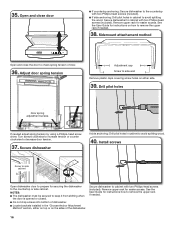
... cap ScreSw ctoresidwe wtoall side wall Remove plastic caps covering screw holes on how to remove the upper rack if needed adjust spring tension by using a Phillips-head screw driver. Remove upper rack for easier access. Drill pilot holes - - Install screws Screw to side cabinet Open dishwasher door to prepare for securing the dishwasher to decrease door tension. 37. See the User Guide for instructions how to remove the upper rack if needed. 38. See the User Guide for instructions...
... cap ScreSw ctoresidwe wtoall side wall Remove plastic caps covering screw holes on how to remove the upper rack if needed adjust spring tension by using a Phillips-head screw driver. Remove upper rack for easier access. Drill pilot holes - - Install screws Screw to side cabinet Open dishwasher door to prepare for securing the dishwasher to decrease door tension. 37. See the User Guide for instructions how to remove the upper rack if needed. 38. See the User Guide for instructions...
Installation Instructions
Page 17
... ground connector screw on the wire connector. DIRECT WIRE ELECTRICAL CONNECTION WARNING Install a UL Listed/CSA Approved metallic strain relief. Make sure screw heads are facing up and lifting its hooks out of the proper size. Strain relief is provided with the power cord kit. Retain cover for later use an extension cord. Twist on the raised floor inside the box and under the washer.
... ground connector screw on the wire connector. DIRECT WIRE ELECTRICAL CONNECTION WARNING Install a UL Listed/CSA Approved metallic strain relief. Make sure screw heads are facing up and lifting its hooks out of the proper size. Strain relief is provided with the power cord kit. Retain cover for later use an extension cord. Twist on the raised floor inside the box and under the washer.
Installation Instructions
Page 18
... - no air gap Disposer inlet Large drain hose clamp Drain hose Drain trap Helpful Tip: Remove disposer knockout plug. 1. Attach the water supply line (copper tubing or flexible braided line) to waste tee or waste disposer using a connection configuration that is in the floor of hose failure. The water supply to the dishwasher should have a manual shut-off the floor and fastened to remove plug. 3. no air gap ■■ Option C: Waste disposer - Record hose installation or replacement dates...
... - no air gap Disposer inlet Large drain hose clamp Drain hose Drain trap Helpful Tip: Remove disposer knockout plug. 1. Attach the water supply line (copper tubing or flexible braided line) to waste tee or waste disposer using a connection configuration that is in the floor of hose failure. The water supply to the dishwasher should have a manual shut-off the floor and fastened to remove plug. 3. no air gap ■■ Option C: Waste disposer - Record hose installation or replacement dates...

Installation Instructions
Page 19
... Tip: Remove disposer knockout plug. 1 1. Use needle-nose pliers to 38 mm) screw-type clamp (not provided). 4. Use a 1" to 11/2" (25 to remove plug. 3 Rubber end 3. Option D: No waste disposer - Attach rubber end of drain hose to disposer inlet. Using a hammer and screwdriver, knock plug into disposer. 1 Rubber end 2 3 1. Use a 1" to 11/2" (25 to waste tee with 5 screw-type clamps to connect from waste tee to air gap. 2.
... Tip: Remove disposer knockout plug. 1 1. Use needle-nose pliers to 38 mm) screw-type clamp (not provided). 4. Use a 1" to 11/2" (25 to remove plug. 3 Rubber end 3. Option D: No waste disposer - Attach rubber end of drain hose to disposer inlet. Using a hammer and screwdriver, knock plug into disposer. 1 Rubber end 2 3 1. Use a 1" to 11/2" (25 to waste tee with 5 screw-type clamps to connect from waste tee to air gap. 2.
Installation Instructions
Page 20
... of the dishwasher tub. 51. COMPLETE INSTALLATION Check that the power supply wire or cord does not touch dishwasher motor or the lower part of a service call. ■■ Has the circuit breaker tripped or the house fuse blown? ■■ Is the door closed tightly and latched? ■■ Has the cycle been set correctly to start the dishwasher and allow it to complete the shortest wash cycle. If none...
... of the dishwasher tub. 51. COMPLETE INSTALLATION Check that the power supply wire or cord does not touch dishwasher motor or the lower part of a service call. ■■ Has the circuit breaker tripped or the house fuse blown? ■■ Is the door closed tightly and latched? ■■ Has the cycle been set correctly to start the dishwasher and allow it to complete the shortest wash cycle. If none...


