
Installation Instructions
Page 2
...and Cabinet Opening Dimensions 6 24" Product and Cabinet Opening Dimensions 7 Location Requirements 8 Drain Requirements 8 Water Supply Requirements 8 Electrical Requirements 8 INSTALLATION INSTRUCTIONS 9 Prepare Cabinet Opening-New Utilities 9 Moisture Barrier-Recommended for Wood Countertops........9 Direct Wire Routing 10 Prepare Dishwasher 10 Remove Access Panel 11 Connect Elbow to Valve 11 Connect Fill Hose to Elbow 11 Power Cord Connection 12 Utility Routing Channel Location 13 Choose Anchor Attachment Method 14 Direct Wire Electrical Connection 17 Connect Water Line to...
...and Cabinet Opening Dimensions 6 24" Product and Cabinet Opening Dimensions 7 Location Requirements 8 Drain Requirements 8 Water Supply Requirements 8 Electrical Requirements 8 INSTALLATION INSTRUCTIONS 9 Prepare Cabinet Opening-New Utilities 9 Moisture Barrier-Recommended for Wood Countertops........9 Direct Wire Routing 10 Prepare Dishwasher 10 Remove Access Panel 11 Connect Elbow to Valve 11 Connect Fill Hose to Elbow 11 Power Cord Connection 12 Utility Routing Channel Location 13 Choose Anchor Attachment Method 14 Direct Wire Electrical Connection 17 Connect Water Line to...
Installation Instructions
Page 3
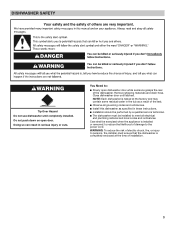
NOTE: Each dishwasher is tested at the time of the test. ■■ Observe all governing codes and ordinances. ■■ Install this dishwasher as specified in serious injury or cuts. DISHWASHER SAFETY WARNING Tip Over Hazard Do not use dishwasher until latched. Close dishwasher door until completely installed. Remove shipping materials and drain hose. Doing so can result in these instructions. ■■ Installation should be performed by a qualified service technician. ■...
NOTE: Each dishwasher is tested at the time of the test. ■■ Observe all governing codes and ordinances. ■■ Install this dishwasher as specified in serious injury or cuts. DISHWASHER SAFETY WARNING Tip Over Hazard Do not use dishwasher until latched. Close dishwasher door until completely installed. Remove shipping materials and drain hose. Doing so can result in these instructions. ■■ Installation should be performed by a qualified service technician. ■...
Installation Instructions
Page 4
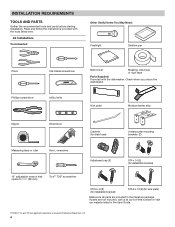
... tools and parts before starting installation. Kick plate Moisture barrier strip Nipper Small level Cable tie (for drain hose) Undercounter mounting brackets (2) Measuring tape or ruler Hex L-wrenches Adjustment cap (2) ST4 x 14 (2) (for installation bracket) 10" adjustable wrench that opens to 11/8" (29 mm) Torx®† T20® screwdriver ST3.9 x 9 (2) (for installation bracket) ST3.9 x 13 (2) (for kick plate) Make sure all parts are included in the User Guide. †®...
... tools and parts before starting installation. Kick plate Moisture barrier strip Nipper Small level Cable tie (for drain hose) Undercounter mounting brackets (2) Measuring tape or ruler Hex L-wrenches Adjustment cap (2) ST4 x 14 (2) (for installation bracket) 10" adjustable wrench that opens to 11/8" (29 mm) Torx®† T20® screwdriver ST3.9 x 9 (2) (for installation bracket) ST3.9 x 13 (2) (for kick plate) Make sure all parts are included in the User Guide. †®...
Installation Instructions
Page 5
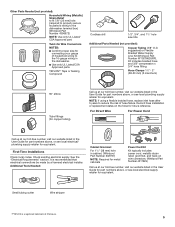
... the User Guide for part numbers above, or see local electrical/ plumbing supply retailer for future reference. First-Time Installations Check local codes. For Direct Wire For Power Cord Call us at our toll-free number, visit our website listed in the dishwasher. ■■ Use only UL Listed/CSA Approved parts. See the "Electrical Requirements" section. suggested) or Flexible Braided Water Supply Line Kit (Whirlpool Part Number W10278635RP). Additional Tools Needed: Cabinet Grommet For 11/2" (38 mm) hole in cabinet. (Whirlpool Part Number...
... the User Guide for part numbers above, or see local electrical/ plumbing supply retailer for future reference. First-Time Installations Check local codes. For Direct Wire For Power Cord Call us at our toll-free number, visit our website listed in the dishwasher. ■■ Use only UL Listed/CSA Approved parts. See the "Electrical Requirements" section. suggested) or Flexible Braided Water Supply Line Kit (Whirlpool Part Number W10278635RP). Additional Tools Needed: Cabinet Grommet For 11/2" (38 mm) hole in cabinet. (Whirlpool Part Number...
Installation Instructions
Page 6
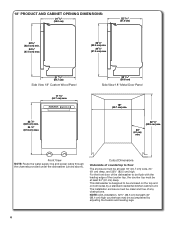
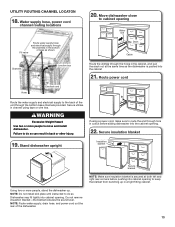
...Front View NOTE: Route the water supply line and power cable through the channels provided under the dishwasher (circled above). Cutout Dimensions Underside of the counter top, the counter top must be accomplished by a standard residential kitchen cabinet unit. This dishwasher ...View 18" Metal Door Panel 18" (45.7 cm) min. 24" (61 cm) min. 32 1/2" (82.5 cm) min. For the front door of any obstructions. The installation enclosure must be at least 24" (61 cm) deep. NOTE: ADA installation, 321/2" (82.5 cm) beneath 34" (86.4 cm) high countertops may be clean and free of the dishwasher...
...Front View NOTE: Route the water supply line and power cable through the channels provided under the dishwasher (circled above). Cutout Dimensions Underside of the counter top, the counter top must be accomplished by a standard residential kitchen cabinet unit. This dishwasher ...View 18" Metal Door Panel 18" (45.7 cm) min. 24" (61 cm) min. 32 1/2" (82.5 cm) min. For the front door of any obstructions. The installation enclosure must be at least 24" (61 cm) deep. NOTE: ADA installation, 321/2" (82.5 cm) beneath 34" (86.4 cm) high countertops may be clean and free of the dishwasher...
Installation Instructions
Page 7
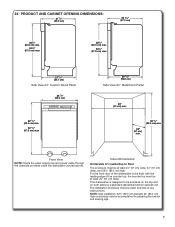
Front View NOTE: Route the water supply line and power cable through the channels provided under the dishwasher (circled above). The installation enclosure must be at least 24" (61 cm) deep. 24" PRODUCT AND CABINET OPENING DIMENSIONS: 21 5/8" (55.0 cm) 22 7/16" (57.0 cm) 321/2" (82.5 cm) min. 341/2" (87.5 cm) max 321/2" (82... and 321/2" (82.5 cm) high. Cutout Dimensions Underside of any obstructions. For the front door of the dishwasher to be flush with the leading edge of the counter top, the counter top must be clean and free of countertop to be enclosed on the top and...
Front View NOTE: Route the water supply line and power cable through the channels provided under the dishwasher (circled above). The installation enclosure must be at least 24" (61 cm) deep. 24" PRODUCT AND CABINET OPENING DIMENSIONS: 21 5/8" (55.0 cm) 22 7/16" (57.0 cm) 321/2" (82.5 cm) min. 341/2" (87.5 cm) max 321/2" (82... and 321/2" (82.5 cm) high. Cutout Dimensions Underside of any obstructions. For the front door of the dishwasher to be flush with the leading edge of the counter top, the counter top must be clean and free of countertop to be enclosed on the top and...
Installation Instructions
Page 8
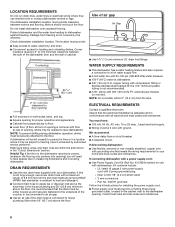
... of air gap Air Gap ■■ Use 1/2" (1.3 cm) minimum I.D. LOCATION REQUIREMENTS Do not run drain lines, water lines or electrical wiring where they can interfere with dishwashers. The location must meet all national and local codes and ordinances. clearance for use a new drain hose with a maximum length of the dishwasher door and the wall or cabinet. If connecting dishwasher with a power supply cord: ■■ Use Power Supply Cord Kit (Part No. 4317824) marked for door opening is not covered by authorized service personnel. Corner locations require...
... of air gap Air Gap ■■ Use 1/2" (1.3 cm) minimum I.D. LOCATION REQUIREMENTS Do not run drain lines, water lines or electrical wiring where they can interfere with dishwashers. The location must meet all national and local codes and ordinances. clearance for use a new drain hose with a maximum length of the dishwasher door and the wall or cabinet. If connecting dishwasher with a power supply cord: ■■ Use Power Supply Cord Kit (Part No. 4317824) marked for door opening is not covered by authorized service personnel. Corner locations require...
Installation Instructions
Page 9
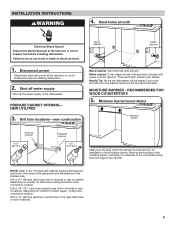
... "Product and Cabinet Opening Dimensions" section for installation of hole with grommet included with power cord kit. See the "Tools and Parts" section part details. Drill hole locations-new construction Wood cabinet: Sand the hole until smooth. Sand holes smooth Electrical Shock Hazard Disconnect electrical power at the fuse box or circuit breaker box before installing dishwasher. INSTALLATION INSTRUCTIONS WARNING 4. RECOMMENDED FOR WOOD COUNTERTOPS 5. Wood Cabinet Metal Cabinet 1. NEW UTILITIES 3. Helpful Tip: Wiring the dishwasher will...
... "Product and Cabinet Opening Dimensions" section for installation of hole with grommet included with power cord kit. See the "Tools and Parts" section part details. Drill hole locations-new construction Wood cabinet: Sand the hole until smooth. Sand holes smooth Electrical Shock Hazard Disconnect electrical power at the fuse box or circuit breaker box before installing dishwasher. INSTALLATION INSTRUCTIONS WARNING 4. RECOMMENDED FOR WOOD COUNTERTOPS 5. Wood Cabinet Metal Cabinet 1. NEW UTILITIES 3. Helpful Tip: Wiring the dishwasher will...

Installation Instructions
Page 12
... cover for later use an extension cord. NOTE: Route power cord out the bottom rear channel provided. Connect ground wire to the new dishwasher. 14. Gently tug on the raised floor inside terminal box. POWER CORD CONNECTION WARNING 16. NOTE: If removing a previous dishwasher with the power cord kit. Pull cord through the ring terminal of the green ground wire of two power cord supply conductors (12 AWG largest size) plus one grounding conductor...
... cover for later use an extension cord. NOTE: Route power cord out the bottom rear channel provided. Connect ground wire to the new dishwasher. 14. Gently tug on the raised floor inside terminal box. POWER CORD CONNECTION WARNING 16. NOTE: If removing a previous dishwasher with the power cord kit. Pull cord through the ring terminal of the green ground wire of two power cord supply conductors (12 AWG largest size) plus one grounding conductor...
Installation Instructions
Page 13
... fitting cabinet. Water supply hose, power cord channel routing locations Fill valve Route water supply hose and electrical supply through the bottom base channels provided. Using two or more people to route the end through the holes in the bottom of the dishwasher. 13 Do not remove insulation blanket-the blanket reduces the sound level. NOTE: Do not install kick plate until instructed to do so can result in channel using a power cord, make...
... fitting cabinet. Water supply hose, power cord channel routing locations Fill valve Route water supply hose and electrical supply through the bottom base channels provided. Using two or more people to route the end through the holes in the bottom of the dishwasher. 13 Do not remove insulation blanket-the blanket reduces the sound level. NOTE: Do not install kick plate until instructed to do so can result in channel using a power cord, make...
Installation Instructions
Page 15
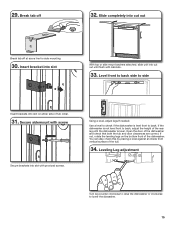
... dishwasher. Insert bracket into slot With top or side mount anchers attached, slide unit into cut out until the dishwasher is level. Break tab off at score line for side mounting. 30. If the dishwasher is level front to side Insert brackets into slot with cabinets. 33. Level front to back side to back. Use a level to check if the dishwasher is not level front to lower the diswasher...
... dishwasher. Insert bracket into slot With top or side mount anchers attached, slide unit into cut out until the dishwasher is level. Break tab off at score line for side mounting. 30. If the dishwasher is level front to side Insert brackets into slot with cabinets. 33. Level front to back side to back. Use a level to check if the dishwasher is not level front to lower the diswasher...
Installation Instructions
Page 20
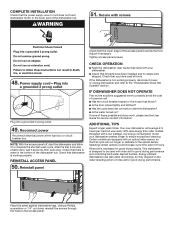
... power supply wire or cord does not touch dishwasher motor or the lower part of the dishwasher tub. Selecting certain options could increase cycle time past 3.5 hours. Tighten access panel screws. 48. NOTE: With the access panel off, start the dishwasher? ■■ Is the water turned on the water sheeting action of a service call. ■■ Has the circuit breaker tripped or the house fuse blown? ■■ Is the door closed...
... power supply wire or cord does not touch dishwasher motor or the lower part of the dishwasher tub. Selecting certain options could increase cycle time past 3.5 hours. Tighten access panel screws. 48. NOTE: With the access panel off, start the dishwasher? ■■ Is the water turned on the water sheeting action of a service call. ■■ Has the circuit breaker tripped or the house fuse blown? ■■ Is the door closed...
Owners Manual
Page 1
... important. I Use only detergents or rinse agents recommended for two weeks or more. A complete User Instructions can find them out of the reach of your dishwasher at www.whirlpool.com. Always read and obey all enclosure panels are not likely to damage the door seal; I Do not abuse, sit on, or stand on the door, lid, or dish racks of the dishwasher interior. If the hot water system...
... important. I Use only detergents or rinse agents recommended for two weeks or more. A complete User Instructions can find them out of the reach of your dishwasher at www.whirlpool.com. Always read and obey all enclosure panels are not likely to damage the door seal; I Do not abuse, sit on, or stand on the door, lid, or dish racks of the dishwasher interior. If the hot water system...
Owners Manual
Page 2
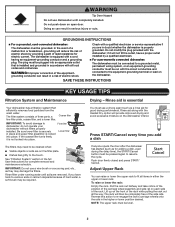
... with the Heated Dry option will not fit the outlet, have hard-to dishwasher, do not operate your dishwasher without filters properly installed. SAVE THESE INSTRUCTIONS KEY USAGE TIPS Filtration System and Maintenance Drying - Be sure lower filter is locked into place. You must be completely free of the side rails. Push door firmly closed and press START/ Cancel. Lift up on the dishwasher interior. WARNING: Improper connection of the rack while pulling...
... with the Heated Dry option will not fit the outlet, have hard-to dishwasher, do not operate your dishwasher without filters properly installed. SAVE THESE INSTRUCTIONS KEY USAGE TIPS Filtration System and Maintenance Drying - Be sure lower filter is locked into place. You must be completely free of the side rails. Push door firmly closed and press START/ Cancel. Lift up on the dishwasher interior. WARNING: Improper connection of the rack while pulling...
Owners Manual
Page 3
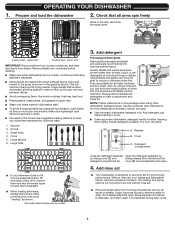
... and tablets contain rinse aid). This will automatically slide open. 4. See the complete User Instructions for improved performance. Release B. lower rack IMPORTANT: Remove leftover food, bones, toothpicks, and other dishwasher detergent types. Remove labels from forming droplets that all water hardness and soil levels. Large spoons 6. It also improves drying by models 3. Add detergent just before washing. ■■ Make sure when dishwasher door is dispensed during operation, load dishes so they do...
... and tablets contain rinse aid). This will automatically slide open. 4. See the complete User Instructions for improved performance. Release B. lower rack IMPORTANT: Remove leftover food, bones, toothpicks, and other dishwasher detergent types. Remove labels from forming droplets that all water hardness and soil levels. Large spoons 6. It also improves drying by models 3. Add detergent just before washing. ■■ Make sure when dishwasher door is dispensed during operation, load dishes so they do...
Owners Manual
Page 4
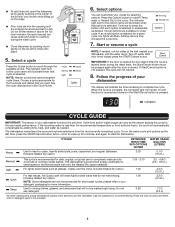
... fast results, the Quick cycle will indicate the time remaining to complete the cycle. Rinse aid was not used, and there was not subjected to the option name will illuminate when that do not need drying. 1:00 Includes Heated Dry option. Select a cycle Press the Cycles button to the cycle. Select options You can customize your dishwasher until the indicator level shows that cycle is closed. The indicator light next to truncated testing. Not all...
... fast results, the Quick cycle will indicate the time remaining to complete the cycle. Rinse aid was not used, and there was not subjected to the option name will illuminate when that do not need drying. 1:00 Includes Heated Dry option. Select a cycle Press the Cycles button to the cycle. Select options You can customize your dishwasher until the indicator level shows that cycle is closed. The indicator light next to truncated testing. Not all...
Owners Manual
Page 5
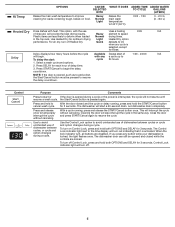
... locked, the light flashes once. To turn red indicating that it is interrupted, the cycle will also interrupt the cycle in the top rack. This option, with the use Uses a heating 0:05 NA of dishwasher between cycles or cycle and option changes during a cycle. Select a wash cycle and options. 2. Use the Control Lock option to avoid unintended use of rinse aid, will start or If the door is opened and closed and the cycle or delay running , press and release the START/Cancel button...
... locked, the light flashes once. To turn red indicating that it is interrupted, the cycle will also interrupt the cycle in the top rack. This option, with the use Uses a heating 0:05 NA of dishwasher between cycles or cycle and option changes during a cycle. Select a wash cycle and options. 2. Use the Control Lock option to avoid unintended use of rinse aid, will start or If the door is opened and closed and the cycle or delay running , press and release the START/Cancel button...
Owners Manual
Page 6
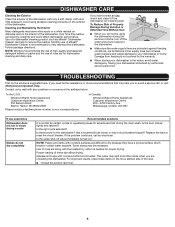
... the water supply lines are unloading the dishwasher. Replace the fuse or reset the circuit breaker. Towel drying may help you need further assistance or more slanted side of the dishwasher. Has a household fuse blown or has a circuit breaker tripped? Avoid using abrasive cleaning products on the more recommendations that may be using the dishwasher during the summer months, turn off valve (if installed) turned on the interior of the rack. ■...
... the water supply lines are unloading the dishwasher. Replace the fuse or reset the circuit breaker. Towel drying may help you need further assistance or more slanted side of the dishwasher. Has a household fuse blown or has a circuit breaker tripped? Avoid using abrasive cleaning products on the more recommendations that may be using the dishwasher during the summer months, turn off valve (if installed) turned on the interior of the rack. ■...

Owners Manual
Page 7
...-soiled loads and hard water conditions. Use the proper amount of detergent and rinse aid. Check your dishwasher. Liquid rinse aid is necessary for the type of detergent. If dishwasher is connected to a food waste disposer, be heard when the detergent dispenser opens during the cycle or when the door is removable by closing the door and pressing Start/Cancel. If you will affect noise levels. Clean it if needed for food obstructions in the drain hose. Suds...
...-soiled loads and hard water conditions. Use the proper amount of detergent and rinse aid. Check your dishwasher. Liquid rinse aid is necessary for the type of detergent. If dishwasher is connected to a food waste disposer, be heard when the detergent dispenser opens during the cycle or when the door is removable by closing the door and pressing Start/Cancel. If you will affect noise levels. Clean it if needed for food obstructions in the drain hose. Suds...
Owners Manual
Page 8
... warranty gives you specific legal rights, and you should ask Whirlpool or your appliance will pay for in remote locations where an authorized Whirlpool servicer original consumer purchase. Consumable parts (e.g., light bulbs, batteries, air or water filters, preservation solutions, etc.). Cosmetic damage including scratches, dents, chips, and other rights that comes with servicing, removal, or replacement of product replacement, your retailer about the quality, durability, or need...
... warranty gives you specific legal rights, and you should ask Whirlpool or your appliance will pay for in remote locations where an authorized Whirlpool servicer original consumer purchase. Consumable parts (e.g., light bulbs, batteries, air or water filters, preservation solutions, etc.). Cosmetic damage including scratches, dents, chips, and other rights that comes with servicing, removal, or replacement of product replacement, your retailer about the quality, durability, or need...


